![]()
TV Sound Bar SystemMODEL:DS6402/ DS6601/ DS6601P/ DS6405PUser ManualE-mail:[email protected]
Important Safety Instructions
- Before using your TV Sound Bar System, read all the instructions contained in this manual.
- Keep this manual for future consultation.
- This device is only for indoor usage, its safety outdoors has not been tested.
- Do not place this device near water, fire, flames, heat sources, electrical wires, water or gas tubes.
- Protect the device from heat, cold, dust, direct sunlight, moisture, dripping, and splashing water.
- Do not allow liquids to spill over the device or into any of its outlets or connectors.
- Only use the fabric accessories provided or replacements specified by the manufacturer.
- If the device or any of its accessories are damaged when unpacked, do not use the device. Contact your dealer and save the device with all its original accessories and packing.
- Before connecting the device to an electrical outlet verify that the voltage is suitable for the electrical current load of the Sound Bar System specified by the manufacturer.
- We recommend plugging the device directly into an electrical outlet, but if you need to use an extension cord, choose a safe extension to prevent overheating short circuits or fires. Ensure that the cord’s load capacity (wire gauge and length) is appropriate for the electrical current load of the device.
- Do not attempt to modify the provided plug of the power supply cord. If the plug does not fit into your electrical outlet, consult a qualified electrician for adjustments.
- To avoid damage to the wires inside the power-supply cord, unplug the device by pulling the power plug (not the power-supply cord) and do not wrap the cord.
- Protect the power supply cord from being bent or pinched and keep it away from hot surfaces and flames.
- To avoid electrical fires or damage due to overheating, place the device in a place with proper ventilation and avoid blocking any ventilation outlets on the device.
- Always power off the device before unplugging it from the electrical outlet.
- During lightning storms or when unused for long periods of time, completely disconnect the device by unplugging it from the electrical outlet.
- If malfunctioning occurs from an electrostatic discharge or electric breakdown, unplug the device from the electrical outlet, wait for a few seconds before plugging it again.
- This device is not intended for use by children unless they are supervised by an adult responsible for their safety.
- If the device is malfunctioning, do not attempt to open the device or fix it yourself. Contact your dealer and save the device with all its original accessories and packing.
- Regularly check for damages on your device. If the power supply cord or plug is damaged, do not use the device, unplug it and seek qualified assistance.
- Do not make unauthorized alterations to the device. Doing so may void the guarantee of the device.
- Refer all servicing with your dealer or manufacturer’s authorized personnel.
 Warning:
- This system contains magnetic material. If you have a medical implant consult with your physician if this device can cause its malfunctioning.
- To avoid the risk of fire or electric shock, do not expose this device to water nor operate it while you are standing on wet floor or with your hands wet
Regulatory Information
FCC Information (USA)
This device has been tested and found to comply with the limits for a Class B digital device, pursuant to Part 15 of the FCC Rules. These limits are designed to provide reasonable protection against harmful interference with other electronic devices when the device is operated in a residential environment.
This device generates, uses, and can radiate radio frequency energy if not installed and used in accordance with the user manual, with a possible risk of causing harmful interference to radio or television reception and operation of other electronic devices. If this device is found to be the source of interference, try to eliminate the interference by relocating this device or connecting it into an outlet of a different circuit from the outlet to which the other receiver is plugged in. If these measures do not resolve the issue, contact a qualified radio/TV technician for assistance.
Changes or modifications not expressly approved by SAKOBS could void the user’s authority to operate this device.
EU Declaration of Conformity
 This device has been inspected and audited and found to fulfill the essential European Union requirements from the directives that apply to this device. Information of the certification can be found at www.cer-mark.com. The CE Marking shown on the certificate is only valid under the conditions established in the EU/EC Declaration of Conformity.
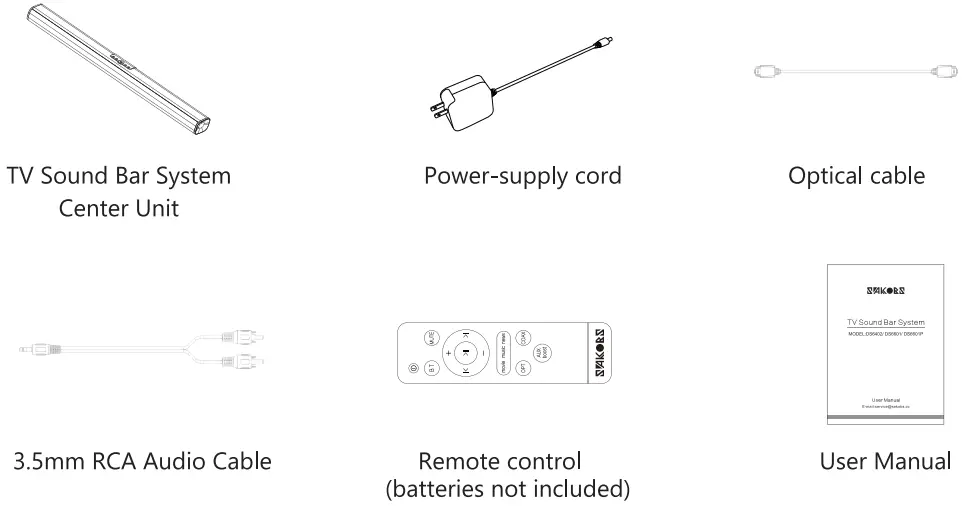
Supplied Items
Carefully unpack the device and make sure that you have received the following parts:
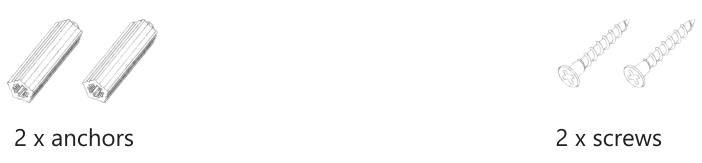
Wall mounting accessories
Notes:
- If part of the contents is missing or damaged, do not use the device. Contact SAKOBS customer service or an authorized dealer.
- The provided power supply system complies with Protection Class II and does not need an earth connection for safe operation.
- Accessories are subject to change without notice.
Tips:
If you have any problems or questions about the installation, functioning, or operation of this device, contact us via email at [email protected]
Features
- 0 (Model DS6601 P: 2.1) Channel Stereo TV Sound Bar System
- Analog and digital audio interface
- Three digital sound modes: movie, music, and news.
- Bluetooth connection to stream music from suitable devices
- Streamlined and elegant design
- Functions programmable with remote control and buttons on the center unit
- Sound Bar System can be mounted on the wall (accessories included)
Specifications
| Power supply | |
| Input : | 100-240VAC 50/60Hz |
| Output: | Model DS6402 15V 1.6A (0CP>3.5A)
Model DS6601/ DS6601P 15V 1.6A(OCP>3.5A) 2 x 1.5V |
| Remote control: | AAA batteries (not included) |
| TV Sound Bar System | |
| Output Power; | Model DS6402/DS6601 60WModel DS6601P 80WModel DS6405P 40W |
| Frequency response: | Model DS6402/DS6601 65Hz-20KHzModel DS6601 P 80W 55Hz-20KHzModel DS6405P 70Hz-20KHz |
| Signal-to-noise ratio: | 80dB |
| Total harmonic distortion: | 0.5% (20KHz LPF) |
| Standby power: | <0.5W |
| Digital audio interfaces: | Optical and coaxial |
| Audio format: | PCM (Pulse Code Modulation) |
| Sampling frequency: | 32KHz, 44.1KHz, 48KHz, 96KHz, 192KHz |
| Sampling Bit Rate resolution: | 16-bit — 24-bit |
| Protection Class: | II |
| Sampling Bit Rate resolution: | VI |
Note: Specifications are subject to change without notice.
Parts and Functions
Center unit front view
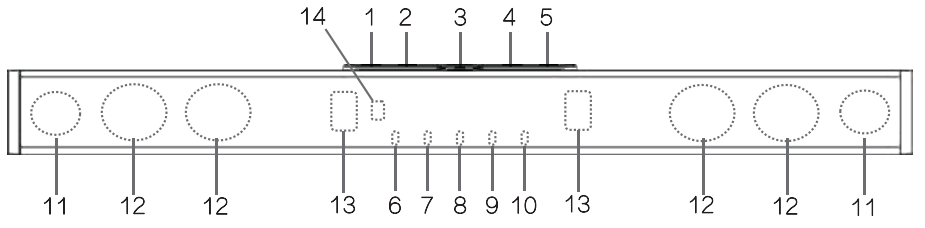
Buttons
- Mode (Source)
- Play / Pause
- Power (Standby)
- Volume down
- Volume upIndicators, drivers, and sensor
- OPT (Optical)
- COAX ( Coaxial )
- Power (Standby)
- BT (Bluetooth)
- AUX (Auxiliary)
- Speaker driver, tweeter (only for model DS6601 P)
- Speaker driver
- Bass reflex tube
- Remote sensor
Center unit rearview (Connecting panel)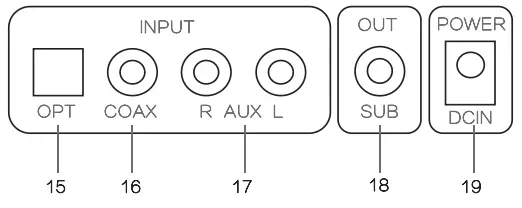 INPUT
INPUT
- Optical input socket
- Coaxial input socket
- AUX input sockets( Right and left)OUTPUT
- SUB out socket( cable or wireless adapter not included)
POWER
- DC IN socket
Setting up the System
Installation
The center unit can be placed on a horizontal surface like a TV stand or can be mounted on a wall.
On horizontal surfaces
- Place the device on a stable and dry surface.
- Do not place the device near hot surfaces, fire, heat or flame sources.
- Do not place the device near electrical wires, water or gas tubes.
- Make sure that there is an electrical outlet nearby to plug in the devices power-supply cord.
- Make sure that the device is placed on a well-ventilated area, with enough free space around the unit. Inappropriate ventilation may result in overheating and can damage your device or cause electrical fires.
- Don not place a weight over the center unit or pile it up with other devices as it may cause
- Be sure to place the center unit with the front panel facing forward.
- To avoid wireless transmission-blocking or interference:
– Do not place any objects in front of the center unit.– Do not place the device near magnetically sensitive items or in metallic cabinets.– Do not place the device near other wireless appliances.
Mounting the center unit on a wall
Caution:
- To avoid personal injury or damage to the device, consult a qualified technician for assistance.
- While mounting the device, keep children and pets out of the site.
- Only use the mounting accessories provided by the manufacturer.
- To prevent the unit from falling, check that the wall is made of building material such as solid concrete, bricks or wood that will not crack.
- For cinder block walls, check first that the blocks have a concrete thickness of at least 1.2 inches (3 cm) to place the anchors.
- Run the cables along the wall as possible to prevent people from tripping over them and causing the unit to fall.
- Verify that the unit is firmly secured and stable to avoid accidents
- Before starting with the wall mounting, make sure that the power-supply cord is disconnected from the electrical outlet.
Mounting the center unit on a wall
- You can install the center unit below a TV already mounted on a wall. The center unit should be installed at least 2 inches (5 cm) below the TV.

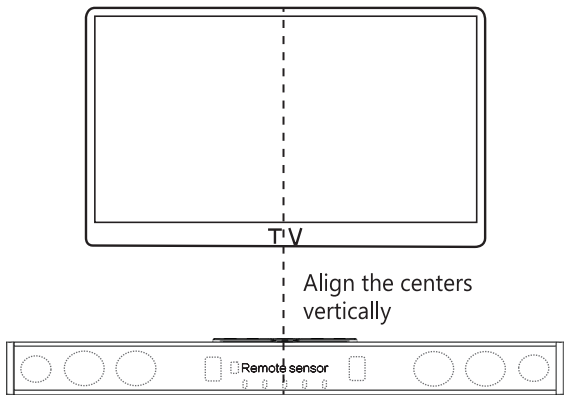
Align the center unit with the center of the TV vertically.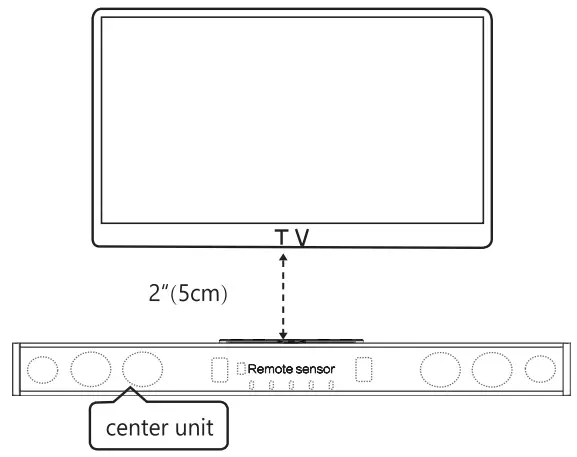
- There is a mismatch between the distance of the text and the distance of the diagram. You need to rectify and match both the text and the diagram with the correct measure.
The distance between two holes of the soundbarModel D56402: 28.46inches(72.3cm)Model 056601/D56601 P: 33.S8inches (85.3cm)
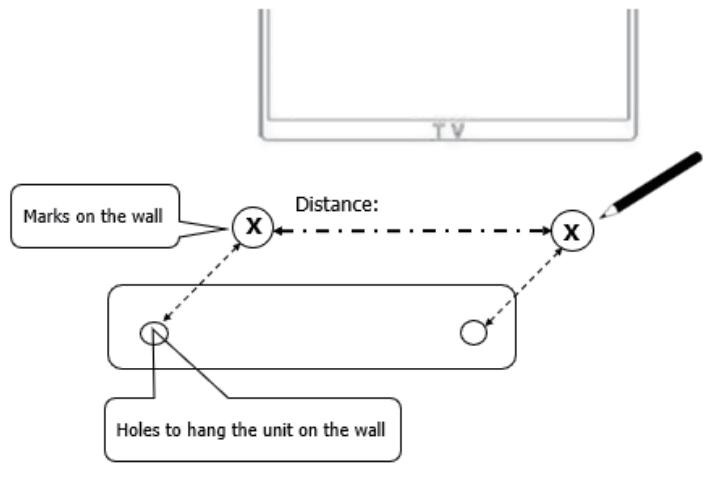
- Using the appropriate drill size, drill the holes on the wall at each marking. (Add the final period)
The detente between the wall mount brackets refers to the third item on the previous page
- Use a hammer to insert the provided wall mounting anchors into the holes on the wall.
- Drive the provided screws into the anchors and screw them firmly. Make sure that they are firmly fixed and stable.
- Hang the center unit by inerting the holes of the center unit into the hooks of the screws. Make sure that they are firmly fixed and stable.

Connection Options
To connect your Nor another suitable device to the Sound Bar System, use one of the following options:
SPDIF Digital Connection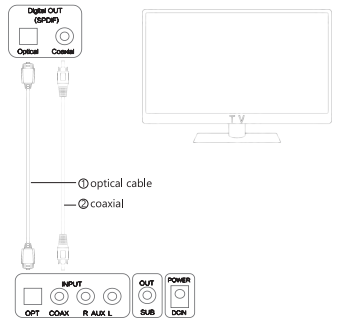 Connection with optical cable
- Use the optical cable provided.
- Connect one end of the cable to the N Optical Digital OUT port and the other end to the OPT Input port of the center unit.
- Turn on the Sound Bar. Pair the Sound Bar with the TV by pressing the “M” button on the Sound Bar or the “OPT” button on the remote control. A successful pairing will be shown with the first indicator light turning blue. The Sound Bar System will be ready to operate.
![]()
“M” button on the Center Unit “OPT’ button on the remote control
Connection with coaxial cable
- Use a coaxial cable.
- Connect one end of the cable to the TV Coaxial Digital OUT port and the other end to the COAX Input port of the center unit.
- Turn on the Sound Bar. Pair the Sound Bar with the N by pressing the “M” button on the Sound Bar or the “COAX” button on the remote control. A successful pairing will be shown with the second indicator light turning blue. The Sound Bar System will be ready to operate.
![]() “COAX” button on the remote control “M” button on the Center Unit
“COAX” button on the remote control “M” button on the Center Unit
Note: For SPDIF digital audio connection, change the settings of the audio output of the source device to the PCM format. Refer to the user manual of the source device for more information.
Audio AUX Connection
- Use the RCA audio cable provided.
- Ensure that the TV port type is an AUX port.
- Connect one of the cables to the cable to the Audio OUT / Line OUT Right and of the N.or a suitable device, and the other end to the AUX(R/L) input ports of the center unit.
- Make sure to match the colors of the cable’s connectors with the colors of the corresponding RCA ports.
- Turn on the Sound Bar. Press the “M” button on the Sound Bar or the “AUX” button on the remote control. A successful pairing will be shown with the fifth indicator light turning blue. The Sound Bar System will be ready to operate.
“M” button on the Center Unit “AUX/boost” button on the remote control
Note: For audio cable connection, you can boost or restore the volume by double-clicking the “boost” button on the remote control.
Headphones Connection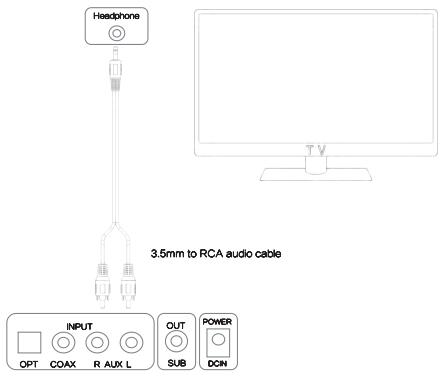
- If your Nor source device has only a headphone connector, use a 3.5 mm stereo cable.
- Connect the 3.5 mm single end of the cable to the headphone connector of the source device and the other two ends to the AUX Right and Left input ports of the center unit.
- Ensure that the TV speakers are turned on. Refer to the N user manual for more information.
- Set the volume of the Nor the source device to the highest audio level.
Bluetooth®connection
Connecting a device
Audio from suitable external devices can be played on the Sound Bar System over a Bluetooth® wireless connection.
To pair the center unit with the external device:
- Press the Tr button on the remote control or the “M” button on the center unit to select Bluetooth® as the input source. The fourth indicator will light up blue.
- Once the indicator is blinking blue, turn on the Bluetooth9eature on the external device.
- Search the Bluetooth® device list on the external device. Select “SAKOBS”. This action will enable the Bluetooth® connection between the two devices.
- When both devices are connected, the SAKOBS device will appear in the device list as
- Once the Bluetooth® connection has been established, the sounds of the external device will be played on the Sound Bar System.
![]()
“M” button on the Center Unit “Br button on the remote control
Disconnecting a device
The Bluetooth® connection can be terminated by any of the following actions:
- Use the settings menu of the external source device and turn off the Bluetooth® function.
- Press the “OPT”, “COAX” or “AUX” button on the remote control or the “M” (Mode) button on the Sound Bar System for two seconds to select a new source.
- When the Bluetooth® P connection has been terminated, the system will start searching for another Bluetooth® device.
- To reconnect the external device, press again the “M” (Mode) Button for two seconds.
Notes:
- The intended range of the Bluetooth connection is up to 33 feet (10 meters).
- If you cannot pair the devices, remove the Sound Bar from the Bluetoothsdevices list After clearing the list, search and select “SAKOBS” and try pairing them again.
- Music streaming may be interrupted if the external device and the Sound Bar are being hampered by walls, objects covering the external device or the central unit, or by devices operating nearby with the same frequency.
- If the Bluetooth connection suddenly breaks down, the Sound Bar will reconnect automatically when the transmission comes back within range.
- The Bluetooth’3device used will be saved in the memory even after the Sound Bar System has been powered off.
Tips:
Once the power connection is successful all five indicators are on and there is a power-on tone.
Operating the System
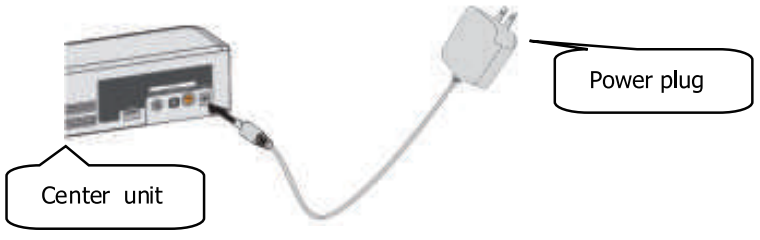
Connecting the Power-Supply Cord
After completing all the cable connections, connect the power-supply cord provided to the POWER DCIN connector on the center unit and plug the other end into an electrical outlet The power indicator will light up red indicating that the Sound Bar is in standby mode.
Powering on the System
- Power on your Turn off the TV speakers to avoid a distorted sound. Verify that no sound comes out of the TV speakers.
- Turn on the Sound Bar by pressing the (power) button on the remote control or the center The status indicator will light up green and the system will be ready to playback.
- Check for sound coming out from the Sound Bar.
Managing Playback Functions
Operating with the remote control
Use the remote control to manage and adjust the functions of your Sound Bar System.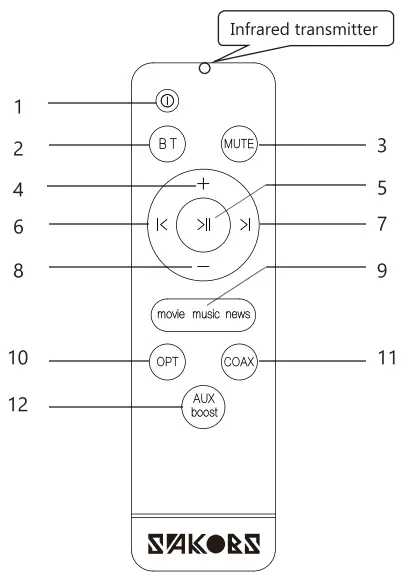
| Buttons | |
| 1 | Power on/off |
| 2 | Bluetooth feature |
| 3 | Mute audio output |
| 4 | Volume up |
| 5 | Play / Pause |
| 6 | Navigation to the previous track |
| 7 | Navigation to next track |
| 8 | Volume down- |
| 9 | Switch sound modes Movie/Music/News |
| 10 | Optical audio |
| 11 | Coaxial audio |
| 12 | Auxiliary boost |
Notes:
- We recommend keeping the remote control in good condition and store it in a safe place because the Sound Bar System only works with the provided remote control and is not compatible with other universal remote controls.
- The system can also be operated with the buttons on the center unit but not all the functions on the remote control are available on the center unit.
Operation Range
The remote control is designed to transmit a signal at a maximum range of approximately 16.5 feet (5 meters) and at an angular position of 30° to the left or to the right of the remote sensor.
Notes:
1. Unstable operation or malfunctioning of the remote control may occur if
1.1 Obstacles are placed between the remote sensor of the Sound Bar System and the remote control.1.2 The remote sensor of the center unit is directly exposed to direct sunlight, incandescent or fluorescent lamps or other strong light sources.1.3 Other infrared devices are operated nearby.
- The remote control may be less effective, if:
2.1 Other remote controls are operated at the same time.2.2 The battery power is low.
- If the remote control is not working properly:
3.1 Make sure that there are no obstacles between the remote control and the infrared receiver of the Sound Bar System.3.2 Replace the batteries.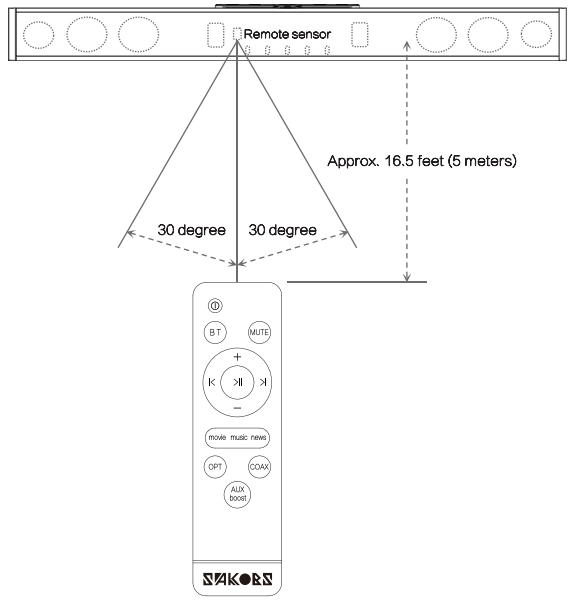
Operating with the center unit
The following playback functions can be managed with the controls of the center unit.
| Button | Function | Press the key | |
| Power | Power the system on | One time | |
| Power the system off | One time | ||
|
M |
Mode | Select the source | One time |
| Disconnect a Bluetooth° device | Two seconds | ||
| Play /Pause | Pause playback sound (The light indicator will flash) | One time | |
| Play playback sound | Two times | ||
| Navigation | Skip to the previous or next track | One time | |
|
– / + |
Volume | Volume setting, down or up | One time |
Selecting a Source Device
- Several compatible source devices may be permanently connected to the central unit through the different connection types (BT/OPT/COAX/ AUX).
- To select or switch the source, press repeatedly the “BT”, “OPT”, COAX”, or “AUX boost” buttons on the remote control or the “M” (Mode) button on the center unit. The source indicator will light up blue.
Note: The settings of the external source device connected affect the audio output of the Sound Bar System. To optimize the audio output, adjust the settings of the source device as needed.
Selecting a Sound Mode
- To get optimized sound effects, this device features three sound modes: movie, music, and news.
- Press the “movie/music/news” button on the remote control to select the desired sound mode.
- Based on the kind of sound from the playback source, we recommended the following modes:
| Sound type | Sound mode |
| Strong bass movie | Music / News |
| Documentary | Music / News |
| Variety show | Music / News |
| Strong bass music | Music / News |
| Light music | Music / News |
| News / Dialogue | Music / News |
| Standard movie | Movie/ Music |
| Pop music | Movie/ Music |
- Before switching the sound output from the source device to the Sound Bar System, set the volume of the TV or source device to a low audio level and set the Sound Bar’s volume to 75% of the highest audio level.
- Switch the sound output to the Sound Bar System.
- Regulate the volume of the source device and of the Sound Bar System to a comfortable audio level.
Notes:
- The source, sound mode, and volume settings will be saved in the memory even after that the Sound Bar is powered off. 2. Volume settings greater than 75% will be saved at 75%. 3. This feature is available only in the remote control, not available on the center unit
Troubleshooting
| Problem | Solution |
| No power | -Check that the power-supply cord is properly connected to an electrical outlet– Check that the DC plug is properly connected to the DC IN connector.– Unplug the power-supply cord for at least one minute. Afterward, plug it in again and reconnect. |
| No sound |
– Press the power button on the Sound Bar System or the remote control. Make sure that the Sound Bar System is turned on.– Press the “MUTE” button on the remote control, and ensure that the sound is restored.– Check that the source device has the appropriate volume settings and that it is playing sound.– Check that the correct source device has been selected.– Plug the audio cable into the Line OUT or Audio OUT connector of the source device. (Not into the Line IN nor Audio IN connectors) SPDIF digital audio connection -Plug the optical cable into the Optical OUT or Digital OUT connector of the source device. (Not into the Optical IN nor Digital IN connectors) – Plug the RCA cable into the Coaxial OUT or Digital OUT connector of the source device. (Not into the Coaxial IN nor Digital IN connectors) – Activate the PCM format in the audio settings menu of the source device. (Refer to the user manual of the source device for more information.) Headphone connection – Check that the N or source device speakers are turned on.– Increase the Nor source device volume to the highest audio level. |
| Poor audio quality |
– Press the ‘movie/music/news” button on the remote control and select the desired sound mode.– Set the volume of the Sound Bar System to 75% of the highest audio level ( Note the maximum volume drop is 75%.)– Check the Sound Bar and the source device cables are properly con connected and plugged into the correct connectors.– Check all the cable plugs are fully inserted into the connectors.– Try to connect to another source device. If the problem persists, check the cable connections.– Reduce the audio level volume of the source device.Audio able connection-Double click the “boost” button on the remote control and check if the volume has been restored.Bluetooth® connection– Place the external device closer to the Sound Bar System and make sure that there are no obstacles hampering or interfering with the transmission between the two devices? |
| Remote control not working |
-Ensure that the batteries are correctly inserted. If necessary, replace the batteries. -Bring the remote control closer to the Sound Bar System, ensuring that the remote control is within a 16.5 feet (5 meters) range of the Sound Bar System. Make surethat there are no obstacles between them.-Point the remote control directly to the infrared receiver of the Sound Bar System. |
| Blocked system | – Malfunctioning could be caused by an electrostatic discharge.
-Unplug the power-supply cord for at least one minute and afterward, plug it in. |
| Cannot connect a Bluetooth device |
-Place the external device closer to the Sound Bar System. -Switch off the device and the Sound Bar System. Afterward, turn them back on and repeat the pairing process. -Make sure that the Sound Bar System is not connected to another BluetootliDdevice. -Make sure that you have selected SAKOBS from the Bluetooth device list on the source device. -Make sure that you are using the correct device. If you still cannot pair the desks, try any of the following: -Remove the SAKOBS Sound Bar System from the list of paired devices on your source device. -Turn the Sound Bar off and afterward, turn it on again. -Pair it again with the source device and verify if the connection has been successful. Note: If you still cannot connect Bluetooths, the device’s Bluetoothromay be malfunctioning. Try to connect to another Bluetooth device. If the problem persists, the Sound Bar System may be malfunctioning in which case you should contact your dealer for a device check and repair. |
| No sound on one side of the Sound Bar | -The double head RCA cable may be wrongly connected to the audio connectors. Check to ensure that each terminal of the cable is connected to the right connector. We recommend checking if the Sound Bar is functioning correctly by making it work with a Bluetooth connection. |
| There is echo noise on the Sound Bar speakers | _Check that the TV sound is off to avoid overlapping with the speakers’ sound and producing echo noise. |
| Device and TV connection methods are not working |
-If you do not have the connection port, contact our customer service for us to provide you with the needed accessories. |
Care and Maintenance
- Before cleaning, be sure to turn off the device and unplug the power adapter from the electrical outlet.
- Do not use gasoline, alcohol, or other abrasive cleaners to clean outside of the device.
- Clean the surface of the device with a soft, dry cloth.
- Do not use any sprays near the system. Do not use any solvents, chemicals or cleaning solutions containing alcohol, ammonia or abrasives.
- Do not allow liquid to splash into any openings.
- If you need a shipping device, use the original packaging.
Batteries Handling Precautions
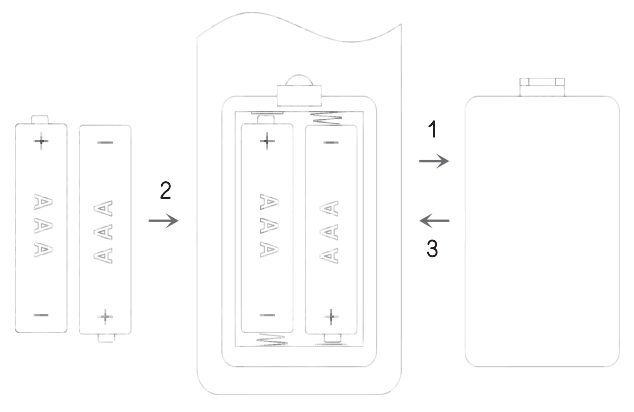
Inserting and replacing the batteries of the remote control
- Slide the cover to open the battery compartment.
- Before inserting the batteries, clean the contact surfaces of the batteries and the remote control.
- Insert 2 x 5V AAA batteries (not included) into the battery compartment. Make sure to insert the batteries properly according to the polarity markings on the compartment.
- Slide the cover to close the battery compartment.
Notes:
- Only use the size and type of batteries specified for the device.
- Only use high-quality batteries. Low-quality batteries may leak and cause damage to the remote control.
- Do not use different types of batteries together (e.g. alkaline and carbon-zinc).
- Do not use new and used batteries together.
- When inserting the batteries, ensure to match the positive and negative ends of the batteries with the polarity markings on the battery compartment.
- If the batteries are exhausted or the device will not be used for an extended period of time, remove the batteries to prevent damage caused by battery leakage.
- 0o does not recharge the batteries unless they are specified as ‘rechargeable`, as it could result in overheating or rupture. Follow the battery manufacturer’s instructions.
- Keep batteries away from high-temperature areas, sunlight fire or heat sources.
Batteries disposal
- Do not discard the batteries as household waste.
- Do not incinerate the batteries.
- Discard the used batteries properly by disposing of them inappropriate collecting facilities and following your local and country regulations.
- We strongly recommend recycling the batteries for health protection and environmental care.
Product Disposal
- Do not discard the product as household waste.
- For health protection and environment care, contact your local disposal service or your product dealer to get information about the proper way to dispose of the product.
Cleaning
- Before cleaning the device, power it off and unplug the power supply cord from the electrical outlet
- Clean the surface of the device with a soft, dry cloth.
- Do not use any cleaning solution containing chemicals such as alcohol, benzine, ammonia, thinner or abrasives, nor scrubbing wipes containing chemical agents.
- Do not use any sprays near the device.
Customer Service
|
If you experience any problem with your device, want a replacement or a refund, contact our customer service, available 24 hours to attend to your issues. We provide lifetime technical support for your device. If you have any questions about the operation or functioning of this device contact our customer service. |
Guarantee
![]() 60-day money-back guaranteeThe SAKOBS TV Sound Bar System comes with a limited 365-days warranty, starting on the date of your purchase.
60-day money-back guaranteeThe SAKOBS TV Sound Bar System comes with a limited 365-days warranty, starting on the date of your purchase.
![]() One-year replacement guaranteeTo get an EXTRA 1–year guarantee, register your order ID by email at [email protected]
One-year replacement guaranteeTo get an EXTRA 1–year guarantee, register your order ID by email at [email protected]
| Email: | ||
| US | [email protected] | |
| EU | [email protected] | |
| JP | [email protected] | |
| Manufacturer: | ||
| Name | Shenzhen Saiyin Electronics Co., Ltd | |
| Address | 4B, No.4, Building, Shanyu Huating, East of Yiyuan Road, Xin’an Street,Baoan District, Shenzhen, China | |
| Importer: | EC | REP |
| Name | Luxus Lebenswelt GmbH | |
| Address | Kochstr. 1, 47877, Willich, Germany |
 report this ad
[xyz-ips snippet=”download-snippet”]