
Instruction Manual
![]()

SALTER 1.6 Litre Soup Maker
Please read all of the instructions carefully and retain for future reference.
Safety Instructions
- When using electrical appliances, basic safety precautions should always be followed.
- Check that the voltage indicated on the rating plate corresponds with that of the local network before connecting the appliance to the mains power supply.
- Children aged from 8 years and people with reduced physical, sensory or mental capabilities or lack of experience and knowledge can use this appliance, only if they have been given supervision or instruction concerning use of the appliance in a safe way and understand the hazards involved.
- Children should be supervised to ensure that they do not play with the appliance.
- Unless they are older than 8 and supervised, children should not perform cleaning or user maintenance.
- This appliance is not a toy.
- This appliance contains no user serviceable parts. If the power supply cord, plug or any part of the appliance is malfunctioning or if it has been dropped or damaged, only a qualified electrician should carry out repairs. Improper repairs may place the user at risk of harm.
- Keep the appliance and its power supply cord out of the reach of children.
- Keep the appliance out of the reach of children when it is switched on or cooling down.
- Keep the appliance and its power supply cord away from heat or sharp edges that could cause damage.
- Keep the power supply cord away from any parts of the appliance that may become hot during use.
- Keep the appliance away from other heat emitting appliances. Keep hands, fingers, hair and any loose clothing away from the rotating tools of the appliance.
- Do not immerse the electrical components of this appliance in water or any other liquid.
- Do not operate the appliance with wet hands.
- Do not leave the appliance unattended whilst connected to the mains power supply.
- Do not remove the appliance from the mains power supply by pulling the cord; switch it off and remove the plug by hand. Do not pull or carry the appliance by its power supply cord.
- Do not use the appliance if it has been dropped, if there are visible signs of damage or if it is leaking.
- Do not use the appliance for anything other than its intended use.
- Do not use any accessories other than those supplied.
- Do not use any damaged accessories.
- Do not use this appliance outdoors.
- Do not store the appliance in direct sunlight or in high humidity conditions.
- Do not move the appliance whilst it is in use.
- Do not place boiling water or very hot liquid in the appliance. Do not dry blend ingredients; always add a small amount of liquid.
- Do not overload the appliance as the mixture level may rise during blending.
- Do not touch any moving parts on this appliance during use, as this could cause injury.
- Do not touch any sections of the appliance that may become hot during use, as this could cause injury.
- Do not use broken or loose cutting or rotating blades.
- Do not remove the lid until the blades have stopped rotating. Switch off the appliance and disconnect it from the mains power supply before changing or fitting accessories.
- Always unplug the appliance after use and before any cleaning or user maintenance.
- Always ensure that the appliance has cooled fully after use before performing any cleaning or maintenance.
- Always use the appliance on a stable, heat-resistant surface, at a height that is comfortable for the user.
- Use of an extension cord with the appliance is not recommended.
- This appliance should not be operated by means of an external timer or separate remote control system, other than that supplied with this appliance.
- This appliance is intended for domestic use only. It should not be used for commercial purposes.
![]() Caution: Hot surface – do not touch the hot section or heating components of the appliance.
Caution: Hot surface – do not touch the hot section or heating components of the appliance.
Warning: Do not touch sharp blades.
Important
- Check that the base of the soup maker is clean before each cycle.
- Always fill the stainless steel jug above the min. fill mark, whilst making sure not to exceed the max. fill mark. Exceeding the max. fill mark may activate the overfill sensor, causing the soup maker to stop working and preventing the ejection of hot liquid during operation.
- Never connect the soup maker to the mains power supply until the required ingredients have been added.
- Do not operate the soup maker when the stainless steel jug is empty.
- Never allow any liquid into the connection on the underside of the lid. If liquid is accidentally spilled onto the connection, dry thoroughly with a paper towel before fitting.
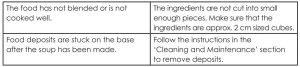
- The soup maker uses a safety cut-out thermostat which may operate from time to time to prevent it from overheating. The safety cut-out thermostat may operate when the stainless steel jug is used empty, when/if the liquid content has evaporated before the end of the cycle or when ingredients are sticking to the base of the stainless steel jug. If the safety cut-out thermostat operates, the soup maker will not heat up or generate any further heat. Please allow the soup maker to cool for approx. 5-10 minutes after each use. Remove the soup and clean the base of the stainless steel jug.
Note: The soup maker will not operate unless the lid is positioned correctly on the stainless steel jug. The soup maker is fitted with a boil dry function. If the soup maker is switched on when empty, it will switch off approx. 35 seconds later.
Warning: The soup maker is not suitable for use with packet, carton, canned or other prepared soups. The soup maker is designed for the creation of fresh soups and smoothies to be served upon completion of the programmed cycles.
Always carry the soup maker by the side handle.Do not place the soup maker underneath cupboards whilst in use.
Care and Maintenance
Switch off and unplug the soup maker from the mains power supply before performing any cleaning or user maintenance.
STEP 1: Wipe the soup maker and the overfill sensor with a soft, damp cloth then allow it to dry thoroughly.
STEP 2: Wash the inside of the stainless steel jug and the inside of the lid with warm, soapy water and then rinse and dry thoroughly.
Wipe away any remaining food with a soft cloth and a mild detergent before rinsing again.
Never touch the blender blade; using extreme caution, clean the blade with a brush and dry carefully.
Do not immerse the soup maker in water or any other liquid. Do not use harsh or abrasive detergents or scourers to clean the soup maker, as this could cause damage.
Note: Pre-clean the soup maker using the auto-clean function, following the instructions in the section entitled ‘Auto-clean Function’.
Caution: Handle the blender blade on the underside of the lid with care as the blade is sharp. Exercise caution when attaching, removing, cleaning or storing the blender blade.
Description of Parts
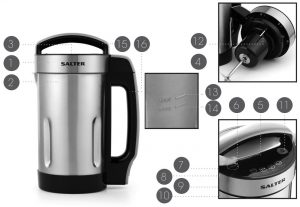
- 1.6 Litre Soup Maker main unit
- Stainless steel jug
- Lid
- Blender blade
- Control panel
- Select button
- Smooth button
- Chunky button
- Blend button
- Auto-clean button
- Start/cancel button
- Overfill sensor
- Max. fill mark
- Min. fill mark
- Lid handle
- Jug handle
Instructions for Use
Before First UseWash the blender blade in worm. soapy water. then rinse and dry thoroughly. Wipe the soup maker main unit with a soft, damp cloth and allow to dry thoroughly. Never touch the blender blade; the attachment should be washed using a brush and dried carefully.
Do not immerse the soup maker in water or any other liquid.
Note: When using the soup maker for the first time, a slight odour may be emitted. This is normal and will soon subside. Allow for sufficient ventilation around the soup maker.
Using the 1.6 Litre Soup MakerThe blender blade must be securely fitted before use: do not attempt to remove it until it has stopped moving.
- STEP 1: Switch off and unplug the soup maker from the mains power supply.
- STEP 2: Position the stainless steel jug onto a flat. stable. heat-resistant surface at a height that is comfortable for the user.
- STEP 3: Apply a tablespoon of cooking oil to the bottom of the stainless steel jug. This will help to prevent the ingredients from sticking.
- STEP 4: Chop all of the chosen soup ingredients into approx. 2 cm sized cubes and place them into the stainless steel jug.
- STEP 5: Add the desired liquid or stock to the stainless steel jug, making sure that the total volume of ingredients is at least 1.4 L (min. fill mark) but no more than 1.6 L (max. fill mark).
- STEP 6: After adding all of the ingredients and stock. stir to make sure that the liquid is evenly mixed. Plug in and switch on the soup maker at the mains power supply; the soup maker will make an audible beep and the setting buttons will begin to flash.
- STEP 7: To use the soup maker. follow the instructions in the relevant ‘Setting’ section.
- STEP 8: To stop the soup maker mid-cycle. press the ‘Start/cancel’ button. This does not pause the setting. To pause the setting mid-cycle. follow the instructions in the section entitled ‘Auto-memory Function’.
- STEP 9: Once cooking is complete, check that the selected setting has finished and then switch off the soup maker at the mains power supply.
- STEP 10: Carefully remove the lid and transfer the soup into a suitable container; the lid must be completely removed prior to transferring the soup.
- STEP 11: Allow the soup maker to cool sufficiently before making a second batch of soup.
Note: Check that the lid is securely positioned before use. Do not add any frozen ingredients or uncooked meats or fish to the soup maker. All ingredients must be thawed and at room temperature and all meats or fish much be precooked before use.
A slight browning of the internal base may appear when cooking is complete. This is completely normal and can be removed during cleaning.
Caution: The soup maker is not designed to reheat soup once it is made. Reheating can damage the heating element.
Exercise caution when removing the lid after use, as hot steam will vent out.
Warning: Sharp blades; handle with care.
The stainless steel jug and the lid will get very hot during use; always take care when touching these components and use the handle when moving the stainless steel jug.
‘Smooth’ Soup SettingWhen making smooth soup, the soup maker will automatically heat and blend the ingredients.
STEP 1: Press the ‘Select’ button until the ‘Smooth’ button illuminates.STEP 2: Press the ‘Start/cancel’ button to begin the cooking process; the soup maker will run for approx. 25-30 minutes.STEP 3: Once the setting has completed, the soup maker will beep.
‘Chunky’ Soup SettingWhen making chunky soup, the soup maker will automatically heat the ingredients.
STEP 1: Press the ‘Select’ button until the ‘Chunky’ button illuminates.STEP 2: Press the ‘Start/cancel’ button to begin the cooking process; the soup maker will run for approx. 30 minutes.STEP 3: Once the setting has completed, the soup maker will beep.
Note: Make sure that all of the ingredients are chopped into the required size, as the blender blade does not rotate during use of the ‘Chunky’ soup setting.
‘Blend’ SettingWhen making smoothies, the heat function will not operate.
- STEP 1: Press the ‘Select’ button until the ‘Blend’ button illuminates.
- STEP 2: Press the ‘Start/cancel’ button to begin the cooking process; the soup maker will run for approx. 3 minutes.
- STEP 3: Once the setting has completed, the soup maker will beep.
- STEP 4: If the smoothie has not reached the desired consistency, repeat steps 1-2.
Note: Do not blend dry ingredients.Do not use the ‘Blend’ setting for more than 5 full cycles without allowing the soup maker to cool down sufficiently.
‘Auto-clean’ FunctionWhen cleaning the soup maker using the auto-clean function, the heat function will not operate.
- STEP 1: Fill the soup maker with warm water to the max. fill mark; do not exceed the max. fill mark as this will prevent the soup maker from operating.
- STEP 2: Press the ‘Select’ button until the ‘Auto-clean’ button illuminates.
- STEP 3: Press the ‘Start/cancel’ button to begin the cleaning process; the soup maker will run for approx. 4 minutes.
- STEP 4: If the soup maker required further cleaning, repeat steps 1–3.
- STEP 5: Finish cleaning the soup maker, following the instructions in the section entitled ‘Care and Maintenance’.
Warning: Do not add soap to the water when using the auto-clean function, as this could cause damage to the soup maker.
Auto-memory FunctionThe soup maker has an auto-memory function. This allows more ingredients to be added to the soup maker mid-cycle whilst remembering where the setting was up to. To utilise the auto-memory function:
- STEP 1: Switch off the soup maker at the mains power supply; this will pause the soup maker.
- STEP 2: Carefully remove the lid, add the extra ingredients and stir to make sure that the liquid is evenly distributed.
- STEP 3: Replace the lid and switch on the soup maker at the mains power supply; the soup maker will return to where the previously selected setting was paused.
Hints and Tips
- Make sure that the ingredients are chopped, peeled, sliced or cubed into small, 2-3 cm pieces.
- Stir the ingredients before adding the lid, to prevent the ingredients from sticking to the base of the stainless steel jug.
- If the alarm sounds, unplug the soup maker and check the overfill sensor on the lid. Clean the sensor and reduce the amount of ingredients before trying again.
- Remove the contents of the stainless steel jug as soon as the setting is complete, as the soup maker remains hot after use and may cause the soup to burn.
- The soup maker does not reheat soup. Once the setting has finished, the soup needs to be served or stored appropriately for future reheating on the hob or in a microwave.
- Clean the soup maker thoroughly after each use, following the instructions in the sections entitled ‘Care and Maintenance’ and ”Auto-clean’ Function.
- Apply a tablespoon of cooking oil to the bottom of the stainless steel jug. This will help to prevent the ingredients from sticking.
Storage
Check that the soup maker is cool, clean and dry before storing in a cool, dry place. Never wrap the cord tightly around the soup maker; wrap it loosely to avoid causing damage.Do not store the cord inside the soup maker.
Troubleshooting

Specifications
- Product code: EK2613
- Input: 220-240 v- 50/60 Hz
- Heating output: 850 W
- Blending output: 200 W
Recipes

Make sure that all of the ingredients are no bigger than 2 cm in size by chopping them prior to blending.
* Any recipe images used in this instruction manual are intended for illustrative purposes only.
Broccoli and Blue Cheese SoupIngredients
- 100 g blue cheese (e.g. Stilton or Roquefort], crumbled
- 1 head broccoli, chopped into approx. 3 cm florets
- 1 large onion, chopped
- 1 large potato, peeled and cubed 1 large knob butter
- 800 ml vegetable stock:
- Salt and pepper, to taste
Method
Add the potato, onion, butter, broccoli and stock to the soup mak:er, stir and select the ‘Smooth’ setting.Once the setting has completed. the soup maker will beep.Add the blue cheese and blend further using the ‘Blend’ setting until smooth.Season to taste with salt and pepper.Serve the soup in warm bowls.
Tomato and Red Bean Soup
Ingredients
- 600 g plum tomatoes
- 400 g red kidney beans. rinsed well and drained
- 1-2 garlic cloves, peeled and finely chopped
- 1 onion, peeled and chopped 600 ml vegetable stock
- 2 tbsp flat leaf parsley
- Salt and pepper, to taste
Method
Add the tomatoes and vegetable stock to the soup maker. Use the ‘Blend’ setting for approx. 10 seconds; to stop the ‘Blend’ setting, press the ‘Start/cancel’ button.Add the rest of the ingredients and select the ‘Chunk:y’ setting.Once the setting has completed, the soup maker will beep.Use the ‘Blend’ setting until the desired consistency is achieved.Season to taste with salt and pepper.Serve the soup in warm bowls.
Carrot and Coriander Soup
Ingredients
- 450 g carrots, sliced
- 1 onion, chopped
- 1 garlic clove
- 1 large k:nob butter
- 1.2 L cold vegetable stock:
- 3 tbsp fresh coriander, chopped
- 1 tsp ground coriander
- Squeeze lemon juice
- Single cream, to serve (optional]
- Salt and pepper. to taste
Method
Add all of the ingredients to the soup mak:er, stir and select either the ‘Smooth’ or ‘Chunk:y’ setting, as desired.Once the setting has completed. the soup mak:er will beep.Season to taste with salt and pepper.Add single cream to taste. if desired.Serve the soup in warm bowls, swirled with cream, if desired.
Spiced Lentil Soup
Ingredients
- 150 g red lentils
- 2 large carrots. peeled and grated
- 1 onion, finely chopped
- 1 small piece ginger, peeled and grated 1 lime, juiced to taste
- l L cold vegetable stock.
- l tsp cumin seeds
- l pinch chilli flakes
- l small bunch coriander leaves Salt and pepper. to taste
Method
Add all of the ingredients to the soup maker, stir and select the ‘Smooth’ setting. Once the setting has completed, the soup mak:er will beep.Season to taste with salt and pepper.Serve the soup in warm bowls.
Tomato Soup
Ingredients
- 600 g tinned plum tomatoes
- 1 carrot. peeled and chopped 1 celery stick:, sliced
- 1 medium onion, sliced
- 1 garlic clove, peeled and sliced
- 800 ml chicken or vegetable stock 1 tsp sugar
- Small bunch basil
- Olive oil
- Salt and pepper, to taste
Method
Add all of the ingredients to the soup maker. stir and select the ‘Smooth’ setting.Once the setting has completed, the soup maker will beep.Check: the consistency of the soup and blend further using the ‘Blend’ setting, if necessary. Season to taste with salt and pepper.Serve the soup in warm bowls.

Leek and Potato Soup
Ingredients
- 280 g potatoes, peeled and cut into small, bite-sized chunks
- 55 g butter
- 3 leeks
- 1 onion, chopped
- 850 ml cold vegetable stock
- Salt and pepper. to taste
- Single cream, to serve (optional]
Method
Add all of the ingredients to the soup maker, stir and select the ‘Smooth’ setting. Once the setting has completed, the soup maker will beep.Season to taste with salt and pepper.Serve the soup in warm bowls swirled with cream, if desired.
Cauliflower Cheese Soup
Ingredients
- 100 g mature cheddar cheese, diced
- 1 cauliflower, leaves trimmed and cut into florets (no more than 2 cm in size)
- 1 medium potato, peeled and cut into chunks (no more than 2 cm in size)
- 1 large onion, chopped (no more than 2 cm in size]
- 800 ml cold vegetable stock
- 100 ml double cream
- Salt and pepper, season to taste
Method
Place the onion, cauliflower, potato and stock into the soup maker, stir and select the ‘Smooth’ setting.Once the setting hos completed, the soup maker will beep.Add the double cream and season to taste with salt and pepper.Serve the soup in warm bowls, adding the diced cheese and stir.
Carrot and Cumin Soup with Fresh Coriander
Ingredients
- 6 medium carrots, peeled and chopped
- 1 large onion, chopped (no more than 2 cm in size)
- 400 ml cold vegetable or chicken stock
- 2 tsp brown sugar
- 1 tsp cumin seeds
- 1 bunch of coriander, chopped
- Small pinch chilli flakes or powder
- Salt and pepper. to taste
- Low fat creme fraiche, to serve (optional)
Method
- Add the carrots, onion, cumin seeds, chilli flakes, sugar and stock to the soup maker, stir and select the ‘Smooth’ setting.
- Once the setting has completed. the soup maker will beep.
- Add the coriander, season to taste with salt and pepper and blend further using the ‘Blend’ setting for an extra 2 seconds.
- Serve the soup in warm bowls, adding a spoonful of creme fraiche, if desired.
Chunky Vegetable Soup
Ingredients
- 400 g can of butter beans
- 3 celery sticks, roughly chopped [no more than 2 cm in size)
- 2 medium potatoes. diced
- 2 garlic cloves, crushed
- 1 large carrot, peeled and chopped
- 1 onion, roughly chopped
- 1h head savoy cabbage, chopped 1 L cold vegetable stock
- 2 tbsp tomato puree
- 1 tbsp olive oil
- Salt and pepper, to taste
Method
Add all of the ingredients to the soup maker. stir and select the ‘Chunky’ setting. Once the setting has completed. the soup maker will beep.Use the ‘Blend’ setting until the desired consistency is achieved.Season to taste with salt and pepper.Serve the soup in warm bowls.
Autumn Vegetable Soup
Ingredients
- 600 g tinned tomatoes
- 400 g tinned chickpeas
- 2 carrots, chopped into small pieces 1 leek, chopped into small pieces
- 1 garlic clove, finely chopped
- 500 ml cold vegetable stock:
- 3 tbsp chopped parsley
- 1 tbsp finely chopped fresh rosemary
- Salt and pepper. to taste
Method
Add all of the ingredients to the soup maker, stir and select the ‘Chunky’ setting. Once the setting has completed. the soup maker will beep.Use the ‘Blend’ setting until the desired consistency is achieved.Season to taste with salt and pepper.Serve the soup in warm bowls.
Indian Spiced Tomato Soup
Ingredients
- 400 g tin chopped tomatoes
- 1 onion. roughly chopped
- 550 ml cold vegetable stock
- 2 tbsp red lentils
- 2 tsp garam mosaic
- 1h bunch coriander Pinch chilli flakes
- Salt and pepper, to taste
Method
Add a II of the ingredients except the coriander to the soup maker, stir and select the‘Smooth’ setting.Once the setting has completed. the soup maker will beep.Add the coriander, season with salt and pepper, to taste and blend further using the ‘Blend’ setting for a further 2 seconds.Serve the soup in warm bowls.

Mexican SoupIngredients
- 400 g can plum tomatoes
- 4 garlic cloves, finely chopped
- 1 onion. roughly chopped
- 1 large chilli, deseeded and softened 1 L cold chick.en stock
- 2 tbsp olive oil
- 1h tsp ground cumin Juice 2 limes
- Salt and pepper. to taste
Method
Add all of the ingredients to the soup maker, stir and select the ‘Smooth’ setting. Once the setting has completed. the soup maker will beep.Season to taste with salt and pepper.Serve the soup in warm bowls.
Spicy Potato Soup
Ingredients
- 2 medium potatoes, cut into 1 cm cubes 2 medium onions, finely chopped
- 800 ml vegetable stock:
- 100 ml double cream
- 2 tbsp groundnut oil
- 1 tbsp medium curry powder
- Salt and pepper, to taste
Method
Add all of the ingredients, except the double cream, to the soup maker, stir and select the ‘Smooth’ setting.Once the setting has completed, the soup maker will beep.Add the double cream at the end of the cycle and blend through using the ‘Blend’ setting for a thick, creamy texture.Season to taste with salt and pepper.Serve the soup in worm bowls.
Minted Courgette Soup
Ingredients
- 40 g fresh mint stalks removed
- 3 courgettes, grated
- 2 Moris Piper potatoes, peeled and diced 2 garlic cloves, chopped
- 1 small onion, chopped
- 1.2 L cold vegetable stock
- l tbsp Greek: yoghurt. to serve [optional) l tsp cornflour
- Salt and pepper, to taste
Method
Add all of the ingredients to the soup maker. stir and select the ‘Smooth’ setting. Once the setting has completed, the soup maker will beep.Season to taste with salt and pepper.Serve in warm bowls swirled with Greek: yoghurt, if desired.
Spring Vegetable Soup with Basil Pesto
Ingredients
- 300 g can of cannellini beans, drained 100 g green beans
- 25 g Parmesan cheese
- 25 g pack basil
- 1 leek, washed and chopped
- 1 large courgette, chopped
- 1.1 L cold vegetable stock
- 1 tbsp olive oil
- Salt and pepper, to taste
Method
Add all of the ingredients to the soup maker. stir and select the ‘Chunky’ setting. Once the setting has completed. the soup maker will beep.Use the ‘Blend’ setting until the desired consistency is achieved.Season to taste with salt and pepper.Serve the soup in warm bowls.
Celery and Stilton Soup
Ingredients
- 150 g Stilton cheese. crumbled
- 4 celery sticks. chopped
- 1 onion, chopped
- 1 carrot, chopped and cubed
- 800 ml cold chicken stock
- 125 ml double cream
- 2 tbsp butter
- Ground nutmeg
- Salt and pepper, to taste
Method
Add the butter. onion, celery, carrot, chicken stock, seasoning and 100 ml of the double cream to the soup maker. stir and select the ‘Smooth’ setting.Once the setting has completed, the soup maker will beep.Add the cheese and the rest of the double cream and blend further using the ‘Blend’ setting. Season to taste with salt and pepper.Serve the soup in warm bowls.
Pea and Mint Soup
Ingredients
- 700g peas
- 2 carrots, chopped
- 2 celery sticks
- 1 onion, finely chopped
- 1 garlic clove, crushed
- 700 ml cold vegetable stock
- Small bunch fresh mint
- Salt and pepper, to taste
Method
Add all of the ingredients to the soup maker, stir and select the ‘Smooth’ setting. Once the setting has completed, the soup maker will beep.Season to taste with salt and pepper.Serve the soup in warm bowls.
Mushroom Soup
Ingredients
- 300 g mushrooms
- 2 celery sticks, chopped 1 onion, chopped
- 1/2 leek, chopped
- 1 garlic clove, crushed
- 800 ml cold vegetable stock
- 100 ml double cream
- 2 tbsp flour
- Solt and pepper, to taste
Method
Add all of the ingredients, except the double cream, to the soup maker, stir and select the ‘Smooth’ setting.Once the setting has completed, the soup maker will beep.Add the double cream at the end of the cycle and blend through using the ‘Blend’ setting for a thick, creamy texture.Season to taste with salt and pepper.Serve the soup in warm bowls.
Connection To The Mains
Please check that the voltage indicated on the product corresponds with your supply voltage.
ImportantAs the colours in the mains lead of this appliance may not correspond with the coloured markings identifying the terminals in your plug, please proceed as follows:
The wires in the mains lead are coloured in accordance with the following code:

Blue Neutral (N)Brown Live (L)Green/Yellow Earth(![]() )FOR UK USE ONLY – Plug fitting details (where applicable).The wire coloured BLUE is the NEUTRAL and must be connected to the terminal markedN or coloured BLACK.The wire coloured BROWN is the LIVE wire and must be connected to the terminal marked L or coloured RED.The wire coloured GREEN/YELLOW must be connected to the terminal marked with the letter E or marked
)FOR UK USE ONLY – Plug fitting details (where applicable).The wire coloured BLUE is the NEUTRAL and must be connected to the terminal markedN or coloured BLACK.The wire coloured BROWN is the LIVE wire and must be connected to the terminal marked L or coloured RED.The wire coloured GREEN/YELLOW must be connected to the terminal marked with the letter E or marked ![]() ·On no account must either the BROWN or the BLUE wire be connected to the EARTH terminal (
·On no account must either the BROWN or the BLUE wire be connected to the EARTH terminal (![]() ).
).
Always ensure that the cord grip is fastened correctly.The plug must be fitted with a fuse of the same rating already fitted and conforming to BS 1362 and be ASTA approved.If in doubt, consult a qualified electrician who will be pleased to do this for you.
Non-Rewireable Mains Plug
If your appliance is supplied with a non-rewireable plug fitted to the mains lead and should the fuse need replacing, you must use an ASTA approved one (conforming to BS 1362 of the same rating).
If in doubt, consult a qualified electrician who will be pleased to do this for you.If you need to remove the plug, DISCONNECT IT FROM THE MAINS, then cut it off themains lead and immediately dispose of it safely. Never attempt to reuse the plug or insert it into a socket outlet as there is a danger of an electric shock.
UP Global Sourcing UK Ltd.,Victoria Street, Manchester OL9 ODD. UK.If this product does not reach you in an acceptable condition please contact ourCustomer Services Department at www.saltercookshop.com.Please have your delivery note to hand as details from it will be required.If you wish to return this product, please return it to the retailer from where it was purchased with your receipt (subject to their terms and conditions}.
Guarantee
All products purchased as new carry a manufacturer’s guarantee; the time period of the guarantee will vary dependent upon the product. Where reasonable proof of purchase can be provided, Salter will provide a standard 12 month guarantee with the retailer from the date of purchase. This is only applicable when products have been used as instructed for their intended, domestic use. Any misuse or dismantling of products will invalidate any guarantee.
Under the guarantee, we undertake to repair or replace free of any charge any parts found to be defective. In the event that we cannot provide an exact replacement, a similar product will be offered or the cost refunded. Any damages from daily wear and tear are not covered by this guarantee, nor are consumables such as plugs. fuses etc.
Please note that the above terms and conditions may be updated from time to time and we therefore recommend that you check these each time you revisit the website. Nothing in this guarantee or in the instructions relating to this product excludes, restricts or otherwise affects your statutory rights.
The crossed out wheelie bin symbol on this item indicates that this appliance needs to be disposed of in an environmentally friendly way when it becomes of no further use or has worn out. Contact A your local authority for details of where to take the item for recycling.

*To be eligible for the extended guarantee, go to www.saltercookshop.com and register your product within 30 days of purchase.

Find us onwww.facebook.com/SalterCookshop
![]()
Manufactured by:UP Global Sourcing UK Ltd.,Victoria Street.Manchester OL9 ODD. UK.Made in China.
[xyz-ips snippet=”download-snippet”]