
SALTER Digital Air Fry
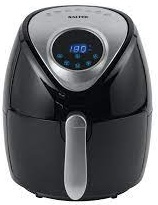
SALTER Digital Air Fry
Please read all of the instructions carefully and retain for future reference
Safety Instructions
When using electrical appliances, basic safety precautions should always be followed.
- Check that the voltage indicated on the rating plate corresponds with that of the local network before connecting the appliance to the mains power supply.
- Children aged from 8 years and people with reduced physical, sensory or mental capabilities or lack of experience and knowledge can use this appliance, only if they have been given supervision or instruction concerning use of the appliance in a safe way and understand the hazards involved.
- Children should be supervised to ensure that they do not play with the appliance.
- Unless they are older than 8 and supervised, children should not perform cleaning or user maintenance.
- This appliance is not a toy.
- This appliance contains no user serviceable parts.
- If the power supply cord, plug or any part of the appliance is malfunctioning or if it has been dropped or damaged, only a qualified electrician should carry out repairs. Improper repairs may place the user at risk of harm.
- Keep the appliance and its power supply cord out of the reach of children.
- Keep the appliance out of the reach of children when it is switched on or cooling down.
- Keep the appliance and its power supply cord away from heat or sharp edges that could cause damage.
- Keep the power supply cord away from any parts of the appliance that may become hot during use.
- Keep the appliance away from other heat emitting appliances.
- Do not immerse the appliance in water or any other liquid.
- Do not operate the appliance with wet hands.
- Do not leave the appliance unattended whilst connected to the mains power supply.
- Do not remove the appliance from the mains power supply by pulling the cord; switch it off and remove the plug by hand.
- Do not pull or carry the appliance by its power supply cord.
- Do not use the appliance for anything other than its intended use.
- Do not use any accessories other than those supplied.
- Do not use this appliance outdoors.
- Do not store the appliance in direct sunlight or in high humidity conditions.
- Do not move the appliance whilst it is in use.
- Do not touch any sections of the appliance that may become hot or the heating components of the appliance, as this could cause injury.
- Do not use sharp or abrasive items with this appliance; use only plastic or wooden spatulas to avoid damaging the non-stick surface.
- Always unplug the appliance after use and before any cleaning or user maintenance.
- Always ensure that the appliance has cooled fully after use before performing any cleaning or maintenance or storing away.
- Always use the appliance on a stable, heat-resistant surface, at a height that is comfortable for the user.
- Use of an extension cord with the appliance is not recommended.
- This appliance should not be operated by means of an external timer or separate remote control system, other than that supplied with this appliance.
- This appliance is intended for domestic use only.
- It should not be used for commercial purposes.
- The outer surface or door may get hot during operation.
![]() Caution: Hot surface – do not touch any sections or SSS surfaces of the appliance that may become hot or the heating components of the appliance.
Caution: Hot surface – do not touch any sections or SSS surfaces of the appliance that may become hot or the heating components of the appliance.
Warning: Keep the appliance away from flammable materials.
Automatic Switch-off
- The AeroCool Pro XL is fitted with an automatic switch-off.
- This will activate if the set cooking time has elapsed.
- The timer will sound and the automatic switch-off will activate, turning off the AeroCool Pro XL.
Note: If the AeroCool Pro XL needs to be turned off before the set cooking time has elapsed, switch off and unplug it from the mains power supply.
Dos and Don’ts
Do:
- Always check that the baking/drip tray is inserted in the lowest position when cooking with other accessories, to catch any drips and make cleaning easier.
- Make sure that the mesh tray and baking/drip tray are correctly aligned when inserting into the AeroCook Pro XL.
- Wear heat-resistant gloves when adding or removing food or using the cooking accessories.
- Take care when opening the cooking compartment door of the AeroCook Pro XL, as steam may be emitted.
- Empty the baking/drip tray if it becomes too full with excess oil.
- Use a heatproof dish to collect excess oil, and dispose of it properly once it has cooled.
- Use the rotisserie tongs when removing rotisserie accessories, taking care not to touch the heating element, as these could still be hot after use.
Do not
- Move the AeroCook Pro XL when hot or with hot food inside, as oil or juices could spill from the baking/drip tray.
- Cover the AeroCook Pro XL or its air inlets or outlets, as this will disrupt the airflow and could affect the cooking results and cause heat damage or fire.
- Store anything on top of the AeroCook Pro XL; it must be kept clear at all times.
- Touch the inside of the cooking compartment or any of the accessories when hot.
- Touch the sharp ends of the rotisserie forks.
- Leave the AeroCook Pro XL unattended when cooking at a high temperature or cooking flammable foods.
- Position the AeroCook Pro XL directly against a wall or other surface, as the air outlet may cause heat damage.
- Spray the heating element in the top of the inner unit with cleaning solution.
Care and Maintenance
- Before attempting any cleaning or maintenance, switch off and unplug the AeroCook Pro XL from the mains power supply and allow it to cool fully.STEP 1: Wipe the AeroCook Pro XL main unit with a soft, damp cloth and dry thoroughly.STEP 2: Clean any accessories with warm, soapy water, then rinse and dry thoroughly.
- Do not immerse the AeroCook Pro XL main unit in water or any other liquid.
- Never use harsh or abrasive cleaning detergents or scourers to clean the AeroCook Pro XL or its accessories, as this could cause damage.
Note: The AeroCook Pro XL should be cleaned after each use. The cooking compartment door features an door latch switch, which enables it to be removed from the AeroCook Pro XL main unit for easy cleaning. Carefully pull the door latch switch to the left and carefully remove the cooking compartment door. To reattach, pull the door latch switch to the right and realign the cooking compartment door with the hinges on the AeroCook Pro XL main unit. Once aligned, release the door latch switch to lock the cooking compartment door back into position.
Getting Started
Remove the AeroCook Pro XL from the box. Remove any packaging from the AeroCook Pro XL. Place the packaging inside the box and either store or dispose of safely.
In the Box
- AeroCook Pro XL main unit
- Non-stick baking/drip tray
- 3 x mesh trays
- Rotisserie bar
- 2 x rotisserie forks
- Rotisserie tongs
- 2 x tightening screws
- Instruction manual
Features
- 2000 W power
- 11 litre capacity
- Digital control with 8 presets
- Tough-sensitive display with on/off button
- 60-minute timer
- Adjustable time and temperature settings from 65-200 °C
- Non-stick coating for easy cleaning
- Accessories include – 3 cooking racks, a drip tray, rotisserie fork and rotisserie tong.
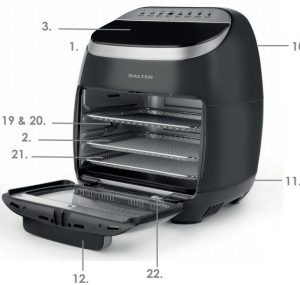
Description of parts
- AeroCook Pro XL main unit
- Cooking compartment
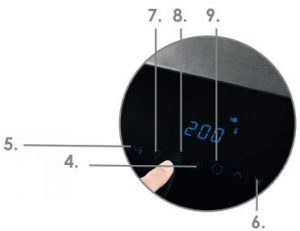
- Digital control panel
- Power (start/pause) button

- Temperature control button(s) and
- Timer control button(s) and
- Light button
- Preset button
- Rotisserie button
- Air outlet
- Air inlets
- Door handle
- Baking/drip tray
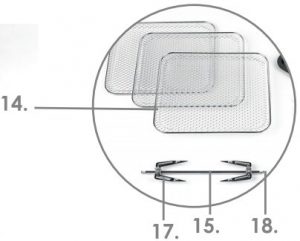
- Mesh tray(s)
- Rotisserie bar
- Rotisserie tongs
- Rotisserie forks
- Rotisserie fork tightening screw
- Rotisserie bar bracket (inside)
- Rotisserie bar rotating slot (inside)
- Accessory slots
- Door latch switch

Instructions for Use
Before First UseSTEP 1: Before connecting to the mains power supply, wipe the AeroCook Pro XL main unit with a soft, damp cloth and allow to dry thoroughly.STEP 2: Clean all of the accessories in warm, soapy water, then rinse and dry thoroughly. Do not immerse the AeroCook Pro XL main unit in water or any other liquid. Never use harsh or abrasive cleaning detergents or scourers to clean the AeroCook Pro XL or its accessories, as this could cause damage.STEP 3: Place the AeroCook Pro XL main unit onto a stable. heat-resistant surface. at a height that is comfortable for the user.
Note: When using the AeroCook Pro XL for the first time, a slight smoke or odour may be emitted. This is normal and will soon subside. Allow for sufficient ventilation around the AeroCook Pro XL during use. It is advised to run the AeroCook Pro XL at a high temperature without food for approx. 10 minutes before first use; this will prevent the initial smoke or odour from affecting the taste of the food.
Using the Digital Control PanelPlug in and switch on the AeroCook Pro XL at the mains power supply. The AeroCook Pro XL will beep and the power button will illuminate, signalling that it is being powered.
Power ButtonTo switch on the AeroCook Pro XL, press ![]() .The LED display will alternate between ‘180 °C’ and ’15 MIN’: these are the default cooking settings. If other settings are required, programme the time and temperature as detailed in step 3. Press
.The LED display will alternate between ‘180 °C’ and ’15 MIN’: these are the default cooking settings. If other settings are required, programme the time and temperature as detailed in step 3. Press ![]() again to turn off the AeroCook Pro XL. The AeroCook Pro XL will beep several times and automatically turn off.
again to turn off the AeroCook Pro XL. The AeroCook Pro XL will beep several times and automatically turn off.
Note: The power button will remain illuminated as long as the AeroCook Pro XL is plugged in and switched on at the mains power supply.
Timer Control ButtonsPress the ![]() or
or ![]() to change the cooking time up to a max. of 60 minutes. To alter the cooking time more quickly, press and hold
to change the cooking time up to a max. of 60 minutes. To alter the cooking time more quickly, press and hold ![]() or
or ![]() The cooking time can be changed at any time during cooking. Once the timer has expired, the AeroCook Pro XL will turn off.
The cooking time can be changed at any time during cooking. Once the timer has expired, the AeroCook Pro XL will turn off.
Temperature Control ButtonsTap ![]() or
or ![]() to adjust the cooking temperature to between 65-200 °C. To alter the cooking temperature more quickly, press and hold
to adjust the cooking temperature to between 65-200 °C. To alter the cooking temperature more quickly, press and hold ![]() or
or ![]() . Once the desired cooking time and temperature have been set, press
. Once the desired cooking time and temperature have been set, press ![]() to begin heating. The LED display will illuminate with a heat icon to indicate that the AeroCook Pro XL is heating up and a fan icon to signal that the fan is operating. During use, the heating icon will switch on and off to signal that it is maintaining the selected temperature. The cooking temperature can be changed at any time during cooking.
to begin heating. The LED display will illuminate with a heat icon to indicate that the AeroCook Pro XL is heating up and a fan icon to signal that the fan is operating. During use, the heating icon will switch on and off to signal that it is maintaining the selected temperature. The cooking temperature can be changed at any time during cooking.
Rotisserie ButtonActivate the rotisserie function at any point during cooking by pressing ![]() . The rotisserie bar must be inserted. If
. The rotisserie bar must be inserted. If ![]() is pressed before the cooking cycle has started, the rotisserie function will activate when the cooking cycle begins.
is pressed before the cooking cycle has started, the rotisserie function will activate when the cooking cycle begins.
Preset ButtonThe cooking time and temperature can also be set using ![]() . This will automatically cycle between preset cooking times and temperatures for various foods. These presets can be adjusted using the timer and temperature control buttons as required.
. This will automatically cycle between preset cooking times and temperatures for various foods. These presets can be adjusted using the timer and temperature control buttons as required.
Light ButtonThe cooking compartment light con be switched on at any time by pressing ![]() .
.
Using the AeroCook Pro XLSTEP 1: Plug in and switch on the AeroCook Pro XL at the mains power supply. The AeroCook Pro XL will beep and the power button will illuminate, signalling that it is being powered.STEP 2: To switch on the AeroCook Pro XL, press ![]() .STEP 3: Preheat the AeroCook Pro XL for approx. 5 minutes following the instructions in the section entitled ‘Using the Digital Control Panel’. Use the timer and temperature control buttons to increase cooking time and temperature if required.STEP 4: Place the ingredients on top of the required cooking accessory (mesh tray or baking/drip tray). Slide the cooking accessory with food into the required slot in the AeroCook Pro XL main unit.STEP 5: Gently close the cooking compartment until it clicks shut.STEP 6: Use the control panel to set the required cooking time and temperature, following the instructions in the section titled ‘Using the Digital Control Panel.’ and begin the required cooking cycle.STEP 7: Some ingredients may require moving during the cooking cycle Remove the cooking accessory containing the food by gently pulling it out from the AeroCook Pro XL main unit using heat-resistant gloves. Shake the food gently as required, then slide it back into the AeroCook Pro XL main unit and close the cooking compartment to continue cooking.STEP 8: To change the cooking preset of any time during cooking, press
.STEP 3: Preheat the AeroCook Pro XL for approx. 5 minutes following the instructions in the section entitled ‘Using the Digital Control Panel’. Use the timer and temperature control buttons to increase cooking time and temperature if required.STEP 4: Place the ingredients on top of the required cooking accessory (mesh tray or baking/drip tray). Slide the cooking accessory with food into the required slot in the AeroCook Pro XL main unit.STEP 5: Gently close the cooking compartment until it clicks shut.STEP 6: Use the control panel to set the required cooking time and temperature, following the instructions in the section titled ‘Using the Digital Control Panel.’ and begin the required cooking cycle.STEP 7: Some ingredients may require moving during the cooking cycle Remove the cooking accessory containing the food by gently pulling it out from the AeroCook Pro XL main unit using heat-resistant gloves. Shake the food gently as required, then slide it back into the AeroCook Pro XL main unit and close the cooking compartment to continue cooking.STEP 8: To change the cooking preset of any time during cooking, press ![]() once. This will pause the current cycle. Press
once. This will pause the current cycle. Press ![]() until the desired function is highlighted and then press
until the desired function is highlighted and then press ![]() once more to begin the new cooking cycle. Alternatively, press
once more to begin the new cooking cycle. Alternatively, press ![]() again to turn off the AeroCook Pro XL.STEP 9: Once cooking is complete and the preset time has elapsed, the timer will sound. Check whether the ingredients are ready by carefully opening the cooking compartment. If the ingredients are not cooked, close the cooking compartment door and use the digital control panel to adjust the cooking time accordingly. If the food is cooked, remove the cooking accessory containing the food from the cooking comportment using heat-resistant gloves, then empty the contents into a bowl or onto a plate. Use a pair of heat-resistant tongs (not included) if the food is large or fragile.
again to turn off the AeroCook Pro XL.STEP 9: Once cooking is complete and the preset time has elapsed, the timer will sound. Check whether the ingredients are ready by carefully opening the cooking compartment. If the ingredients are not cooked, close the cooking compartment door and use the digital control panel to adjust the cooking time accordingly. If the food is cooked, remove the cooking accessory containing the food from the cooking comportment using heat-resistant gloves, then empty the contents into a bowl or onto a plate. Use a pair of heat-resistant tongs (not included) if the food is large or fragile.
Note:
- Always preheat the AeroCook Pro XL before starting to cook. Alternatively, add approx. 3-5 minutes onto the cooking time.
- If the cooking time or temperature settings need to be changed during use, simply use the timer or temperature control buttons, as required.
- The AeroCook Pro XL will automatically adjust the settings.
- If the cooking compartment is opened during use, cooking will be paused.
- Close the cooking compartment to resume the cooking process.
- The AeroCook Pro XL will turn off after 2 hours if the cooking compartment has not been reinserted.
Caution: Exercise caution when opening and closing the cooking compartment during use, as it will become very hot.Warning: Nominal voltage is still present even when the AeroCook Pro XL is turned off using ![]() . To fully turn off the AeroCook Pro XL, switch off and unplug it from the mains power supply. The AeroCook Pro XL will become very hot during use; take caution to avoid injury and always place on a heat-resistant surface.
. To fully turn off the AeroCook Pro XL, switch off and unplug it from the mains power supply. The AeroCook Pro XL will become very hot during use; take caution to avoid injury and always place on a heat-resistant surface.
Using the RotisserieThe rotisserie can be used to cook large foods, such as whole chicken or meat joints. Prepare the food to be cooked by skewering it with the rotisserie bar, making sure that the bar goes through the centre of the food. Use the two rotisserie forks to hold the food in place. Put one fork on either end of the rotisserie bar with the forks pointing inwards, then use them to clamp the food securely. Tighten them into place with the tightening screws. It should be possible to rotate the rotisserie bar without the food slipping. Carefully place the larger end of the rotisserie bar into the rotating socket at the right side of the cooking compartment, then gently lower the smaller end of the rotisserie bar into the rotisserie bar bracket at the left side of the cooking comportment. The rotisserie bor should be able to spin freely in the bracket.
Note: Foods must be able to turn fully and should not rub against any side of the cooking compartment when rotating. Always use the baking/drip tray to catch any drips from foods being cooked using the rotisserie feature. Cook the foods using the instructions in the section entitled ‘Using the AeroCook Pro XL, but make sure that 0 is pressed prior to beginning the cooking cycle to guarantee even cooking. Always use the rotisserie tongs to remove hot food.
Cooking Guide
The following is a guideline for cooking certain types of foods with the AeroCook Pro XL. This is a guideline only and cooking should always be monitored.Food should always be piping hot before serving.
Potatoes and Chips
| Food | Amount | Approx. Cooking Time | Temperature | Extra Information |
| Thin frozen chips | 300-700 g | 18-20 mins | 200 °C | Shake the chips following the instructions in the section entitled ‘Using the AeroCook Pro XL’ |
| Thick frozen chips | 300-700 g | 18-20 mins | 200 °C | Shake the chips following the instructions in the section entitled ‘Using the AeroCook Pro XL’ |
| Home-made chips | 300-800 g | 20-25 mins | 220 °C | Follow the full instructions in the section entitled ‘A Step by Step Guide to Making Chips’ |
| Home-made potato wedges | 300-800 g | 20-25 mins | 220 °C | Part soak the potato wedges in water to remove the starch. add ‘A tbsp of oil and shake following the instructions in the section entitled ‘Using the AeroCook Pro XL.’ |
| Steak | 100-500 g | Well done: 20 mins Medium: 18 mins Rare: 16 mins | 200 °C | Turn over halfway through the total cooking time |
| Burgers | 100-500 g | 13-15 mins | 180 °C | Turn over halfway through the total cooking time |
| Pork chops | 100-500 g | 10-15 mins | 200 °C | Turn over halfway through the total cooking time. |
| Chicken breast | 100-500 g | 15-22 mins | 200 °C | Always check that chicken is cooked thoroughly |
| Chicken drumsticks | 100-500 g | 15-22 mins | 200 °C | Always check that chicken is cooked thoroughly |
Meat and Poultry
| Food | Amount | Approx.Cooking Time | Temperature | Extra Information |
| Steak | 100-500 g | Well done: 20 mins Medium: 18 mins Rare: 16 mins | 200 °C | Turn over halfway through the total cooking time |
| Burgers | 100-500 g | 13-15 mins | 180 °C | Turn over halfway through the total cooking time |
| Port chops | 100-500 g | 10-15 mins | 200 °C | Turn over halfway through the total cooking time |
| Chicken breast | 100-500 g | 15-22 mins | 200 °C | Always check that chicken is cooked thoroughly |
| Chicken drumstick | 100-500 g | 15-22 mins | 200 °C | Always check that chicken is cooked thoroughly |
Snack and Sides
| Food | Amount | Approx.Cooking Time | Temperature |
| Frozen chicken nuggets | 100-500 g | 6-10 mins | 200 °C |
| Spring rolls | 100-400 g | 8-10 mins | 200 °C |
| Stuffed vegetables | 100-400 g | 16-18 mins | 180 °C |
Bakes and Cakes
| Food | Amount | Approx.Cooking Time | Temperature |
| Quiche | 400 g | 20-22 mins | 180 °C |
| Cake | 300 g | 14-20 mins | 160 °C |
A Step by Step Guide to Making Chips
A Step by Step Guide to Making Chips
Home-made ChipsSTEP 1: Preheat the AeroCook Pro XL to 200 °C.STEP 2: Cut the potatoes into chips opprox. I cm wide.STEP 3: Place the chopped potatoes into o pan of cold water and bring to the boil. Parboil for opprox. 3 minutes.STEP 4: Drain the water from the potatoes and thoroughly dry with a paper towel.STEP 5: Coot the chopped potatoes with 1/2 tbsp of cooking oil or oil spray and add them to the baking/drip troy. Slide the baking/drip tray into the AeroCook Pro XL, making sure that they are fully coated for best results.STEP 6: Cook of 200 °C for 18-20 mins.STEP 7: Shake the chips regularly (approx. every 6 minutes) so that all of the chips cook evenly.STEP 8: Once cooked through and crispy, remove from the AeroCook Pro XL, season and enjoy.
Frozen ChipsSTEP 1: Preheat the AeroCook Pro XL to 200 °C.STEP 2: Add 300-700 g of frozen chips to the baking/drip fray. Slide the baking/drip troy into the AeroCook Pro XL.STEP 3: Cook at 200 °C for 12-16 minutes.STEP 4: Shake the chips regularly (approx. every 6 minutes) so that all of the chips cook evenly.STEP 5: Once cooked through and crispy, remove from the AeroCook Pro XL. season and enjoy.
StorageCheck that the XL Power Cook Pro is cool, clean and dry before storing in o cool, dry place. Never wrap the cord tightly around the XL Power Cook Pro; wrap it loosely to ovoid causing damage.
Specifications
| Product code | EK3662 |
| Input | 220-240 V – SO-60 Hz |
| Output | 2000 W |
Chicken Katsu Curry
Ingredients
2 chicken breast fillets: Panko breadcrumbs (or 2 slices of.1 egg: bread, crumbed)
For the Katsu Curry Sauce
2 garlic cloves : 2 tbsp plain flour300 ml chicken stock : 1 tbsp soy sauce1 cm fresh ginger. grated : 2 tsp honey1 tbsp medium curry powder : 1 tsp vegetable oil
Method
- To prepare the chicken, peel the garlic and zest the lemon.
- Put the crackers into a food processor with the butter. garlic, parsley, lemon zest and o pinch of salt and pepper and then process until the mixture is very fine.
- Pour these crumbs onto o plate.
- Sprinkle the flour onto o second plate, and then crack the eggs into a small bowl to beat with a fort
- Roll the chicken pieces in the flour until all sides are completely coated and then dip them into the egg, followed by the flavoured crumbs.
- Rub the crumbs onto the chicken pieces so that they stick: the chicken pieces should be totally coated.
- Preheat the air fryer to 200 °C.
- Spray the chicken pieces on all sides with ol and cook them onto the non-stick coated cooking rack for approx.
- 10-IS minutes or until cooked through, golden and crisp.
Soy and Garlic Chicken Thighs/Drumsticks
Ingredients
4 chicken thighs/drumsticks : 2 tbsp oil2 cloves of garlic. chopped finely : 1/2 tsp ground ginger3 tbsp soy sauce : 1/2 tsp Worcester sauce3 tbsp honey : Garlic salt
Method
STEP 1: Preheat the AeroCook Pro XL to 200°C for 5 minutes.STEP 2: Combine all of the ingredients, apart from the chicken thighs to create a marinade.STEP 3: Coat the chicken thighs generously in the mixture. Leave to marinate for 2-3 hours, or overnight.STEP 4: Add the chicken thighs to the baking/drip tray and cook at 200 °C for 20-25 minutes or until cooked thoroughly (depending upon the size of the thighs). Serve with mashed potatoes and/or an easy salad.
Pork Steaks with Apple
Ingredients
2 pork steaks : 1 tsp vegetable oil1 red apple : 11/2 tsp fresh rosemary1/2 red onion I tsp mustard : 1/2 tsp fresh thyme
Method
STEP 1: Preheat the AeroCook Pro XL to 200 °C for 5 minutes.STEP 2: Season the pork steaks with salt and pepper before rubbing generously with the mustard and a little oil.STEP 3: Finely slice the apple and onion. Soften in a frying pan with oil, then add the fresh herbs and turn the heat right down. Once softened, remove from the heat.STEP 4: Add the pork steaks to the baking/drip tray and cook at 200 °C for 20-25 minutes.STEP 5: Remove the pork steaks from the AeroCook Pro XL and add the apple and onion mixture to the top. Put the pork steaks back into the AeroCook Pro XL and continue to cook for a further 5 minutes.Serve with new potatoes.
Lamb Cutlets with Garlic and Rosemary
Ingredients
4 lamb cutlets: 1 tbsp fresh rosemary, chopped2 garlic cloves, chopped: 1 tbsp olive oil
Method
STEP 1: Preheat the AeroCook Pro XL to 180 °C for approx. 5 minutes.STEP 2: Combine the garlic cloves with the fresh rosemary and olive oil in a bowl to create a marinade.STEP 3: Coat the lamb cutlets generously in the mixture. Leave to marinate for 2-3 hours, or overnight.STEP 4: Add the lamb cutlets to the baking/drip tray and cook at 180 °C for 10-15 minutes or until cooked to preference.
Serve with roast potatoes and sautéed vegetables.
Sirloin Steak with Mushrooms
Ingredients
2 sirloin steaks : 250 g mushrooms : 2 tsp mustard50 ml double cream : 2 tsp garlic paste
Method
STEP 1: Preheat the AeroCook Pro XL to 180 °C for approx. 5 minutes.STEP 2: In a pan, sweat the mushrooms in vegetable oil and the garlic paste. Add the mustard and double cream and turn down to a lower heat to reduce.STEP 3: Rub pepper into the two steaks.STEP 4: Add the pork steaks to the baking/drip troy and cook at 180 °C for 20-25 minutes or until cooked to preference.Serve the steaks coated with the garlic mushroom sauce.
Sea Bass Fillets with Roasted Vegetables
Ingredients
2 seabass fillets : 2 tsp dried oregano5 cherry tomatoes : Fresh rosemary (sprig)1 red onion : Rock salt1 courgette : Lemon juice1 red pepper : Spray olive oil1 yellow pepper :
Method
STEP 1: Preheat the AeroCook Pro XL to 180 °C for approx. 5 minutes.STEP 2: Roughly chop the vegetables into similar sized pieces. The smaller the pieces, the quicker they will cook.STEP 3: Add to the baking/drip tray and spray with oil. Season with the fresh rosemary sprigs and dried oregano.STEP 4: Cook the vegetables at 180 °C for approx. 20 minutes.STEP 5: Spray the fish fillets with oil, then rub with rock salt and a lemon wedge. Add to the baking/drip tray and cook, along with the vegetables for a further 10-15 minutes until the fish is cooked thoroughly and the vegetables are starting to brown slightly.
Serve the sea bass fillet on top of the roasted vegetables.
Chips
- Par boiled – 200 ° C for 30-35 minutes.
- Not par boiled – 200 °C for 50-60 minutes.
Connection To The Mains
Please check that the voltage indicated on the product corresponds with your supply voltage.
ImportantAs the colours in the mains lead of this appliance may not correspond with the coloured markings identifying the terminals in your plug, please proceed as follows:
The wires in the mains lead are coloured in accordance with the following code:
Blue Neutral (N)Brown Live (L)Green/Yellow Earth ![]() FOR UK USE ONLY – Plug fitting details (where applicable).
FOR UK USE ONLY – Plug fitting details (where applicable).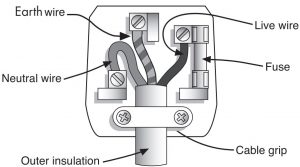
The wire coloured BLUE is the NEUTRAL and outer insulation Cable grip must be connected to the terminal marked N or coloured BLACK. The wire coloured BROWN is the LIVE wire and must be connected to the terminal marked L or coloured RED. The wire coloured GREEN/YELLOW must be connected to the terminal marked with the letter E or marked ![]() On no account must either the BROWN or the BLUE wire be connected to the EARTH terminal
On no account must either the BROWN or the BLUE wire be connected to the EARTH terminal ![]() . Always ensure that the cord grip is fastened correctly. The plug must be fitted with a fuse of the same rating already fitted and conforming to BS 1362 and be ASTA approved. If in doubt, consult o qualified electrician who will be pleased to do this for you.
. Always ensure that the cord grip is fastened correctly. The plug must be fitted with a fuse of the same rating already fitted and conforming to BS 1362 and be ASTA approved. If in doubt, consult o qualified electrician who will be pleased to do this for you.
Non-Rewireable Mains Plug
If your appliance is supplied with a non-rewireable plug fitted to the mains lead and should the fuse need replacing, you must use an ASTA approved one (conforming to BS 1362 of the same rating). If in doubt, consult a qualified electrician who will be pleased to do this for you. If you need to remove the plug, DISCONNECT IT FROM THE MAINS, then cut it off the mains lead and immediately dispose of it safely. Never attempt to reuse the plug or insert it into a socket outlet as there is a danger of an electric shock.
To be eligible for the extended guarantee, go to www.saltercookshop.com and register your product within 30 days of purchase.
Find us on ![]()
www.facebook.com/SalterCookshop.
Manufactured by
UP Global Sourcing UK LTD.,Victoria Street,Manufacture OL9 0DD. UK.
Made in China.
DOWNLOAD RESOURCES
- [pdf] User Manual Digital Air Fry
- Read more:
FAQ’S
The fryer is very easy to clean. Just wipe it with a damp cloth or sponge and then dry it off with a dry cloth.
The digital air fryer has a digital timer and temperature controls. The air fryer does not have these features, but both are similar in design and function.
If your air fryer is not heating up, you may need to replace the heating element. If you are unsure how to fix your air fryer, you can contact customer service for assistance.
If your food is not cooking evenly, there may be an issue with your heating element. You can contact customer service for assistance if you are unsure how to fix your air fryer.
Cooking time will vary depending on what you are cooking, but most foods should be ready in about 20 minutes or less.
Yes, and you should be using oil in some capacity for almost 75% of what you cook.
Air fryers are much more energy-efficient than most convection ovens because they cook food much faster, though they do use electricity which is typically more expensive than gas.
air frying pizza is a game changer. Not only does the pizza cook more quickly, but you get that perfectly crispy bottom crust that can be difficult to achieve in a traditional oven.
Turning off or Pausing the Air Fryer. Push the On/Off button to turn off the air fryer immediately. If your air fryer is already turned on or you’re already cooking with it, pressing the off button will clear all of the settings and turn off the fryer.
To make a factory reset on your Airfryer and delete all information regarding usage or Wifi, press temperature up button and time up button simultaneously for about 10sec.
Check that the basket is properly attached and the airy fryer door is closed completely. Try rebooting the air fryer to see if it turns on. If these steps don’t work, it’s possible the air fryer may have a blown fuse that needs to be replaced.
10 Downsides of Air FryersLimited Capacity.Easy to Burn Food.Food Dries Out.Some Foods Don’t Work.Difficult to Clean.Less Affordable.Requires Learning.Noisy.
Video
[xyz-ips snippet=”download-snippet”]