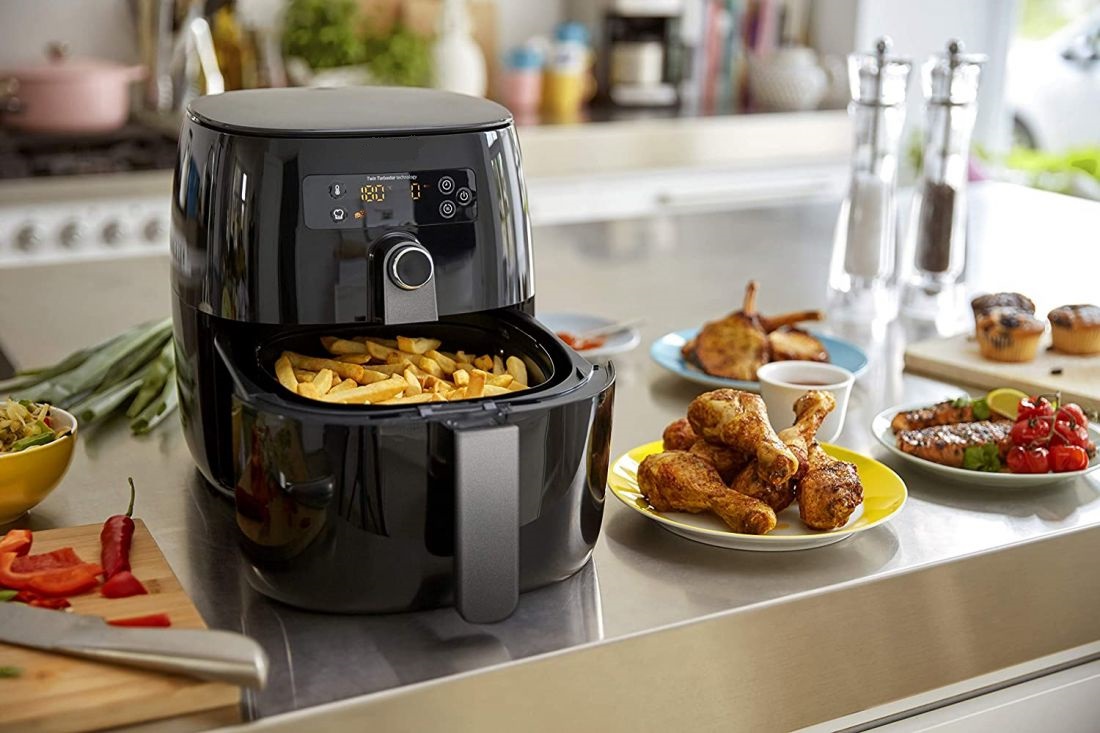
SALTER Health Fryer

Please read all of the instructions carefully and retain for future reference.
Safety Instructions
- When using electrical appliances, basic safety precautions should always be followed.
- Check that the voltage indicated on the rating plate corresponds with that of the local network before connecting the appliance to the mains power supply.
- Children aged from 8 years and people with reduced physical, sensory or mental capabilities or lack of experience and knowledge can use this appliance, only if they have been given supervision or instruction concerning use of the appliance in a safe way and understand the hazards involved.
- Children should be supervised to ensure that they do not play with the appliance.
- Unless they are older than 8 and supervised, children should not perform cleaning or user maintenance.
- This appliance is not a toy.
- This appliance contains no user serviceable parts. If the power supply cord, plug or any part of the appliance is malfunctioning or if it has been dropped or damaged, only a qualified electrician should carry out repairs. Improper repairs may place the user at risk of harm.
- Keep the appliance and its power supply cord out of the reach of children.
- Keep the appliance and its power supply cord away from heat or sharp edges that could cause damage.
- Keep the power supply cord away from any parts of the appliance that may become hot during use.
- Keep the appliance away from other heat emitting appliances. Do not immerse the appliance in water or any other liquid. Do not operate the appliance with wet hands.
- Do not leave the appliance unattended whilst connected to the mains power supply.
- Do not remove the appliance from the mains power supply by pulling the cord; switch it off and remove the plug by hand. Do not use the appliance for anything other than its intended use.
- Do not use any accessories other than those supplied.
- Do not use this appliance outdoors.
- Do not store the appliance in direct sunlight or in high humidity conditions.
- Do not move the appliance whilst it is in use.
- Do not touch any sections of the appliance that may become hot or the heating components of the appliance, as this could cause injury.
- Do not use sharp or abrasive items with this appliance; use only heat-resistant plastic or wooden spatulas to avoid damaging the non-stick surface.
- Always unplug the appliance after use and before any cleaning or user maintenance.
- Always ensure that the appliance has cooled fully after
- use before performing any cleaning or maintenance or storing away.
- Always use the appliance on a stable, heat-resistant surface, at a height that is comfortable for the user.
- Use of an extension cord with the appliance is not recommended. This appliance should not be operated by means of an external timer or separate remote control system, other than that supplied with this appliance.
- This appliance is intended for domestic use only. It should not be used for commercial purposes.
- The door or the outer surface of the appliance may get hot during operation.
Caution: Hot surface – do not touch the hot section or heating components of the appliance.Take care not to pour water on the heating element.Warning: Keep the appliance away from flammable materials.
Automatic Switch-off
The Health Fryer is fitted with an automatic switch-off. This may activate if:
- The set cooking time has elapsed. The timer will sound and the automatic switch-off will activate, turning off the Health Fryer.
- The cooking compartment is pulled out from the Health Fryer during cooking. In this case, the timer will continue counting down until the set cooking time has elapsed.
Note: If the Health Fryer needs to be turned off before the set cooking time has elapsed, turn the temperature control dial to ‘O’ and allow the timer to count down naturally.
Dos and Don’ts
Do:Check that the non-stick coated cooking basket is securely fitted before use. Not doing so may prevent the Health Fryer from operating.Only hold the cooking compartment by the cooking basket handle.Take care when removing the non-stick coated cooking basket, as steam may be emitted.Don’t:Invert the non-stick cooking basket with the cooking compartment still attached, as excess oil may collect at the bottom of the cooking compartment and could leak into the ingredients.Cover the Health Fryer or its air inlets, as this will disrupt the airflow and could affect the frying results.Fill the cooking compartment with oil or any other liquid. Press the non-stick coated cooking basket release button whilst shaking the ingredients.Touch the cooking compartment during or straight after use, as it gets very hot and could emit steam; only hold the cooking compartment by the handle.Turn the timer control dial in an anticlockwise direction, as this will damage its accuracy.
Care and Maintenance
Before attempting any cleaning or maintenance, the temperature control dial must be in the off position (0) and the Health Fryer must be unplugged from the mains power supply and allowed to fully cool.STEP 1: Wipe the Health Fryer main unit with a soft, damp cloth and dry thoroughly.STEP 2: Clean the accessories in warm, soapy water, then rinse and dry thoroughly.Do not immerse the Health Fryer main unit in water or any other liquid.Never use harsh or abrasive cleaning detergents or scourers to clean the Health Fryer or its accessories, as this could cause damage.
Note: The Health Fryer should be cleaned after each use.
Getting Started
Remove the appliance from the box.Remove any packaging from the appliance.Place the packaging inside the box and either store or dispose of safely.
In the BoxHealth Fryer main unitCooking compartmentRemovable, non-stick coated cooking basketInstruction manual
Features3.2 litre capacityRemovable, non-stick coated cooking basket30-minute timerAutomatic switch-offCooks healthy meals with hot air circulation
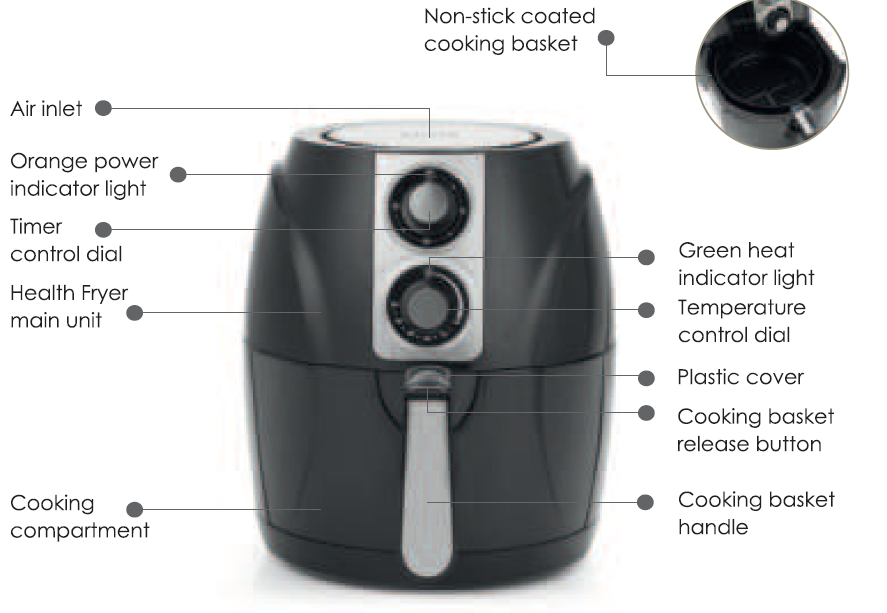
Description of Parts
Introduction
A healthier way to fry without losing any of the flavour, the Health Fryer is extremely versatile and is a perfect alternative to low fat cooking. Utilising hot air, it cooks delicious food using little or no oil, meaning treats can still be enjoyed even when leading a healthy lifestyle.
Instructions for Use
Before First Use
STEP 1: Switch off and unplug the Health Fryer from the mains power supply.STEP 2: Wipe the Health Fryer main unit with a soft, damp cloth and dry thoroughly.STEP 3: Clean the accessories in warm, soapy water, then rinse and dry thoroughly. Do not immerse the Health Fryer main unit in water or any other liquid. Never use harsh or abrasive cleaning detergents or scourers to clean the Health Fryer or its accessories, as this could cause damage.STEP 4: Place the Health Fryer main unit onto a stable, heat-resistant surface, at a height that is comfortable for the user.
Note: When using the Health Fryer for the first time, a slight smoke or odour may be emitted. This is normal and will soon subside. Ensure that there is sufficient ventilation around the Health Fryer. It is advised to run the Health Fryer without food for approx. 10 minutes before first use; this will prevent the initial smoke or odour from affecting the taste of the food.
Assembling the Health Fryer
STEP 1: Fit the non-stick coated cooking basket into the cooking compartment, until it is secure.STEP 2: Slide the cooking compartment inside the Health Fryer main unit to close it.
Note: The cooking compartment must be closed securely before use, as not doing so could prevent the Health Fryer from working.
Using the Health Fryer
STEP 1: Plug in and switch on the Health Fryer at the mains power supply.STEP 2: To switch on the Health Fryer, turn the temperature control dial to the required heat setting.STEP 3: Preheat the Health Fryer for approx. 3-5 minutes by turning the timer control dial to the corresponding time setting. The orange power and green heat indicator lights will illuminate, signaling that the Health Fryer has been switched on and is heating up. When the Health Fryer reaches the required temperature, the green heat indicator light will turn off.STEP 4: Remove the cooking compartment by pulling the cooking basket handle out of the Health Fryer. Ensure that the plastic cover is concealing the cooking basket release button, taking care not to release the hot non-stick coated cooking basket. STEP 5: Place the ingredients into the non-stick coated cooking basket and then slide the cooking compartment inside the Health Fryer main body to close it.STEP 6: Turn the temperature control dial to the required heat setting.STEP 7: Determine the cooking time required for the ingredients and use the timer control dial to set it accordingly; the timer will begin to count down once set.STEP 8: Some ingredients may require shaking halfway through the cooking time. Remove the cooking compartment by pulling the cooking basket handle out of the Health Fryer. The plastic cover must be concealing the cooking basket release button; take care not to release the hot non-stick coated cooking basket by pressing the cooking basket release button. Shake the cooking compartment gently, slide it back inside the Health Fryer main unit to close it and continue to cook.STEP 9: Once cooking is complete and the set time has elapsed, the timer will sound. Using the cooking basket handle, carefully pull the cooking compartment out from the Health Fryer main unit. Check whether the ingredients are ready by carefully opening the cooking compartment. If the ingredients are not cooked, replace the cooking compartment and use the timer control dial to adjust the cooking time accordingly.STEP 10: When the food is cooked, empty the contents into a bowl or onto a plate, using a pair of heat-resistant tongs (not included) if the food is large or fragile.
Note: Always preheat the Health Fryer before starting to cook. During use, the green heat indicator will cycle on and off to signal that it is maintaining the selected temperature.
Caution: Do not tip the food directly into a bowl or onto a plate, as excess oil may collect at the bottom of the cooking compartment and could leak onto the ingredients. Exercise caution when opening and closing the cooking compartment during use, as it will get very hot.Warning: Nominal voltage is still present even when the thermostat is turned to the off position, to permanently switch off the Health Fryer, ensure it is turned off from the mains power supply.
Using the Non-Stick Coated Cooking Basket
The non-stick coated cooking basket is removable for ease of cleaning.STEP 1: To remove the non-stick coated cooking basket from the cooking compartment, push forward the plastic cover on the handle to reveal the cooking basket release button.STEP 2: Press and hold the cooking basket release button and carefully lift the handle to release the non-stick coated cooking basket from the Health Fryer main unit.STEP 3: Replace the non-stick coated cooking basket by fitting it into the cooking compartment, until it is secure.STEP 4: Slide the plastic cover back into position, so that it conceals the cooking basket release button.
Note: Do not use the Health Fryer without the non-stick coated cooking basket; ensure that it is properly and securely fitted before turning on the Health Fryer.Warning: Never press the handle release button if the cooking compartment is elevated, as this could cause injury; only press it once the cooking compartment has been placed onto a flat, stable surface.
Cooking Guide
The following is a guideline for cooking certain types of foods with the Health Fryer. This is a guideline only and cooking should always be monitored.
Potatoes and Chips
| Food | Amount | Approx. Cooking Time | Temperature | Extra Information |
| Thin frozen chips | 300-700g | 12-16mins | 200°c | Shake the chips following the instructions in the
section entitled ‘Using the Health Fryer’. |
| Thick frozen chips | 300-700g | 12-16mins | 200°c | Shake the chips following the instructions in the section entitled ‘Using the Health Fryer’. |
| Home-made chips | 300-800g | 18-25mins | 200°c | Follow the instructions in the section entitled ‘A Step to Step Guide to
Making Chips’. |
| Home-made potato wedges | 300-800g | 20-25mins | 180°C | Part soak the potato wedges in water, then add
½ tbsp of oil and shake following the instructions in the section entitled ‘Using the Health Fryer’. |
Meat and Poultry
| Food | Amount | Approx. Cooking Time | Temperature |
| Steak | 100-500g | 14-25mins | 200°C |
| Hamburger | 100-500g | 15-20mins | 180 °C |
| Pork chops | 100-500g | 18-22mins | 200°C |
| Chicken breast | 100-500g | 15 -22mins | 200°C |
| Chicken drumsticks | 100-500g | 15-22mins | 200°C |
Snacks and Sides
| Food | Amount | Approx. Cooking Time | Temperature |
| Frozen chicken nuggets | 100-500g | 6-10mins | 200°c |
| Spring rolls | 100-400g | 10-12mins | 200°c |
| Stuffed vegetables | 100-400g | 12-15mins | 160°C |
Bakes & Cakes
| Food | Amount | Approx. Cooking Time | Temperature |
| Quiche | 400 g | 20-22 mins | 180°C |
| Cake | 300 g | 12-15 mins | 160°C |
| Muffins | 300 g | 10-12 mins | 200°c |
A Step by Step Guide to Making Chips
Home-made Chips
STEP 1: Preheat the Health Fryer to 200 °C.STEP 2: Cut the potato into chips, approx. 1 cm wide.STEP 3: Place the chopped potatoes into a bowl of water and soak for approx. 30 minutes to remove the starch.STEP 4: Rinse the chopped potatoes with cold water using a colander. Dry thoroughly using kitchen towel.STEP 5: Coat the chopped potatoes with ½ tbsp of cooking oil or oil spray and add them to the cooking basket. Ensure they are fully coated for best results.STEP 6: Cook at 200 °C for 18-25 minutes.STEP 7: Ensure to shake the chips regularly (approx. every 6 minutes) to ensure that all of the chips cook evenly.STEP 8: Once cooked through and crispy, remove from the Health Fryer, season and enjoy.
Frozen Chips
STEP 1: Preheat the Health Fryer to 200 °C.STEP 2: Add 300-700 g of frozen chips into the cooking basket.STEP 3: Cook for 12-16 minutes.STEP 4: Ensure to shake the chips regularly (approx. every 6 minutes) to ensure that all of the chips cook evenly.STEP 5: Once cooked through and crispy, remove from the Health Fryer, season and enjoy.
Storage
Check that the Health Fryer is cool, clean and dry before storing in a cool, dry place. Never wrap the cord tightly around the Health Fryer; wrap it loosely to avoid causing damage.
Specifications
Product code : EK2328BMFOBInput: 220-240 V – 50/60 HzOutput : 1200-1400 W
RECIPES
Chicken Nuggets
Ingredients:12 cream orplain crackers2 skinless chicken breast fillets,cut into 2-3 cm pieces2 garlic cloves (optional)2 medium eggs1 lemon (optional)2 tbsp butter2 tbsp dry parsley or 4 sprigsfresh parsley (optional)2 tbsp plain flourSalt and pepper, to taste
Method: Preheat the Health Fryer to 200 °c.To prepare the chicken, peel the garlic and zest the lemon. Put the crackers into a food processor with the butter, garlic, parsley, lemon zest and a pinch of salt and pepper, then process until the mixture is very fine. Pour these crumbs onto a plate.Sprinkle the flour onto a second plate, then crack the eggs into a small bowl and beat with a fork. Roll the chicken pieces in the flour until all sides are completely coated, then dip them into the egg, followed by the flavoured crumbs. Rub the crumbs onto the chicken pieces so that they stick; the chicken pieces should be totally coated.Spray the chicken pieces on all sides with oil and cook them in the non-stick coated cooking basket for approx. 10-15 minutes or until cooked through, golden and crisp.
Breaded Fish Fillets
Ingredients:200 g cod fillets/loins(even in size for the best cooking results)75 g breadcrumbs1 egg, beaten4 tbsp plain flour2 tbsp Parmesan cheese BasilVegetable oilSalt and pepper, to taste
Method: Preheat the Health Fryer to 190 °c.Add some plain flour to a medium sized bowl and coat the cod fillets in the flour.In another bowl, mix together the breadcrumbs, Parmesan and basil and then add salt and pepper to taste. Dip the fillets into the egg, then coat the fish in the breadcrumb mixture. Spray the fish with oil on all sides, then place the fillets into the non-stick coated cooking basket and cook for approx. 15-20 minutes or until golden brown.
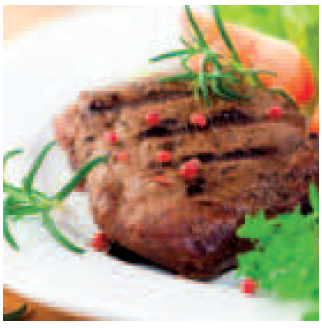
Peppercorn Steak
Ingredients:200 g sirloin steak(1.5 cm-2.5 cm thick)50 g unsalted butter2 shallots, finely diced100 ml beef stock2 tbspWorcestershire sauce2 tbsp brandy2 tbsp double cream1 tbsp Dijon mustard1 tbsp olive oil1 tbsp green peppercorns Black and white peppercorns, to taste Salt and pepper, to taste
Method: Preheat the Health Fryer to 200 °C.Dry the steaks with kitchen paper and press the black and white peppercorns into both sides. Cover with foil or plastic film and then refrigerate for approx. 2-3 hours.When ready to cook, place the steak into the non-stick coated cooking basket and cook for approx. 14-25 minutes. Turn the steak halfway through to caramelise on both sides. Meanwhile, make the sauce.Heat the oil and butter in a frying pan and cook the shallots over a medium heat, until soft. Add the Worcestershire sauce, brandy and stock to the frying pan. Cook rapidly, scraping the bottom of the pan to incorporate the flavours. Add the green peppercorns, mustard and cream, then season to taste.Remove the meat from the Health Fryer, slice it diagonally and add the meat to the sauce. Stir to combine the meat juices with the peppercorn sauce and to warm the meat through.
Roasted Vegetables
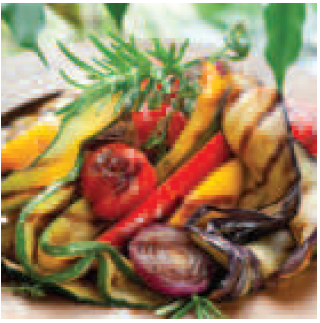
Ingredients:12 cherry tomatoes on the vine10 garlic cloves, left whole with skins still on4 small new potatoes,not peeled3 large chestnut mushrooms, quartered2 white onions, quartered1 red, 1 green, 1 yellow pepper, deseeded and thickly sliced1 courgette, sliced at an angle2 tbsp olive oil1 tsp mixed herbsSalt and pepper, to taste
Method: Preheat the Health Fryer to 200 °c.Place all of the ingredients into a large, round dish or bowl, coated in olive oil. Season to taste and then sprinkle on the mixed herbs. Place into the non-stick coated cooking basket and cook for approx. 25-30 minutes. Stir halfway through to ensure that all of the vegetables are cooked through.Note: Alternatively, the ingredients can be place directly into the non-stick coated cooking basket.
Connection To The Mains
Please check that the voltage indicated on the product corresponds with your supply voltage.
Important:As the colours in the mains lead of this appliance may not correspond with the coloured markings identifying the terminals in your plug, please proceed as follows: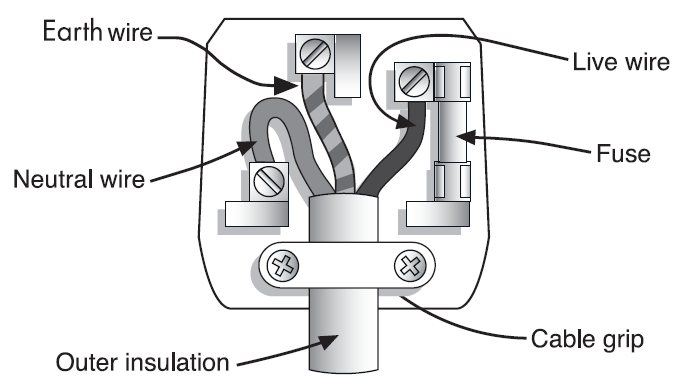 The wires in the mains lead are coloured in accordance with the following code:
Blue Neutral (N)Brown Live (L)Green/Yellow Earth (-=4=-)
The wire coloured BLUE is the NEUTRAL andmust be connected to the terminal marked N or coloured BLACK.The wire coloured BROWN is the LIVE wire and must be connected to the terminal marked Lor coloured RED.The wire coloured GREEN/YELLOW must be connected to the terminal marked with the letter E or marked -=4=-.On no account must either the BROWN or the BLUE wire be connected to the EARTH terminal (-=4=-).Always ensure that the cord grip is fastened correctly.The plug must be fitted with a fuse of the same rating already fitted and conforming to BS 1362 and be ASTA approved.If in doubt, consult a qualified electrician who will be pleased to do this for you.
Non-Rewireable Mains PlugIf your appliance is supplied with a non-rewireable plug fitted to the mains lead and should the fuse need replacing, you must use one that is ASTA approved one ( conforming to BS 1362 of the same rating).If in doubt, consult a qualified electrician who will be pleased to do this for you.If you need to remove the plug, DISCONNECT IT FROM THE MAINS, then cut it off the mains lead and immediately dispose of it safely. Never attempt to reuse the plug or insert it into a socket outlet as there is a danger of an electric shock.
UP Global Sourcing UK Ltd.,Victoria Street, Manchester OL9 ODD. UK.If this product does not reach you in an acceptable condition please contact our Customer Services Department by one of the following methods:
Telephone: 0161 934 2240**Telephone lines are open Monday-Friday, 9 am-5 pm (Closed Bank Holidays)Email: [email protected]Fax: 0161 628 2126
Please have your delivery note to hand as details from it will be required.
If you wish to return this product, please return it to the retailer from where it was purchased with your receipt (subject to their terms and conditions).
Guarantee
All products purchased as new carry a manufacturer’s guarantee; the time period of the guarantee will vary dependent upon the product. Where reasonable proof of purchase can be provided, Salter will provide a standard 12 month guarantee with the retailer from the date of purchase. This is only applicable when products have been used as instructed for their intended, domestic use. Any misuse or dismantling of products will invalidate any guarantee.
Under the guarantee, we undertake to repair or replace free of any charge any parts found to be defective. In the event that we cannot provide an exact replacement, a similar product will be offered or the cost refunded. Any damages from daily wear and tear are not covered by this guarantee, nor are consumables such as plugs, fuses etc.
Please note that the above terms and conditions may be updated from time to time and we therefore recommend that you check these each time you revisit the website.Nothing in this guarantee or in the instructions relating to this product excludes, restricts or otherwise affects your statutory rights.
The crossed out wheelie bin symbol on this item indicates that this appliance needs to be disposed of in an environmentally friendly way when it becomes of no further use or has worn out. Contact your local authority for details of where to take the item for recycling.

Manufactured by:UP Global Sourcing UK Ltd., Victoria Street, Manchester OL9 ODD. UK.Made in China.
[xyz-ips snippet=”download-snippet”]