Samsung Galaxy S9 Phone Setup and Basics
About your phone
NOTE: Devices and software are constantly evolving—the screen images and icons you see here are for reference only.
Setting up your phone
Your phone already has a SIM card installed.
Optional: Insert the microSD card
- With the screen facing up, insert the tool that came with your phone into the hole on the SIM/microSD™ card tray to open it.
- Carefully slide out the tray.
- Insert the microSD card into the tray with the gold contacts facing down (as shown).
- Carefully slide the tray back into place.
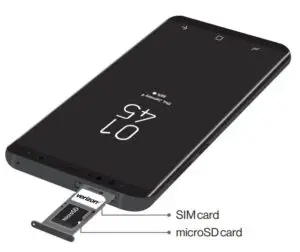
NOTE: MicroSD card sold separately.
Charge the Phone
Before turning on your phone, charge it fully.
Your phone comes with an Adaptive Fast Charging charger and a USB cable. Plug the smaller end of the cable into the USB/charger port on your phone and the larger end into the charger. Then plug the charger into an electrical outlet.

CAUTION: Use only charging devices that are approved by Samsung. Samsung accessories are designed for your device to maximize battery life. Using other accessories may void your warranty and may cause damage.
Using your phone
Turning your phone on/offTo turn your phone on, press and hold the
Power/Lock button.To turn your phone off, press and hold the Power/Lock button and follow the prompts.
Locking/Unlocking the screenTo turn on your screen, press the Power/Lock button and then swipe on the screen to unlock it.
To turn off your screen and prevent accidental key presses, press the Power/Lock button.
For added security, choose one of these other locking features:
- Intelligent Scan: Use both your face and irises to unlock your phone.
- Fingerprint Scanner: Use your fingerprint to unlock your phone.
- Face Lock: Have your phone unlock when it recognizes your face.
- Iris Scanner: Use your eyes to unlock your phone.
 From the Home screen, swipe up for Apps and then tap Settings > Lock screen and security and choose your screen lock type. Then follow the onscreen instructions.
NOTE: The Iris Scanner is not intended to be used as a medical device and the biometric data collected and stored locally by the mechanism is not intended to be used for any diagnostic, therapeutic, or preventative purposes. Please follow all instructions for use of this feature. For more information, refer to the online support content or visit: Samsung.com/US/IrisScanner.
Home screen mode
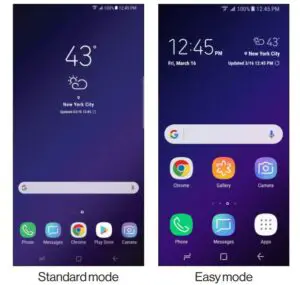
You can select one of the two modes: Easy or Standard. Instructions in this guide are written using Standard mode.
Standard mode is for users who are familiar with Android™.
Easy mode is a simplified experience for the first-time smartphone user.
 From the Home screen, swipe up for Apps and then tap Settings > Display > Easy mode.
- Choose the mode you want to use and tap APPLY.
Edge screens
Edge screens deliver always-on access to text, email, notifications, news, and more.
To choose which Edge screen you want to use and customize the information it displays:
 From the Home screen, swipe up for Apps and then tap Settings > Display > Edge screen.

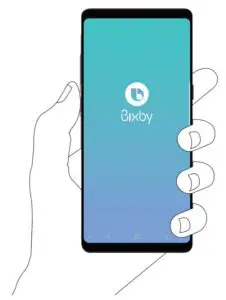
Hello Bixby
To launch Hello Bixby, press the Bixby button.
Hello Bixby allows you to quickly set reminders, create voice dictation, search and access content on your phone and on the Internet.
Apps
Find new apps to download and install on your device.
 Play Store: Download new apps from the Google Play store.Visit Play.Google.com/Store/Apps to learn more.
 Galaxy Apps: view and download Samsung apps that are optimized for use with Galaxy devices. Visit samsung.com/us/support/owners/app/galaxy-apps to learn more.
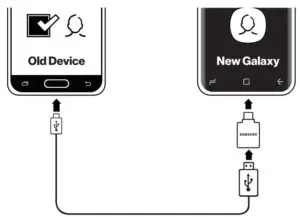
Copying content from your old phoneFor help transferring contacts, photos, and other content from your old phone, visit verizonwireless.com/Cloud.
Or, transfer content using Smart Switch and the USB connector that came with your phone.
 From the Home screen, swipe up for Apps and then tap Settings > Accounts > Smart Switch.
Learning more

Managing your account

Additional information
Your wireless device and third-party servicesVerizon Wireless is the mobile carrier associated with this wireless device, but many services and features offered through this device are provided by or in conjunction with third parties. Verizon Wireless is not responsible for your use of this device or any non-Verizon Wireless applications,services and products, including any personal information you choose to use, submit or share with others. Specific third-party terms and conditions, terms of use and privacy policies apply. Please review carefully all applicable terms, conditions and policies prior to using this wireless device and any associated application, product or service.
Hearing aid compatibility informationThis phone has been tested and rated for use with hearing aids for some of the wireless technologies that it uses. However, there may be some newer technologies thathave not been tested yet for use with hearing aids. It is important to try the different features of this phone thoroughly and in different locations, using your hearing aid or cochlear implant, to determine if you hear any interfering noise. Ask your service provider or the manufacturer of this phone for information on hearing aid compatibility. If you have questions about return or exchange policies, ask your service provider or phone retailer.
Samsung and Galaxy S9 and Galaxy S9+ are trademarks of Samsung Electronics Co., Ltd. Android, Google, the Google logo and Google Play are trademarks of Google LLC. Screen images simulated. Appearance of device may vary.
© 2018 Verizon Wireless. All Rights Reserved.
Read More About This Manual & Download PDF:
Samsung Galaxy S9 Phone Setup and Basics – Samsung Galaxy S9 Phone Setup and Basics –
Questions about your Manual? Post in the comments!
[xyz-ips snippet=”download-snippet”]

