![]()
Samsung SSDData Migration v.4.0

Copyright © 2020SAMSUNG ELECTRONICS CO., LTD.
- This user manual is copyrighted by Samsung Electronics. Any unauthorized reproduction, use, or disclosure of this material, or any part thereof, is strictly prohibited and is a violation of copyright law. Samsung Electronics reserves the right to change products, information, and specifications without notice.The material and information provided in this publication are considered to be accurate and reliable at the time of publication, but Samsung Electronics does not warrant the accuracy, completeness, or reliability, either expressed or implied, with any material or information provided herein.
- Trademarks & Service MarksThe Samsung Logo is the trademark of Samsung Electronics. Adobe and Adobe Acrobat have registered trademarks of Adobe Systems Incorporated. All other company and product names may be trademarks ofthe respective companies with which they are associated.
- Introduction
- The Samsung Data Migration software is designed to help you migrate all of your data quickly, easily, and safely from your existing storage device (e.g. HDD) to a new Samsung SSD.With the Samsung Migration software, you can easily migrate your current operating system, application software, and user data to your new Samsung SSD.Samsung Data Migration software is developed and distributed by Clonix Co., Ltd. exclusively for owners of Samsung Solid State Drives (SSDs).
- Precautions
- When the content of the Source Drive (e.g. HDD) is cloned using this software, all data on the Target Drive (Samsung SSD) will be deleted and will be impossible to recover. Therefore, if you have stored any data that you would like to keep on the Target Drive, please back it up in advance.
- Samsung Electronics assumes no responsibility for any loss of data that may occur on the Target Drive in the course of using this software and will not be held liable for data recovery services. Even if the cloning fails, data stored on the Source Drive will not be affected.
- If you are cloning the Source Drive to the Target Drive (Samsung NVMe SSD) using this software, make sure that you install the Samsung NVMe Driver first.
Improvements
- Support for new models
- Improvements to the cloning compatibility
System Requirements
| Component | Minimum Requirement |
|
Operating System |
Windows 7 SP1 (32/64 bit) |
| Windows 8 (32/64 bit) | |
| Windows 8.1 (32/64 bit) | |
| Windows 10 (32/64 bit) | |
| PC Memory (RAM) | 1 GB or more |
| Drive Space Required for
Installation |
100 MB or more |
| Supported Partition Type | MBR, GPT |
| Supported Language | English |
| Minimum Resolution | 1600×900 |
| Source Drive | HDD or SSD with a supported operating system
installed |
|
Target Drive (Samsung SSD) |
Samsung SSD 980 PRO Series |
| Samsung SSD 970 PRO Series | |
| Samsung SSD 970 EVO Series | |
| Samsung SSD 970 EVO Plus Series | |
| Samsung SSD 960 PRO Series | |
| Samsung SSD 960 EVO Series | |
| Samsung SSD 950 PRO Series | |
| Samsung SSD 870 EVO Series | |
| Samsung SSD 870 QVO Series | |
| Samsung SSD 860 EVO Series | |
| Samsung SSD 860 PRO Series | |
| Samsung SSD 860 QVO Series | |
| Samsung SSD 850 EVO Series | |
| Samsung SSD 850 PRO Series | |
| Samsung SSD 840 EVO Series | |
| Samsung SSD 840 Series | |
| Samsung SSD 840 PRO Series | |
| Samsung SSD 830 Series | |
| Samsung SSD 470 Series |
Limitations
- This software supports the Windows operating systems listed in the User Manual only.
- This software supports the Samsung SSDs listed in the User Manual only. OEM storage devices provided through a computer manufacturer or supplied through another channel are not supported.
- This software can only clone a Source Drive on which an operating system has been installed. It cannot clone a drive without an operating system installed on it.
- When the Source Drive has two or more volumes (e.g. volumes to which drive letters, such as C:, D:, or E:, are assigned), this software can clone the C: volume on which an operating system is installed and two more volumes. The System Reserved Partition, which is created automatically during Windows installation, is cloned automatically.
- The OEM Partition, which is created by the computer manufacturer when shipped from the factory, is not cloned. However, it will be automatically closed if the computer manufacturer is Samsung and SRS (Samsung Recovery Solution) 5, SRS 6, or SRS 7 has been installed. (Versions lower than SRS 5 are not supported.)
- After cloning the Source Drive to the Target Drive, their data sizes may differ by a few gigabytes. This is normal. During cloning, the software does not copy virtual memory (page files, hibernation files, etc.) automatically created and managed by the operating system.
- This software cannot clone encrypted drives. In order to clone an encrypted drive, you must remove its password first.
- If the motherboard chipset drivers are not up to date when cloning, this software may not function properly.
- If you have multiple operating systems installed on your computer (e.g. Windows 7 installed on the C: volume and Windows 8 installed on the D: volume), then the cloned drive may not function properly in some cases.
- If the Source Drive is damaged (e.g. it has bad sectors), then the cloned drive may not function properly.
- Before attempting to clone a drive using this software, it is recommended that you close all open programs and allocate sufficient memory first.
- If you have instant recovery software installed on your computer, then this software may not function properly.
- If the Source Drive has been converted to a dynamic disk, then the software may not function properly.
- The Program Files, Windows, and Recycle Bin folders will not be displayed when scanning for files to exclude from cloning.
- If the Target Drive is a Samsung NVMe SSD and it does not have the Samsung NVMe Driver installed on it, then this software may not function properly.
- If a portable device (e.g. an external USB device) is connected to the Target Drive for cloning, then this software may not function properly because of the USB adapter.
- If the OS version installed in the original drive does not support the GPT partition and when it is
duplicated in a drive exceeding 2TB, the MBR partition type will be applied to the duplicated drive. As MBR does not support large drives, the space exceeding 2TB will remain unallocated.
User Guide
If the amount of data saved on the Source Drive is smaller than the capacity of the Target DriveSTEP 1. Start migration
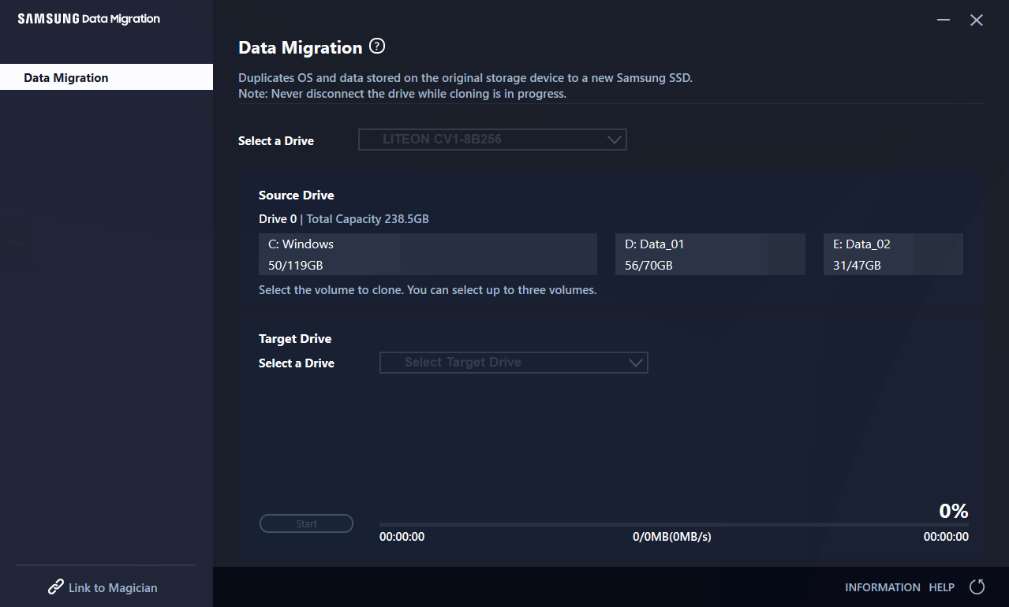
STEP 2. Connect and select your Target Drive
- Connect your Target Drive.
- Click the Refresh button so that the Target Drive can be recognized. Once the Target Drive is successfully connected, you can select the Target Drive on the screen.
- Select your Target Drive.
When connecting an mSATA SSD, you may need an additional mSATA/SATA converter (connector) or mSATA/USB converter (connector).When connecting an NVMe or M.2 SSD, you may need an additional M.2 PCIe/USB converter (connector).
STEP 3. If the Source Drive has two or fewer volumes apart from the C: volume and if you also wish to clone those additional volumes to the Target Drive, then proceed to STEP 4.If the Source Drive has three or more volumes apart from the C: volume and if you also wish to clone those additional volumes to the Target Drive, then proceed to STEP 5.If you only wish to clone the Source Drive C: volume to the Target Drive, then proceed to STEP 6.
STEP 4. Select the volume(s) that you wish to clone (If the Source Drive has two or fewer volumes apart from the C: volume and if you also wish to clone those additional volumes to the Target Drive).
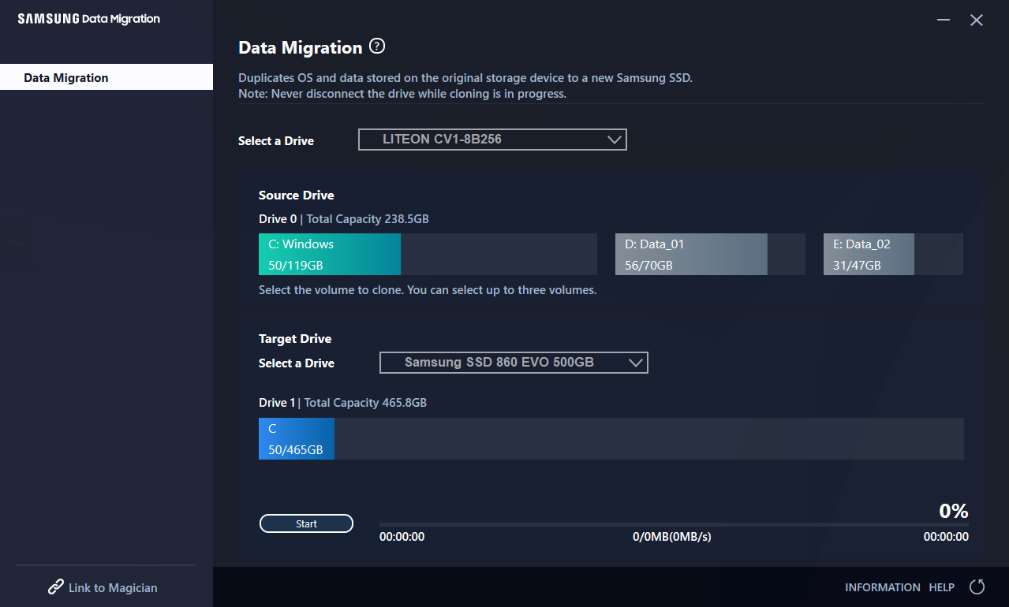
Select all the volumes that you wish to clone additionally from the Source Drive pane using the mouse.You can select up to three volumes including the C: volume.
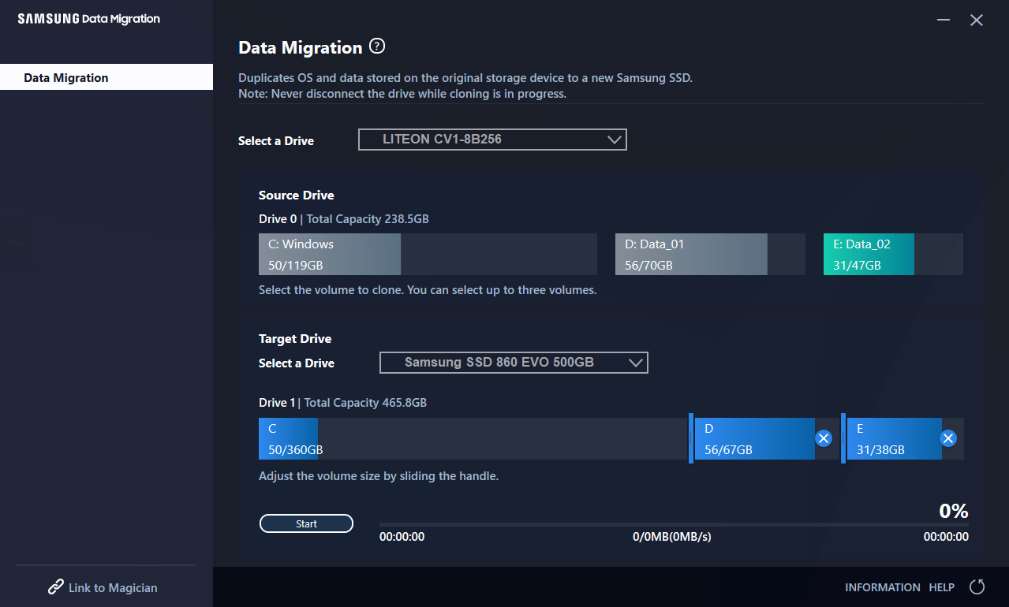
Adjust the capacity of each volume in the Target Drive pane using the slide bar.If you wish to delete any of the volumes that you have added, click the [X] icon for the relevant volumes in the Target Drive pane.When you add a volume, its minimum added capacity is 20 GB or more.
STEP 5. Select the volume(s) that you wish to clone (If the Source Drive has three or more volumes apart from the C: volume and if you also wish to clone those additional volumes to the Target Drive).

Select all the volumes that you wish to clone additionally from the Source Drive combo box and then click the [+] button.
You can select up to three volumes including the C: volume.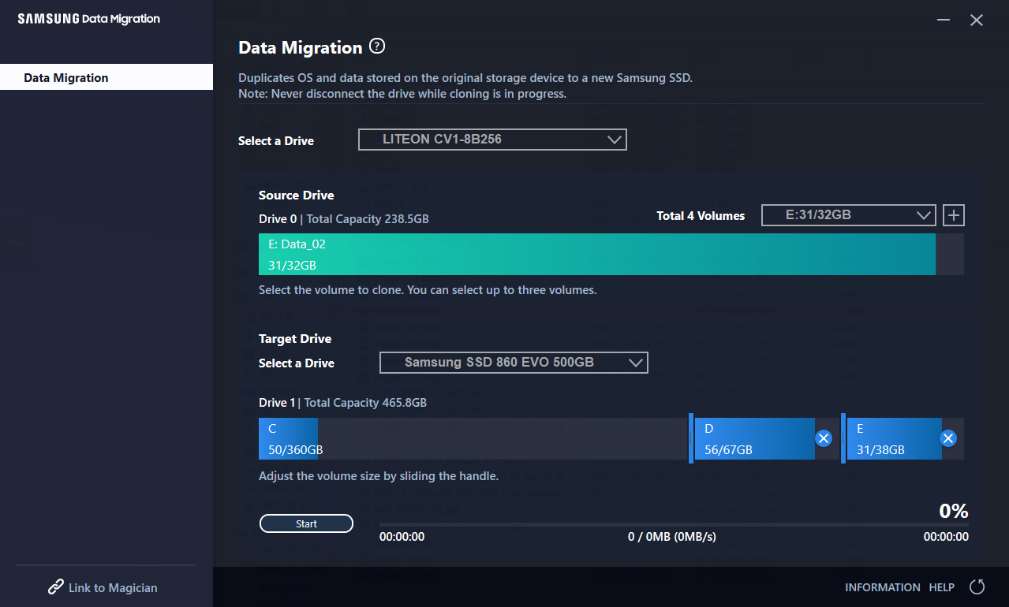 Adjust the capacity of each volume in the Target Drive pane using the slide bar.
-
If you wish to delete any of the volumes that you have added, click the [X] icon for the relevant volumes in the Target Drive pane.
-
When you add a volume, its minimum added capacity is 20 GB or more.

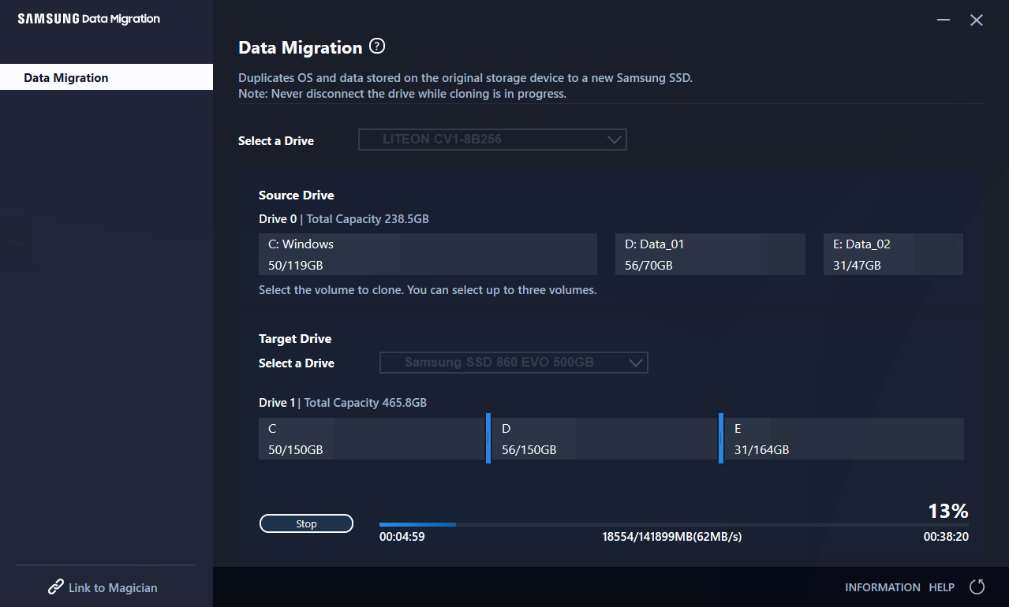
STEP 7. Cloning in progress
 The cloning speed may vary depending on the computer specifications and operating environment.
- Once the cloning process is complete, the computer will shut down automatically within 20 seconds.
 The cloning speed may vary depending on the computer specifications and operating environment.
If the amount of data saved on the Source Drive is larger than the capacity of the Target Drive
STEP 1. Start migration

STEP 2. Connect and select your Target Drive
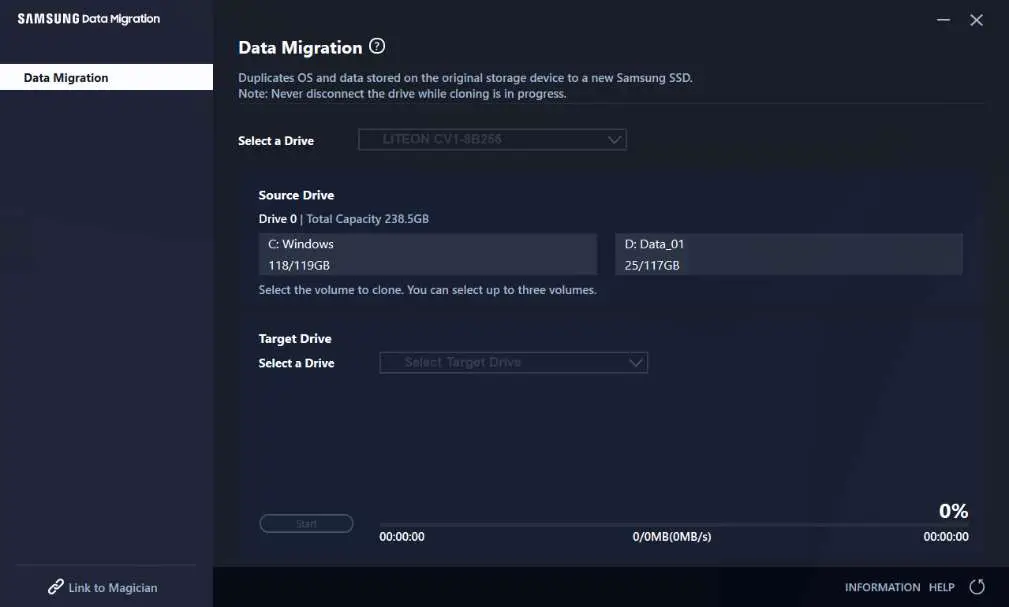
- Connect your Target Drive.
- Click the Refresh button so that the Target Drive can be recognized. Once the Target Drive is successfully connected, you can select the Target Drive on the screen.
- Select your Target Drive.
When connecting an mSATA SSD, you may need an additional mSATA/SATA converter (connector) or mSATA/USB converter (connector).When connecting an NVMe or M.2 SSD, you may need an additional M.2 PCIe/USB converter (connector).
STEP 3. Select a folder to scan for files to exclude from cloning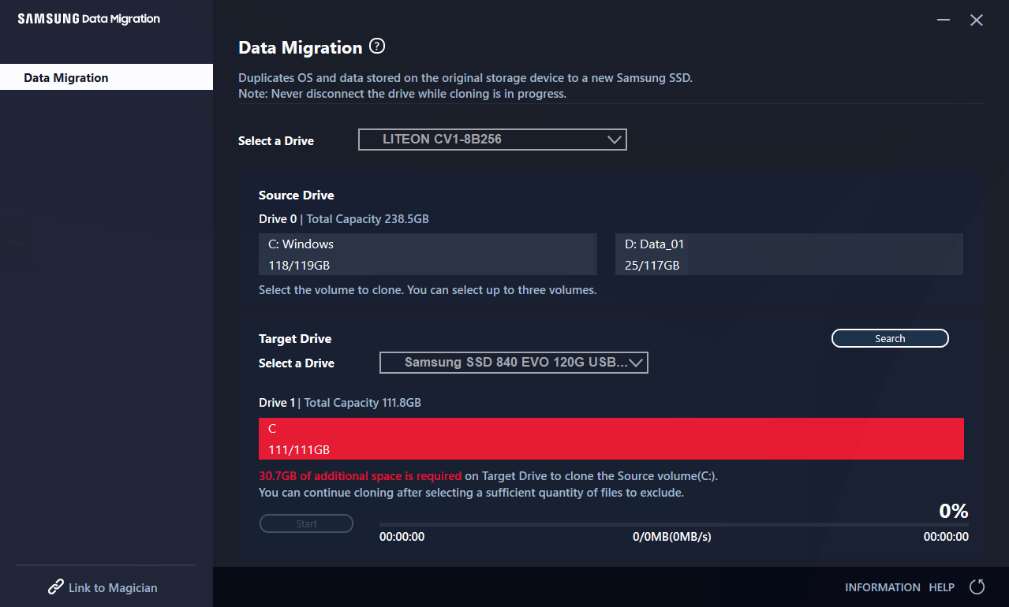
- Click the [Select Exclude Data] button.
- Click the [Set Folder to Scan] button.
- Select a folder to scan for files to exclude from cloning.
- Click the [Search] button.
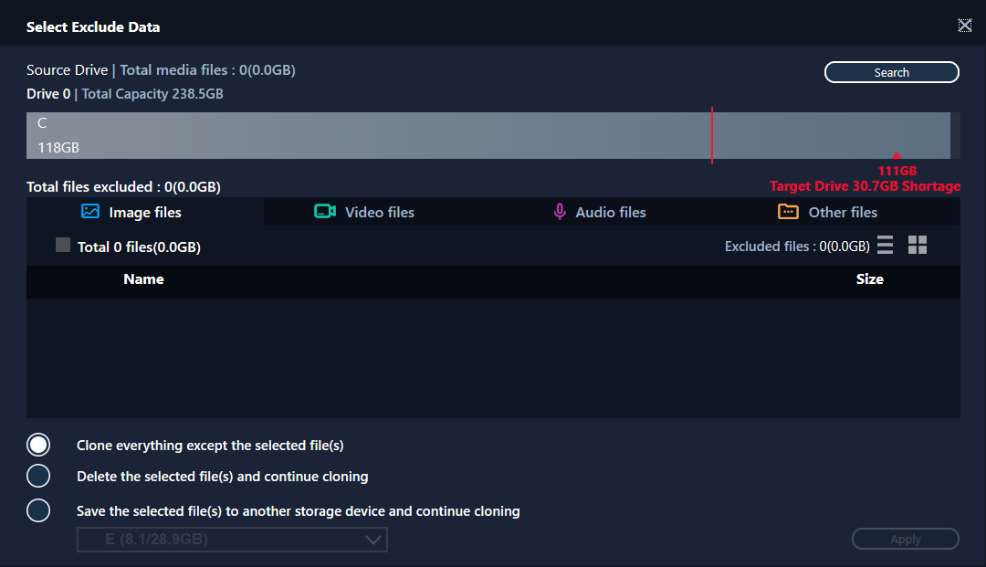

STEP 4. If the Select Exclude Data screen displays a list of excluded files, then proceed to STEP 5. If the Select Exclude Data screen does not display a list of excluded files, then return to STEP 3 and select a folder to scan for files to exclude from cloning again.
STEP 5. Select files to exclude from cloning
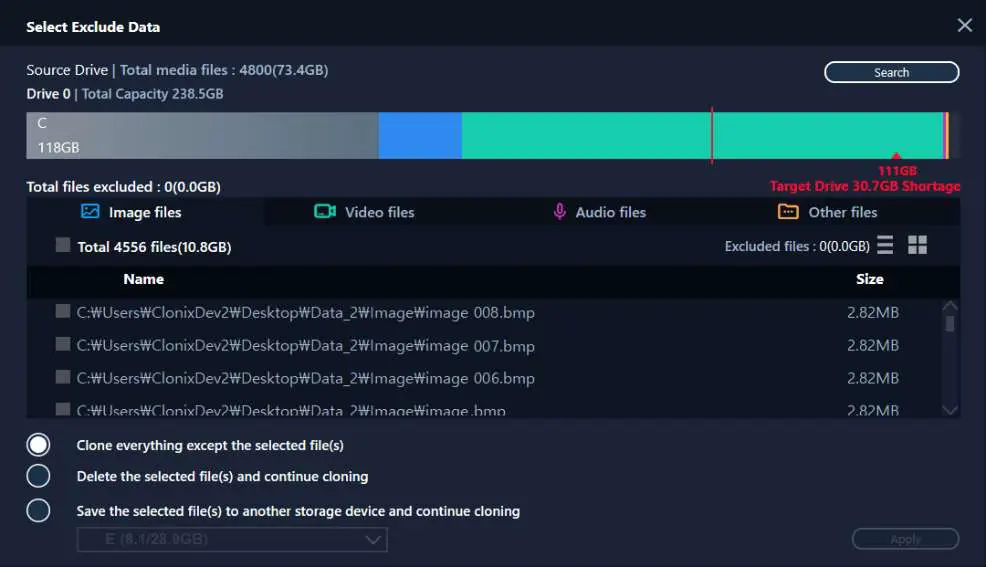
Select files to exclude them from cloning until their total size becomes equivalent to the amount specified in the shortage message displayed in the upper-right corner.
STEP 6. Select what to do with the excluded files

- To clone the drive without the excluded files, select the [Clone everything except the selected file(s)] option.To delete the excluded files from the Source Drive and then proceed with the cloning, select the [Delete the selected file(s) and continue cloning] option.To save the excluded files to a different storage device and then proceed with the cloning, select the [Save the selected file(s) to another storage device and continue cloning] option and then select the storage device to which you wish to save the excluded files.
- Click the [Apply] button.
STEP 7. Start cloning

STEP 8. Cloning in progress
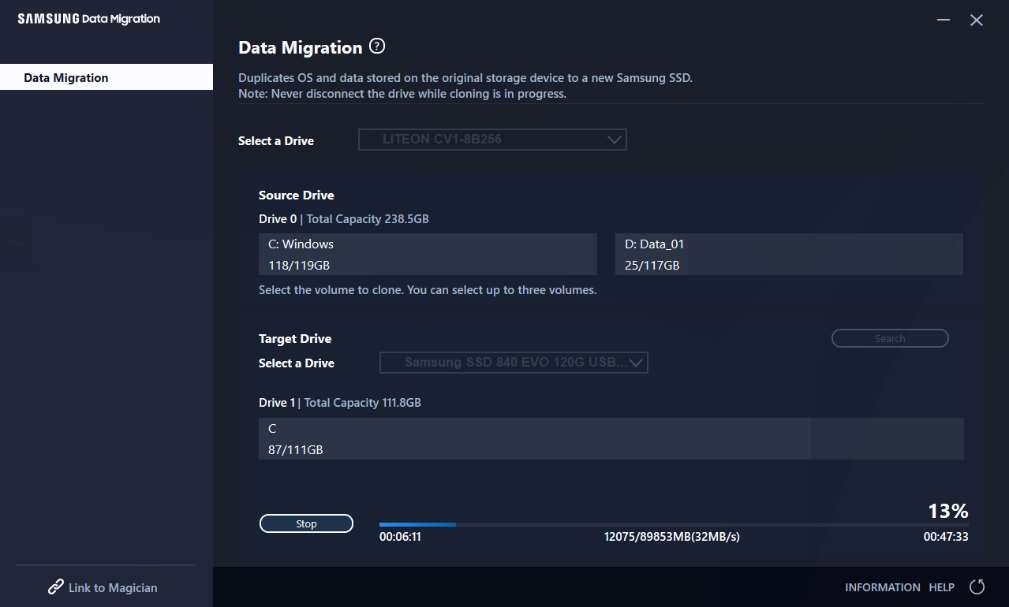
- The cloning speed may vary depending on the computer specifications and operating environment
- Once the cloning process is complete, the computer will shut down automatically within 20 seco
Boot from the cloned Target Drive
If the Target Drive is connected via USBSTEP 1. Connect the Target Drive to the computer internally
- Disconnect the USB cable from the Target Drive.
- Connect the cloned Target Drive.
When there is only one connectable drive inside the computer, remove the Source Drive and then connect the cloned Target Drive.

- Turn on the computer and enter the BIOS screen using the BIOS access key.
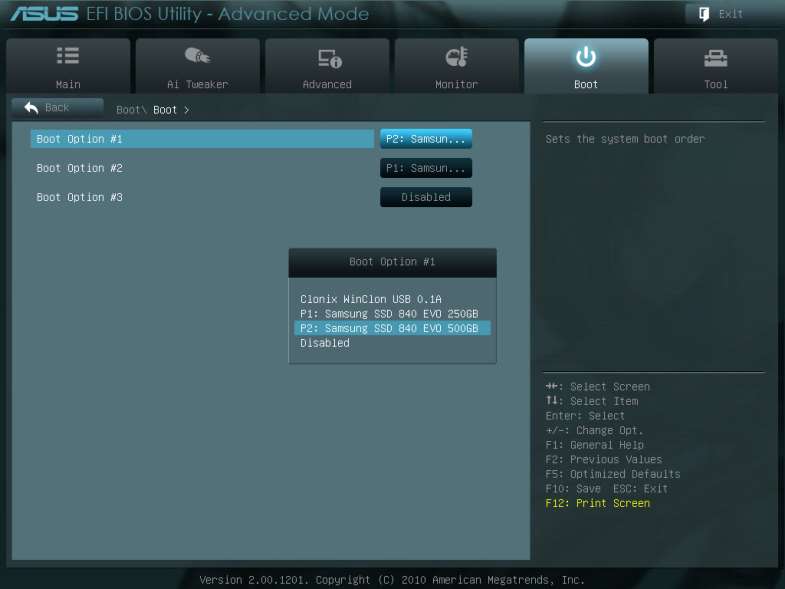
- Open the Boot menu.
- Place the Target Drive above the Source Drive to give the cloned drive a higher boot priority.
- Press the F10 key to save the change.
- Press the ESC key to exit the BIOS screen.
The BIOS access key and boot priority change method may differ depending on the cam manufacturer or motherboard specifications.STEP 3. Boot from the Target Drive
- Check whether the operating system boots from the Target Drive.
If the Target Drive is connected via SATASTEP 1. Change the boot priority to the cloned drive
- Turn on the computer and enter the BIOS screen using the BIOS access key.
- Open the Boot menu.
- Place the Target Drive above the Source Drive to give the cloned drive a higher boot priority.
- Press the F10 key to save the change.
- Press the ESC key to exit the BIOS screen.

STEP 2. Boot from the Target Drive
- Check whether the operating system boots from the Target Drive.
The BIOS access key and boot priority change method may differ depending on the comp manufacturer or motherboard specifications.
FAQ
Product usage
- I ran the software, but the Target Drive selection combo box is disabled.→ If the Target Drive selection combo box is disabled, it means the Target Drive is not connected properly or it does not exist.→ You can check whether the Target Drive is connected properly as instructed below:* How to check the Target Drive’s connectiona. Check the hardware interface connection→ Check whether the USB adapter or SATA cable is properly connected to the Target Drive.b. Check the Target Drive from Disk Management in Windows→ Type the “diskmgmt.msc” command in the Run box and press Enter to open Disk Management. Then, check whether the Target Drive is on the list.c. Refresh the software→ Click the Refresh icon in the lower-right corner of the software’s main screen to update the drive’s information.
- The “The drive you selected does not support this feature.” message appeared when I ran the software.→ If the Target Drive has been successfully connected but it is not a supported drive, then you will see the “The drive you selected does not support this feature.” message.→ For the list of supported drives, please refer to “System Requirements” in this document.
- Can I use this product when the Source Drive is in a RAID group or storage pool?→ This software does not support a RAID configuration.→ When the drive is in a storage pool supported by Windows, you need to delete the storage space and then the storage pool because the software can only support a single SourceDrive. (Note that if you remove the storage pool configuration, the data in the storage space will be formatted.)
- Do I need to perform any checks before running this software?→ It is recommended that you run a check on your Source Drive before cloning it since cloning may fail to depend on the Source Drive’s condition.* How to run a check on the Source Drivea. Check the drive by running chkdsk /f→ Type the “cmd” command in the Run box as an administrator and press Enter. Type “chkdsk /f” and press Enter. Then, reboot to check whether there are any issues with the drive.b. Check the system by running sfc /scannow→ Type the “cmd” command in the Run box as an administrator and press Enter. Type “sfc /scannow” and press Enter. Then, check whether there are any issues with the Windows system files.→ Cloning may fail if the drive cannot be recovered because of issues with the Windows system files.
- Will the Recovery Partition of the Source Drive be cloned as well?→ The OEM Partition created by the computer manufacturer when shipped from the factory will not be cloned. However, it will be automatically cloned if the computer manufacturer is Samsung and SRS (Samsung Recovery Solution) 5, SRS 6, or SRS 7 has been installed. (Versions lower than SRS 5 are not supported.)
Cloning failure
- Change to the “No virtual memory paging file” option.→ Go to Control Panel > System and Security > System > Advanced system settings. Open the Advanced tab, click Settings under Performance, open the Advanced tab in the Performance Options dialog, and then click [Change] under Virtual memory. Deselect the“Automatically manage paging file size for all drives” checkbox, select the “No paging file” radio button, click [OK], and then restart the computer.
- Check the drive, check the system, defragment the drive, and then optimize the drive.→ To learn how to check the drive and system, please refer to “FAQ. 1-2-4.”→ To learn how to defragment and optimize the drive, please refer to the following:* How to defragment and optimize the drivea-1. Type “Defragment and Optimize Drives” in the search bar and press Enter.a-2. Click This PC, right-click Local Disk (C:), select Properties, open the Tools tab, and then click [Optimize] under Optimize and defragment the drive.a-3. Type “dfrgui” or “dfrgui.exe” in the Run box and press Enter.b. Select the volume on which Windows is installed, click [Analyze], and then click [Close].c. Select the volume on which Windows is installed, click [Optimize], and then click [Close].
- Disable system restore point files.→ Go to Control Panel > System and Security > System, select the System Protection tab, click [Configure], select the “Disable system protection” radio button, and then click [OK].
- Restart the computer and extend or shrink the C: drive volume.→ Type “diskmgmt. MSC” in the Run box and press Enter to open Disk Management. Then, shrink or extend the C: drive volume on which Windows is installed.→ Restart the computer, connect the Target Drive, and then clone the Source Drive to it.
- Turn off BitLocker, a Windows security program.→ Check whether BitLocker is turned on in the following cases:→ The process is stuck at 0%.→ The “Data migration has stopped for unknown reasons” error message appears.
BitLocker is turned on automatically in the following cases:
- The operating system is Windows 7, Windows 8, Windows 8.1, or Windows 10. (It may not be available on some Windows editions.)
- TPM is enabled (i.e., the TPM option in the BIOS is on).
- UEFI Secure Boot is enabled (i.e., the TPM option in the BIOS is on).
- You have signed in with a Microsoft account.
How to turn off BitLocker
- Go to Control Panel > System and Security > BitLocker Drive Encryption, and click Turn off BitLocker.
- Once the drive is decrypted, BitLocker will be turned off. (The decryption process may take a while if a large amount of data is involved.)
- Once BitLocker is turned off successfully, the padlock icon will disappear from the operating system drive.
How to change the drive’s state from “BitLocker waiting for activation”
- On some operating systems, such as Windows 10 Pro, BitLocker is always waiting for activation by default.
- If BitLocker is turned on and shows an unlocked padlock icon, click the icon. This will change the icon to a locked padlock icon but BitLocker will still be on. Then, click the icon again to turn off drive encryption.
- Once BitLocker is turned off successfully, the padlock icon will disappear from the operating system drive.
Turn off security programs.
- Stop or close all currently running security and restoration programs and then start cloning.
- If you see a process that starts with “Nasca” in the Processes tab of the Task Manager, uninstall it before you start cloning, because it is a type of security program.
- For programs that offer MBR protection, turn off the “Protect MBR” option.
Product uninstallation
How do I uninstall the program?
- Go to Control Panel > Uninstall a program, and then select “Samsung Data Migration” from the list to uninstall the program.
- Alternatively, go to Settings > Apps and features, and then select “Samsung Data Migration” from the list to uninstall the program.
![]() January 2020www.samsung.com/ssdwww.samsung.com/samsungssdAll brand and product names are trademarks of their respective companies.The design and contents of this manual are subject to change without notice.©2020 Samsung Electronics, Co., Ltd. All rights reserved.
January 2020www.samsung.com/ssdwww.samsung.com/samsungssdAll brand and product names are trademarks of their respective companies.The design and contents of this manual are subject to change without notice.©2020 Samsung Electronics, Co., Ltd. All rights reserved.
References
[xyz-ips snippet=”download-snippet”]