![]()
iXpandTM Wireless ChargerUser Manual

Accessing Support
- For online technical support visit sandisk.com/wirelesscharger/help and kb.sandisk.com.
- To speak with technical support visit: sandisk.com/about/contact/customer-care
Welcome
FeaturesFast Charging — QiTM certified 10W fast wireless charger for Qi-compatible iPhones and Samsung and other smartphones.Back-Up in Full Resolution — Place a phone on the base to automatically back up photos, videos, and contacts.Free up Space on Your Phone — Easily free up space on your phone knowing your photos are backed up in full resolution.
Kit Contents
The SanDisk iXpand Wireless Charger kit includes the following items:
- SanDisk iXpand Wireless Charger
- AC power adapter
- Getting Started Guide
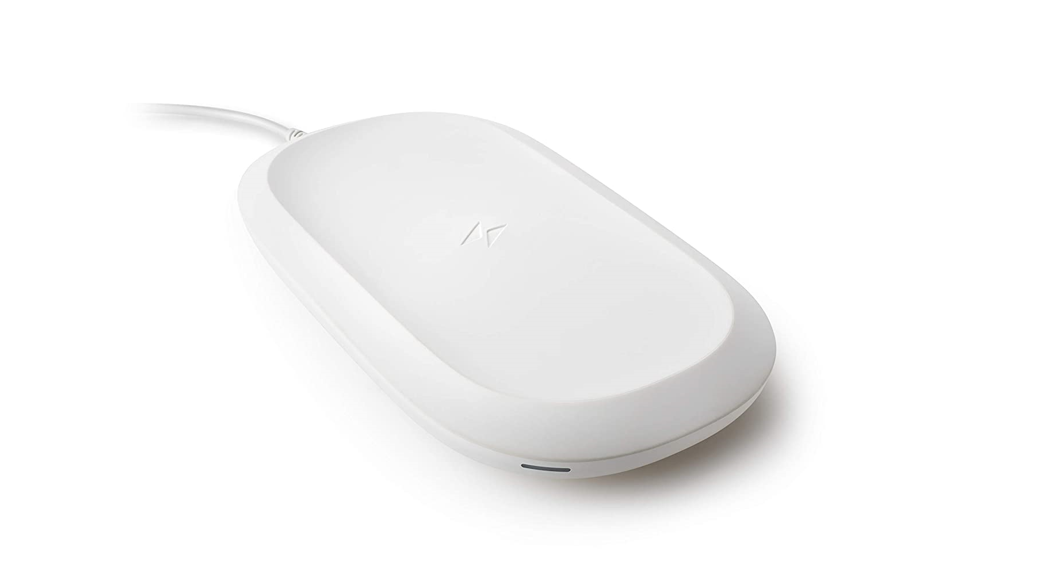
Product Description
- Front LED
- Rear Layout
- Reset Button
- USB Port
Front LED
1. Front LED The front LED will display a different color and blink to indicate a specific “Device Condition”. These different conditions have outlined in the table below.
Table 1.1
| LED Behavior | System Condition |
| No LED light illuminated |
Power is Off or not charging |
| Solid Purple – no blinking | Charging |
| Solid White – no blinking | Charging Complete (for supported Android devices only) |
| Blinking Purple |
Firmware Updating, or confirm the following: 1) Phone is placedon the charger, properly aligned in the center, and 2) No foreignobjector metal between phone and Wireless charger. |
Rear LayoutThe iXpand Wireless Charger includes these ports and connectors.
- USB Port
- DC Power Connector
Reset ButtonOn the underside of your device, there is a Reset Button. This is a tiny recessed the button that requires something similar to the pointy end of a paper clip to bepressed.
Table 1.2
|
Reset Button Function |
Device Operation |
| Press for 10 or more seconds | The LED will begin blinking. This function will reset the iXpand Wireless Charger to default settings. This will not delete any content. |
USB PortThe USB port is designed to connect the iXpand Wireless Charger directly to a host computer system. This is a USB Micro B connector using the USB 2.0 standard.The storage on an iXpand Wireless Charger is formatted with the exFAT file system.
Handling Precautions
SanDisk products are precision instruments and must be handled with care during unpacking and installation. Devices may be damaged by rough handling, shock, or vibration. Always observe the following precautions when unpacking and installing your external storage device:
- Do not drop or jolt the device.
- Keep dry and avoid placing the device near sources of heat.
- Do not use this product as a portable device.
Simple To Use
|
iXpand Wireless Charger SetupCharging a SmartphoneAutomated BackupFree Up Space |
Select and Restore – PhotosSelect and Restore – ContactsUSB ConnectionAdding Multiple Smartphones |
iXpand Wireless Charger SetupInstallationNote: The setup process outlined below includes connecting your smartphone to the iXpand Wireless Charger. However, the setup steps may vary between operating systems and versions of an operating system.
- Connect one end of the power adapter into the DC power connector on the iXpand Wireless Charger device, and connect the other end of the power adapter into an AC power outlet.
- Download and install the iXpand Charger app from the applicable app store.
- Agree to the End User License Agreement by tapping the Continue button.
- For a complete continuous backup, make sure to always allow location access for the iXpand Charger application. This may include enabling device location.
- Allow the iXpand Charger app to find the iXpand Wireless Charger.
- After the charger is found, continue to the next screen.
- The Bluetooth Pairing Request pop-up will open. Tap the Pair option.
- On the Join Home Network screen, enter the password for the selected network and select Join.a. If a home network is not available, the iXpand Wireless Charger will broadcast its own SSID to create a wireless-direct connection with your smartphone.
- Connecting to the network may take a few moments. After this begins the PrivateAccessTM account setup process if you plan to share your iXpand Wireless Charger with others and wish to keep your data private. Tap the Sign Up button or log in if you already have an account.
- Fill in the required fields and tap Sign Up.
- Once the account is set up the Allow Analytics screen will display. Select either Allow or Don’t Allow.
- Next, on the Allow access for backup screen tap Continue. This will open a dialog box requesting access to your photos. Select Ok to allow access.
- This will open a dialog box requesting access to your contacts. Select Ok to allow access.
- This will open a dialog box requesting to send you notifications. Select Ok to allow notifications.
- To complete this process, you will receive a PrivateAccessTM email to confirm your new SanDisk account. Follow the instructions noted in the email.
- Congratulations! Your iXpand Wireless Charger and iXpand Charger app are now ready to use.
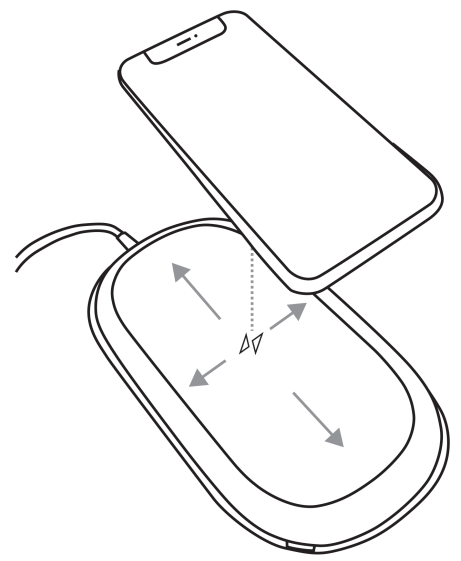
Charging a SmartphoneCharging a smartphone with the iXpand Wireless Charger does not require the installation of an app. For wireless charging, follow these steps.Note: For best practices on wireless charging, visit the SanDisk knowledgebase and search for Answer 21587.
- The iXpand Charger works with most slim cases (less than 3mm thick). If the case is heavy-duty, made of metal, or your case doubles as a wallet and holds metal cards, charging may not properly function and the case would need to be removed.
- The smartphone should have the screen facing up.
- Place the smartphone capable of Qi wireless charging on the iXpand Wireless Charger.
- The smartphone should be lined up length-wise on top of the wirelesscharger as is illustrated below. If the orientation is perpendicular or misaligned, charging will not occur.

- The LED on the iXpand Wireless Charger will turn a solid color, and the operating system on your smartphone will provide confirmation when charging has begun.
Automated BackupAfter the app setup process, an automated backup routine will activate. This will backup the device every time it is placed on the iXpand Wireless Charger with the battery level at 20% or higher.
Free Up SpaceThe Free Up Space function allows for content to be removed from a smartphone while still retaining a copy of the file(s) on the iXpand Wireless Charger. To use this process, follow these steps:Caution: By removing a file from your smartphone, the only remaining version of the file will be on the iXpand Wireless Charger — there is no longer a separate backup copy of the file that is removed.
- Access the iXpand Charger app.
- Select the Free Up Space button at the bottom of the Activity screen. This process will take a few minutes as all of the content in your camera roll is accessed.
- The Free Up Space box will open, select the Continue button.
- Select the items from your camera roll that you want to remove by tapping the image. This will place a checkmark in the circle located on each image. If you choose to select and delete all files in your camera roll, tap the icon in the upper left-hand corner with two checkmarks.
- After all of the files for removal have been selected, note the Free Up button at the bottom of the screen with the amount of space that will be freed up.
- Tap the Free Up button. This will open a confirmation box. Select the Continue button.
- In iOS, another confirmation box will open. This will confirm whether or not you want to delete these files from your smartphone. If you choose to have these files deleted from your smartphone, tap the Delete button. Otherwise, tap the Don’t Allow button.
- If you delete the files selected during this process, a congratulatory screen will briefly display the amount of space that was made available. Then the process will return to the Activity screen.
Select and Restore – Photos
To restore files from the iXpand Wireless Charger back to the camera roll on your smartphone.
- Access the iXpand Charger app.
- Tap the Photos icon on the main menu.
- Tap the Select and Restore button at the bottom of the screen.
- This will open the Restore box. Would you like to restore all photos and videos or select specific ones? Select either the All or Some option.
- If you choose All, then all files deleted from the smartphone will be restored.
- If you choose Some, then you will select the individual files that will be restored.
- After the file section is done, tap the Restore button, and the deleted files will be restored.
Select and Restore – ContactsTo restore contacts from the iXpand Wireless Charger to your smartphone, follow these steps:
- Access the iXpand Charger app
- Tap the Contacts icon on the main menu.
- Tap the Select and Restore at the bottom of the screen.
- This will open the Restore box. Would you like to restore all contacts or select specific ones? Select either the All or Some option.
- If you choose All, then all contacts deleted from the smartphone will be restored.
- If you choose Some, then you will select the individual contacts that will be restored.
- After the file section is done, tap the Restore button and then deleted contacts will be restored.
USB ConnectionThe contents stored on the iXpand Wireless Charger can be accessed from a host computer using a USB connection. Use the following steps for this process.
Note: If login with Private Access is enabled, visit SanDisk Support to download the Private Access software to view the content on the iXpand Wireless Charger.
- Remove the smartphone from the iXpand Wireless Charger.
- Disconnect the power cable and connect the iXpand Wireless Charger to a host computer with a USB 2.0 Micro B cable (this cable is not included with the device).
- In Windows, the iXpand Wireless Charger will be discovered and accessible under Devices and Drives for This PC.
- For macOS, the iXpand Wireless Charger will be mounted to, and be accessible from the desktop.
- Use the functionality of Windows File Explorer or macOS Finder to navigate to the contents of the iXpand Wireless Charger. There will be individual folders for Contacts, Photos, and Videos.
Adding Multiple SmartphonesMultiple Smart Device InstallationIt is best to connect multiple smartphones to the same wireless network used by the iXpand Wireless charger. In order to have additional smartphones use the iXpand Wireless Charger as a backup location, follow these steps:
- Connect one end of the power adapter into the DC power connector on the iXpand Wireless Charger device, and connect the other end of the power adapter into an AC power outlet.
- Download and install the iXpand Charger app from the applicable app store.
- Agree to the End User License Agreement by tapping the Continue button.
- For a complete continuous backup, make sure to always allow location access for the iXpand Charger application.
- Allow the iXpand Charger app to find the iXpand Wireless Charger.
- After the charger is found, continue to the next screen.
- For iOS, The Bluetooth Pairing Request pop-up will open. Tap the Pair option.
- The Charger Access Password screen will appear, requesting the password for the iXpand Wireless Charger.a. Access the iXpand Charger app from a smartphone already set up and connected to the iXpand Wireless Charger.b. Tap the two-line menu icon in the upper left-hand corner.c. Tap the Settings option. This will open the Settings screen.d. Tap the Charger Access Password option. This will display the Charger Password. Enter this password on the Charger Access Password screen for the additional device you are connecting to the iXpand Wireless Charger and select Join.
- If your smartphone is already connected to the same wireless network as the iXpand Wireless Charger, this setup process will automatically join this network. a. If a home network is not available, the iXpand Wireless Charger will broadcast its own SSID to create a wireless-direct connection with your smartphone.
- Connecting to the network may take a few moments. After this begins the PrivateAccessTM account setup process if you plan to share your iXpand Wireless Charger with others and wish to keep your data private. Tap the Sign Up button or log in if you already have an account.
- Once the account is set up the Allow Analytics screen will display. Select either Allow or Don’t Allow.
- Next, on the Allow access for backup screen tap Continue. This will open a dialog box requesting access to your photos. Select Ok to allow access.
- This will open a dialog box requesting access to your contacts. Select Ok to allow access.
- This will open a dialog box requesting to send you notifications. Select Ok to allow notifications
- To complete this process, you will receive a PrivateAccessTM email to confirm your new SanDisk account. Follow the instructions noted on the email.
- Congratulations! Your iXpand Wireless Charger and iXpand Charger app are now ready to use.
Settings
| Settings – Auto-Backup | Settings – Restore All Content |
| Settings – Network | Settings – Anonymous Data Sharing |
| Settings – Charger Access Password | Settings – App Permissions |
Settings – Auto-BackupThis process allows for the option to turn on or off the backup of Photos, Videos, or Contacts. To make any of these changes to the auto-backup, follow these steps:
- Access the iXpand Charger app.
- Tap the two-line menu icon in the upper left-hand corner.
- Tap the Settings option. This will open the Settings screen.
- Tap the Auto-Backup: Types> option. This will open the Auto Backup screen.
- Toggle any of the Auto Backup options on or off. Then navigate back to the Activity screen.
Settings – NetworkTo access or change the wireless network for the iXpand Wireless Charger, or to connect to the charger with a direct connection, follow these steps:
- Access the iXpand Charger app.
- Tap the two-line menu icon in the upper left-hand corner.
- Tap the Settings option. This will open the Settings screen.
- Tap the Network option to see a list of available networks or to make a direct connection.
- The Available Network screen will display the current network and a list of available networks. Select one of these networks or tap the Switch to Direct Connection button.a. The Direct Connection feature allows for a direct wireless connection between your smartphone and the iXpand Wireless Charger. If you choose this option, the iXpand Wireless Charger will broadcast its own SSID and ask you to join its network. Select the Join option.b. If you are already connected to the iXpand Wireless Charger with a direct connection, but want to change to another wireless network, select the option. Change Networks at the bottom of the Available Network screen. The iXpand Charger app will search for available networks. After the wireless connection is selected, choose the option to Join and then the option to Pair.
Settings – Charger Access PasswordTo access the iXpand Wireless Charger password, follow these steps:
- Access the iXpand Charger app.
- Tap the two-line menu icon in the upper left-hand corner.
- Tap the Settings option. This will open the Settings screen.
- Tap the Charger Access Password option. This will display the Charger Password, which is used to connect another smartphone to the iXpand Wireless Charger.
Settings – Restore All ContentUse this process to do a full restore back to your mobile device.
- Access the iXpand Charger app.
- Tap the two-line menu icon in the upper left-hand corner.
- Tap the Settings option. This will open the Settings screen.
- Tap the Restore All Content option.
- This will open the Choose Your Profile screen. Tap the Restore button to restore all photos and contacts to your mobile device.
- To confirm this action, a box will open and ask Are you sure? Tap the Restore button to continue with this process, or Cancel to end this process.
- You will be returned to the Activity screen, which will display the results for this restore process.
Settings – Anonymous Data SharingUse this feature to enable or disable Anonymous Data Sharing.
- Access the iXpand Charger app.
- Tap the two-line menu icon in the upper left-hand corner.
- Tap the Settings option. This will open the Settings screen.
- Tap the toggle switch for the Anonymous Data Sharing option to enable or disable this feature.
Settings – App PermissionsThis process will re-direct you to the Permissions Setting on your mobile device. From here, you can alter the permissions for the iXpand Charger app.
- Access the iXpand Charger app.
- Tap the two-line menu icon in the upper left-hand corner.
- Tap the Settings option. This will open the Settings screen.
- Tap the App Permissions option. This will open the permissions settings specific to your operating system for the iXpand Charger app.
- Make any necessary changes to the permissions.
About
| App Version | Send Logs |
| Firmware Version | Clear Cache |
| Charger Info | Legal Information |
App Version
Firmware Version Charger Info
App VersionTo view the version of the iXpand Charger app on your smart device, follow these steps:
- Access the iXpand Charger app.
- Tap the two-line menu icon in the upper left-hand corner.
- Tap the About option. This will open the About screen.
- The App Version will be displayed in a numeric format similar to: 1.0 (1). This information may be necessary when requesting technical support.
Firmware VersionTo view the firmware version of the iXpand Wireless Charger, follow these steps:
- Access the iXpand Charger app.
- Tap the two-line menu icon in the upper left-hand corner.
- Tap the About option. This will open the About screen.
- The Firmware Version will be displayed in a numeric format similar to: 1.00.79. If there is a new firmware update, the firmware status will state UPDATE. Next, tap UPDATE — the update process will begin and automatically complete.
Charger InfoTo view the password for the iXpand Wireless Charger, follow these steps:
- Access the iXpand Charger app.
- Tap the two-line menu icon in the upper left-hand corner.
- Tap the About option. This will open the About screen.
- Tap the Charger Info option.
- Under the Charger Settings menu, it will list a numeric Charger Password. This password is used to connect additional smartphones to the iXpand Wireless Charger.
Send LogsThis process is used for providing SanDisk support the log files from your version of the iXpand Charger app. This process may be necessary when troubleshooting an issue with the app. To send the app and device logs, follow these steps:
- Access the iXpand Charger app.
- Tap the two-line menu icon in the upper left-hand corner.
- Tap the About option. This will open the About screen.
- Tap the Send Logs option. This will initiate the Preparing Device Logs function.
- This process will then open the default email client for your mobile device and create a new email with the log files attached. Follow the instructions in the email and enter a valid email address for the recipient (To:).
- After filling in the pertinent information, tap Send. The process will return back to the Settings screen. You can navigate back to the Activity screen.
Clear CacheUse this feature to refresh the content listing of the iXpand Charger app if you have made any modifications to the content using the computer.
- Access the iXpand Charger app.
- Tap the two-line menu icon in the upper left-hand corner.
- Tap the About option. This will open the About screen.
- Tap the Clear Cache option. This will immediately begin the process and vreturn you to the Activity screen. This process makes take a while to complete.
Legal InformationTo view the Privacy Statement, Terms and Services, End User License Agreement (EULA), and Open Source Attributions, follow these steps:
- Access the iXpand Charger app.
- Tap the two-line menu icon in the upper left-hand corner.
- Tap the About option. This will open the About screen.
- This will open the Legal menu. Tap on one of the listed options applicable to the legal information, you want to view.
Technical Notes
Operating System CompatibilityTo compare operating system compatibility between the iXpand Wireless Charger and your smart device, please visit the SanDisk knowledgebase linked below, and search for Answer 21598.KBA 21598 | This answer explains operating system compatibility for an iXpand Wireless Charger
Bluetooth® CompatibilityYour smartphone and iXpand Wireless Charger communicate via Bluetooth during the setup process and for direct communication through the app. The iXpand Wireless Charger is compatible with the Bluetooth Low Energy (BLE) wireless personal area network technology that is part of the Bluetooth 4.2 and later wireless technology standards.
Wireless Compatibility
The iXpand Wireless Charger uses a wireless network when copying data during the backup process. It is compatible with the following wireless standards:
| Standard | Frequency | Bandwidth |
| IEEE 802.11 b/g/n | 2.4 GHz | 20/40 MHz |
Wireless Security CompatibilityAn iXpand Wireless Charger is compatible with the following wireless security protocols and encryption standards:
| Wireless Security Protocol and Encryption Standard |
| WPA2 + AES |
| WPA + AES/TKIP |
| OPEN – no authentication key required |
Private AccessFor more information regarding Private Access, please visit the SanDisk Knowledgebase.
Compliance and Warranty Information
Regulatory Compliance
Safety ComplianceSummary of compliance with National Differences. CA=Canada, US=USA. IEC 60950-1:2005+A1:2009+A2:2013 and EN 60950-1:2006+A11:2009+A1:2010+A12:2011+A2:2013.Summary of compliance with National Differences: CA=Canada, US=USA. IEC 62368-1:2014 and EN 62368-1:2014+AC:2017.
CE Compliance For Europe
Hereby, Western Digital declares compliance of this equipment to the applicable Council Directives of the European Union, including the EMC Directive (2014/30/EU), the Radio Equipment Directive (2014/53/EU), the ERP Directive (2009/125/EC), and the Low Voltage Directive (2014/35/EU).
| Radio Technology | Frequency | Max Transmitter Power |
| Qi | 127.7 kHz | 0.01 mW / -20 dBm |
| Bluetooth: 2.4 GHz | 2402~2480 MHz | 100 mW / 20 dBm |
| Wireless: 2.4 GHz | 2412~2472 MHz | 100 mW / 20 dBm |
Por la presente, Western Digital declara el cumplimiento de este equipo con las directivas aplicables del Consejo de la Unión Europea, incluidas EMC (2014/30/EU) y RED (2014/53 / EU), la Directiva ERP (2009/125 / EC) y la Directiva de bajo voltaje (2014 / 35 / UE).
Russia Federation
Industry Canada StatementThis device complies with ISED’s license-exempt RSS. Operation is subject to the following two conditions: (1) This device may not cause harmful interference, and (2) this device must accept any interference received, including interference that may cause undesired operation.
Radiation Exposure Statement:This equipment complies with ISED radiation exposure limits set forth for an uncontrolled environment. This equipment should be installed and operated with a minimum distance of 20cm between the radiator and your body.
FCC Class B InformationThis device complies with Part 15 of the FCC Rules. Operation is subject to the following two conditions: (1) This device may not cause harmful interference,and (2) this device must accept any interference received, including interference that may cause undesired operation.This equipment has been tested and found to comply with the limits for a Class B digital device, pursuant to Part 15 of the FCC Rules. These limits are designed to provide reasonable protection against harmful interference in a residential installation. This equipment generates, uses and can radiate radio frequency energy and, if not installed and used in accordance with the instructions, may cause harmful interference to radio communications. However, there is no guarantee that interference will not occur in a particular installation. If this equipment does cause harmful interference to radio or television reception, which can be determined by turning the equipment off and on, the user is encouraged to try to correct the interference by one of the following measures:
- Reorient or relocate the receiving antenna.
- Increase the separation between the device and receiver.
- Connect the device into an outlet on a circuit different from that to which the receiver is connected.
- Consult the dealer or an experienced radio/TV technician for help.
Any changes or modifications not expressly approved by the manufacturer could void the user’s authority to operate the device.FCC Caution: Any changes or modifications not expressly approved by the manufacturer could void the user’s authority to operate the device.This transmitter must not be co-located or operating in conjunction with any other antenna or transmitter.Radiation Exposure Statement:This equipment complies with FCC radiation exposure limits set forth for an uncontrolled environment. This equipment should be installed and operated with a minimum distance of 20cm between the radiator and your body.Note: The country code selection is for the non-US models only and is not available to all US models. Per FCC regulation, all WiFi products marketed in US mustfixed to US operation channels only.ICES-3(B)/NMB-3(B) Compliance StatementThis device complies with Canadian ICES-003 Class B.
Warranty Information
Obtaining ServicePlease go to www.sandisk.com/wug for more information on making a warranty claim. If it is determined that your product may be defective, you willreceive an RMA and product return instructions. You are responsible for any expenses associated with a claim under SanDisk’s Limited Warranty. You mustsend your product in a secure, prepaid package, to the address provided with your RMA number. Proof of purchase is required for all warranty claims.
Limited Warranty
This product is subject to the applicable limited warranty terms and conditions, as defined in www.sandisk.com/wug. The term of your limited warranty is for 2 years in the United States and other regions.
Information furnished by SanDisk is believed to be accurate and reliable; however, no responsibility is assumed by SanDisk for its use nor for any infringement of patents or other rights of third parties which may result from its use. No license is granted by implication or otherwise under any patent or patent rights of SanDisk. SanDisk, the SanDisk logo, iXpand, and private access are registered trademarks or trademarks of Western Digital Corporation or its affiliates in the US and/or other countries. iPhone and macOS are trademarks of Apple Inc. Samsung is a trademark of Samsung Electronics Co., Ltd. Android is a trademark of Google LLC. Qi is a trademark of the Wireless Power Consortium. The Bluetooth word mark and logos are registered trademarks owned by Bluetooth SIG, Inc. and any use of such marks by Western Digital is under license. All other marks are the property of their respective owners.
© 2019 Western Digital Corporation or its affiliates. Western Digital Technologies, Inc. is the seller of record and licensee in the Americas of SanDisk® products. All rights reserved.Western Digital5601 Great Oaks ParkwaySan Jose, California 95119 U.S.A.80-36-08418
References
SanDisk® Global Customer Support (US) – Welcome! – (Wireless Chargers)
SanDisk® Global Customer Support (US) – Welcome! – (Software)
Anatel — Português (Brasil)
SanDisk® Global Customer Support (US) – Welcome! – (Wireless Chargers)
Contact Us
Contact Us
SanDisk® Global Customer Support (US) – Welcome!
Warranty | Western Digital
SanDisk® Global Customer Support (US) – Welcome!
SanDisk® Global Customer Support (US) – Welcome!
[xyz-ips snippet=”download-snippet”]