
![]()
Bidet Seat F6 User Manual
Thank you for purchasing Saniwise Bidet Seat. Please read through this manual carefully to ensure the safe use of your product.Keep this manual in a safe place for your future reference.
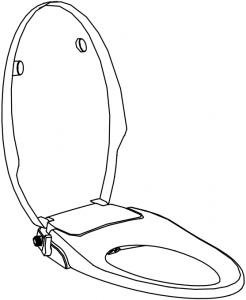
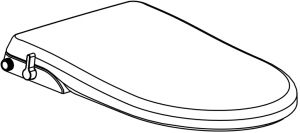
1 Parts and What’s in the Box
Parts

Water inlet on the left

1
What’s in the Box
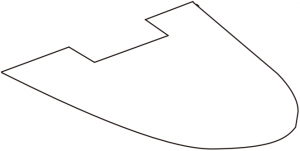
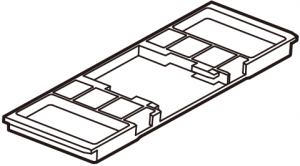
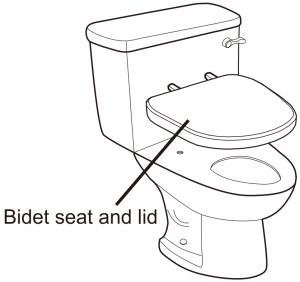
1. Bidet seat and lid 2. Installation template
3. Fixing components


Connecting bolts x2 Expansion nuts x2
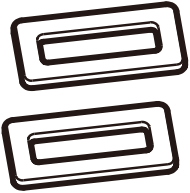
![]()
Sliding plates x2 Nuts x2 Adapter plate x1
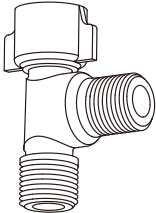
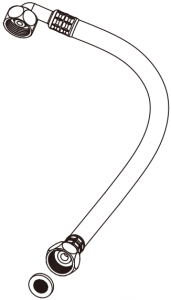
4. T-shaped connector 5. Water inlet hose
6. User Manual
NoteThere are two methods to install the Saniwise Bidet Seat. It is recommended that you use expansion nuts. You can also use butterfly nuts. Please choose the appropriate installation method according to your specific installation needs.
2
2 Installation
Please read the following instructions carefully and install your Saniwise Bidet Seat properly.
Caution
- The water pressure limit ranges from 10 to 110 PSI. Please use as instructed.
- The water shutoff valve should be near where the product can be installed and dismantled.
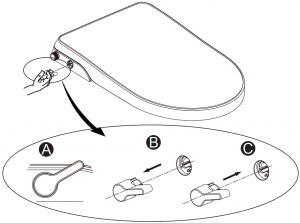
Preparation
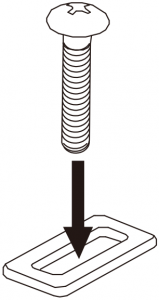
1. Insert the connecting bolts into the sliding plates.Insert the connecting bolts into the holes of the sliding plates, as shown in the figure below.
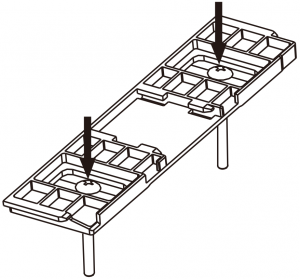
2. Insert the connecting bolts with the sliding plates into the adapter plate.Insert the connecting bolts with the sliding plates into the holes of the adapter plate, as shown in the figure below.
3
Installation Procedures
Installation Method One (Recommended)
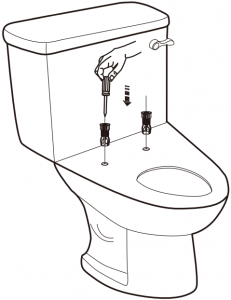
1. Dismantle the old bidet seat and lid.Loosen the hinge and remove the old bidet seat and lid.
2. Install the expansion nuts.Insert the expansion nuts into the holes of the ceramic. Be sure to firmly press down so the top of the expansion nut is flush with the ceramic toilet surface.
3. Install the installation template.Place the installation template on the ceramic.

4. Fix the adaptable panel.Attach the adapter plate. Attach the adapter plate in the toilet seat holes. Adjust the connecting bolts’ and adjusting pieces’ position to line up the connecting bolts to the expansion nuts. Then tighten them to secure the adapter plate.
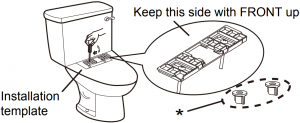
*Butterfly nuts are only used for the optional installation method two.
5. Remove the installation template.
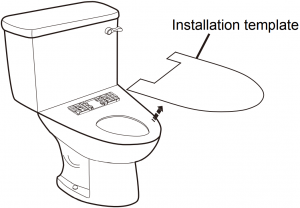
6. Mount the Saniwise Bidet Seat.Keep the fixing slots under the Saniwise Bidet Seat aiming at the slots on the adaptable panel. Push the Saniwise Bidet Seat to the end. Now, the Saniwise Bidet Seat is installed successfully.

Installation Method Two
1. Dismantle the old bidet seat and lid, and place the installation template on the ceramic, as described in step 1 and step 3 of the installation method one.
2. Put the adapter plate over the toilet seat’s mounting holes in the ceramic of the connecting bolts with adjusting pieces. Screw the nuts from underneath the toilet. Then tighten them to secure the adapter plate. Refer to the step 4 of the installation method one.
3. Complete the following installation procedures, as described in step 5 and step 6 of the installation method one.
4
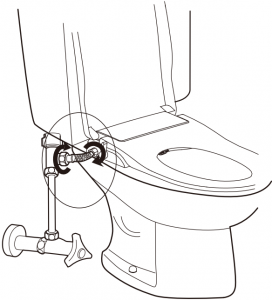
Connecting Water Inlet Hose
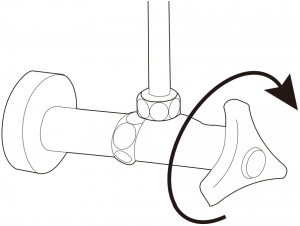
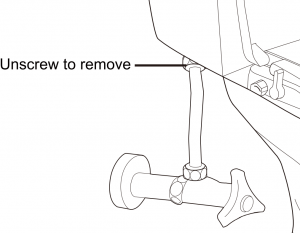
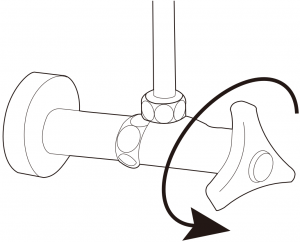
1. Turn off the water supply valve.
2. Unscrew the water supply hose from the water tank. Place a towel below the tank to catch any dripping water.
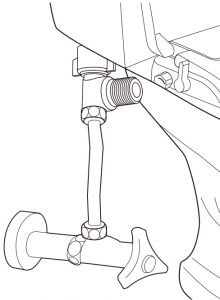
3. Using finger nut, attach the T-shaped connector to the water tank where you removed the water supply hose.

4. Attach the water supply hose to the bottom of the T-shaped connector.
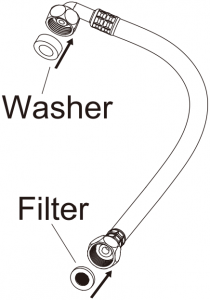
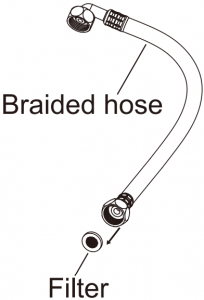
5. If they have become loose during shipping, press the filter screen and rubber washer into the connectors at the ends of the white water inlet hose. Connect the white water inlet hose to the bidet seat and the other end to the T-shaped connector and tighten snugly. Do not over tighten.

6. Slowly turn on the water valve to check if there is any water leakage.
5
7. Wipe the hoses and connectors thoroughly with a towel and carefully observe for any leaks for at least 10 minutes. Tighten any connectors gently until leakage stops. If any leaks continue, turn off the water supply and check older hoses for damaged rubber O-rings and replace them if necessary.
*Optional, only do the following if water pressure is too low.
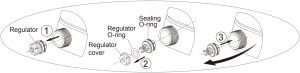
Please remove the regulator cover and regulator O-ring under the following conditions:
a. When the water pressure is lower than 10 PSI.b. When the nozzle cannot work normally and water pressure is low.
 How to do:
- Take out the regulator with pliers and other tools.
- Remove the regulator cover and regulator O-ring except the sealing O-ring.
- Insert the regulator component into the inlet pipe.
Caution: Must use the regulator cover and regulator O-ring when the water pressure is greater than 15 PSI.

- Do not lift the product with the seat cover and seat open. This may damage the bidet seat.
- Do not use with hot water where temperature is higher than 40°C/104°F.
6
Extra Installation Tips
- This will not apply to most customers, however, if you happen to have a rigid water supply line to your toilet tank you will need to replace that with a flexible steel braided water supply hose which can be found at any hardware store, Home Depot, Lowe’s etc. The addition of the “T” connector will make an existing “rigid” hose too long. We recommend you purchase the same length flexible hose as your rigid line +/- an inch. It does not need to be exact because it’s flexible, but too long may look unattractive.
- There is a white rubber hose that is sealed in a plastic bag. Occasionally the rubber gasket will fall out of the hose end during shipping. Just make sure you put it back in place if yours fell out, or if you find it loose in the bag with the hose.
- If you are not using the nuts, be sure to firmly push the two adapter plate anchors all the way into the two holes on your toilet bowl to ensure the adapter plate fits tightly to your toilet after tightening the stainless steel screws.
- In most cases everyone is happy with the pressure that the cleaning jets put out. If for any reason you would like a stronger stream, please refer to page 6 in the instructions and it will explain how to remove the pressure regulator and dramatically increase the pressure.
If you still need help, feel free to send us an email at [email protected].
7
4 Functions
WASH (REAR WASH)

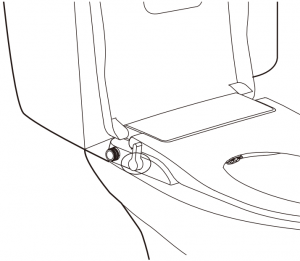
1) Turn the lever clockwise from the vertical position.2) The nozzle for rear wash extends forward, and the freshwater spray function starts.3) The water volume decreases while turning the lever towards the vertical position. It will totally shut off when the lever is on the vertical position.
BIDET (FRONT WASH)

1) Turn the lever counterclockwise from the vertical position.2) The nozzle for feminine Bidet (front wash) moves forward and the freshwater spray function starts.3) The water volume decreases while turning the lever towards the vertical position. It will totally shut off when the lever is on the vertical position.Note that the front wash nozzle is slightly longer when fully extended and directs spray more in the forward direction.
STOP

1) During WASH or BIDET status, rotate the lever to the vertical position to stop the freshwater spray.2) The nozzle moves back to the original position.3) The water volume decreases while turning the lever towards the vertical position. It will totally shut off when the lever is on the vertical position.
8
5 Cleaning and Dismantling
1. Clean the exterior of the bidet seat.Use a smooth sponge/cloth with diluted dish detergent to clean the product. Do not use the following types: hydrogen chloride detergent, paint thinner, benzene, abrasive paper, polishing agent, bleach, or chlorine.


2. Clean the spray nozzles.Pull out the nozzle softly and use smooth cloth/sponge or toothbrush with liquid dish soap to clean the nozzle.

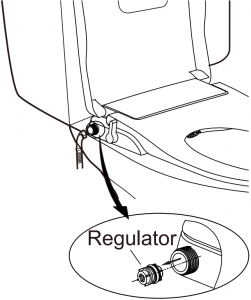
3. Clean the filter and regulator.(If the water flow is less than usual)1) Turn off the water supply, remove the white water inlet hose, and clean the filter screen.2) Remove the regulator with a pair of pliers, remove the regulator cover, and clean the regulator O-ring.
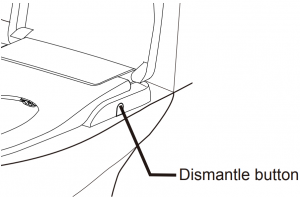
4. Dismantle the Saniwise Bidet Seat.Close the cover. Push the dismantle button and pull the Saniwise Bidet Seat forward, as shown in the figure below.

9
6 Maintenance
1. Lever Replacement
1) Remove the old lever as shown in figure A.2) Insert the new lever rib into the corresponding slot. When the new lever is mounted properly, a click will be heard.
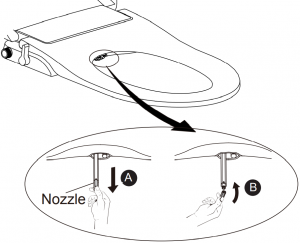
2. Nozzle Replacement
1) Pull out the tube and hold it, then remove the old nozzle, as shown in figure A.2) Mount the new nozzle to the corresponding slot on the tube. Now, the nozzle is replaced successfully.
3. Regulator Replacement
1) Rotate the lever forward. Remove the regulator from the water inlet with the needle-nose pliers.2) Press the new regulator into the water inlet tube.3) Rotate the lever to the vertical position. Now, the regulator replacement is completed.

4. Repairing a Leaking Water Hose
If water leaks from either end of the water hose, tighten the nuts gently until the water inlet hose stops leaking.
10
7 Self-diagnosis and Specifications
Self-diagnosis and Troubleshooting
|
Issue |
Cause |
Solution |
| The water pressure is low when using WASH/BIDET. | The bidet seat’s water pressure is low. | Turn the lever forward or backward to the highest setting during use. |
| The pressure of the water supply is low. | If the pressure of the water supply is too low, please contact your local water department. | |
| No water comes out when using WASH/BIDET. | The shutoff valve is turned off. | Turn on the shutoff valve. |
| The T-shaped connector’s filter is stuck. | Clean the T-shaped connector’s filter. | |
| The water inlet hose’s filter is stuck. | Clean the water inlet hose’s filter. | |
| The nozzle head is stuck. | Remove the nozzle head and clean it. | |
| The pressure of the water supply is too low. | Increase the pressure of the water supply. | |
| The toilet bowl is leaking during usage. | The pressure of the water supply is too high. | The maximum water pressure of the Saniwise Bidet Seat is 110 PSI. If the pressure of the water supply is higher than that, please contact your local water department. |
If the failure still occurs after the solutions above have been taken, please contact Saniwise by sending an email to [email protected].

Do not disassemble, repair, or remodel the Saniwise Bidet Seat.
Specifications
| Model No. | FB106 |
| Water Flow (WASH) | 0.35 – 1.8 L/min |
| Water Flow (BIDET) | 0.35 – 1.8 L/min |
| Backflow Prevention | Check valve and vacuum breaker |
| Water Supply | Directly from water pipes |
| Water Pressure Range | 10-110 PSI |
| Dimensions | 370x500x62 mm |
| Weight | 2.09 kg |
11
Warranty Record
Dear customer,Thank you for choosing Saniwise. If any failure or issue occurs, please check your Saniwise Bidet Seat following the troubleshooting methods in this manual first. If the failure or issue cannot be fixed, please follow the return instructions on the next page.
A. Related Information
| Name: |
| Tel: |
| Address: |
| Model No.: |
| Date of Purchase: |
| Warranty Period: |
B. Notes
- Please make sure the above information is completed before requesting the warranty service.
- This Warranty Record and User Manual are important documents for product maintenance. Please keep them in a safe place.
- During the warranty period, if any product issue or failure occurs under normal condition following the User Manual, free repair will be provided. See the following page for complete warranty details and return instructions.
- Thank you for choosing Saniwise. We are pleased to share with you that you can extend your bidet seat’s warranty by one year (which is equivalent of $35) for free after registering on www.saniwise.com within 2 weeks of receiving the product.
Saniwise Warranty
Your Saniwise Bidet Seat is warranted against defects in materials or workmanship for one (1) year from the date of original purchase. A defective product or defective parts returned to Saniwise will be repaired or exchanged for a Refurbished Saniwise Bidet Seat as determined by Saniwise in their sole discretion. Saniwise will not charge for labor or parts in connection with warranty repairs or replacements. Saniwise is not responsible for the cost of removal, return and/or re-installation of products.
This limited warranty given by Saniwise covers all defects encountered in normal use of Saniwise Bidet Seat and does not apply in the following situations.
- Loss of or damage to Saniwise Bidet Seat due to abuse, misuse, tampering, mishandling, improper packaging by you, alteration, modification and not following operation instructions.
- Use of unauthorized or incorrect parts or supplies sourced from anywhere other than Saniwise authorized dealers or parts that cause damage to the Saniwise Bidet Seat.
- Replacement of discolored or stained parts caused by use of chlorine, bleach, ammonia, and other chemicals, or abrasive cleaning supplies, oxidation or normal wear and tear.
- Damage to or malfunction of the Saniwise Bidet Seat as a result of improper and negligent installation.
- Damage or loss resulting from sediments or foreign matter contained in a water system.
- Any and all damages to plumbing, walls, floors, ceiling, and personal properties resulting from water leaks or breakage. The product must be used at the user’s own risk. Therefore, the owner hereby releases the manufacturer and distributor from any and all claims for damages where the above conditions exist.
No implied warranty, including any implied warranty of merchantability or fitness for a particular purpose applies to the Saniwise Bidet Seat after the applicable period of the expressed warranty or guarantee stated above, and no other express warranty or guarantee, except as mentioned above, given by any person or entity with respect to Saniwise Bidet Seat shall bind Saniwise, (some states and provinces do not allow limitation on how long an implied warranty applies, so the above limitations or exclusions may not apply to you if prohibited by law,) Saniwise shall not be liable for revenues or profits, inconvenience, expense, for substitute equipment or service, or any other special, incidental or consequential damages. In no event shall any claim or recovery of any kind against Saniwise be greater in amount than the purchase price of the product causing the alleged damage. Without limiting the foregoing, you assume all risk and liability for loss, damage or injury to you and your property and to others and their property arising out of use or misuse of, or inability to use, the Saniwise Bidet Seat not caused directly by the negligence of Saniwise. This limited warranty shall not extend to anyone other than the original purchaser of the Saniwise Bidet Seat.
Return Policy: A Saniwise Bidet Seat which has been installed or used is non-refundable due to governmental regulations pertaining to personal hygiene products. Saniwise cannot accept product returns if the installation hardware kit has been opened or if other signs of use are detected.
How to obtain service:To obtain repair service under this warranty, you must contact us to obtain an RMA (Return Merchandise Authorization) number.Proof of purchase in the form of a copy of your original receipt must accompany the returned unit for the warranty to be valid.To obtain your RMA number and to receive return instructions or to speak with a customer service representative, email [email protected].
Web: www.saniwise.comEmail: [email protected]
References
[xyz-ips snippet=”download-snippet”]