![]()
Handheld Stereo Audio RecorderSR-Q2User Manual
StatementPlease read this manual carefully before using and strictly operate and store in accordance with the instructions. Please save it for your future reference.If the user manual can not help you to solve certain problems, please ask your retailer for help or email us: [email protected].
Cautions
- Do not use the unit under water, don’t expose it to rain. Please store it in a cool, dry place.
- Please use and store it in normal temperature. Do not move it from overheated to supercooled condition frequently as well as keep away from heat sources such as heater and oven.
- When using and storing, please pay attention to dust and moisture.
- Be careful to violent collision.
- To avoid acoustical feedback, do not hold the microphone close to the loudspeakers.
- For the best sound pick-up pattern, do not hold your hand against the microphone head.
- Remove the batteries from the battery compartment when the device is not used for a long time.
General Introduction
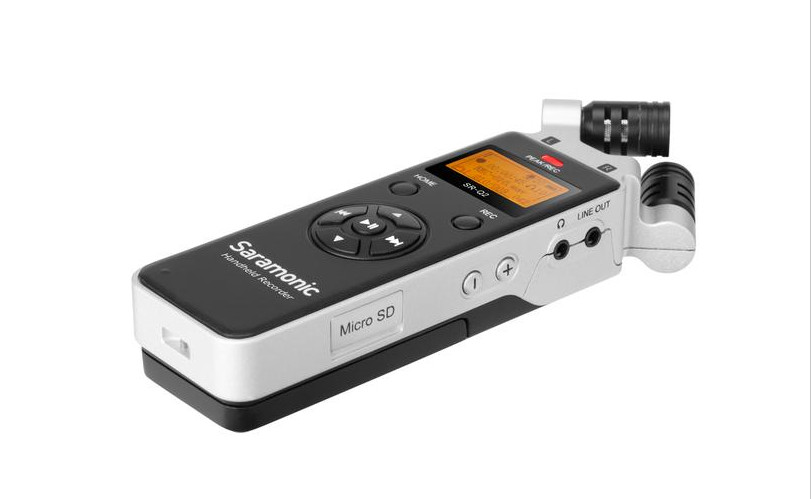
The Saramonic SR-Q2 is a handheld audio recorder with a built-in X/Y stereo microphone. The easy-to-read LCD menu display and onebutton-recording interface make SR-Q2 very simple to use. Ideal for using in applications such as audio for video, ENG, filmmaking, field recording, music production, podcasting, etc.The X/Y microphone captures clean stereo sound. The integrated flash recording allows you to record up to 96kHz/16bit. wav audio files to a microSD card of capacity up to 32GB or a microSDXC card of capacity up to 128GB. Separate microphone input and line input jacks provide a multitude of options for attaching a wide range of audio equipment.SR-Q2 runs on two AA batteries or it could powered with DC 5V power via its USB port. With audio input level control and real-time headphone monitoring, the SR-Q2 allows you to easily record audio safety at optimum signal.
Highlights
- Compact and handy operation interface
- X/Y stereo microphone
- Easy-to-read menu and LCD display
- 3.5mm microphone input jack
- 3.5mm line input jack
- Built-in speaker
- Records up to 96kHz/16bit .wav audio files
- Adjustable input level and headphone monitor volume controls
- HOLD function to prevent inadvertent operation
- Powered by two AA batteries or DC 5V USB power
Product Structure
 X/Y stereo microphoneThe X/Y configuration angled 90° to produce realistic stereo image.
- PEAK/REC LED indicatorThe LED indicator will be in solid red while recording; The LED indicator will flash in red while signal overload.
- LCD screenDisplays menu, please refer to “6. LCD Screen” for more details.
- HOME buttonBack to previous menu or back to the main menu during recording.
- REC buttonPress the REC button to start recording immediately.
- Control panelGo through menu and select functions or values shown on the display. Refer to “5. Control Buttons Introduction”
- MICROPHONE IN jackA stereo 3.5mm microphone jack. Plug in 3.5mm stereo TRS microphone.
- Built-in speakerEasily check the playback audio with no delay.
- 1/4″ -20 female screw
- Battery compartmentPlease refer to “4.1 Install two AA batteries and a memory card.”
- LINE IN jack3.5mm line input jack to plug in external audio sources.
- REMOTE jack2.5mm remote jack for connecting the remote control.
- “+ -” INPUT LEVEL controlAdjust the level of incoming audio signal. Press “+” to increase and “-” to decrease.
- Power & HOLD buttonPower on /offSlide the power button to for 2 seconds to turn on/off.HOLDSlide the power button to HOLD to disable all the buttons, preventing inadvertent operation.
- DC 5V USB portVia the USB port and supplied cable, the SRQ2 can be powered with a USB power bank, USB power supply, computer and more.
- DC power indicatorThe LED indicator will turn green while recorder is being powered by the DC 5V.
- LINE OUT jackA 3.5mm stereo output jack. Output audio to devices like DSLRs, mirrorless cameras, video cameras, etc.
- Headphone jackA 3.5mm stereo headphone jack. Connect headphones to monitor the audio output.
- Headphone volume controlPress “+/-” to adjust the headphone volume to optimum level.
- Micro SD card slotPlease refer to “4.1 Install two AA batteries and a memory card.”
 X/Y stereo microphoneThe X/Y configuration angled 90° to produce realistic stereo image.
Quick Setup Guide
- Install two AA batteries and a memory card• Pull off the cover of the card slot, insert a MicroSD or MicroSDXC memory card into the card slot with the contacts facing up.To remove: Press the card to unlock it, then pull it out from the card slot.• Gently slide out the battery cover at the back of the unit. Insert the battery with the “+” positive terminal lined up with the “+” indicator on the battery compartment.Note: The recording file will be saved automatically if the batteries run out.
- You could record with the built-in X/Y microphone, or you could connect an external 3.5mm microphone to the MIC IN jack, or any line level audio source to the LINE IN jack.Please note that only one input signal could be recorded at one time, the sequence priority is LINE IN, MIC IN, built-in X/Y microphone.
- Plug headphones into the headphone output to monitor the audio.The audio can be monitored only on recording screen and playback screen.
- Slide the power button to for 2 seconds until the Saramonic startup screen appears, and the SR-Q2 is powered on. System default is on recording screen once powered on.Note: If the unit isn’t in use for long time, the real-time-clock battery can run out. It will automatically enter to the “Date&Time” setting menu once powered on. Please set the time and date before use.
| ControlButton | On RecordingScreen | On RecordingScreen Standby/Pause | On PlaybackScreen | On MainMenu | On Submenu | On Popup menu |
| ——- | ——- | ——- | Scroll up | • Scroll up• Change parameters only on SYSTEM SET menu | ——- | |
| ——- | ——- | ——- | Scroll down | • Scroll down• Change parameters only on SYSTEM SET menu | ——- | |
| ——- | ——- | Playback last audio file | ——- | • Back to parent menu• Scroll left | Scroll and Select | |
| ——- | ——- | Playback next audio
file |
Enter submenu | • Enter submenu• Scroll right• When it is certain file name, enter delete option | Scroll and Select | |
| ——- | Save and play the last file | Start/Pause playback | Enter submenu | • Enter submenu• Playback when it is certain file name | Confirm setting | |
| REC (short press) | Pause recording | Start / restart recording | Back to recording
standby screen |
Back to recording standby screen | Back to recording standby screen | ——- |
| REC (long
press) |
Stop recording and save the file | Stop recording and save the file | ——- | ——- | ——- | ——- |
| HOME | ——- | Save the current file and back to main menu | Enter present file folder | ——- | Back to parent menu | Exit |
LCD Screen
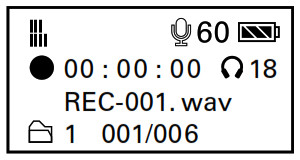 Recording Screen
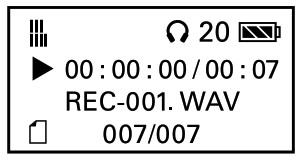 Playback Screen
| Power indicator | |
| Microphone gain volume (from 1 to 60) | |
| Headphone monitor volume (from 1 to 30) | |
| Level meter | |
| Elapsed time. This shows the elapsed time (hours: minutes: seconds) of the current file. You can set the maximum elapsed time of every audio file in the “REC SET” | |
| Elapsed time / total time of playback. This shows the elapsed time (hours: minutes: seconds) / total time (minutes:seconds) of the current playback file. | |
| Current file name / total number of saved files in current folder. | |
| Folder name. |
Note: SR-Q2 will automatically create a maximum of 9 folders. Folder names FOLDER01-FOLDER09. Each folder can accommodate 200 wav files. File names REC001.WAV – REC-200.WAV.For example: The screen shows you are recording: No.001 .wav file. The .wav file will be stored in FOLDER01.
Recording/playback symbol:
| Recording standby | |
| Recording/playback pause | |
| Recording | |
| Playback |
| Main Menu | Sub Menu | Sub Menu |
| 1 FILE | FOLDER01 | REC-001.WAV |
| 2 REC SET | File Limit | 30 minutes60 minutes90 minutes120 minutes |
| Sample Rate | 44.1kHz/16bit44.1kHz/24bit48kHz/16bit48kHz/24bit88.2kHz/16bit96kHz/16bit | |
| 3 SD CARD | Total:***MBRemain:***MBFormat SD | |
| 4 PLAY MODE | Play 1 FileRepeat 1 FilePlay FolderRepeat Folder | |
| 5 SYSTEM SET | Date & Time | |
| LCD Backlight | Always OnAlways Off5 seconds10 seconds15 seconds30 seconds | |
| LCD Contrast | 1-2-3-4-5 | |
| Version | ||
| Factory Reset | No/Yes | |
| Battery Type | Ni-MH |
Menu Introduction(1) FILE: Press Play button ![]() to browse all recorded files.FOLDER01: Folder name.REC-001.wav: File name.Delete File: Select a file and press
to browse all recorded files.FOLDER01: Folder name.REC-001.wav: File name.Delete File: Select a file and press ![]() enter delete option.Press left
enter delete option.Press left ![]() or right
or right ![]() button to choose “Yes” or “No”, then press to confirm. If one file is deleted, the name of remaining files will not be changed, and the next recording file will be named the same as the deleted one.Note: Once audio files have been deleted, they cannot be recovered .
button to choose “Yes” or “No”, then press to confirm. If one file is deleted, the name of remaining files will not be changed, and the next recording file will be named the same as the deleted one.Note: Once audio files have been deleted, they cannot be recovered .
(2) REC SET: Set recording parameter.File Limit: Set maximum elapsed time limit. For Example: If you set file limit up to 30 minutes, a 90 minutes’ recording will be divided into 3 separate .wav files. Default setting is 60 minutes.
Sample Rate: Set sample rate.Default setting is 44.1kHz/16bit. The higher the rate you set, the shorter the maximum record time your MicroSD card will accommodate.
|
44.1kHz/ 16bit |
44.1kHz/
24bit |
48kHz/
16bit |
48kHz/
24bit |
88.2kHz/
16bit |
96kHz/ 16bit |
|
|
8GB |
12 hrs | 8 hrs | 11 hrs | 7 hrs | 6 hrs | 5 hrs |
|
16GB |
24 hrs | 16 hrs | 22 hrs | 15 hrs | 12 hrs | 11 hrs |
|
32GB |
49 hrs | 32 hrs | 45 hrs | 30 hrs | 24 hrs |
22 hrs |
| 64GB | 98 hrs | 65 hrs | 90 hrs | 60 hrs | 49 hrs |
45 hrs |
| 128GB | 196 hrs | 130 hrs | 180 hrs | 120 hrs | 98 hrs |
90 hrs |
(3) SD CARDTotal: Total memory storage.Remain: Remain memory storage.Format SD: Format SD card will erase all data. Please always format new memory cards in the device before use.
(4) PLAY MODEPlay 1 File: Play one selected .wav file for one time.Repeat 1 File: Play one selected .wav file repeatedly.Play Folder: Play .wav files in order of file name of present folder.Repeat Folder: Play all .wav files of present folder in repeatedly.
(5) SYSTEM SETDate & Time: Set the date and time so that all files will include a time-stamp when exported.LCD Backlight: Set background LCD light. Select LCD backlight on, off or delay 5/10/15/30 seconds. Default setting is 30 seconds.LCD Contrast: Set LCD contrast. Set LCD screen contrast from 1 to 5. In LCD contrast screen, press ![]() or
or ![]() to adjust contrast level. Then press to confirm and exit.Version: Version of the SR-Q2.Factory Reset: Restore factory settings.Battery Type: Set the battery type for precise power indication. Select Ni-MH or Alkaline. Default setting is Alkaline.
to adjust contrast level. Then press to confirm and exit.Version: Version of the SR-Q2.Factory Reset: Restore factory settings.Battery Type: Set the battery type for precise power indication. Select Ni-MH or Alkaline. Default setting is Alkaline.
Specification
| Recording channel | 2 |
| Recovery channel | 2 |
| Recording format | .WAV(44.1kHz/16bit, 44.1kHz/24bit, 48kHz/16bit , 48kHz/24bit, 88.2kHz/16bit, 96kHz/16bit) |
| Playback format | .WAV(44.1kHz/16bit, 44.1kHz/24bit, 48kHz/16bit, 48kHz/24bit, 88.2kHz/16bit, 96kHz/16bit) |
| A/D conversion | 24-bit, 128x oversampling |
| D/A conversion | 24-bit, 128x oversampling |
| Signal processing | 32-bit |
| Recording media | Micro SD card (8-32GB)MicroSDXC (64-128GB) |
| LCD | LCD 128*64 ( with light ) |
| Built-in stereo mic | 90° X/Y stereo configuration Unidirectional condenser |
| Gain | 0 to +45dB |
| Minimum gain with digital attenuation | -30dB |
| Microphone Input | 3.5mm (1/8”) Stereo Microphone Input |
| Line Input | 3.5mm (1/8”) Line Level Input |
| Input level | 0 to -45dB |
| Output impedance | 2 kΩ |
| Line output | 3.5mm (1/8) stereo jack |
| Output load impedance | 10 kΩ or more |
| Rated output level | -10dBm |
| Headphone output level | 20mW + 20mW into 32Ω load |
| Built-in Speaker | 1W 8Ω |
| USB jack | Type-C |
| Power required | LR6 or Ni-MH AA battery X 2USB DC 5V |
| Recording hours | Alkaline Battery13.5 hours under 96kHz/16bit (wav)19.5 hours under 44.1kHz/16bit (wav) |
| Weight | 116g (4.1oz.) |
| Dimension | 60 (W) x 167 (D) x 30 (H) mm |
Packing List
The SR-Q2 Micro SD card (8G) USB cable Foam windscreen Furry windscreen Hanging strap Storage bag User manual Warranty card
www.saramonic.comThe Saramonic logo is trademark which is registered and owned by Saramonic International.COPYRIGHT 2011-2021 SARAMONIC INTERNATIONAL ( A brand of DSQN )Email: [email protected]
References
[xyz-ips snippet=”download-snippet”]