Saramonic SR-R1 Miniature Handy Recorder
with Lavalier Microphone User Manual

Statement
Please read this manual carefully before using and strictly operate and store in accordance with the instructions. Please save it for your future reference. If the user manual can not help you to solve certain problems, please ask your retailer for help or email us: [email protected].
Important Safety Precautions
- Do not use the unit under water, don’t expose it to rain. Please store it in a cool, dry place.
- Please use and store it in normal temperature. Do not move it from overheated to supercooled condition frequently as well as keep away from heat sources such as heater, oven, or other devices that produce heat.
- When using and storing, please pay attention to dust and moisture.
- Be careful to violent collision.
- To avoid acoustical feedback, do not hold the microphone close to the loudspeakers.
- For the best sound pick-up pattern, do not hold your hand against the microphone head.
- Remove the batteries from the battery compartment when the device is not used for a long time.
- Only use accessories specified by the manufacturer.
- This product uses batteries, please handle and dispose batteries properly.
Introduction
The SR-R1 is a miniature recorder, equipped with a Lavalier microphone. It offers professional-quality digital audio recordings and supports industry-standard WAV file format. It is compatible with almost any audio or video editing software’s. It is ideal for various audio capturing occasions such as wedding videography, public events, documentary shoots, or reality shows.
Features
- Ideal for wedding videography, public events, documentary shoots, or reality shows
- Locking 3.5mm mic input and real-time monitoring headphone jack
- Easy-to-read menu and LCD display
- Professional DK3A Lavalier Microphone included
- Supports stereo input (please order stereo mic separately if needed, SR-XMS2 or DK3A2 recommended)
- Records up to 48kHz/16bit .wav audio files
- Supports micro SD card up to 128GB
- Powered by a AAA battery or DC SV USB power
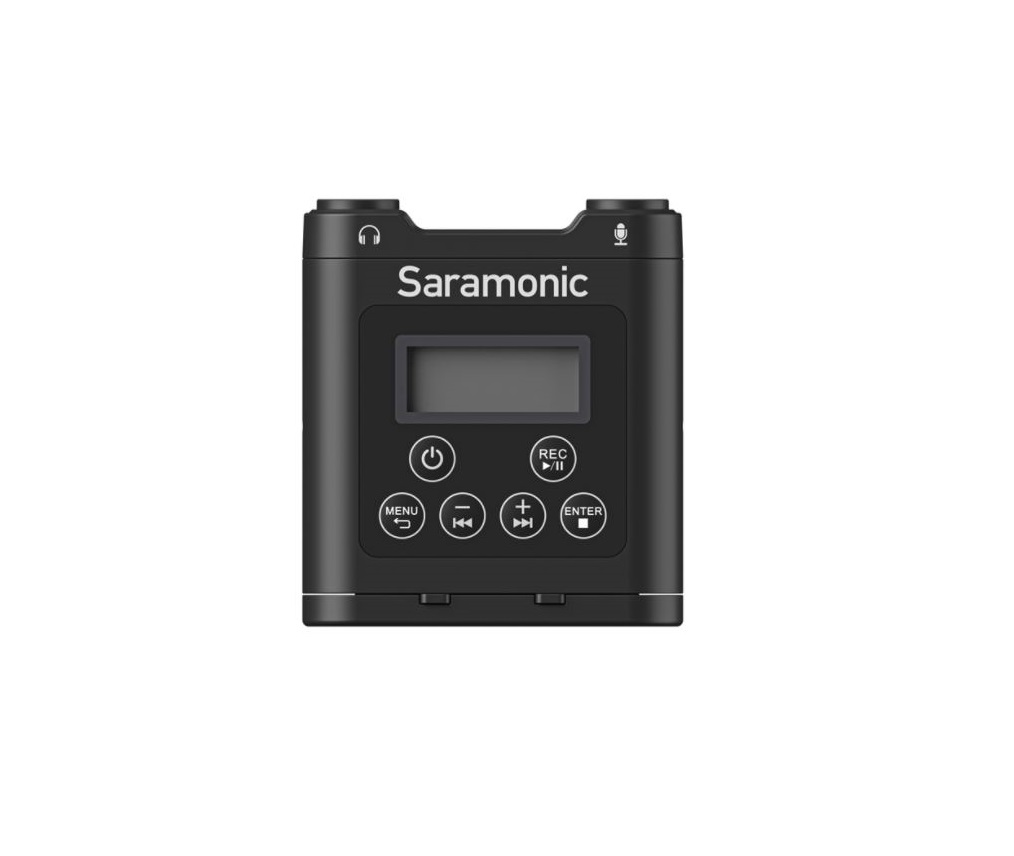
Product Structure

- LCD DisplayDisplays menu, please refer to “LCD Display Introduction” for more details.
- Power ON/OFFPress and hold power button to turn on/off.
- REC ButtonPress the REC button momentarily to start/pause recording.Press and hold the rec button to enter/exit the playback interface, and then press the rec button to play the recording.
- MENU ButtonPress and hold the MENU button for 2s (or short press the MENU button) to enter the menu page. Press the MENU button momentarily to return to the previous menu. In the menu, long press the menu key to exit the menu.
- +/- ButtonAdjust the level of audio input. Press”+” to increase and “-” to decrease.Go through menu and select functions or values shown on the display.
 / Go back to the previous audio track during playback. Go forward to the next audio track during playback.
 - ENTER ButtonOn the recording interface, press the ENTER button to save the current recording.On the playback interface, press the ENTER button to return to the playback standby mode.In the menu, press the ENTER button to enter or select functions.For more details, please refer to “LCD Display Operation Guide”
- 3.5mm Headphone OutputA 3.5mm stereo headphone jack.Connect headphones to monitor the audio output.
- Mic In Jack3.5mm microphone/line input jack to plug in external audio signal.Supports stereo microphones like SR-XMS2 (not included).Note: Please make sure that you select the right input mode in the Line-IN/Mic-IN setting before you plug in an external audio device.
- Micro SD CardPlease refer to “Quick Setup Guide”
- DC SV USB-C PortVia the USB-C port and supplied cable, the SR-R1 can be powered with a USB power bank or connecting to a computer for data transfer.
- Belt Clip
- Battery Compartment and CoverPlease refer to “Quick Setup Guide”
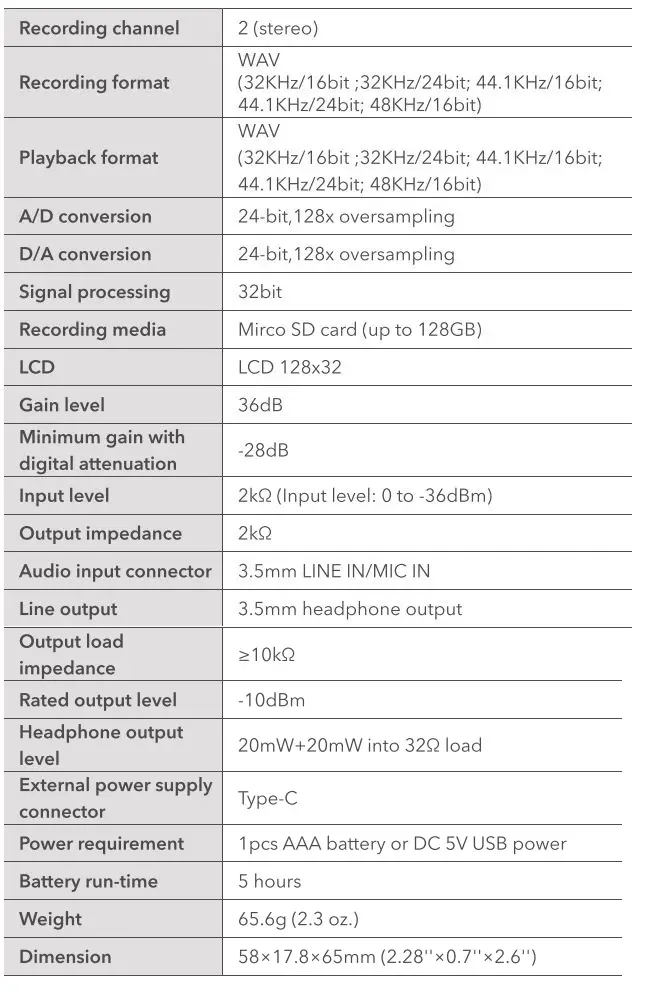
Specifications
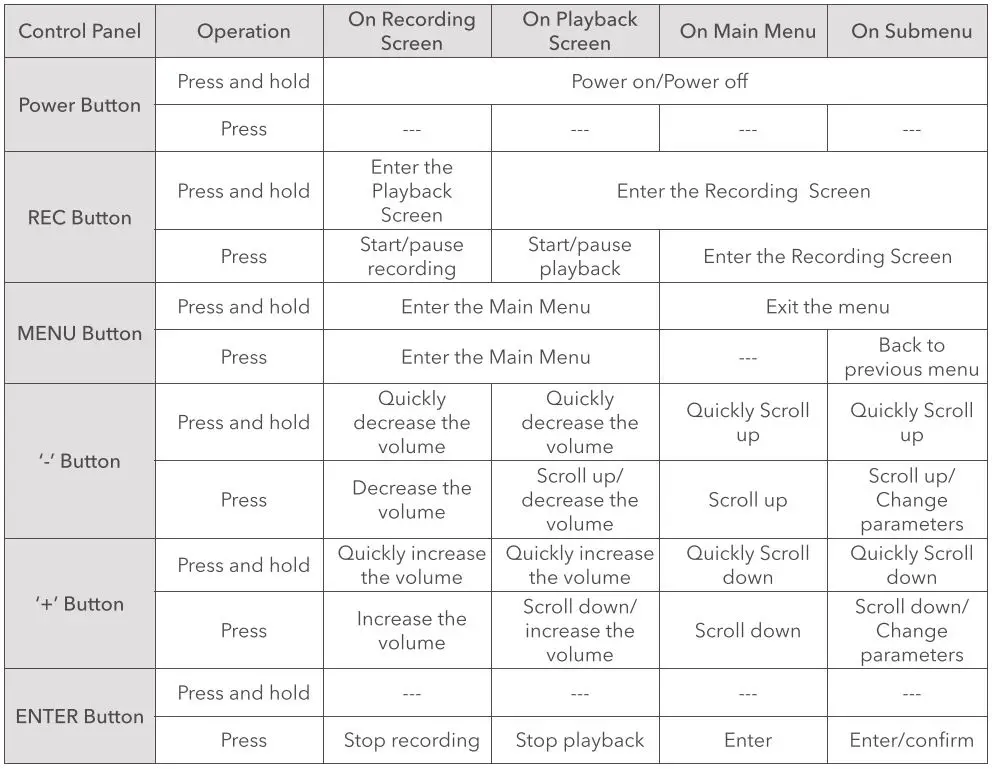
LCD Display Operation Guide
LCD Display Introduction
1. Recording Screen ( Home Screen )

2. Playback Screen
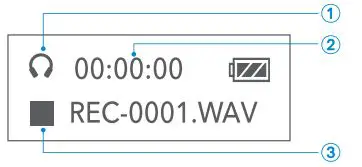
Press and hold the REC button to enter/exit the playback screen.
- Playback mode indicator
- Time indicator This shows the remaining playback time (hours: minutes: seconds) of the current file.
- Playback indicator■ Playback standby►II Playback pause► PlaybackPress the REC button momentarily to start/pause the playback.Press the ENTER button to stop and return to the playback standby mode.
3. Menu

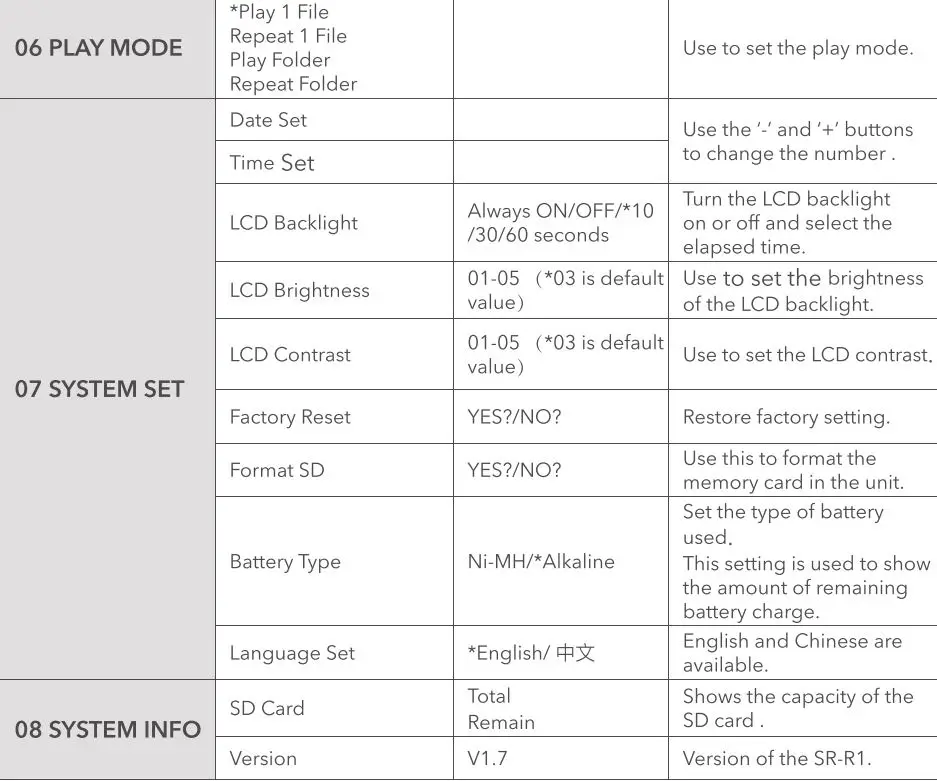
Press and hold the MENU button for 2s {or short press the MENU button) to enter/exit the menu page.Press the MENU button momentarily to return to the previous menu.Press the REC button to return to the recording screen.Please refer to” Menu Introduction” for more details.

Note:
- A When the machine is powered down (while recording), the file will not be saved automatically.
- B. Only in the recording interface and during recording, there is real-time monitoring (no real-time monitoring function in the playback interface).
- C. The date and time setting will not be entered at any time when the machine is turned on ( the date and time can be set only by entering the menu).
- D. When the battery is too low, you may not be able to reset to factory settings.
Quick Operation Guide
Available Recording Time (Hours)
Stereo:
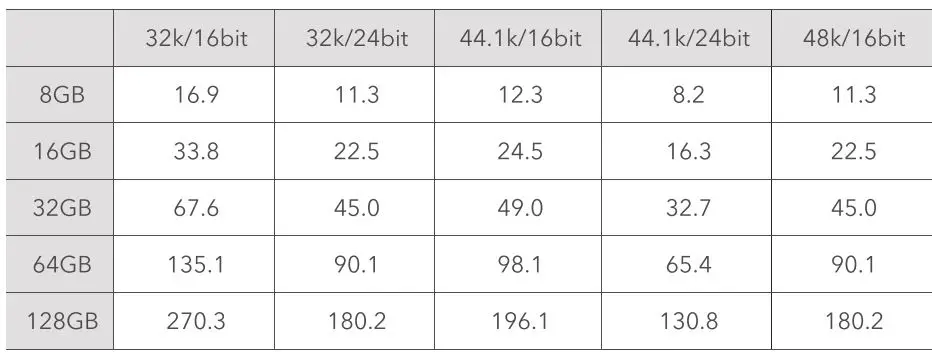
Mono:
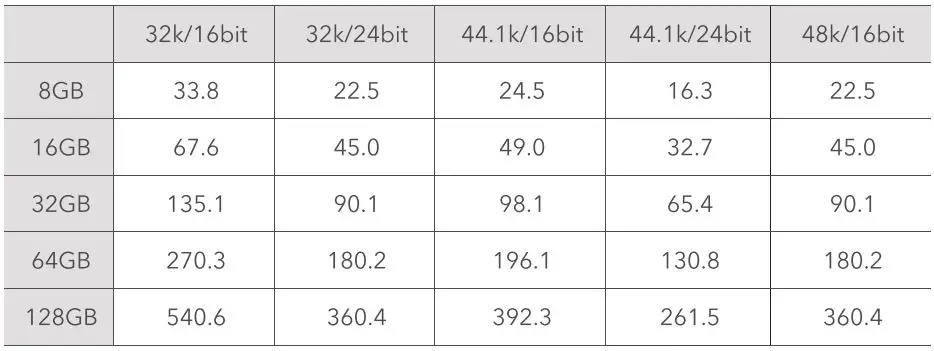
Note: The actual time may vary slightly from the values listed in the tables.
Quick Setup Guide
Battery InstallationPress the release catches to open the compartment cover.
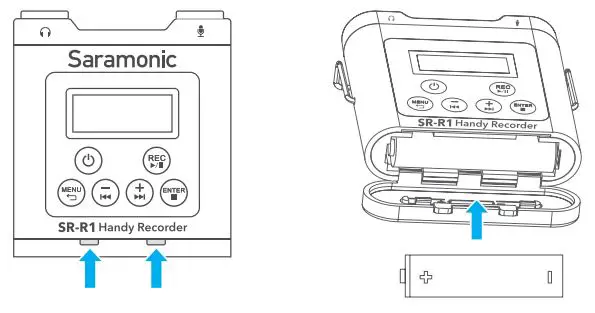
Insert one AAA battery into the compartment, respecting the polarity indicated inside the compartment.
Memory Card Installation
Pull off the cover of the card slot, insert a MicroSD or MicroSDXC memory card into the card slot with the contacts facing up. To remove: Press the card to unlock it, then pull it out from the card slot.
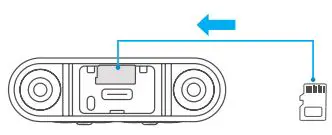
Note: If the SD card cannot work normally, please back up your data and then format it through the SR-R1. To format an SD card, use MENU > SYSTEM SET> Format SD.
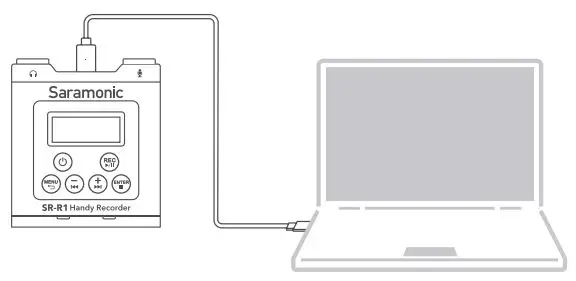
Connect the recorder to a computer via the supplied USB-C cable as picture shown. Please make sure the recorder is power on when connected, the selection on screen will pops up to select “Connect to PC?”
If “NO” is selected, the recorder will being powered and the Home screen will be open.If “Yes” is selected, the recorder will be connected to your computer and start file transferring.
Note: If the unit isn’t in use for long time, the battery can run out.
Packing Lists
- SR-R1 Miniature Handy Recorder
- DK3A Lavalier Microphone
- Type-C to USB-A Cable
- Belt Clip
- Carrying Pouch
- Micro SD Card (BG)

Scan the QR code and follow us!
Shenzhen Jizya Photo Industrial., Ltd
A16 Building, Intelligent Terminal Industrial Park of Silicon ValleyPower, Guanylin, Longhead District, Shenzhen, China
 report this ad
![]() 400-613-1096
400-613-1096![]() www.saramonic.com
www.saramonic.com![]() [email protected]
[email protected]
[xyz-ips snippet=”download-snippet”]