
2.4GHz Dual WirelessLavalier SystemSR-WM21 00User Manual
Thank you for choosing Saramonic!The Saramonic SR-WM2100 is a compact dual channel 2.4GHz wireless lavalier microphone system intended for portable operation. Ideal for DSLR, Mirrorless, and video cameras as well as smartphones and tablets for broadcast TV, electronic newsgathering (ENG), on-the-spot interviews, and more. With an operating range of up to 70m in open areas.Statement
Please read this manual carefully before using it and strictly operate and store it in accordance with the instructions. Please save it for your future reference.If the user manual can not help you to solve certain problems, please ask your retailer for help or email us: [email protected].
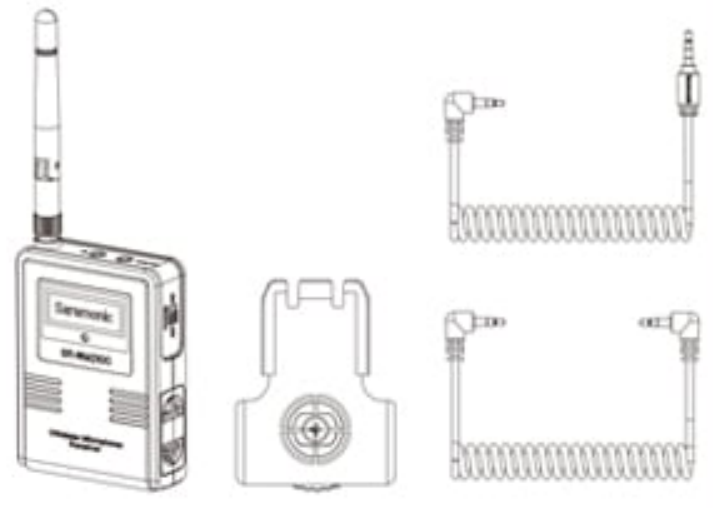
Portable Receiver SR-WM2100 RX
IntroductionThe SR-WM2100 RX is a camera-mountable wireless receiver. It features a level control, headphone monitoring, automatic pairing with transmitters, and two output cables, TRS for video cameras and TRRS for mobile devices.Equipped with an auto-scan function, the RX can automatically search for an available transmission frequency with the best signal.
Product Structure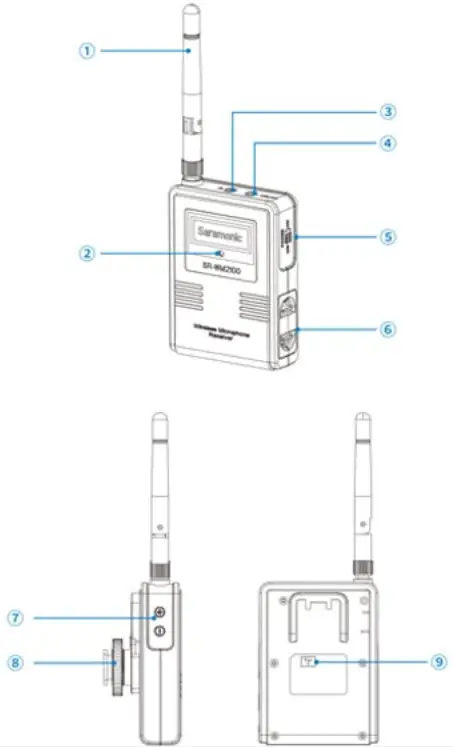
- AntennasScrew clockwise to install.Screw counterclockwise to dismantle.Adjust the antenna accordingly to get the best sound reception.Please do not touch the antenna during recording to avoid interfering with the signal.
- LED indicator
Status Both transmitter TX and receiver RX Turn on the TX / RX Quick flashing green light ( every one second) TX & RX pairing successfully Flashing green light(every 2.5 seconds) Low battery level Flashing red light - Headphone jack3.5mm stereo mini headphone jack.Connect headphones to monitor the audio output.Note: Please do not connect a headphone with a monaural mini jack. This may short-circuit the headphone jack and distorted sound output.
- Line out jack1-Connect the RX receiver to a video camera, camcorder, audio recorder, or mixer with the supplied 3.5mm TRS output cable.2-Connect the RX receiver to a smartphone or tablet with the supplied 3.5mm TRS to TRRS (CTIA standard) output cable.
- Power button (OFF/ON switch)Slide the power button to ON, turn on the RX receiver.Slide the power button to OFF, turn off the RX receiver.
- Battery compartmentOperates on two AA batteries (not included).
- + or – buttonAudio output level controls.The setting is retained even after the power is turned off.
- Standard cold shoe mount
- Pairing pinhole
Attaching Accessories
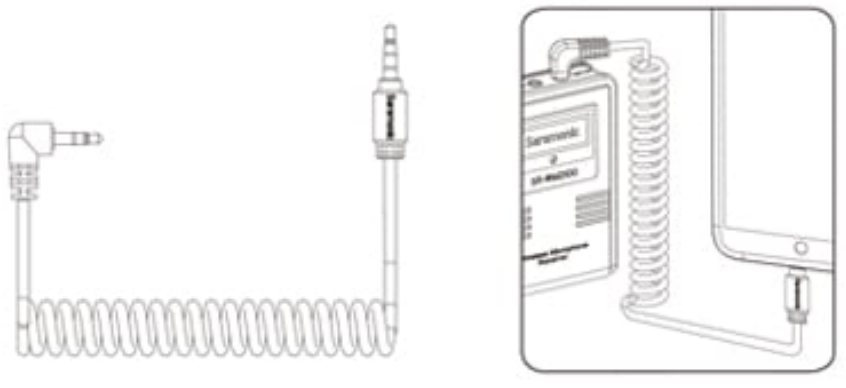
- Connect the supplied cable to the line output jack
- When connecting to a DSLR, Mirrorless camera, camcorder, audio recorder, or mixer, please use the 3.5mm TRS output cable. Plug one end into the line output jack of the receiver and plug the other end into the mic input jack of the camera.

- When connecting to a smartphone or tablet, please use the 3.5mm TRS to TRRS (CTIA standard) output cable. Plug the 90 degrees right-angle TRS into the line output jack of the receiver and plug the straight TRRS end into the 3.5mm headphone jack of a smartphone or tablet.
- Attach the shoe-mount adapterAttach the shoe mount adapter to the receiver, and secure it on your camera’s hot shoe or rig.
 |
 |
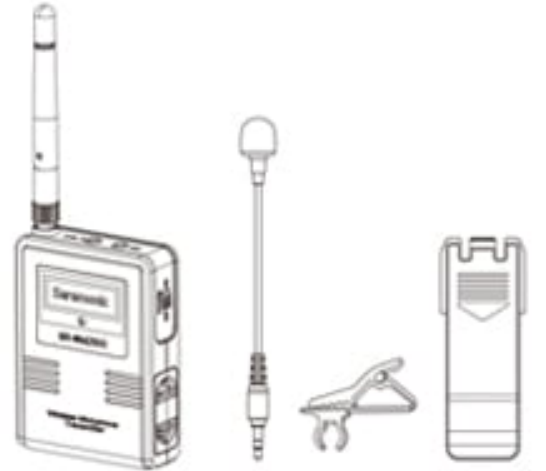
Portable Transmitter SR-WM2100 TX
Introduction
The SR•WM2100 TX is a compact wireless belt-pack transmitter that features both Mic and Line input connectors, a foldable antenna for the best possible wireless transmission, and automatic pairing with the receiver.
Product Structure
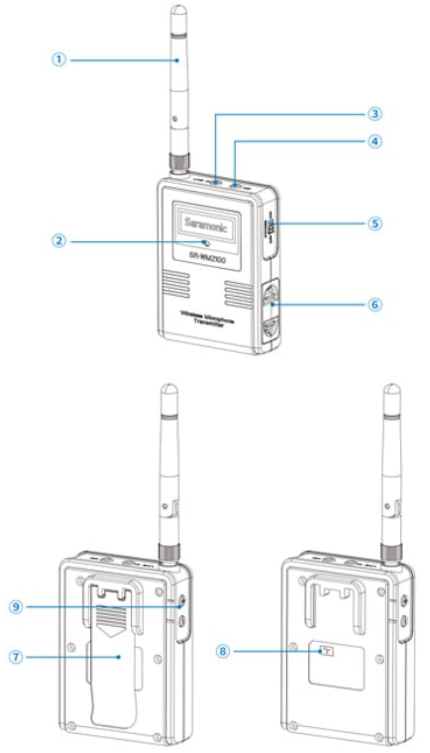
- AntennasScrew clockwise to install.Screw counterclockwise to dismantle.Adjust the antenna accordingly to get the best sound transmission.Please do not touch the antenna during recording to avoid interfering with the signal.
- LED indicator
Status Both transmitter TX and receiver RX Turn on the TX / RX Quick flashing green light ( every one second) TX & RX pairing successfully Flashing green light(every 2.5 seconds) Low battery level Flashing red light - Line input jackConnect to audio devices with a line output.
- Mic input jackConnect to the supplied 3.5mm lavalier microphone.
- Power button (OFF/ON switch)Slide the power button to ON, turn on the TX transmitter.Slide the power button to OFF, turn off the TX transmitter.
- Battery compartmentOperates on two AA batteries (not included).
- Belt clip
- Pairing pinhole
- + or – buttonAudio level controls.The setting is retained even after the power is turned off.
Attaching Accessories
- Connect the microphoneConnect the supplied 3.5mm lavalier microphone into the mic input jack, or connect audio device’s line output into the 3.5mm line input jack of the transmitter.Note: Please turn off the transmitter before connecting or removing the microphone.
- Clip the transmitter on your belt, or put it in your pocket.
Operation Guide
- Install the batteriesTransmitter TX and Receiver RX both need two AA-size batteries.
- Slide the two catches inward and pull out the battery
- Insert two AA size batteries according to the polarity indicators and close the compartment.Please make sure the battery compartment is locked securely.
![]() Cautions on battery use
Cautions on battery use
Please make sure to follow the several points when installing batteries:
- Make sure the batteries are inserted correctly according to the polarity indicators.
- It is suggested to replace both batteries at the same time.
- Please do not use two batteries from different brands together as a combination.
- Remove the batteries from the battery compartment when the device is not used for an extended period of time.
- Slide the power button to ON, turn on both the transmitter and receiver.
- Transmitter and Receiver pairing
- Pull off the belt clip, as the image below illustrates, and you will notice the pairing pinhole on both transmitter and receiver.
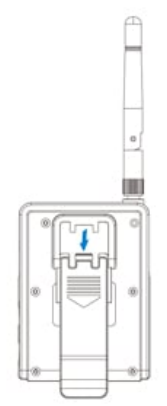
- Using the supplied pairing pin, insert into the small pinhole on both transmitter and receiver in quick succession. When pairing is successful, the indicators flash in green slowly, about every 2.5 seconds.
- The other transmitter can easily be paired with the receiver using the same method.

| Note: The system is already paired at the factory and will be paired when it is turned on. Additionally, it will automatically search for an available transmission frequency with the best signal. |
- Connect the receiver to the mic input of a camera, camcorder, mixer, smartphone or tablet with one of the supplied output cables.
- Plug headphones into the receiver to monitor the recording audio if your camera or device lacks a headphoneNote: If headphones are connected successfully, the indicator flashes slowly in green every 2.5 seconds. Otherwise, the indicator flashes quickly in green, please ensure headphones are fully plugged into the phone jack.
- Attach the accessories you need for the receiver and transmitter, refer to “attaching accessories” on Page 5-6 and Page 9.
- You are ready to record.Notice: Due to the 2.4GHz wireless frequency, the signal can be easily attenuated. Please try to avoid obstacles, such as walls and buildings, and avoid close proximity to devices with 2.4GHz signals, such as high-power WiFi antennas, smartphones with WiFi in use, radios, etc.
Specification
| Oscillator type | GFSK |
| Carrier frequencies | 2.4GHz (2404-2476MHz) |
| Antenna | 2.4GElz built•out antenna |
| Frequency response | 35Hz•141cHz (+1-34:1B) |
| Signal to noise ratio | 75dB or more |
| The polar pattern of a lavalier microphone | Omnidirectional |
| Reference deviation | 10ppm |
| Distortion | 0.05% or less (320,1 kHz, 65mW output) |
| Receiver sensitivity | -87d8m |
| RF output power | 5mW |
| Headphone output level | 65mW (32Q) |
| Reference audio input level | -30–42d8v (MC input, 0dB attenuation) |
| Audio input connectors | 3.5mm ink input |
| 3.5mm tine input | |
| Headphone output connector | 3.5mm mini-jack |
| Operating Distance | 70m (without obstacle) |
| Battery | Two AA-size batteries |
| Approximate Battery Life | ≥20 hours |
| Dimensions | TX: 62.515.716.4 mm |
| RX: 62.5%5.7’26.4 mm |
| Weight | TX: 689 (2.40oz) (without batteries) |
| Mt 68.59 (2A2oz) (without batteries) | |
| Operating temperature | OT to SOt |
| Storage temperature | -20•C to *SOT |
Packing lost
TX
- Bodypack transmitters: TX x 2
- Omni-directional lavalier microphonesx 2
- Microphone clipsx2
- Antennas x 2
- Belt clipsx2
- Windscreensx2
RX9
- Portable receiver: RX9 x 1
- 5mm TRS audio output cable x 1
- 5mm TRS to TRRS (CTIA standard) audio output cable x 1
- Shoe mount adapterx 1
- Antenna x 1
- Pairing pin x1
www.saramonic.comSaramonic is a trademark registered and owned by Shenzhen DSONInvestment CO., LTD. COPYRIGHT 2011-2021 SARAMONIC INTERNATIONAL ( A brand of DSQNRoom 2009, Shenzhou Banuida Bldg, Banxuegang Road, Banyan Street, Longgang District, Shenzhen, China 518129Email: infoesaramonic.comMade in China
[xyz-ips snippet=”download-snippet”]