
SATCO S11265 Starfish WiFi Smart 16′ Outdoor Strip Light Instruction Manual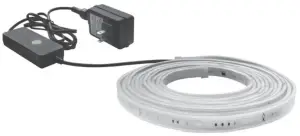
INSTALLATION AND SAFETY INSTRUCTIONS
IMPORTANT: Read before installing fixture. Retain for future reference.
WARNING: Risk of Fire or Electric Shock
- Installation requires knowledge of luminaries electrical systems. If notqualified, do not attempt installation. Contact a qualified electrician.
- To reduce risk of fire and over-heating, secure all connections.
- TURN OFF the electrical power before proceeding.
- The electrical rating of this product is 120V/60Hz.
- The grounding and banding of the overall system shall be done inaccordance with National Electric Code (NEC) Article 600 and local codes.
- To prevent wiring damage or abrasion, do not expose wiring to edges of sheet metal or other sharp objects.
- Do not make or alter any open holes in an enclosure of wiring or electricalcomponents during kit installation.
- This device is not intended for use with emergency exits.
- Suitable for wet locations.
NOTE: This device complies with part 15 of the FCC Rules. Operation issubject to the following two conditions: (1) This device may not cause harmfulinterference; (2) This device must accept any interference received, includinginterference that may cause undesired operation. Visit www.Satco.com forfull warranty details and dimmer compatibility information.

INSTALLATION
Before installation, select a location where you want to install, measure the required length of strip light, and mark it. Confirm that the adapter power cord will reach the desired power outlet and the LED strip light. Clean the mounting surface and keep it dry. It is important that the surface is smooth and clean before mounting the fixture.
STEP 1:Turn power OFF before installing fixture.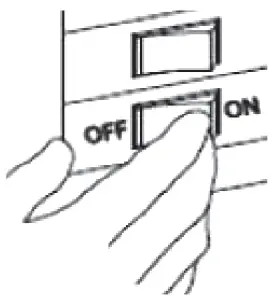
STEP 2:Find the desired place for the strip light and mark it clearly using the provided clips. Mount the fixture using the provided screws.
STEP 3:If there is an LED chip in a corner when placing the strip light, ensure the angle of the bend is greater than 90º to avoid damaging the LED chip.
STEP 4:Plug strip light into the nearest outlet. Installation is complete. Turn power ON.
STEP 5:Via the control button on the driver, toggle through the functions:
- Warm White – ON
- Cool White – ON
- Warm and Cool White – ON
- RGB – ON
- OFF
- Press and hold on for 5 seconds to connect APP
STEP 6:App Connection: To connect your device, download the free “Starfish Smart Lighting” App from the app store. Please refer to our Starfish User Guide for detailed instructions on how to pair your device.
![]()
References
[xyz-ips snippet=”download-snippet”]