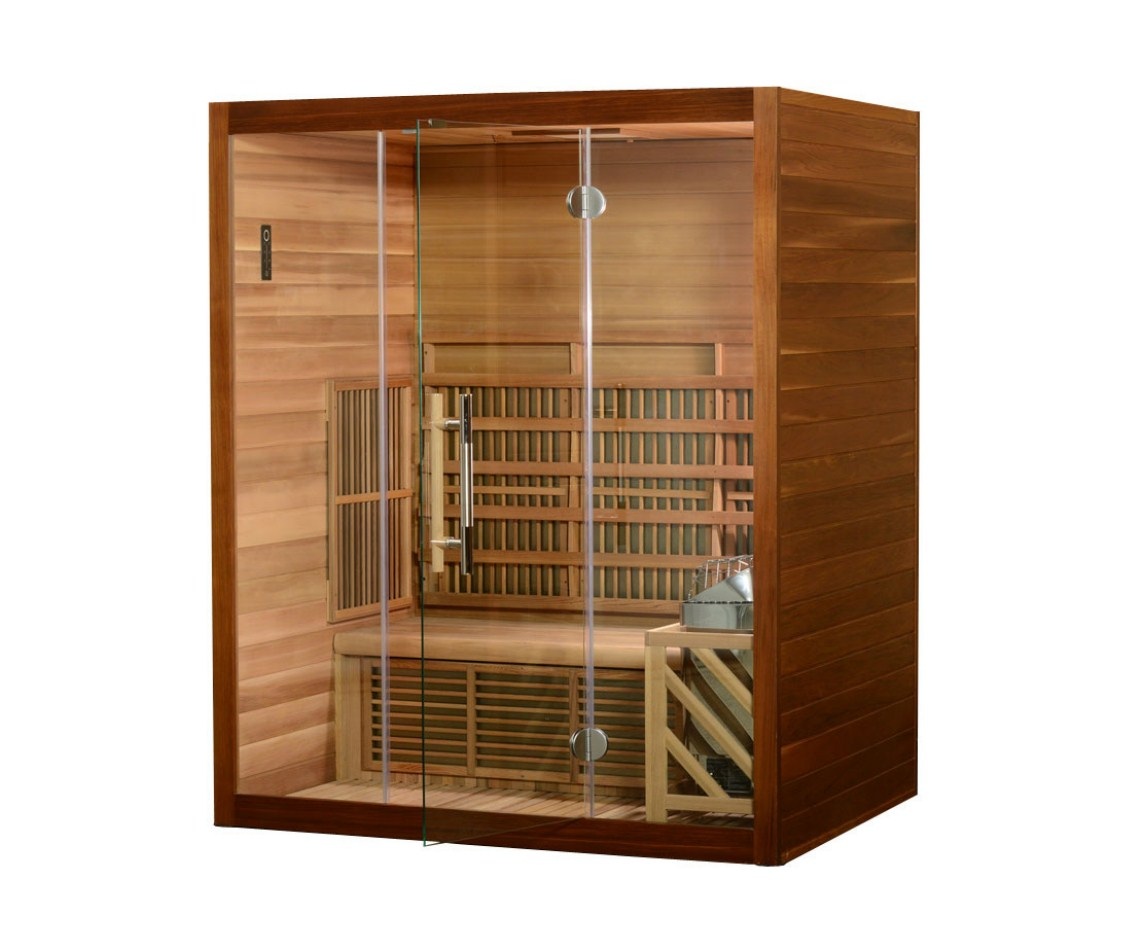
Hampton Hybrid Sauna User Manual

![]()
Hampton SaunaInstallation & Owner’s Manual
Read this entire manual through to the end before proceeding with the assembly.
Thank you for your purchase of your Hampton indoor sauna!Should you have any questions during assembly,please feel free to call us at 888.355.3050,or email [email protected].Regular business hours are 9-5 EST, M-F.
Your Hampton Indoor Sauna is specifically designed to utilize your existing floor. As such, assembly is made very simple since the entire sauna sits on pre-fabricated rails and risers. Your sauna can be assembled on any surface that is firm and flat, including concrete, ceramic, vinyl, laminate or tile. Installation on a carpeted surface is not recommended.
NOTE: Your Hampton sauna requires a dedicated 20 amp outlet for proper operation. A separate hard-wired 220V, 30 amp circuit is required for the traditional sauna heater.
Pre-Assembly Suggestions
- While you can move the completed Hampton very gently by sliding it across the floor, we suggest that you assemble the sauna in the location where you plan to use it.
- Terms such as “left” and “right” refer to the location when facing the completed sauna from the front, or glass side.
Sauna Assembly
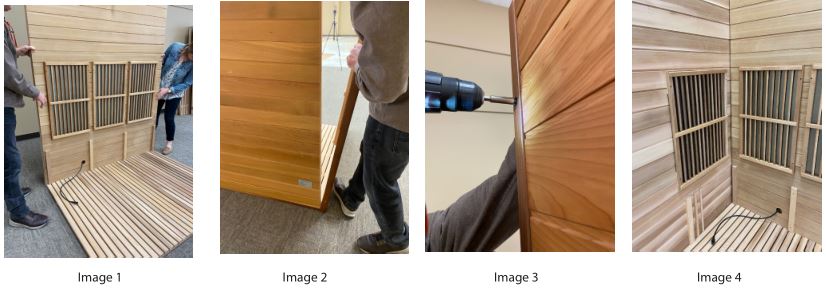
- Place the floor section in the location where you will want the sauna and position the rear wall so that it is on the outside of the floor section as shown (1). Find the left wall section and position so that it is outside the floor section and aligns with the rear wall section (2). Screw the left wall section to the rear wall using the 3” screws as shown (3). View from inside after left wall has been attached to rear wall. Note: The floor section does not attach to any of the walls (4).
 Slide the bench support between the vertical boards at the base of the left wall section (5). Plug the wire from the rear wall section into the wire from the bench support. This connection will power the floor heating panel located on the bench support (6). Place the bench over the bench support (7). It will be supported by the bench support as well as support boards located on the side and rear walls. Note: The bench support and bench are installed prior to installing the right wall section. Find the right wall section and place to the outside of the floor section, ensuring that the bench support fits between the vertical boards on the right wall section (8). Screw the right wall section to the rear wall using 3” screws (9). Locate the back rest and position over the heater panels (10). Secure the back rest to the rear wall using 2” screws. Note: Be sure the back rest is level and positioned approximately 2” above the bench (11). Picture of assembly thus far (12). The front glass wall will attach to the left and right wall sections via a pin and slot assembly. Note the pin on left and right wall sections (13). Note the slots on the right and left sides of the front glass panel (14). With two people, position the front wall section so that the pins align with the slots (15). Then lift the front wall section so that the pin will insert into the large portion of the slot at the top, middle and bottom of each side. Then lower the wall section so that the pin slides into the narrow part of the slots. This will secure the front wall section to the left and right wall sections. (16). If necessary, use a rubber mallet to assist in lowering the front wall section to the height of the left and right wall sections (17). Find the heater wire connections at the top of the panels and move them so they lay to the outside of the sauna for now. This is so that they do not interfere with positioning the roof section (18). Find the roof section and remove the thin protective dust cover that is secured with small screws (19). Place the roof section over the top of the sauna and lower between the walls so that it rests on the supports at the top of the wall sections. Note: The power box on the top side of the roof should be to the rear of the sauna (20). Connect the heater wires, then lay the wire into the groove that is cut into the roof section. This will ensure that the dust cover can be reinstalled without interfering with the wires (21). Be sure that the wires plugs are fully connected and seated securely into the receptacles (22). The plug accompanying your Hampton sauna will be different than pictured (23). Feed the power connector through the hole in the dust cover and reposition the dust cover over the roof section (24). Reattach the dust cover to the roof section (25). Find the door handle and disassemble (26). Reattach the door handle to the holes located in the glass door. Note: Tighten screws until they are snug, but not overly tight (27). Find the two door hinges and hex wrench and disassemble the hinges (28). Reattach the hinges to the door and the glass window, tightening with the hex wrench so they are snug. Note: You may have to loosen the screws again when the door is attached to adjust the fit of the door. Once the fit is completed you may tighten the screws in the hinges (29). Attach the magnetic door latch to the top of the door frame. Note: Do not fully tighten the door latch until you are sure that the door will properly secure to the latch (30). Slide the metal catch over the door to align with the magnetic door latch as shown (31). Install the traditional heater according to the instructions in the heater manual. This will include mounting the heater to the wall of the sauna with mounting screws, with the bottom of the heater being approximately 7” from the floor of the sauna. Be sure that the screws are at the same height (32). Lower the heater onto the mounting screws (33). Assemble the heater fence (34). Place the heater fence in front of the traditional heater (35). WARNING: Never operate the infrared heaters and the traditional heaters at the same time. Operate one or the other, depending on the type of sauna you would like to enjoy.
 Slide the bench support between the vertical boards at the base of the left wall section (5). Plug the wire from the rear wall section into the wire from the bench support. This connection will power the floor heating panel located on the bench support (6). Place the bench over the bench support (7). It will be supported by the bench support as well as support boards located on the side and rear walls. Note: The bench support and bench are installed prior to installing the right wall section. Find the right wall section and place to the outside of the floor section, ensuring that the bench support fits between the vertical boards on the right wall section (8).
 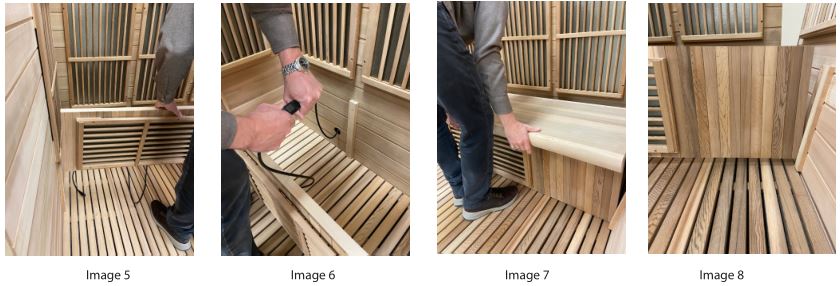 Screw the right wall section to the rear wall using 3” screws (9). Locate the back rest and position over the heater panels (10). Secure the back rest to the rear wall using 2” screws. Note: Be sure the back rest is level and positioned approximately 2” above the bench (11). Picture of assembly thus far (12).
 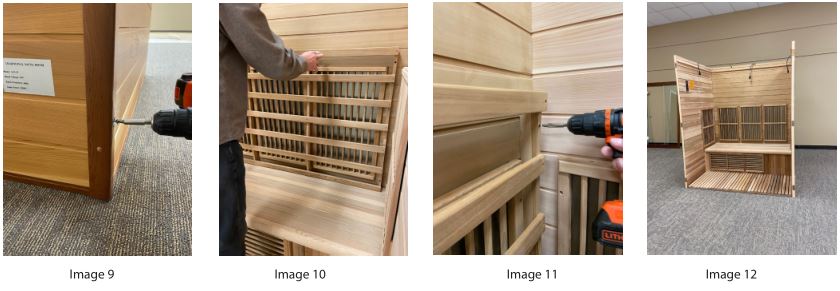 The front glass wall will attach to the left and right wall sections via a pin and slot assembly. Note the pin on left and right wall sections (13). Note the slots on the right and left sides of the front glass panel (14). With two people, position the front wall section so that the pins align with the slots (15). Then lift the front wall section so that the pin will insert into the large portion of the slot at the top, middle and bottom of each side. Then lower the wall section so that the pin slides into the narrow part of the slots. This will secure the front wall section to the left and right wall sections. (16).
  If necessary, use a rubber mallet to assist in lowering the front wall section to the height of the left and right wall sections (17). Find the heater wire connections at the top of the panels and move them so they lay to the outside of the sauna for now. This is so that they do not interfere with positioning the roof section (18). Find the roof section and remove the thin protective dust cover that is secured with small screws (19). Place the roof section over the top of the sauna and lower between the walls so that it rests on the supports at the top of the wall sections. Note: The power box on the top side of the roof should be to the rear of the sauna (20).
 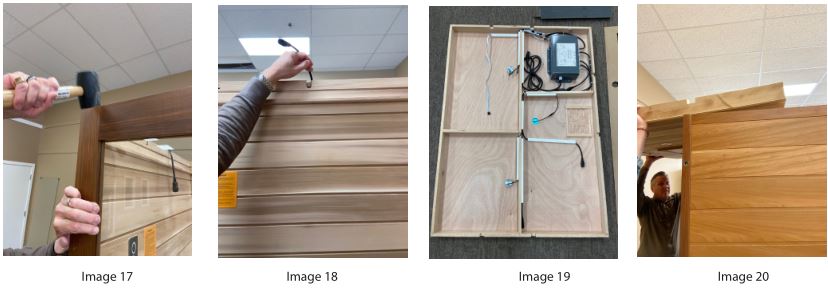 Connect the heater wires, then lay the wire into the groove that is cut into the roof section. This will ensure that the dust cover can be reinstalled without interfering with the wires (21). Be sure that the wires plugs are fully connected and seated securely into the receptacles (22). The plug accompanying your Hampton sauna will be different than pictured (23). Feed the power connector through the hole in the dust cover and reposition the dust cover over the roof section (24).
 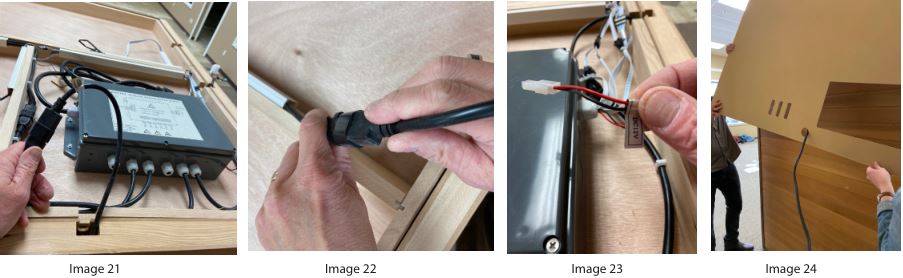 Reattach the dust cover to the roof section (25). Find the door handle and disassemble (26). Reattach the door handle to the holes located in the glass door. Note: Tighten screws until they are snug, but not overly tight (27). Find the two door hinges and hex wrench and disassemble the hinges (28).
 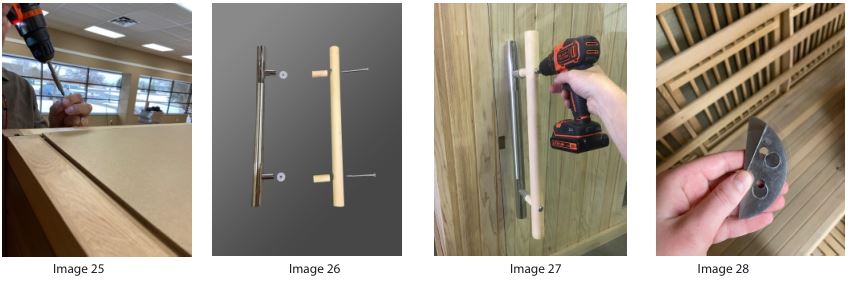 Reattach the hinges to the door and the glass window, tightening with the hex wrench so they are snug. Note: You may have to loosen the screws again when the door is attached to adjust the fit of the door. Once the fit is completed you may tighten the screws in the hinges (29). Attach the magnetic door latch to the top of the door frame. Note: Do not fully tighten the door latch until you are sure that the door will properly secure to the latch (30). Slide the metal catch over the door to align with the magnetic door latch as shown (31).
 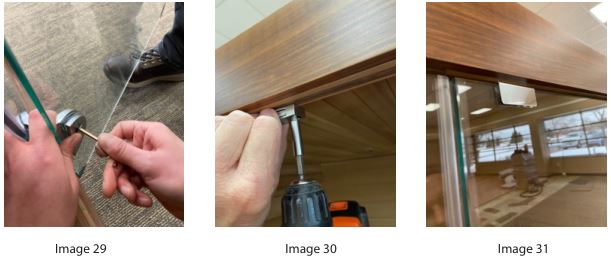 Install the traditional heater according to the instructions in the heater manual. This will include mounting the heater to the wall of the sauna with mounting screws, with the bottom of the heater being approximately 7” from the floor of the sauna. Be sure that the screws are at the same height (32). Lower the heater onto the mounting screws (33). Assemble the heater fence (34). Place the heater fence in front of the traditional heater (35).
 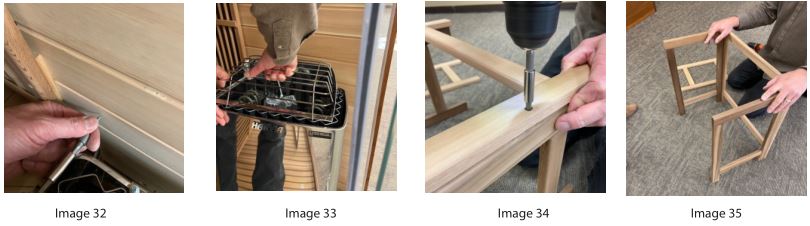 WARNING: Never operate the infrared heaters and the traditional heaters at the same time. Operate one or the other, depending on the type of sauna you would like to enjoy.
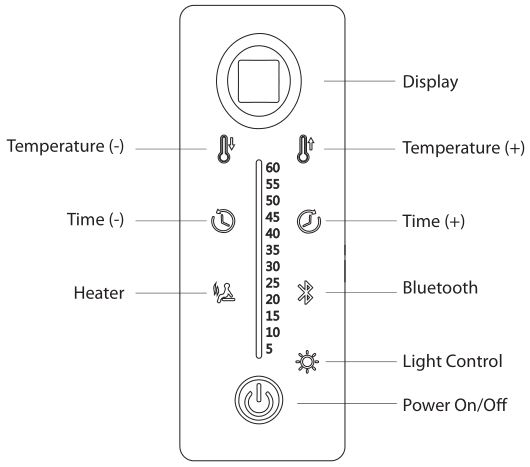
CONTROL OPERATION
Power On/Off
Turn on the system by pushing and holding the Power button for 4 seconds until the green lights on the display are lit. Turn the system off by pushing the Power button a second time for 1 second. The red light on the Power button indicates the system is turned off. All of the sauna functions will only operate when the system is on and the panel is green.
Infrared Heater Operation
With the display on, press the Heater button, which will immediately turn green. This indicates that the infrared heater panels are heating.
To adjust the temperature, press the Temperature (-) or Temperature (+) to raise or lower the set temperature. The temperature is displayed in Celsius, with the lowest temperature setting being 30°C (86°F) and the maximum temperature setting being 70°C (158°F). Pressing the temperature buttons will raise or lower the temperature by 1° each time the button is pressed. After 8 seconds the display will indicate the actual temperature in the sauna.
The heaters can operate to a maximum of 60 minutes, and you can adjust the heating time with the Time (-) or Time (+) buttons. You will add 1 minute to the time each time you press the Time button. After 8 seconds the display will show the time remaining. When there are 5 minutes left in the cycle, the timer will sound 3 times to remind you that your session is ending. When the heaters turn off after 60 minutes you can reset the timer if you wish to keep the heaters on for another cycle.
Bluetooth Function
To activate Bluetooth, press the Bluetooth button which will immediately turn green. Turn on the Bluetooth function on our Bluetooth device and pair to BT Audio. You can now listen to music from your device and control the volume from your device. The speakers are located above the ceiling and are not visible from inside the sauna.
Lighting
To turn on the overhead light, press the Light button, which will immediately turn green on the display. The color of the overhead light will be the same as when the unit was last turned off. The light has 9 settings which display as L1-L9. The settings are as follows: L1=white, L2=red+blue, L3=blue, L4=blue+green, L5=green, L6=green+red, L7=red, L8=all colors, L9=fade from color to color. To change the light setting press the Light button and hold for 5 seconds. Then press the button and release to get to the setting you’d like. The system will exit the Light function after 8 seconds.
High Temp Limit
You should never operate the infrared and traditional heaters at the same time. The infrared system will not operate if the temperature in the room is 80°C or above, so be sure the room cools off after using the traditional heater before operating the infrared heaters.
Sensor Fault Detection
An EO indicator on the display panel means there is an open circuit and you should check your circuit breaker to be sure it is not tripped. The plug on your infrared sauna requires a 20amp dedicated circuit.
An E1 indicator on the display panel means that there is some sort of short in the circuit, and you should contact your electrician.
![]()
Hampton Hybrid Sauna User Manual – Hampton Hybrid Sauna User Manual –
[xyz-ips snippet=”download-snippet”]