![]() 12” TABLETOP RGB RING LIGHTUSAGE INSTRUCTIONS
12” TABLETOP RGB RING LIGHTUSAGE INSTRUCTIONS
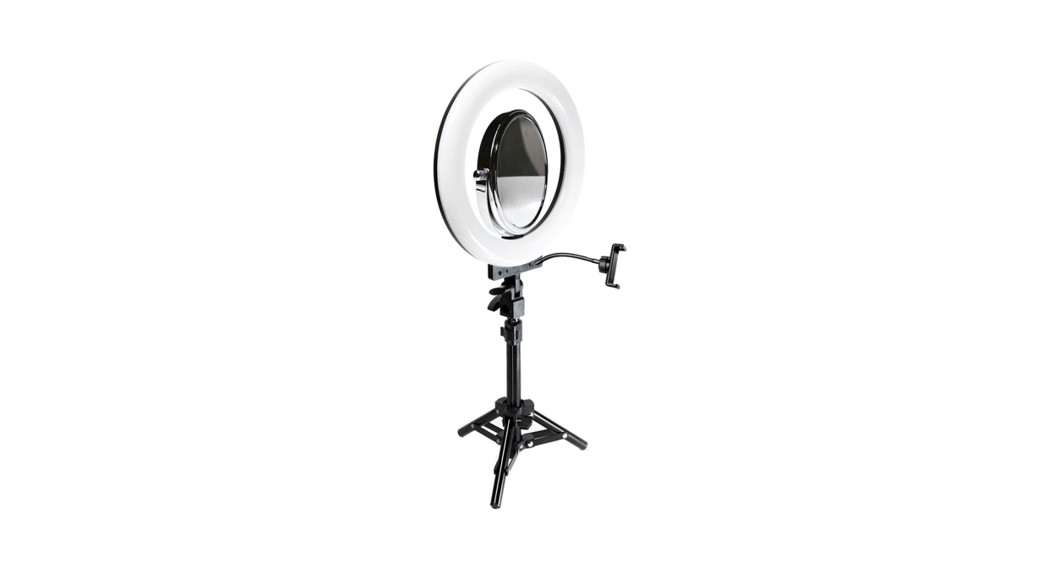
Setting Up:
![]()
- Loosen the knob at the base of the stand to extend the legs outward at a 45° angle from the table for the most secure position. Tighten the knob to secure the legs. Flip open the knob on the stand upright to extend it to your desired height, and close to the lock.
- Loosen the lower knob on the light stand adapter at the bottom of the ring light and slide it onto the top of the light stand. Tighten the adapter knob to secure.
- If tilting is desired, loosen the upper knob on the light stand adapter, tilt to the desired angle and retighten. Always tilt the light over one of the three legs for stability.
- Plug the AC power cord into a household socket.
- If desired, slide the included mirror into the shoe mount located at the bottom inside of the ring light. Tighten the knurled knob above the mirror shoe mounts to secure it in place.
- If you are using the camera on your mobile phone, tighten the included bendable arm with the attached phone holder into either of the (2) ¼”-20 threads on the bottom front of the ring light.
- Press the side of your mobile phone into the top of the phone holder. The holder will expand until it has gripped both sides of the phone. The arm can be bent to achieve any desired camera angle.
The ring light is also compatible with any standard light stand; simply place the bottom bracket over the light stand adapter and tighten the side knob to secure.
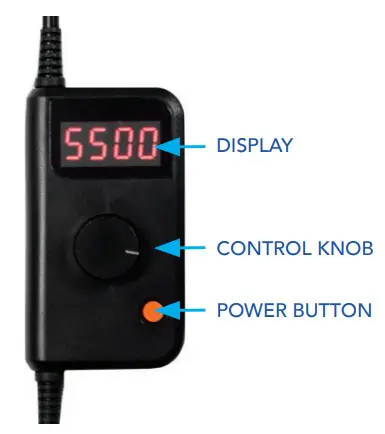
Ring light Control Settings
Press the red On/Off Power button. The ring light will turn on and display either a daylight temperature reading between 3200K and 5500K or “H” followed by a number between 0 – 36, if last used in RGB Mode.
FOR DAYLIGHT USE:
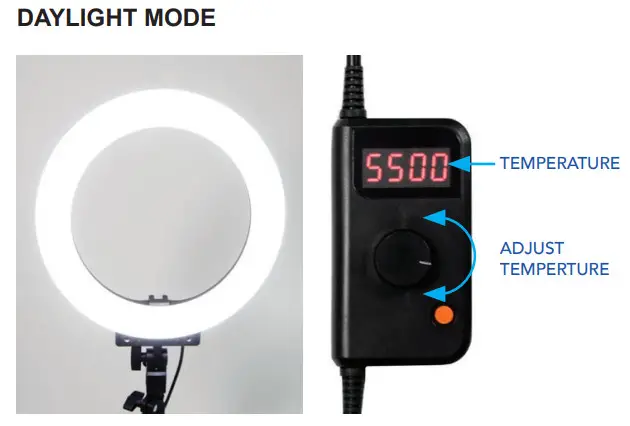
If the ring light displays the letter “H” followed by a number, hold the control knob down for 2 seconds. The ring light will switch from RGB mode to daylight mode. In this mode, you can adjust the Kelvin temperature from 3200K to 5500K.3200K Will provide a warm look similar to a cool white incandescent bulb.5500K Will simulate true daylight and will give the most accurate color reproduction. You can also select a wide range of Kelvin temperatures between 3200K and 5500K to match available light in your current environment.Once the desired color temperature is set, press the control knob once. The display will show a “P” followed by a number between 10 – 100 to represent the power level of the light output. Turn the control knob counterclockwise to reduce the light output or clockwise to increase.
FOR RGB COLOR USE:
If the ring light displays a number between 3200 – 5500, hold the control knob down for 2 seconds. The display will show a “H” followed by a number to represent the selected hue. In this mode, you can select between 360 different colors.
0 = RED, 120 = GREEN, 240 = BLUEOther values are a combination of red, green, and blue to achieve all other possible colors. Once the desired color is set, press the control knob once. The display will show a “P” followed by a number between 10 – 100 to represent the power level of the light output. Turn the control knob counterclockwise to reduce the light output or clockwise to increase.
Smart Phone App
The Savage 12” Tabletop RGB Ring Light can be controlled remotely using the free Savage “Light Manager” App available for download in both the Google Play Store and Apple App Store. To locate, search “Light Manager” and look for the icon pictured on the right of this page.
With the Bluetooth setting on your phone enabled, press the light’s power switch on. Open the Savage “Light Manager” app on your phone. Pairing the ring light in your phone manually is unnecessary. The light should sync with the app automatically as soon as the app is opened. The light will not pair until the app is opened.
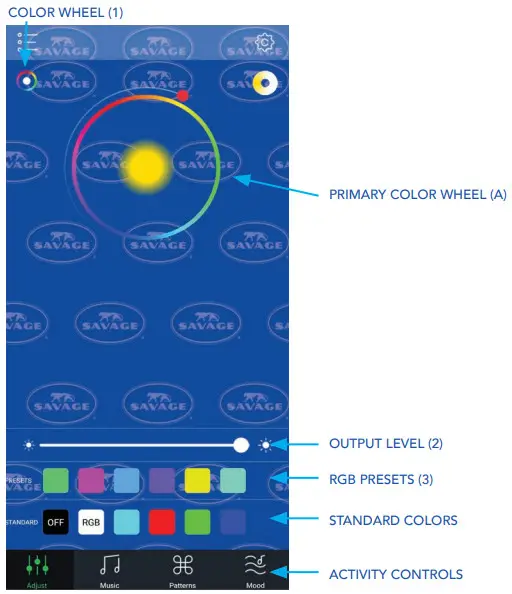
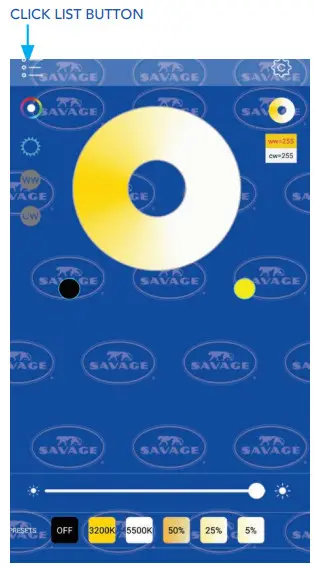
SPECIAL EFFECTSThere are 4 activity controls at the bottom of the app. Tap the activity button at the bottom that you wish to activate.ADJUST FUNCTIONThe adjust function allows the user to change color, brightness, Kelvin temperature, save colors, and adjust hue and saturation.
PRIMARY COLOR WHEEL (A)Primary Color Wheel (A) allows user to scroll around the color wheel to select 36 different colors.Once the desired color has been selected, slide right on the white “Light Output Bar” (2) to increase or left to decrease light output.
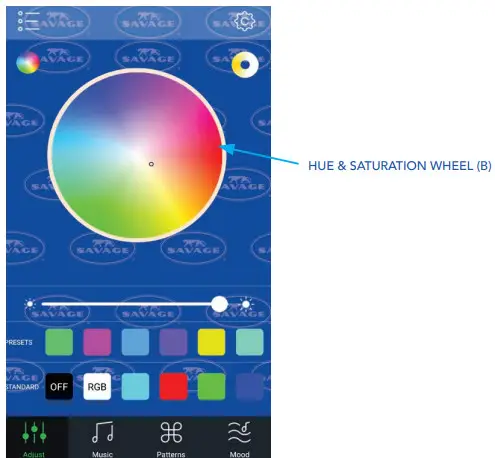
HUE AND SATURATION WHEEL (B)Tap the color wheel (1) in the top left-hand corner of the app. This function allows the user to change to the “Hue and Saturation Wheel” (B). The wheel will allow you to change the hue and saturation of the color selected on the light. Tap the area of the color wheel anywhere inside the wheel to make your selection. You may also drag your finger inside the wheel until you observe the desired color on the light. Below the Light Output Bar (2), there are 6 programmable “Preset Buttons” (3) that allow you to save the color of your choice for future use. To save a color, tap any of the 6 preset buttons. A checkmark will appear in the box. Scroll to the color of your choice on the color wheel. Tap the checked preset button again to uncheck the box. The check mark will disappear and the box will change to the color you selected. That color is saved for future use. You can repeat the above steps to save up to 6 colors, the presets will not save the light level. Only the desired color.
Below the 6 presets, there are 4 common “Standard Colors”. They are RGB, red, green, blue and cannot be programmed. Simply tap to select and the light will change to the standard color. Press the “RGB” button to go from the selected color to white.
RGB COLOR MODE
Note: this white setting is using the RGB bulbs rather than the 5500K LED bulbs and will cast a somewhat blue cast. For best results, we recommend using the 5500K setting in the “Color Temperature Wheel” (C).
Select the “Off” button to decrease light output to 0%. Tap any color on the color wheel or any of the color buttons and the light will re-start at the selected color. To turn the ring light back on, tap any color on the color wheel or any of the color buttons and the light will re-start at the selected color.
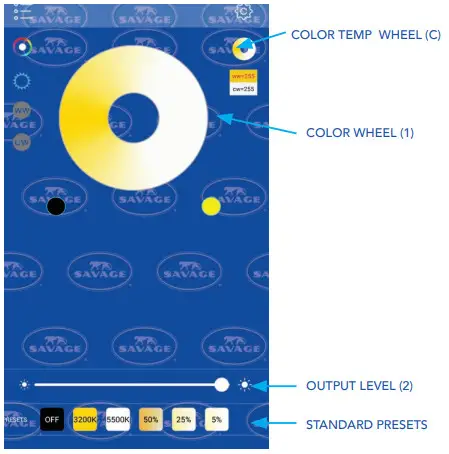
COLOR TEMPERATURE WHEEL (C)The Savage 12” Tabletop RGB Ring Light can be set to 5500K / daylight output. It can also be set to 3200K /tungsten light that is similar to a cool white incandescent look. In many rooms, there are multiple light sources in the room that are blending together. In those instances, the light in the room is neither daylight nor tungsten. The Kelvin wheel allows the user to blend the 2 light sources to match the available light in the room. It can also be used to “warm” or “cool” the subject for creative purposes.
To enable the color temperature blending function on the ring light, tap the “Color Temperature Wheel” (C). You will then be able to slide your finger around the color wheel (1) to achieve the color temperature of your choice. Once the desired color has been selected, scroll right on the white Light Output Bar (2) to increase or left to decrease light output. Below the Light Output Bar (2), there are 6 “Preset Buttons”. They are not programmable.
DAYLIGHT KELVIN MODE
The first button in the Standard presets labeled will decrease the light output to 0% (the light will still be in the On position). The second button labeled “3200K” will adjust your light to tungsten. The third button labeled “5600K” will set the light to daylight color temperature.The 5% button = 3400K, 25% = 3900K and 50% = 4500K.The Light Output Bar (2) can also be used for finer light output adjustments.
MUSIC FUNCTION
Your Savage 12” Tabletop RGB Ring Light can be used to pulse with your music and audio files stored in your media library. The pulsing light will cycle through the various colors (rainbow effect) available and match the beat of the music or voices for audio recordings. It is not possible to specify a specific color in this function. Upon launch, the app will ask for access to your device’s media libraries. Allow permission if you would like to use music or audio files stored on your device to pair with the app’s features. If not, disallow. If you would like to use the function but disallow at a later date, follow the procedure below:
MUSIC MODE
FOR iPhoneGo to your phone’s SettingsScroll down to AppsSelect Light ManagerSelect the Media & Apple Music button to remove permission
FOR ANDROIDGo to your phone’s SettingsSelect Application ManagerSelect Light ManagerSelect PermissionsSelect the Storage button to remove permission
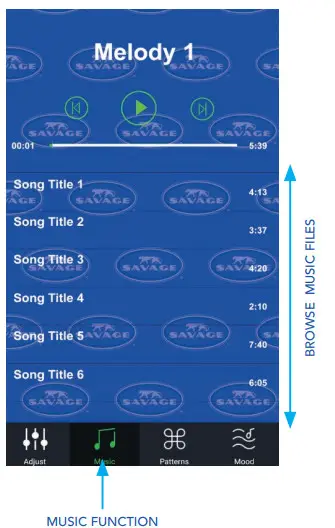
To use, tap the Music button at the bottom of the app. If permission is enabled, you will see a music list in the center of the screen. Select the song/audio recording of your choice. The selected content will begin to play. The volume bars at the top left of the screen should be green. If they are white, tap them to activate the light. If you wish to leave the music playing but prevent the want from pulsing, tap again and the light and the pulsing will stop. Rewind, fast forward and pause functions are also available in the top center of the app screen.
PATTERNS FUNCTION
This function allows the user to engage in numerous special effects. The various “Pulsating” functions cause the light to gradually fade up or down. The various “Strobe” functions cause quick flashes. The various “Fade” functions are similar to the “Pulsating” functions but there are more choices. The “Pulse”,“Strobe” and “Fade” functions can be slowed down or sped up by sliding the speed wheel left to slow the effect or right to speed up. The various rainbow effects cause the light to cycle through all available colors. To select an effect, use your finger to scroll up or down to your selection. When your chosen effect is highlighted in green, the effect will be enabled. There is no need to tap to select.
MOOD FUNCTION
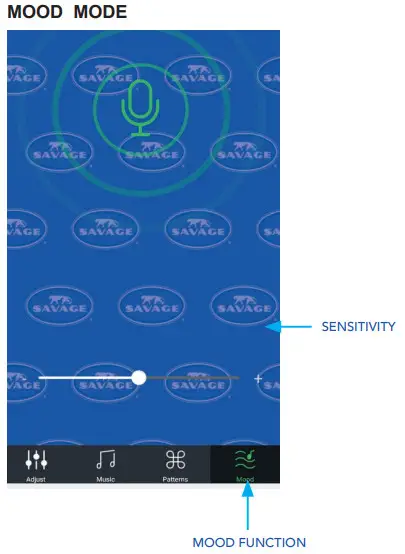
The Mood function causes the light to pulse with surrounding sounds. To use, tap the “Mood” button at the bottom of the app. The app will begin to respond to sounds in the room. If you speak, the light should pulse. The white slider below the green pulsing microphone adjusts the sound sensitivity of the microphone. If you wish to filter out lower noise levels and background sounds, slide the bar to the left to decrease sensitivity. As you slide the bar to the right, the light will gradually pick up sounds at lower noise levels. If the bar is all the way to the light, the light will pick up all sounds including all background noise. The Mood effect is only available in “Rainbow” mode. You cannot select a specific color. The Mood function will not work unless the “Microphone” setting in your phone’s Permissions setting is turned on.
FOR iPhone:Go to your phone’s SettingsScroll down to AppsSelect Light ManagerSelect the Microphone button to allow permission
FOR ANDROID:Go to your phone’s SettingsSelect Application ManagerSelect Light ManagerSelect PermissionsSelect the Microphone button to allow permission
Note: Not all special effects listed within the app will work with this specific light. Available patterns include:Fade: rainbow, red, green, blue, yellow, cyan, purple, white, red/green, red/blue, green/blue, bicolorStrobe: rainbow, red, green, blue, yellow, cyan, purple, whitePulse: rainbow, warm white, cool white, warm/cool white
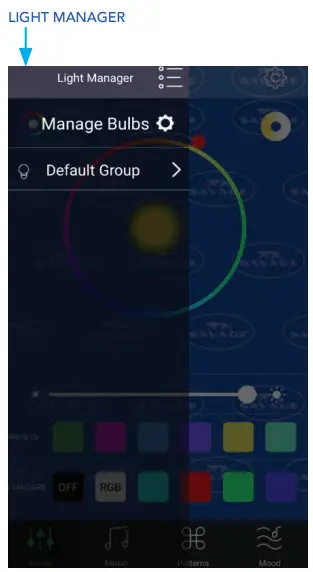
Manage Bulbs
Manage Bulbs
FOR ANDROID:Name your ring light:Tap the “List” icon at the top left of the app. A sidebar will open up that lists “Manage Bulbs” Click the “Settings” icon next to “Manage Bulbs”. You should see the light listed. It will begin with “Magic….”Tap the wrench icon next to the listed light. A box will open to renaming. Type in the name of your choice and select OK. If you have multiple lights, it is possible to control them separately using the Savage Light Manager.
IPHONE:Tap the “List” icon at the top left of the app. A sidebar will open up that lists “Group Manage” and “My Device”.Click “Group Manage”, then “Add”. Type in the name of your choice and select OK. Repeat the above steps to rename the second light.Important: If you are using the app on more than one phone, you can only pair the device/devices to one phone at a time. If the device is paired to more than one phone at the same time, the functions will not work.
TO CONTROL MORE THAN ONE LIGHT USING: DEFAULT GROUPSTap the “List “icon at the top left of the app.A sidebar will open up that lists “Default Groups”.Tap on the right-pointing arrow next to “Default Group” and you should see each paired light.
Note: only lights that are currently turned on will be visible. If the light is controllable with the app, it will be highlighted with a blue background for Android or gray for iPhone.
If multiple lights are highlighted, then the app will control all at the same time.If the light does not have a blue/gray background, tap on it in the app. Blue/gray background will come on and the light will be controllable. Note: the bulb to the left of the named light should appear to be lighted. If it does not, tap the bulb and it will appear to light.Note: The chain to the right side of the light should appear unbroken, if the 2 links appear to be separated, tap on the chain until they appear connected. Breaking the chain can be used when temporarily disabling the light from the app is desired. Only highlighted lights will be controlled by the app. To control lights separately, tap any light icon and the blue highlight will disappear. That light will no longer be controlled by the app allowingthe user to control each light independently.
Troubleshooting
Problem: Light behaves erratically.FOR ANDROID:If the app has been running in the background for extended periods of time, the app’s cache can fill up.
report this adSolution:To solve this, close the “Savage Light Manager” app.Go to “Settings” on your phone.In settings, go to “Application Manager”.Scroll to the app “Savage Light Manager”.Tap “Storage”.Tap “Clear Cache”.This will likely solve the issue. Re-open the “Savage light Manager App” and re-try.If the light fails to pair with your device’s Bluetooth, GPS/Location Service may need to be enabled.
FOR iPhone:Closeout of the app completely and then re-open. You can also try to remove the battery from the light and re-attach or restart the phone completely.If you receive the error message “Unfortunately Light Manager has stopped.” when clicking on the Mood function, it’s likely that the Microphone permissions are turned off in the app. Refer to the Mood section of the instructions for more info.If another specific activity control is not functioning, refer to that activity’s section of the instructions for more info. If the light appears to be paired but the light cannot be controlled, see instructions for Default Groups. The light that is being used should be highlighted in blue/gray, the bulb to the right of the device should appear on and the chain to the left of the described device should appear unbroken.
professional photography made simple800.624.8891 savageUniversal.com
References
[xyz-ips snippet=”download-snippet”]