Instruction Manual
![]()
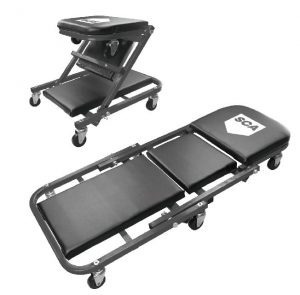
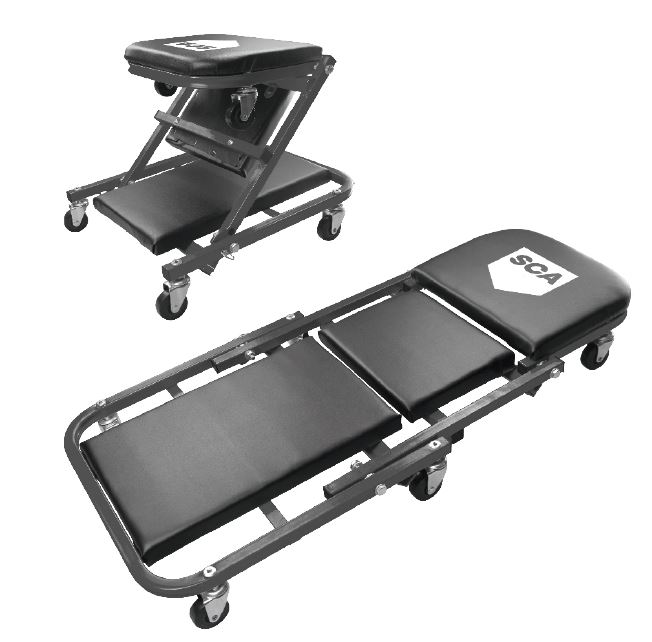
SCA 2 IN 1 Convertible Garage Creeper And Seat
WARRANTY
Our product is guaranteed to be free from quality and manufacturing defects for a period of 12 months.
If your product becomes defective during this period, SRGS PTY LTD will offer you either a replacement, credit or refund where a product is faulty; wrongly described; different from the sample shown to you or do not do what they are supposed to do.
This warranty will not cover substantially modified product; misuse or abuse of the product contrary to user instructions or packaging label; change of mind and normal wear and tear.
Our goods come with guarantees that cannot be excluded under the Australian Consumer Law. You are entitled to a replacement or refund for a major failure and for compensation for any other reasonably foreseeable loss or damage. You are also entitled to have the goods repaired or replaced if the goods fail to be of acceptable quality and failure does not amount to a major failure.
To claim the warranty, take the product to the front Service Desk of your nearest store of purchase. You will need to show receipt or other proof of purchase. Additional informationmay be required to process your claim. Should you not be able to provide proof of purchase with a receipt or bank statement, identification showing name, address and signature may be required to process your claim.
Any expenses relating to the return of your product to the store will normally have to be paid by you. For online store purchases, SRGS PTY LTD will pay for the return freight for any product assessed as having a major failure.
The benefits to the customer given by this warranty are in addition to other rights and remedies of the Australian Consumer Law in relation to the goods or services to which this warranty relates.
This warranty is provided by SRGS PTY LTD, 6 Coulthards Avenue, Strathpine QLD 4500, Australia. Phone: 1300 175 010.
PREPARATION
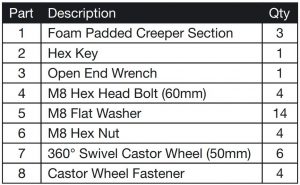
Ensure that all parts are present before assembling your 2 in 1 Convertible Garage Creeper andSeat. Do not attempt to assemble or use the product if any parts are missing or damaged.
ASSEMBLY INSTRUCTIONS
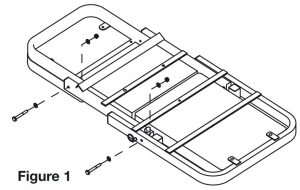
- Place the Foam Padded Creeper Sections (1) face down on a flat surface (as shown inFigure 1), aligning all the outside and inside holes. Ensure the Middle Creeper Section is in the correct orientation.
- Place one M8 Flat Washer (5) through the head of the M8 Hex Head Bolt (4), then insertthrough the aligned hole, starting from the outside and pushing through the hole.
- Place one M8 Flat Washer (5) through the head of the aligned bolt and secure with one M8 Hex Nut (6). Tighten enough that the creeper seat can still fold freely, repeat step 2 and 3 for the remaining three holes.
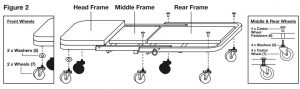
4. Middle & Rear Wheels: Insert one Castor Wheel Fastener (8) into the top of the frame, thenplace one M8 4. Flat Washer (5) through the Castor Wheel (7) and screw in from underneath theframe. Repeat for remaining three middle and rear wheels (see Figure 2).
5. Head Frame Wheels: Place one M8 Flat Washer (5) through the Castor Wheel (7). Screwdirectly into hole underneath the Head Frame and tighten using Open End Wrench (3).
6. Use Open End Wrench (3) to tighten all Castor Wheels (7) and use Hex Key (2) to tightly secure all Castor Wheel Fastener (8) assembled in above steps.
7. Do not use or operate the 2 in 1 Convertible Garage Creeper and Seat until all castor wheelsand bolts are tightly secure as injury may occur.
OPERATING INSTRUCTIONS
Maximum Weight Capacity: 100kg
Seat ModeFailing to adhere to these operating instructions could result in injury.
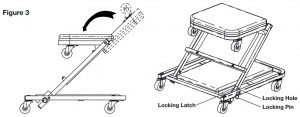
- Unlock the Locking Pin by pulling it out until the locking mechanism (Locking Hole) has1. been disengaged, at the same time flip the middle part of the creeper (Middle Frame) towards the end until the Locking Pin can engage the mechanics seat Locking Latch as shown in Figure 3. Ensure the Locking Pin is fully engaged.
- Flip the front part of creeper (Head Frame) to the other side until its sit horizontally as shown in Figure 3.
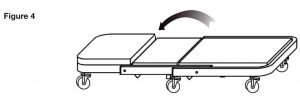
Creeper Mode1. Unlock the Locking Pin by pulling it out until disengaged. Reverse the above steps 1 and 2 toconvert the mechanics seat mode back into creeper mode as shown in Figure 4.
Failing to adhere to these operating instructions could result in injury.
Manufactured and packaged for SRGS PTY LTD ABN 23 113 230 0506 Coulthards Avenue, Strathpine QLD 4500, Australia

MADE IN CHINA
[xyz-ips snippet=”download-snippet”]