

SCA Full HD 1080P Dash Cam Instruction Manual
SCA Full HD 1080P Dash Cam Instruction Manual
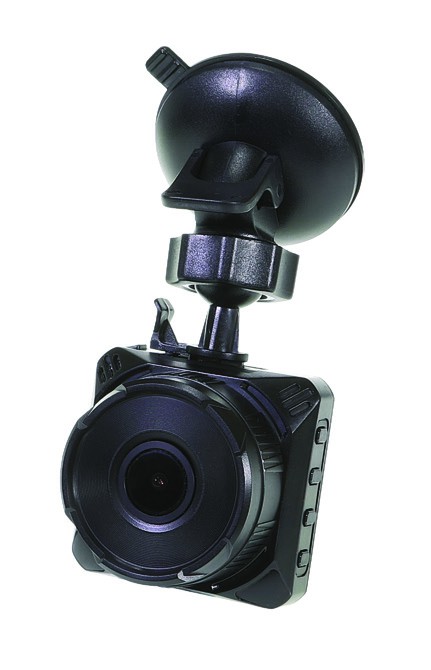
Product overview
Thank you for purchasing the SCADVR18 FULL HD 1080P Dash Cam. This Dash Cam is specifically designed for real-time video and audio recording when driving. The Dash Cam simply mounts to the windscreen and records footage onto a Micro SD memory card. It has a G-sensor with adjustable sensitivity and loop recording functionality.
Product features
- FHD 1920 x 1080P @ 30FPS
- 120 Degree wide viewing angle
- 2.0” Screen
- Time and date stamp
- G-Sensor function
- Mini USB interface
- Seamless cycle loop recording
- Suction cup car mount
- Built-in MIC and Speaker
- 12V in-car USB charger
- Supports Micro SD cards up to 64GB, card not included
ATTENTION: Please charge the unit for 4 hours before installing. The Dash Cam must be connected to power when in use, the battery is for emergency power only.
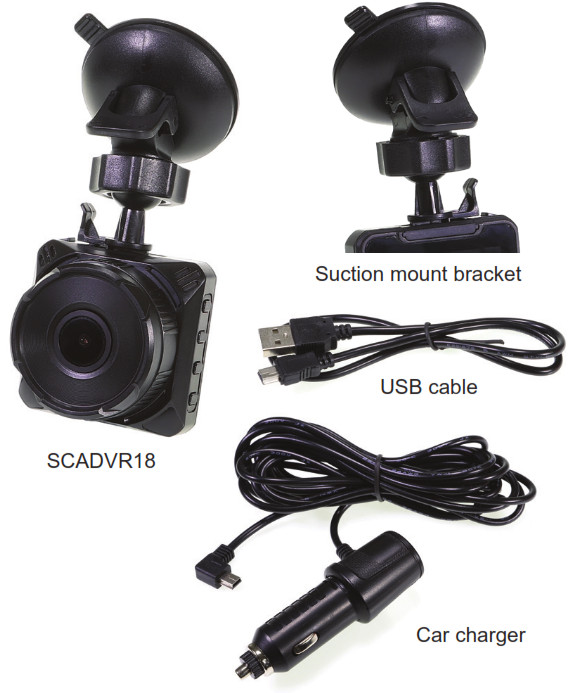
Package components
Product structure
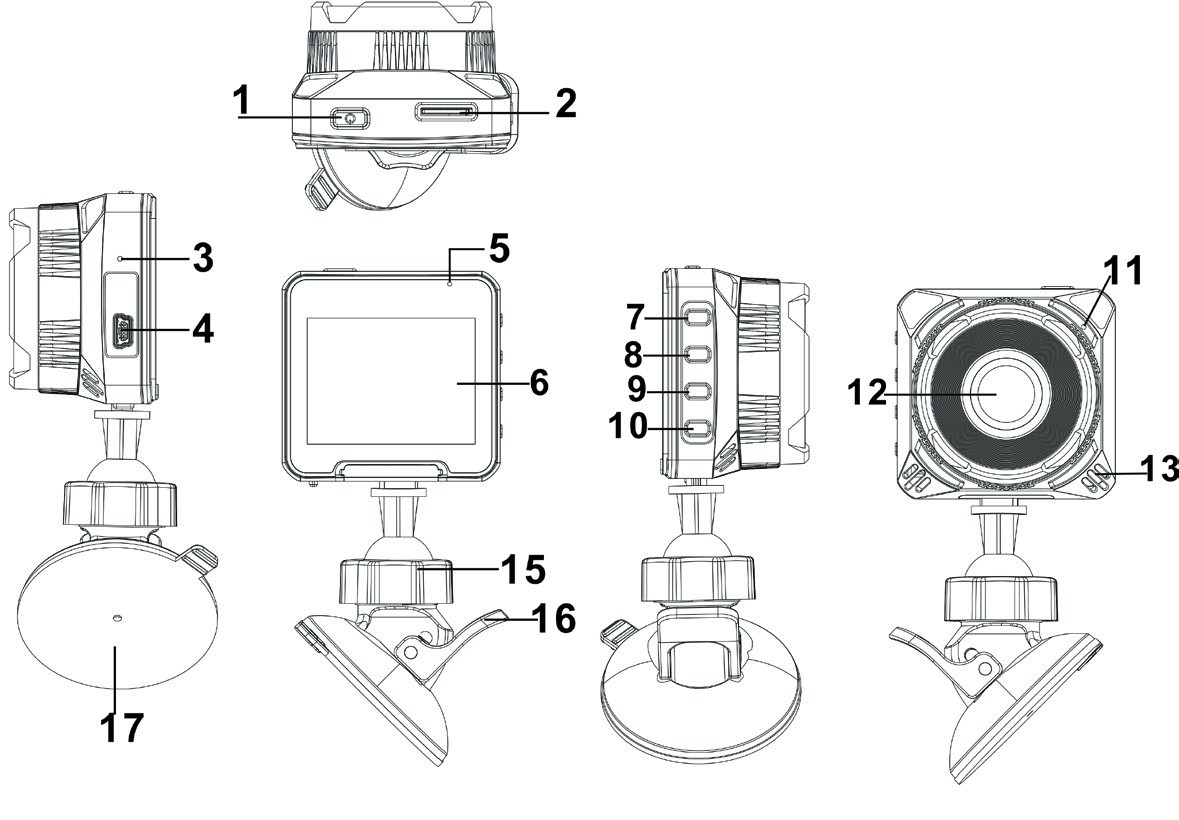
| 1) Power button 2) Micro SD card slot 3) Reset button 4) Mini USB connection 5) Indicator light | 6) Screen 15) Locking nut 16) Suction lock 17) Suction mount |
Product structure cont… 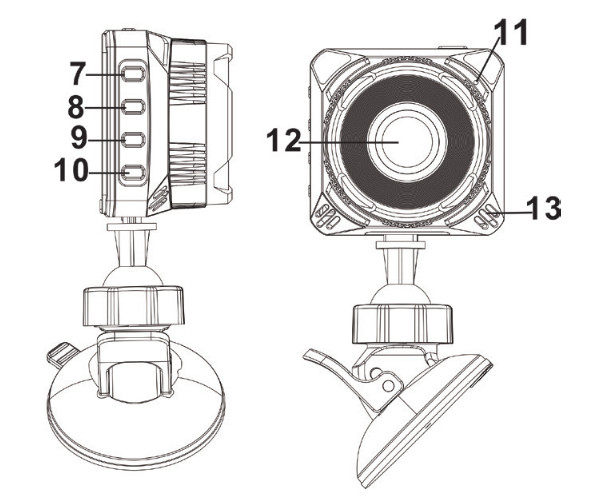
| 7) OK button 8) Down button 9) Up button 10) Menu button | 11) Microphone 12) Lens 13) Speaker |
Charging the Dash Cam
The Dash Cam can be charged multiple ways:
- Using the provided car charger.
- Using a USB cable to connect to the Mini USB interface. When the Dash Cam is charging, a red indicator on the Dash Cam glows red. The Dash Cam takes about 2 hours to fully charge. When the Dash Cam hits full charge, the red indicator will turn off.

Installing the Dash Cam
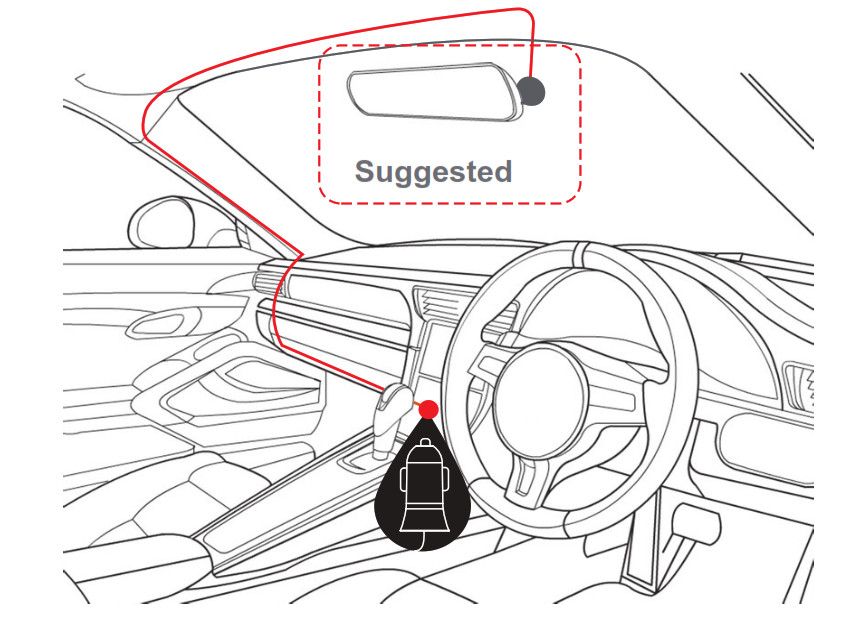
Installing the Dash Cam cont…
- Ensure windscreen is clean and free of debris. Attach a suction cup to the windscreen and lock it into position with the lever.
- Fix where the vision is not blocked (Place close to rear-view mirror is recommended). Don’t install the device on an airbag or within its working range.
- Insert Micro SD card into the Dash Cam
- Insert the Mini USB end of the power cord into the Mini USB interface/ charging point of the Dash Cam. Connect the USB charging end of the cable into USB socket adapter, place the adapter into the 12V power socket of the vehicle.
- Adjust the mounting bracket and rotate the camera direction to get the best view. Ensure of the bonnet of the vehicle is visible from the bottom of the screen for alignment.
- Turn vehicles ignition to ON, and the Dash Cam will power ON and start recording automatically, you will hear an audible tone once powered.
- A blue LED will start flashing when the recording has started. When the blue LED is solid the Dash Cam is in standby mode.
- For the Dash Cam to work it must receive power from the charging adapter. Once power is removed or turned off the Dash, Cam will save the current file and turn it off.
Instructions for video operation
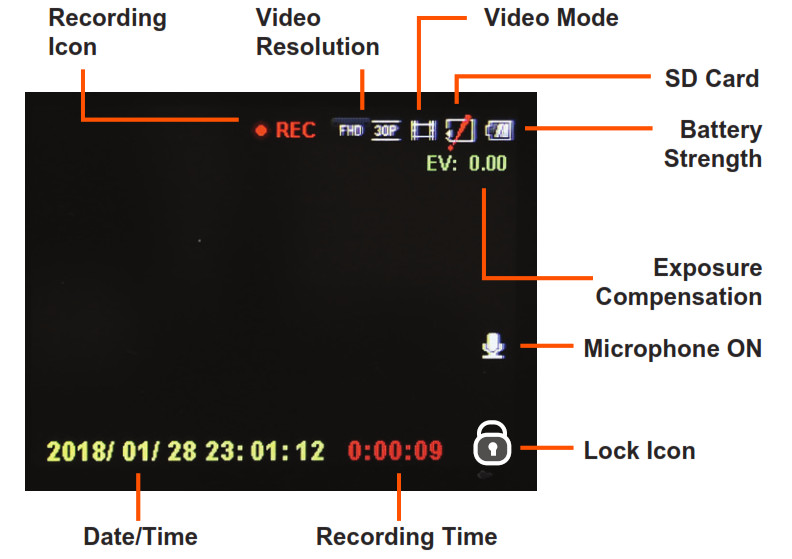
Once the power source is connected and the ignition is turned on, the red indication lamp will light up and it will start recording automatically. Once the ignition is turned off it will save the last file and power OFF. To power ON/OFF manually press the power button underneath. When not recording press the Power button to switch to video mode. To start and stop recording in video mode press the OK button. The red circle indicator on the top middle of the LCD starts flashing. Press UP arrow to mute the mic. When recording press the Power button to lock files (SOS). Note do not turn off until finished recording & lock icon disappears.
Instructions for Photo operation
Press the Power button to switch from video mode to photo mode when not recording. The screen will change from a movie icon to a camera icon. To take a picture press the OK button. The Dash Cam makes a camera sound when a picture is taken. Use the arrow keys to Zoom in and out. Pressing the Menu button in photo mode will allow you to adjust the photo resolution, image quality, and other photo settings.
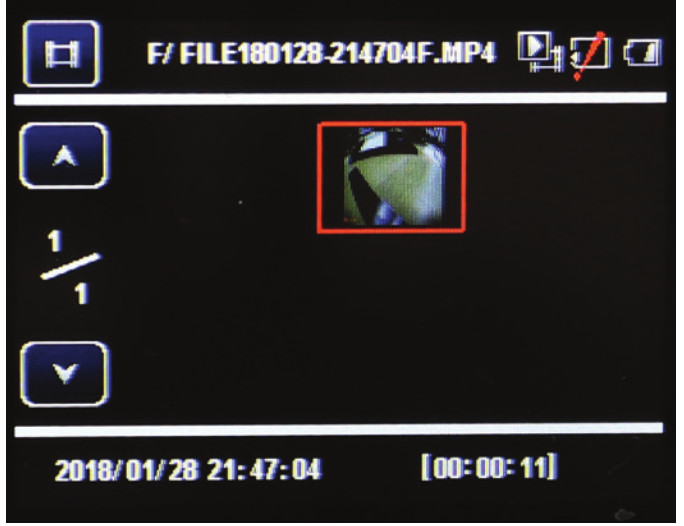
Video/Photo playback & protecting files
Press the Power button until you see the video reel![]() or photo
or photo ![]() icon on the top left of the screen. Using the arrow buttons, you can choose between all your recorded videos or photos. Press the OK button to select a file for playback. Pressing the Menu button will give the option to increase or decrease the volume, delete or protect the file. To lock or protect the file press the OK button once. Select protect options. Press OK twice show Yes or No. Press OK to confirm. The protected files have a lock icon meaning they cannot be deleted until unlocked. To unlock or unprotect the file press the Menu button once. Press the OK button for protecting the sub-menu. Select unprotect options using arrows. Press OK twice show Yes or No. Press OK to confirm. To exit press the power button.
icon on the top left of the screen. Using the arrow buttons, you can choose between all your recorded videos or photos. Press the OK button to select a file for playback. Pressing the Menu button will give the option to increase or decrease the volume, delete or protect the file. To lock or protect the file press the OK button once. Select protect options. Press OK twice show Yes or No. Press OK to confirm. The protected files have a lock icon meaning they cannot be deleted until unlocked. To unlock or unprotect the file press the Menu button once. Press the OK button for protecting the sub-menu. Select unprotect options using arrows. Press OK twice show Yes or No. Press OK to confirm. To exit press the power button.
Menu Settings Press the Menu button to enter into the Movie or Still Capture menu when not recording. Press again to enter the General Settings. You can navigate through the individual settings menu by using the Up/Down buttons. To change or edit a selected setting, use the arrow buttons and press the OK button to confirm. Press the Menu button again to exit the menu settings.
Movie Mode: Two resolutions are available 1920×1080 30fps or1280x720 30fps Movie Clip Time (Loop Recording): This feature allows you to set the size of the files your Dash Cam will record before saving and creating a new file. It allows the Dash Cam to record over the oldest recorded files once the card is full. The card records video in 1,2,3,5 & 10 minute files. If you want to keep any of the files it is best to upload them to your computer. Sound Record: This Feature will allow you to turn the Dash Cam’s recording sound on or off. If you want to stop the Dash Cam recording sound in the cab of your vehicle, set this feature to ‘off’.
General settings
Beep Sound: Allows you to turn the button beep sounds on or off. Clock Settings: This feature will allow you to edit the date and time for use with Stamp format Date Format: This feature will allow you to change the format displayed for the year, month, and day. Stamp Format: This feature will stamp the date/time and logo (Dash Cam Model Number) on all your footage produced by your Dash Cam Language: Allows you to choose from a selection of languages Flicker: This feature allows the best recording in conditions where street lights and AC lighting is used. The Australian standard frequency is 50HZ so it should be set to ‘50hz’.
LCD Power Save: This feature will turn your LCD off completely or off after 1 or 3 minutes but will continue to record regardless. This feature is useful for night driving as having the LCD on could be a distraction or illegal. G Sensor: The G-sensor function activates in the case of a car accident by determining the gravitational acceleration (1g = 9.8meters/second^2). When this function activates, the Dash Cam will take 3 minute locked video file. You can set the sensitivity of the Gravity sensor in the Dash Cam. Sensitivity is Level 0 (less sensitive) to Level 4 (sensitive). We recommend this be set to Level 0-1 to help stop false or irrelevant readings.
Reset Setup: This allows you to reset the settings back to factory default. Format: This feature allows you to format/delete all the files off your micro SD card and also reinstalls your DCIM directory and Dash Cam software on your SD card so the micro SD card can operate with your Dash Cam free of errors. FW Version: This simply shows the firmware/software employed by the Dash Cam’s hardware.
Still Image Size: This is the resolution size of the photos taken, choose 3M, 2M, 1.2M or VGA. Still Quality: Allows you to choose Superfine or Fine for a more detailed image. Exposure: This feature will change the light and dark balance of your photos. We recommend it always be set at ‘0’
Connecting to a PC
USB Interface: The supplied in-car charger is used to power the Dash Cam via the Mini USB interface. The Mini USB cable can also be used to connect to a computer for data transfer. When connecting your Dash Cam to a PC with the USB cable, the Dash Cam will present ‘MSDC’ on its screen allowing you to transfer your videos and photos to your PC. Press the OK button and a “NO NAME” icon will appear on your PC with 3 folders created inside.
- EVENT: For locked files.
- NORMAL: For video files
- PHOTOS: For picture files.
Maintenance
Maintaining the Battery: To prolong the battery life you must charge your Dash Cam on a 5 volt home charger at least once a week for 2-3 hours with the Dash Cam off. If you don’t use the car daily, for cars that are used daily for more than 1 hour you can charge the Dash cam once every 3 weeks for 2-3 hours. It is not recommended to power the Dash Cam with only the battery. The battery will only run for 10-15 mins continuously, always use the charger provided. The internal battery is for backing up, time/date, and saving data.
Formatting Card: It is advisable to format the Micro SD card weekly if you have the setting G-sensor mode setting active, all footage that is locked in G-sensor mode will fill up the card causing it to stop recording any more footage. Every time you remove & re-insert the Micro SD card, it will prompt you to format the card. The Dash Cam will not automatically record once turned on until it’s formatted.
Resetting Dash Cam: Insert a fine point paper clip into the reset hole on the side of the unit.
Product specifications
| MCU | MSTAR MSC8328 |
| Display | 2.0-inch LCD screen |
| Screen resolution | 960*240 pixels |
| Color | Black |
| Video | MP4 |
| Video resolution | 1080 FHD 1920*1080 at 30fps |
| 720 HD 1280*720 at 30fps | |
| Picture | 3M/ 2M/ 1.2M/ VGA |
| Picture format | JPG |
| Viewing angle | 120 degree wide viewing angle |
| Camera sensor | GC2023 (1080P) |
| Functions | G-Sensor, Loop recording |
| OSD Language | English, Russian, Chinese, etc |
| Audio | Built-in Microphone and speaker |
| Storage | Micro SD card 8-64GB Max Class10 |
| Input / Output | 5V 1.5A / Mini/USB 2.0 |
| Battery | 180mAh lithium battery |
| Dimension | W55 x H51 x D35 mm |
| Accessories | Car mount, Car charger, User Manual |
FULL HD 1080P DASH CAM
Warranty
This product is guaranteed against defects for a period of 12 months from the date of purchase. This warranty is provided by Super Cheap Auto Pty Ltd ACN 085 395 124 (Supercheap Auto) of 751 Gympie Rd Lawnton QLD 4501. Ph (07) 3482 7500. Supercheap Auto will offer a repair, replacement product or store credit if the product is assessed as being defective during the warranty period. To claim under this warranty, take this product to the Front Service Desk of your nearest Supercheap Auto store. For store locations, visit www.supercheapauto.com.au (AUS) or www.supercheapauto.co.nz (NZ). You will need your receipt or proof of purchase. Additional information may be requested of you to process your claim. Should you not be able to provide proof of purchase with a receipt or a bank statement, identification showing your name, address, and a signature may be required to process your claim. This product may need to be sent to the manufacturer to assess the defect before determining any claim. Faults or defects caused by product modification, misuse, and abuse, normal wear, and tear, or failure to follow user instructions are not covered under this warranty. Our goods come with guarantees that cannot be excluded under the Australian Consumer Law. You are entitled to a replacement or refund for a major failure and for compensation for any other reasonably foreseeable loss or damage. You are also entitled to have the goods repaired or replaced if the goods fail to be of acceptable quality and the failure does not amount to a major failure. Any expenses incurred relating to the return of this product to the store will normally have to be paid by you. For more information contact your nearest Supercheap Auto store. The benefits to the consumer given by this warranty are in addition to other rights and remedies of the Australian Consumer Law in relation to the goods and services to which this warranty relates. Manufactured and packaged for SRGS PTY LTD ABN 23 113 230 050 751 Gympie Road, Lawnton, Queensland 4501, Australia
FAQS
8GB 16GB 32GB720P 100 minutes 200 minutes 400 minutes1080P 72 minutes 140 minutes 280 minutes
Yes, you can view the footage on the dash cam, it has feartue of playback.a) Press twice the “Mode” button(upper button on the right) , then you can find all files you record.b) Press “up” or “down” button to choose the file you want edit, press”M”button (menu, bottom button on the right), you can view it,Any other questions, please contact
Yes sd card can be replaced.
Yes the power cord comes with it.
There is motion setting. It is making the camera automatically begin as soon as you turn the engine or if camera move really fast.
just front of car. no rear view. good quality. min has been going now over a month
The cord has a usb at the plug in side.
push the off, for a sec.
OldShark offer a worry-free 45-day money back guarantee, an 18-month warranty, and lifetime and friendly customer service.
The Dash Cam can be charged multiple ways: 1) Using the provided car charger. 2) Using a USB charger.
Press the power button for 1 second to turn on the Dash Cam.
Press the menu button for 1 second to enter into settings, then press up or down to select date and time, then press OK to confirm. Select date and time, then press OK again. Use up and down to change date and time, then press OK to confirm. Press menu button again to exit settings.
To format your memory card, please connect it to a computer with a card reader or use a memory card reader that plugs into a USB port on your computer. Then format your memory card in your computer’s operating system as FAT32 or exFAT. Do not format it as NTFS or you will not be able to use it with this product. After formatting, please disconnect your memory card from your computer or device before using it with this product. If you are unable to format your memory card, please contact our customer service team at www.scasafetycamera.com/contact-us . We will help you resolve any issues you may have as quickly as possible!
go to the bottom of the page on amazon where it is listed and one of the short videos is a guide to the dashcam where it shows the audio speaker on the front of the unit.
No. A USB adapter for the microSD card came in the box. Just put the memory card into the adaptor and plug it in to your computer, may even work.
References
[xyz-ips snippet=”download-snippet”]