SCEPTRE FSRD Series TV
IMPORTANT SAFETY INSTRUCTIONS
Electricity is used to perform many useful functions, but it can also cause personal injuries and property damage if improperly handled. This product has been engineered and manufactured with the highest priority on safety. However, improper use can result in electric shock and / or fire. In order to prevent potential danger, please observe the following instructions when installing, operating and cleaning the product. To ensure your safety and prolong the service life of your Liquid Crystal Television, please read the following precautions carefully before using the product.
- Read these instructions.
- Keep these instructions.
- Heed all warnings.
- Follow all instructions.
- Do not use this apparatus near water.
- Clean only with dry cloth.
- Do not block any ventilation openings. Install in accordance with the manufacturer’s instructions.
- Do not install near any heat sources such as radiators, heat registers, stoves, or other apparatus (including amplifiers) that produce heat.
- Do not defeat the safety purpose of the polarized or grounding-type plug. A polarized plug has two blades with one wider than the other. A grounding type plug has two blades and a third grounding prong. The wide blade and the third prong are provided for your safety. If the provided plug does not fit into your outlet, consult an electrician for replacement of the obsolete outlet.
- Protect the power cord from being walked on or pinched particularly at the plugs, convenience receptacles, and the point where they exit from the apparatus.
- Only use attachments/accessories specified by the manufacturer.
 Use only with the cart, stand, tripod, bracket, or table specified by the manufacturer, or sold with the apparatus. When a cart is used, use caution when moving the cart/apparatus combination to avoid injury from tip-over.
- Unplug this apparatus during lightning storms or when unused for long periods of time.
- Refer all servicing to qualified service personnel. Servicing is required when the apparatus has been damaged in any way, such as power-supply cord or plug is damaged, liquid has been spilled or objects have fallen into the apparatus, the apparatus has been exposed to rain or moisture, does not operate normally, or has been dropped.
 Use only with the cart, stand, tripod, bracket, or table specified by the manufacturer, or sold with the apparatus. When a cart is used, use caution when moving the cart/apparatus combination to avoid injury from tip-over.
PACKAGE CONTENTS
- SCEPTRE Display x 1
- Display Neck x 1
- Display Base x 1
- Neck Screws x 4 (M4 x 12mm)
- Base Screws x 4 (M3 x 8mm)
- Warranty Card x 1
- Display Remote Control (AAA Batteries included) x 1
- User Guide x 1 (Complete manual available online at sceptre.com)
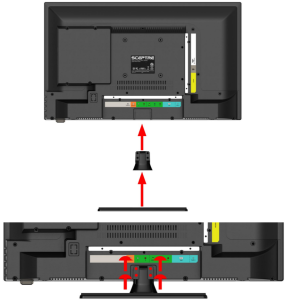
ATTACHING & REMOVING THE BASE
- Insert the neck into the bottom of the TV. Screw in the 4 screws on the neck. Insert the base into the neck until you hear a click sound. Screw in the 4 screws under the base.
- To get the TV ready to mount on a wall, unscrew the 4 screws from the bottom of the TV neck and remove the TV stand assembly.
- To finalize your installation of the Display, please read the following:a. If you are placing the Display on a stand, we would recommend you to use a Display safety strap (not included) in order to minimize the possibility of the Display toppling over.b. If you are mounting the Display on the walli. Make sure the wall is structurally safe for the weight of the Displayii. Make sure the wall mount kit is compatible with the Displayiii. Read and follow all instructions provided by the wall mounting kit.iv. Securely install all screws and connections.
Rear View Mounting Pattern
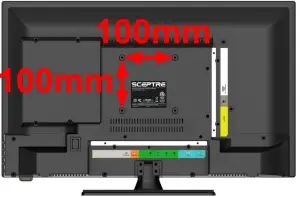
Mounting Specification: 100mm x 100mm using 4 screws (not included) at size M4. The mounting holes are 20mm deep.
Connecting Your Cables
The following picture offers a suggestion for connecting most of your audio video equipment.

TV Tuner is optional. It may or may not be equipped in your product. Please check with the authorized seller, authorized distributor or Sceptre Customer Service for further information.
Ready to Watch Some TV?
- Make sure your power cable is connected and the standby red light in the front of the HDTV is lit up.
- Check all your connection cables off the side or the back of your HDTV and also your AV devices. Make sure they are all connected securely.
- Turn on your HDTV and other AV devices if necessary.
- Press the button on the side of the HDTV or the SOURCE button on the remote control and select the correct source according to the connecting pages.
If You’ve Connected Antenna to the HDTV…
If an antenna or cable (without a cable box) is connected to your TV’s tuner, you will need to go through an INITIAL SETUP process in order to watch the HDTV.
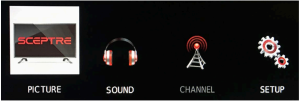
- Press MENU to open the menu
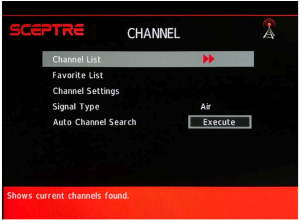
- Use the ◀ or ► button to select the CHANNEL icon and press ENTER.
- Use the ▲ or ▼ buttons to highlight the signal type and press◀ or ► to select your connection either AIR or CABLE.
- Use the ▲ or ▼ buttons to select AUTO CHANNEL SEARCH and press ENTER to scan for channels.
- Once the scanning finishes, you can begin to watch HDTV
If You’ve Connected Cable or Satellite Set-top Boxes to the HDTV…
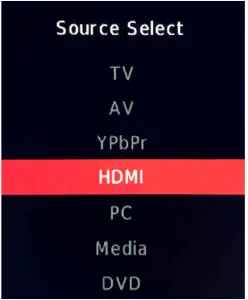
- Press the button on the side of the HD Display or the SOURCE button on the remote control and you will see the picture above.
- Use ▲▼ buttons to select the source you want to switch to and press the ENTER button in the middle of the ▲▼e buttons.
- If you have connected coax cable (the cable with a needle in the middle and a ring to tighten the connection) from the box to the display, you’ll need to change to the correct channel. Make sure your source is TV and press 3 and ENTER on the display remote. If that does not work you’ll need to contact your Satellite or Cable Company for support.
Please Note:
- Not all broadcasts are in High Definition (HD). Please refer to your local broadcasting stations for more information.
- The HD Display’s tuner is designed for HD Display therefore requires a stronger signal than normal Displays. If you cannot achieve that signal level with your antenna or cable, your HD Display might lose picture or sound.
- The source DVD is optional depending on the model you’ve purchased.
SCEPTRE Remote Control
Please insert two AAA batteries into the remote control. Make sure that you match the (+) and (-) symbols on the batteries with the (+) and (-) symbols inside the battery compartment. Afterwards, re-attach the battery cover.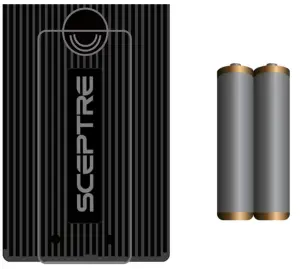
WARNING:
- Only use AAA batteries.
- Do not mix new and old batteries. This may result in cracking or leakage that may pose a fire risk or lead to personal injury.
- The batteries used with this product contain chemicals that are harmful to the environment. Please dispose the batteries in accordance with local laws and regulations.
- To preserve our environment, dispose of used batteries according to your local laws or regulations.
- Do not dispose of batteries with normal household waste.
- For more information please contact the local authority or your retailer where you purchased the product.
- Inserting the batteries incorrectly may also result in cracking or leakage that may pose a fire risk or lead to personal injury.
- Keep the batteries away from children and pets.
- If the remote control is not used for a long time, remove the batteries.
- Keep the remote control away from moisture, sunlight, and high temperatures.
- For Recycling Batteries please visit the web at http://www.call2recycle.org/
This remote control follows SONY’s universal remote code. To find the actual code you need to consult your cable or satellite tech support.
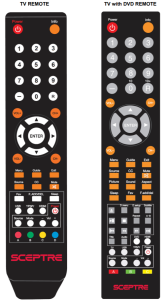
TV REMOTE GENERAL FUNCTION BUTTONS
- POWER Turns the display on or off.
- INFO Shows the display info.
- NUMBER BUTTONS (0-9) Press 0-9 to select a TV channel directly when you are watching the display. The channel will change after 2 seconds.
- (-) Inserts the dash for selecting digital channels directly.
- R Returns to the previous channel.
- VOL(+)/VOL(-) Press the VOL buttons to increase or decrease the sound level.
- ▲/▼/◀/► ENTER These directional buttons allow you to move around in the display’s menu.Press the ENTER button when you want to select a particular option.
- CH(+)/CH(-) Press the CH buttons to switch to the next or previous channel.
- MENU Brings up the main display menu on the screen.
- GUIDE Opens the current digital channel information guide (antenna only).
- EXIT Exit the main display menu on the screen.
- SOURCE Press this button to cycle through INPUT source.
- CC Cycles between different closed captioning modes.
- MUTE Turns the sound off from the display. To un-mute either press VOL(+) or press the MUTE button again.
- FAV Gives you your list of favorite channels.
- F.ADD/DEL Adds or Deletes current channel from favorite list.
- SLEEP Turns the TV off in a specific set of time dependent on your selection.
- USB This button switches the source to USB.
- YPbPr This button switches the source to YPbPr.
- HDMI This button switches the source to HDMI.The following buttons are functions designed to work with the optional, Sceptre Sound Bar.
- POWER This button turns on the sound bar.
- SOURCE This button selects the sound bar’s source.
- MODE This button selects the sound bar’s sound modes.
- VOL(-) This button decreases the volume of the sound bar.
- VOL(+) This button increases the volume of the sound bar.Color Function Buttons
- A This button has no function assigned.
- B This button turns on or off the TV’s voice guidance for the visually impaired.
- C This button has no function assigned.
- D This button has no function assigned.
Please Note:
- Buttons encircled by the word SOUND BAR are to be used with a Sceptre’s sound bar only.
Voice Guidance
This display features audio voice guidance for the visually impaired. Press the green B button to enable this function.
TV with DVD REMOTE GENERAL FUNCTION BUTTONS
- POWER Turns the display on or off.
- INFO Shows the display info.
- NUMBER BUTTONS (0-9) Press 0-9 to select a TV channel directly when you are watching TV.The channel will change after 2 seconds. For switching DVD chapters over 100 the 0 button acts as the 100 button, so press the 0 button twice to get that chapter.
- (-) Inserts the dash for selecting digital channels directly.
- R Returns to the previous channel. For switching DVD chapters over 100 the R button acts as the 100+ button, so press the R button and the number you want to switch to. For example for chapter 125 you would press R and 2 and 5 for the combination of 125.
- VOL(+)/VOL(-) Press the VOL buttons to increase or decrease the sound level.
- ▲/▼/◀/► ENTER These directional buttons allow you to move around in the TV’s menu and the DVD’s menu. Press the ENTER button when you want to select a particular option.
- CH(+)/CH(-) Press the CH buttons to switch to the next or switch to the previous channel.
- MENU Brings up the main display menu on the screen.
- GUIDE Opens the current digital channel information guide (antenna only).
- . EXIT Exit the main display menu on the screen.
- SOURCE Press this button to cycle through INPUT source.
- CC Press this button to enable closed captioning under the source TV.
- MUTE Turns the sound off from the display. To un-mute either press VOL(+) or press the MUTE button again.
- PICTURE Selects various preset picture settings.
- SOUND Selects various preset sound settings.
- ASPECT Selects different picture formats, some zoomed in, some full picture.
- SLEEP Press this button to automatically shut off the TV after a period of time.
- FAV Press this button to look at the favorite channels added.
- F.ADD/DEL Press this button to add or delete the current channel from the favorites list.DVD FUNCTION BUTTONS
- AUTO EJECT Press this button to open or close the DVD player.
- D.MENU Shows the menu of the DVD disc.
- D.SETUP Press this button to setup the disc in DVD mode.
- SUBTITLE Press this button to select available subtitles from the DVD disc.
- / Play/pause button in DVD mode.
- – Stop button in DVD mode.
- REPEAT Press this button for repeat the program.
- A-B Press this button to setup repeat playing from point A to point B.
- PREVIOUS CHAPTER Press this button to select the DVD’s previous chapter.
- REWIND Press this button to reverse the DVD movie to a previous scene.
- FAST FOWARD Press this button to fast forward the DVD to the next scene.
- NEXT CHAPTER Press this button to select the DVD movie’s next chapter.
- TITLE Press this button to jump to the title page of the DVD disc.
- AUDIO Press this button to cycle through various audio tracks of the DVD disc.
- DVD Press this button to switch to the source DVD directly.
- HDMI Press this button to switch to the source HDMI directly.
- TV Press this button to switch to the source TV directly.
- USB Press this button to switch to the source USB directly.
- YPbPr Press this button to switch to the source YPbPr directly.The following buttons are functions designed to work with the optional, Sceptre Sound Bar.
- POWER This button turns on the sound bar.
- SOURCE This button selects the sound bar’s source.
- MODE This button selects the sound bar’s sound modes.
- VOL(-) This button decreases the volume of the sound bar.
- VOL(+) This button increases the volume of the sound bar.Color Buttons
- A No function
- B This button turns on or off the voice guidance for the OSD menu.
- C – No function.
Please Note:
- To insert, eject a disc from the DVD player, to use any functions on the DVD you must press the DVD button first.
- This display does not support QAM function. You need to have a digital cable box in order to receive cable channels.
- The remote picture might be different from the actual remote. Please refer to the user manual on our website http://www.sceptre.com
- Closed Captioning is only available under the source TV.
- This DVD remote is only available with the DVD model E246BD-FSRD.
Voice Guidance
This display features audio voice guidance for the visually impaired. Press the green B button to enable this function.
INSERTING A DVD
With the display turned on and the DVD button pressed from the display remote, you can now insert the DVD disc you want to play. When you are facing the front of the display, insert the DVD disc with the side that is labeled with the movie title facing away from you.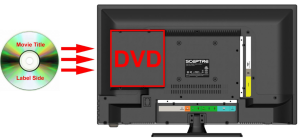
- EJECT Press this button to eject the DVD disc.
- PLAY / PAUSE Press this button to play the DVD disc or to pause the DVD disc.
Recycling Information
Dispose unwanted electronics and batteries through an approved recycler.For TVs please visit the web at http://www.earth911.com/recycling-guide/how-to-recycle-large-electronics/For Batteries please visit the web at http://www.call2recycle.org/For more information visit: www.sceptre.com/recycling.html or call 888-580-5588
Energy Disclaimer
Figure estimates off the Energy Guide yellow label are based on a specific usage pattern with the power saving mode selected under picture mode / picture setting of this product. Other picture settings / picture modes selected will consume more power than the estimate. Energy Guide labels will not always reflect your current electricity prices. They may also vary due to local energy prices and user’s usage habits.
Call Us If You Need Help!
Products are often returned due to a technical problem rather than a defective product that may result in unnecessary shipping charges billed to you. Our trained support personnel can often resolve the problem over the phone or email. For more information on warranty services or repairs after the warranty period, please contact our support department at the number below.
For technical help, contact our Technical Support Group via email or phone.Please have your Product Number (P/N), Serial Number (S/N), and date of purchase available before you call.
Operation Hours: Mon – Fri at 8:30 AM 5:30 PM (PST)Tech Support E-mail: [email protected]Customer Service Email: [email protected]TEL: +1(800) 788-2878
IMPORTANT INFORMATION
 CAUTION: This product employs a Laser System.To ensure proper use of this product, please read this owner’s manual carefully and retain for future reference. Should the unit require maintenance, contact an authorized service center. User of controls, adjustments, or the performance of procedures other than those specified herein may result in hazardous radiation exposure. To prevent direct exposure to laser beam, do not try to open the enclosure. Visible laser radiation when open. DO NOT STARE INTO THE BEAM.
FCC Compliance
This device complies with Part 15 of the FCC Rules.Operation is subject to the following conditions:This device may not cause harmful interferenceThis device must accept any interference received, including interference that may cause undesired operation.
Please Note: This equipment has been tested and found to comply with the limits for a Class B digital device, pursuant to part 15 of the FCC Rules. These limits are designed to provide reasonable protection against harmful interference in a residential installation. This equipment generates uses and can radiate radio frequency energy and, if not installed and used in accordance with the instructions, may cause harmful interference to radio communications. However, there is no guarantee that interference will not occur in a particular installation. If this equipment does cause harmful interference to radio or television reception, which can be determined by turning the equipment off and on, the user is encouraged to try to correct the interference by one or more of the following measures:
- Reorient or relocate the receiving antenna.
- Increase the separation between the equipment and the receiver.
- Connect the equipment into an outlet on a circuit different from that to which the receiver is connected.
Caution: To comply with the limits for an FCC Class B computing device, always use the signal cord and power cord supplied with this unit.
The Federal Communications Commission warns that changes or modifications to the unit not expressly approved by the party responsible for compliance could void the user’s authority to operate the equipment.
European NoticeProducts with the CE marking comply with both the EMC Directive (89/336/EEC), (93/68/EEC) and the Low Voltage Directive (72/23/EEC) issued by the Commission of the European Community.
SAFETY INSTRUCTIONS
Never place a television set in an unstable location. A television set may fall, causing serious personal injury or death. Many injuries, particularly to children, can be avoided by taking simple precautions such as:
- Use only cabinets or stands recommended by the manufacturer of the television set.
- Use only furniture that can safely support the television set.
- Make sure the television set is not overhanging the edge of the supporting furniture.
- Do not place the television set on tall furniture (for example, cupboards or bookcases) without anchoring both the furniture and the television set to a suitable support.
- Do not place the television set on cloth or other materials that may be located between the television set and supporting furniture.
- Make sure to warn and educate children about the dangers of climbing on furniture to reach the television set or its controls.
- Keep a minimum distance of 5 cm around all edges of the display for sufficient ventilation.
- The ventilation should not be impeded by covering the ventilation openings with items, such as newspapers, table-cloths, curtains, etc. Install in accordance with the manufacturer’s instructions
- . No naked flame sources, such as lighted candles, should be placed on the apparatus.
- Operating environment: Temperature: 5°C~35°C, Humidity: 10% to 90% non-condensing, Altitude: 0~2000 m .15. WARNING: To reduce the risk of fire or electric shock, do not expose this apparatus to rain ormoisture. The apparatus shall not be exposed to dripping or splashing and that objects filled with liquids, such as vases, shall not be placed on apparatus.16. WARNING: The mains plug is used as disconnect device, the disconnect device shall remain readily operable.17. WARNING: The battery (battery or batteries or battery pack) shall not be exposed to excessive heat such as sunshine, fire or the like.
IMPORTANT INFORMATION
 report this ad
Disclaimer, Trademarks, & Copyright Information
 |
This product qualifies for ENERGY STAR in the “powersaving” mode and this is the setting in which power savings will be achieved. Changing this mode under picture settings or enabling other features will increase power consumption that could exceed the limits necessary to qualify for ENERGY STAR rating. For more information on the ENERGYSTAR program, please refer to www.energystar.gov. |
 |
This equipment is a Class II or double insulated electrical appliance. It has been designed in such a way that it does not require a safety connection to electrical earth. |
 |
WARNING: This product can expose you to chemicals including lead, which is known to the State of California to cause cancer. For more information, go to www.P65Warnings.ca.gov. |
- Wii™ is a registered trademark or trademark of Nintendo of America, Inc. in the United States and other countries.
- SCEPTRE is a trademark or registered trademark of Sceptre Group.
- Sceptre, Inc. shall not be liable for technical or editorial errors or omissions contained herein; nor for incidental or consequential damages resulting from furnishing this material, or the performance or use of this product.
- In the interest of continuing product improvement, Sceptre, Inc. reserves the right to change product specifications without notice. Information in this document may change without notice.
- No part of this document may be copied, reproduced, or transmitted by any means, for any purpose without prior written permission from Sceptre, Inc.
References
[xyz-ips snippet=”download-snippet”]