scheppach TIGER 3000VS
Explanation of the symbols on the equipment
| Read the operating instructions to reduce the risk of inquiry! | |
 |
Wear hearing protection! |
|
If dust builds up, wear respiratory protection! |
|
Wear safety goggles! |
|
Danger of injury from rotating tool! Keep your hands away. |
|
Keep third parties away from the danger zone. |
|
Warning! Before installation, cleaning, modification, maintenance, storage and transport, the device must be switched off and disconnected from the mains. |
Introduction
Manufacturer:scheppach Fabrikation von Holzbearbeitungsmaschinen GmbH Günzburger Straße 69 D-89335 Ichenhausen
Dear customer,we wish you a pleasant and successful working experience with your new scheppach circular wet grinding machine.
Note:According to the applicable product liability law the manufacturer of this device is not liable for damages which arise on or in connection with this device in case of:
- improper handling,
- non-compliance of the operating instructions,
- repairs by third party, non authorized service technicians,
- installation and replacement of non-original spare parts,
- application other than specified,
- failures of the electrical system due to the non compliance with the electrical specifications and the VDE 0100, DIN 57113 / VDE 0113 regulations.
Recommendations:Read the entire text of the operating instructions prior to the assembly and operation of the device. These operating instructions are intended to make it easier for you to get familiar with your device and utilize its intended possibilities of use.The operating instructions contain important notes on how to work safely, properly and economically with your machine and how to avoid dangers, save repair costs, reduce downtime, and increase the reliability and working life of the machine.In addition to the safety regulations contained herein, you must in any case comply with the applicable regulations of your country with respect to the operation of the machine.Put the operating instructions in a clear plastic folder to protect them from dirt and humidity, and store them near the machine. The instructions must be read and carefully observed by each operator prior to starting the work. Only persons who have been trained in the use of the machine and have been informed on the related dangers and risks are allowed to use the machine. The required minimum age must be met. In addition to the safety notes contained in the present operating instructions and the special regulations of your country, the generally recognized technical rules for the operation of wood working machines must be observed.We accept no liability for damage or accidents which arise due to non-observance of these instructions and the safety information.
General notes
- Open the packaging and carefully remove the device.
- Remove the packaging material, as well as the packaging and transport safety devices (if present).
- Check whether the scope of delivery is complete. · Check the device and accessory parts for transport damage.
- If possible, keep the packaging until the expiry of the warranty period.
ATTENTION!The device and the packaging are not children`s toys! Do not let children play with plastic bags, films or small parts! There is a danger of choking or suffocating!
Proper use
- The grinding machine has been exclusively designed for grinding steel using the offered tool (no hard alloy).
- The machine meets the currently valid EU machine directive.
- The machine has been designed for a one-shift operation, operating factor S1 100%.
- Observe all safety instructions and warnings on the device.
- Make sure that all safety instructions and warnings on the machine always are in a readable state.
- Only use the machine if it is in a technically faultless state. Pay attention to the intended use, the safety and dangers and comply with the operating instructions! Immediately repair (or have repair) failures which may affect the safety.
- The safety, working, and maintenance instructions and the dimensions set forth in the specifications must be observed.
- The applicable regulations for the prevention of accidents and other, generally recognized safety rules must be observed.
- The machine may only be used, maintained or repaired by trained persons who are familiar with the machine and have been informed about the dangers. Unauthorized modifications of the machine exclude a liability of the manufacturer for damages resulting from the modifications.
- The machine may only be used with original accessories and original tools of the manufacturer.
- Any other use is considered to be not intended. The manufacturer excludes any liability for resulting damages, the risk is exclusively borne by the user.
Please note that our equipment has not been designed for use in commercial, trade or industrial applications. Our warranty will be voided if the equipment is used in commercial, trade or industrial businesses or for equivalent purposes.
Safety Instructions
WARNING! Read all safety instructions, information, illustrations and technical data for this electric tool. Failure to observe the following information and instructions can result in electric shock, fire and/or serious injuries.
Store all safety instructions and information for future reference.The term ,,electrical tool” used in the safety instructions refers to mains-powered electrical tools (with a mains cable) and batterypowered electrical tools (without a mains cable).
- Workplace safetya) Keep your work area clean and well-lit.Dis-organised or unlit work areas can result in accidents.b) Do not work with the electric tool in an explosive environment where flammable liquids, gases or dusts may be located.Electric tools produce sparks that may ignite dust or vapours.c) Keep children and other people away while using the electric tool. Distractions may cause you to lose control of the electric tool.
- Electrical safetya) The connection plug of the electric tool must fit into the socket. The plug may not be modified in any way.Do not use an adaptor plug together with earthed electric tools.Unmodified plugs and suitable sockets reduce the risk of an electric shock.b) Avoid body contact with earthed surfaces, such as pipes, heaters, ovens and refrigerators.There is an increased risk of electric shock if your body is earthed.c) Keep your electric tools away from rain and moisture.Water penetrating an electric device increases the risk of an electric shock.d) Do not use the connection cable for another purpose, for example, carrying or hanging the electric tool or pulling the plug out of the socket. Keep the connection cable away from heat, oil, sharp edges or moving parts.Damaged or coiled connection cables increase the risk of an electric shock.e) If you work with an electric tool outdoors, only use extension leads that are also suitable for outdoor use.Using an extension lead suitable for outdoor use reduces the risk of an electric shock.f) If you cannot avoid using the electric tool in a wet environment, use a residual current circuit breaker.Using a fault-current circuit breaker reduces the risk of an electric shock.
- Safety of personnela) Remain attentive, pay attention to what you are doing and be sensible when working with electric tools. Do not use an electric tool if you are tired or under the influence of drugs, alcohol or medication.A moment of carelessness when using electric tools can result in serious injuries.b) Wear personal protective equipment and always wear safety goggles.Wearing personal protective equipment, such as dust masks, antislip safety shoes, safety helmet or hearing protection, depending on the type and use of the electric tool, reduces the risk of injuries.c) Avoid unintentional startup. Make sure that the electric tool is switched off before you connect it the power supply and/or battery, pick it up or carry it.Keeping your finger on the switch when you carry the electric tool or having the electric tool switched on when you connect it to the power supply may result in accidents.d) Remove the setting tools or spanners before switching on the electric tool.A tool or spanner that is located in a rotating part of the electric tool may result in injuries.e) Avoid abnormal posture. Make sure that you have secure footing and always maintain your balance.This will allow you to better control the electric tool in unexpected situations.f) Wear suitable clothing. Do not wear wide clothing or jewellery. Keep hair and clothing away from moving parts.Loose clothing, jewellery and long hair can be caught by moving parts.g) If dust extraction and collection devices can be mounted, these must be connected and used properly.Using a dust extraction unit can reduce hazards caused by dust.h) Do not allow yourself to be lulled into a false sense of security and do not ignore the safety rules for electric tools, even when you have used them many times and have become familiar with them.Careless actions can result in serious injuries within a fraction of a second.
- Using and handling the electric toola) Do not overload the electric tool. Use the electric tool intended for your work. The suitable electric tool allows you to work better and more safely in the indicated power range.b) Do not use an electric tool whose switch is defective. An electric tool that cannot be switched on or off is dangerous and must be repaired.c) Remove the plug from the socket and/or take out a removable battery before setting the device, changing insertion tool parts or putting the electric tool away. These precautionary measures will prevent the electric tool from starting unintentionally.d) Keep unused electric tools out of the reach of children. Do not let people use the electric tool who are not familiar with it or who have not read these instructions. Electric tools are dangerous if they are used by inexperienced people.e) Maintain electric tools and accessories with care. Check whether moving parts function properly and do not get stuck and whether parts are broken or are damaged and thus adversely affect the electric tool function. Have damaged parts repaired before using the electric tool. Many accidents are caused by poorly maintained electric tools.f) Always keep cutting tools sharp and clean. Carefully maintained cutting tools with sharp cutting edges seize up less often and are easier to guide.g) Use electric tools, accessories and tool attachment, etc. according to these instructions. Take the working conditions and the activity to be carried out into consideration. Using electric tools for applications other than the intended uses can lead to dangerous situations.h) Keep the handles and gripping surfaces dry, clean and free of oil and grease. Slippery handles and gripping surfaces prevent safe operation and control of the electrical tool in unforeseen situations.
- Servicea). Only have your electric tool repaired by qualified specialists and only with original spare parts. This ensures that safety of the electric tool is maintained.
ATTENTION! This electric tool generates an electromagnetic field during operation. This field can impair active or passive medical implants under certain conditions. In order to prevent the risk of serious or deadly injuries, we recommend that persons with medical implants consult with their physician and the manufacturer of the medical implant prior to operating the machine.
Safety instructions for grinding machines
- Do not use damaged accessories. Check the accessories, e.g. the grinding disc for cracks before each use. After inspection and installation of an accessory, remove yourself and bystanders from the machine and allow the electric tool to run at maximum idle speed for one minute. Damaged accessories normally break during this test period.
- The nominal speed of the accessories must be at least equal to the maximum speed indicated on the electric tool. Accessories that run faster than the nominal speed may break.
- Never grind on the sides of a grinding disc. Lateral grinding can cause the grindstone to break.
Residual risks
The machine has been constructed according to the state of the art and the recognized safety rules. Nevertheless, single residual risks may occur during the operation.
- The rotating grinding wheel may cause injuries of fingers and hands.
- Danger caused by electric current if inappropriate electrical connecting lines are used.
- Furthermore, non obvious residual risks may exist in spite of all measures taken.
- Residual risks can be minimized by carefully observing the safety instructions and the intended use as well as the entire operating instructions.
Technical specifications
| Dimensions LxWxH mm | 380x290x390 |
| Tool rest ø mm | 12 |
| Grinding stone ø mm | 250 |
| Idle-running speed – grinding stone 1/min. | 90-150 |
| Cutting speed m/sec.m/sec. | 1,2-2 |
| Weight kg | 13 |
| Drive | |
| Motor V | 230 – 240 |
| Input P1 W | 180 |
| Output P2 W | 80 |
| Motor speed 1/min | 1950-3250 |
| Operating mode | S1 |
| Current rating A | 0,95 |
Subject to technical modifications!
Assembly
Assemble the stone and the tool table and hang the water tank as in Figure 1 on the machine.
Installation and AdjustmentPlease make sure that your grinding machine is installed in an upright and stable manner on a firm ground with sufficient illumination.The machine has no front or rear side. You can alternatively grind with or against the direction of rotation.
Working instructions
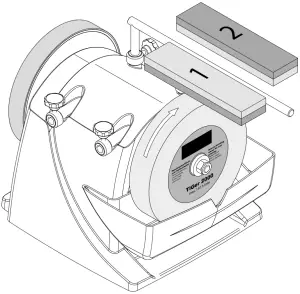
Direction of Grinding (Fig. 1, Fig. 2)It mainly depends on your requirements whether you want to work with or against the direction of grinding. If you want to quickly remove large quantities of steel (e.g. from very old, rusty tools) or if you want to grind coarse tools, such as axes, it is recommended to work against the direction of grinding. If you want to grind more precisely, we recommend to work with the direction of grinding. This applies, for example, to carving tools and knives. Please note that the grinding process is slowed down if you work with the direction of rotation.Please check before each operation whether the surface of the grinding stone is even. To do so, lower the universal support onto the stone and turn it manually by 360°.If required, trim uneven material using the 250 trimming device.Upon the time of delivery, the TiGer provides of even surfaces.
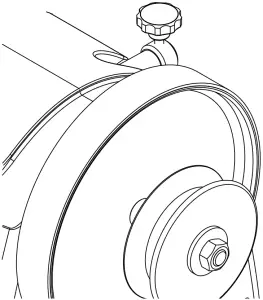
Water Reservoir (Fig. 3, Fig. 4 )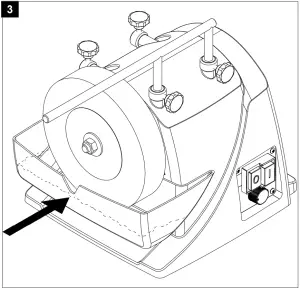 Fill the water reservoir with water up to the marking. The grinding stone becomes saturated with water. Refill water, if required. Do not grind without water. Once the grinding process is completed, lower the water reservoir to prevent the grinding stone from being in the water for an extended period of time. Empty the water reservoir regularly. Otherwise, particles of steel and trimmed stone will accumulate and compress in the reservoir.Expert tip: Such precipitations can be avoided if you place a magnet into the water.
Speed controller (Fig. 5)The speed of the grindstone and of the leather disc can be controlled steplessly using the speed controller. The speed depends on the required result. For grinding, a speed in the lower range is more suitable. For stripping with the leather disc, a higher speed is more suitable.
At high speeds, there is a risk of splashing.Lower the water container when working with the leather disc at high speeds. In order to maintain an even grinding speed with a decreasing grindstone diameter, the speed can be adjusted steplessly with the speed controller.
| Grinding stone ø mm (inch) | Idle-running speed grinding stone 1/min |
| 250 (10”) | 90-100 |
| 230 (9”) | 100-110 |
| 200 (8”) | 110-125 |
| 180 (7”) | 125-150 |
Angle measurer (Fig. 6)Measure the angle of the grinding bezel by comparing the cutting edge to the notches. Then, you set the determined angle at the device by changing the height of the universal support. To do so, perform the following steps:First, clamp the tool into the device and insert the device on the universal support.Then, hold the angle measurer with the desired angle at the tool tip. Now, adjust the height of the universal support in such a manner that the front end of the angle measurer straightly borders the grinding stone. Please make sure that the angle measurer is always in alignment with the tool tip.Note: The values indicated on the angle measurer are only standard values. Of course, you can change these values according to your requirements.
Grinding (Fig. 7)Since the grindstone rotates only slowly, a movement can be seen in the lateral direction. This is normal and does not exert any negative influence on the grinding result.Expert tip: New tools still show traces of the production process. You can substantially increase the lifetime of your tools if you grind them on both sides of the cutting edge before the first application. You simply grind the back side in the freehanded mode on the vertical of the grinding stone, and the front side as follows.After you have set the angle, insert the tool mounted in the device on the universal support, turn on the motor, and start the grinding process. Press the tool evenly onto the grinding stone near the cutting edge, and move it crosswise across the stone.Please make sure that at least half the width of the cutting edge comes into contact with the grinding stone at any time to avoid damages of the stone. To achieve finer grinding results, prepare the stone using the Stone preparer. Thereby you increase the graining from 250 to approximately 1000. The SP is available as an accessory from your scheppach dealer.The height of the Universal Support can be set exactly with the knurled nut attached to the Universal Support.
Sharpening (Fig. 8)Never sharpen against the direction of grinding! Otherwise, the tool will cut into the leather! Impregnate the leather disc using weak machine oil. Then apply abrasive paste on the leather disc. Turn on the device, and distribute the abrasive paste by pressing the ground tool with circular movements on the wheel. These preparations are sufficient for five to ten tools. Then, you start again with a new layer of machine oil, followed by new abrasive paste. These measures increase the lifetime of the leather and the quality of your tools.Expert tip: You can work in the free-handed mode for the trimming itself. You achieve a more precise result if you keep the tool in the device in the position in which you ground the tool. With the star grip screw on the rear side of the machine housing (see Figure 2), you can set the contact pressure on the friction wheel. This is necessary if when trying the honing wheel stops.
Electrical connection
The installed electric motor is connected and is ready to work.The connection complies with the relevant VDE and DIN regulations.The connection to the mains supply on the customer side and the used extension line must meet these regulations or the provisions of the local power supply company.
Damaged electrical connection cableThe insulation on electrical connection cables is often damaged.This may have the following causes:
- Passage points, where connection cables are passed through windows or doors.
- Kinks where the connection cable has been im- properly fastened or routed.
- Places where the connection cables have been cut due to being driven over.
- Insulation damage due to being ripped out of the wall outlet. · Cracks due to the insulation ageing.
Such damaged electrical connection cables must not be used and are life-threatening due to the insulation damage.Check the electrical connection cables for damage regularly. Make sure that the connection cable does not hang on the power network during the inspection. Electrical connection cables must comply with the applicable VDE and DIN provisions. Only use connection cables with the marking ,,H05VV-F”.The printing of the type designation on the connection cable is mandatory.
A.C. Motor
- The supply voltage must be 220240 V/50 Hz.
- Extension lines up to a length of 25 m must have a minimum cross section of 1.5 mm², lines with a length exceeding 25 m must have a minimum cross section of 2.5 mm².
- The mains connection is protected with a maximum of 16 A.
Connections and repairs of the electrical equipment may only be performed by an electrician.
If you have further questions, please specify the following:
- Motor manufacturer and type
- Kind of current of the motor
- Data from the machine type plate
- Data of the electric control
If you return the motor, always return the complete drive unit with the electric control.
Cleaning and maintenance
![]() Warning! Switch off the machine and pull out the mains plug before performing setting, maintenance or service work!
Warning! Switch off the machine and pull out the mains plug before performing setting, maintenance or service work!
CleaningKeep all safety devices, ventilation slots and the engine housing free from dirt and dust insofar as possible. Wipe the device clean with a clean cloth or blow it off with compressed air at low pressure. We recommend cleaning the device immediately after each use.
MaintenanceThe device has no further internal parts that require maintenance.
Service informationPlease note that the following parts of this product are subject to normal or natural wear and that the following parts are therefore also required for use as consumables.Wear parts*: grinding medium, carbon brushes, sharpening wheel, angle gauge, v-belt* Not necessarily included in the scope of delivery!
Storage and transport
Store devices and accessories out of the reach of children in a dark and dry place above freezing point. The ideal storage temperature lies between 5 and 30 °C. Store the electric tool in its original packaging. Store the grindstone in a cool, dry and dark place.![]() Attention! It is essential that the device is secured against falling or tipping over during transport. The machine may only be lifted and transported by its frame.
Attention! It is essential that the device is secured against falling or tipping over during transport. The machine may only be lifted and transported by its frame.
Disposal and recycling
The equipment is supplied in packaging to prevent it from being damaged in transit. The raw materials in this packaging can be reused or recycled. The equipment and its accessories are made of various types of material, such as metal and plastic. Defective components must be disposed of as special waste. Ask your dealer or your local council.
Old devices must not be disposed of with household waste! This symbol indicates that this product must not be disposed of together with domestic waste in compliance with the Directive (2012/19/EU) pertaining to waste electrical and electronic equipment (WEEE). This product must be disposed of at a designated collection point. This can occur, for example, by handing it in at an authorised collecting point for the recycling of waste electrical and electronic equipment. Improper handling of waste equipment may have negative consequences for the environment and human health due to potentially hazardous substances that are often contained in electrical and electronic equipment. By properly disposing of this product, you are also contributing to the effective use of natural resources. You can obtain information on collection points for waste equipment from your municipal administration, public waste disposal authority, an authorised body for the disposal of waste electrical and electronic equipment or your waste disposal company.
Trouble shooting
| Problem | Possible cause | Remedy |
| Engine does not run. | Engine, cable or connector defective, fuses burnt. | Have the machine checked by a specialist. Never repair the engine yourself. Attention! Check the fuses and replace them if necessary. |
| The engine starts slowly and does not reach the operating speed. | Voltage too low, coils damaged, capacitor burnt. | Have the power supply company check the voltage. Have the engine checked by a specialist. Have the capacitor replaced by a specialist. |
| Engine producing excessive noise. | Coils damaged, motor defective. | Have the engine checked by a specialist. |
| Engine does not reach full power. | Circuits in the network are overloaded (lamps, other engines, etc.) | Do not use any other devices or engines on the same circuit. |
| Motor overheats easily. | Overloading of the engine, insufficient cooling of the engine. | Avoid overloading the engine during grinding and remove dust from the engine to ensure optimum engine cooling. |
Special accessories
 Stone preparer, order no. 8949 0707Change the graining of your TiGer within seconds from 250 to 1000 and vice versa!
Device for axes 40, order no. 8949 0712Cut firewood as fast as never before there is no need for huge machines.
Device for tubes and gouges (with 100) 55, order no. 8949 0706 You can equip fingershaped tools with a unique sharpness!
Trimming device, order no. 8949 0713 Trimmed within seconds, and you can also polish unpolished metal! Spare cutting edge, order no. 8949 0714 Just in case.
Device for small knives 60, order no. 8949 0708 Device for large knives 120, order no. 8949 0709 This way it’s pure fun to work in the kitchen!
 Leather honing disc, profiled, order no. 8949 0705 For the inner side of fingershaped tools.
Device for scissors (with 100) 160, order no. 8949 0710 Now you can easily sharpen all kinds of scissors whether for paper, cloth or gardening!
+(49)-08223-4002-99+(49)-08223-4002-58[email protected]www.scheppach.com
 report this ad
References
[xyz-ips snippet=”download-snippet”]