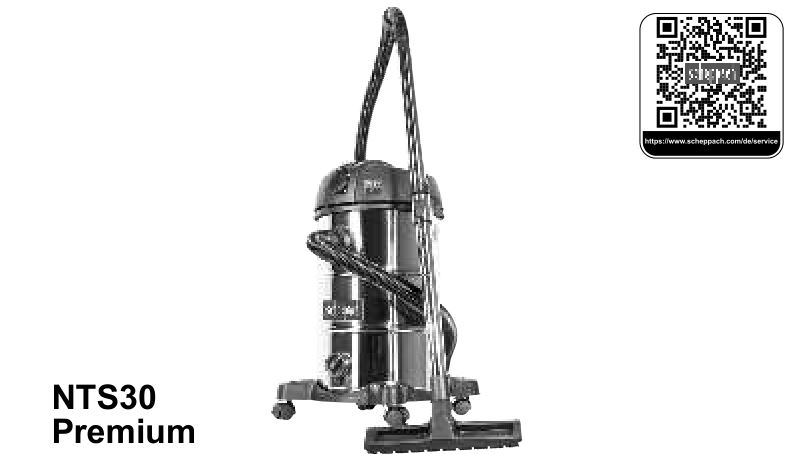
Scheppach Wet and Dry Vacuum Cleaner Instruction Manual


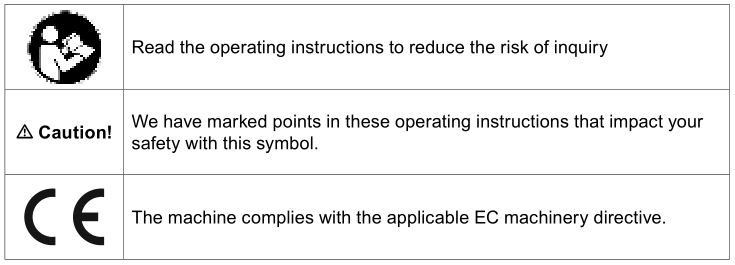
Explanation of the symbols on the equipment
Symbols are used in this manual to draw your attention to potential hazards. The safety symbols and the accompanying explanations must be fully understood. The warnings themselves will not rectify a hazard and cannot replace proper accident prevention measures.
Introduction
Manufacturer: scheppachFabrikation von Holzbearbeitungsmaschinen GmbHGünzburger Straße 69D-89335 Ichenhausen
Dear Customer,We hope your new tool brings you much enjoyment and success.
Note: According to the applicable product liability laws, the manufacturer of the device does not assume liability for damages to the product or damages caused by the product that occurs due to:
- Improper handling,
- Non-compliance of the operating instructions,
- Repairs by third parties, not by authorized service technicians,
- Installation and replacement of non-original spare parts,
- Application other than specified,
- A breakdown of the electrical system that occurs due to the non-compliance of the electric regulations and VDE regulations 0100, DIN 57113 / VDE0113.
We recommend:Read through the complete text in the operating instructions before installing and commissioning the device. The operating instructions are intended to help the user to become familiar with the machine and take advantage of its application possibilities in accordance with the recommendations.
The operating instructions contain important information on how to operate the machine safely, professionally and economically, how to avoid danger, costly repairs, reduce downtimes and how to increase reliability and service life of the machine.
In addition to the safety regulations in the operating instructions, you have to meet the applicable regulations that apply for the operation of the machine in your country. Keep the operating instructions package with the machine at all times and store it in a plastic cover to protect it from dirt and moisture. Read the instruction manual each time before operating the machine and carefully follow its information. The machine can only be operated by persons who were instructed concerning the operation of the machine and who are informed about the associated dangers. The minimum age requirement must be complied with. In addition to the safety instructions contained in this operating manual and the specific regulations of your country, the technical rules generally accepted for the operation of machines of the same type must be observed.
We accept no liability for damage or accidents which arise due to non-observance of these instructions and the safety information.
Device description
- Handle
- Machine head
- Connection cable
- Locking hooks
- Castors5a. Castor mounts
- Castor mounting base
- Screw cap for draining off liquids
- Stainless steel container
- Suction connection
- Socket with auto switch-on device
- On / Off switch
- Cable holder
- Connection for blower function
- Filter basket with safety float valve
Scope of delivery
- Suction hose
- Foam filter
- Paper filter bag
- HEPA filter (optional accessory,Item no. 7907702702)
- Floor nozzle
- Joint nozzle
- Metal extension tube
- Manual
Proper use
The wet and dry vacuum cleaner is designed for wet and dry vacuuming using the appropriate filter. The appliance is not suitable for the vacuuming of combustible, explosive or harmful substances.
The equipment is to be used only for its prescribed purpose. Any other use is deemed to be a case of misuse. The user / operator and not the manufacturer will be liable for any damage or injuries of any kind caused as a result of this.
An element of the intended use is also the observance of the safety instructions, as well as the assembly instructions and operating information in the operating manual.
Persons who operate and maintain the machine must be familiar with the manual and must be informed about potential dangers.
In addition, the applicable accident prevention regulations must be strictly observed. Other general occupational health and safety-related rules and regulations must be observed.
The liability of the manufacturer and resulting damages are excluded in the event of modifications of the machine.
The machine shall be operated only with original parts and original accessories from the manufacturer.
The safety, operating and maintenance specifications of the manufacturer, as well as the dimensions specified in the technical data, must be observed.
Please note that our equipment has not been designed for use in commercial, trade or industrial applications. Our warranty will be voided if the equipment is used in commercial, trade or industrial businesses or for equivalent purposes.
Safety instructions
DANGER!
- The appliance may only be connected to alternating current. The voltage must correspond with the type plate on the appliance.
- Never touch the mains plug and the socket with wet hands. · Do not pull the plug from the socket by pulling on the connecting cable.
- Check the power cord with mains plug for damage before every use. To avoid risks, arrange immediately the exchange by an authorized customer service or a skilled electrician, if the power cord is damaged.
- To avoid accidents due to electrical faults we recommend the use of sockets with a lineside current-limiting circuit breaker (max. 30 mA nominal tripping current).
- Turn off the appliance and remove the mains plug prior to any care and maintenance work.
- Repair works may only be performed by the authorised customer service.
WARNING!
- This appliance is not intended for use by persons with limited physical, sensory or mental capacities or lacking experience and/or skills, unless such persons are accompanied and supervised by a person in charge of their safety or they have received precise instructions on the use of this appliance and have understood the resulting risks.
- Children may only use this appliance if they are over the age of 8 and supervised by a person in charge of their safety, or if they have received instructions on the use of this appliance and have understood the resulting risks.
- Children must not play with this appliance.
- Supervise children to prevent them from playing with the appliance.
- Cleaning and user maintenance must not be performed by children without supervision.
- Keep packaging film away from children – risk of suffocation!
- Switch the appliance off after every use and prior to every cleaning/maintenance procedure.
- Risk of fire. Do not vacuum up any burning or glowing objects.
- The appliance may not be used in areas where a risk of explosion is present.
- Immediately switch the appliance off or pull the power plug if foam forms or liquids escape!
- Do not use abrasives, glass or universal cleaners! Never immerse the appliance in water.
Certain materials may produce explosive vapours or mixtures when agitated by the suction air! Never vacuum up the following materials:
- Explosive or combustible gases, liquids and dust particles (reactive dust particles)
- Reactive metal dust particles (such as aluminium, magnesium, zinc) in combination with highly alkaline or acidic detergents
- Undiluted, strong acids and alkalies
- Organic solvents (such as petrol, paint thinners, acetone, heating oil).
In addition, these substances may cause the appliance materials to corrode.
WARNING!
This electric tool generates an electromagnetic field during operation. This field can impair active or passive medical implants under certain conditions. In order to prevent the risk of serious or deadly injuries, we recommend that persons with medical implants consult with their physician and the manufacturer of the medical implant prior to operating the electric tool.
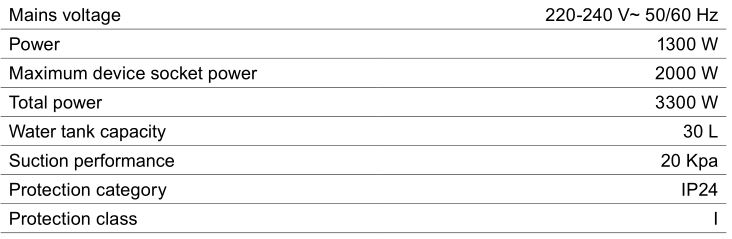
Technical Data
Technical changes reserved!
Unpacking
Open the packaging and remove the device carefully.Remove the packaging material as well as the packaging and transport bracing (if available).Check that the delivery is complete.Check the device and accessory parts for transport damage.If possible, store the packaging until the warranty period has expired.Familiarise yourself with the product by means of the operating instructions before using for the first time.With accessories as well as wearing parts and replacement parts use only original parts.Replacement parts can be obtained from your dealer.When ordering please provide our article number as well as type and year of manufacture for your equipment.
ATTENTION!The device and packaging materials are not toys! Children must not be allowed to play with plastic bags, film and small parts! There is a risk of swallowing and suffocation!
Installation
IMPORTANT!Prior to use, ensure that the device has been correctly and fully assembled.
Unpacking (Fig. A, B, C)
- Release the locking hooks (4) and remove the machine head (2). The accessories are located inside the stainless steel container (8). Only the metal extension tube (g) is located outside the stainless steel container (8) in the packaging. Remove all of the accessories from the stainless steel container (8).
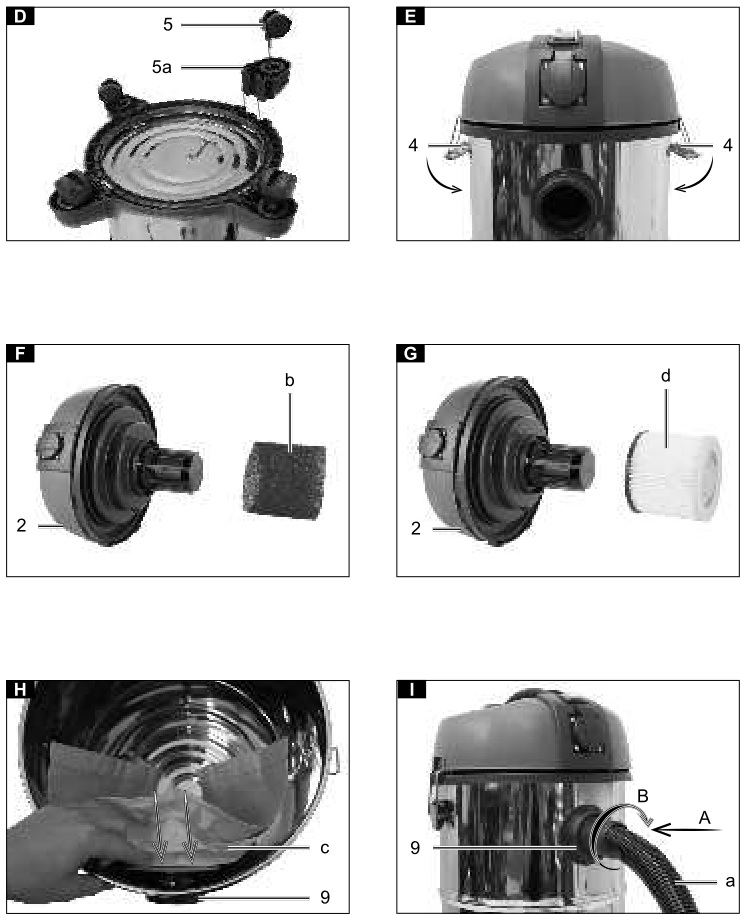
Installing the castor mounts (5a) (Fig. D)
- Turn the stainless steel container (8) upside-down. (The machine head (2) must be removed).
- Push the castor mounts (5a) into the cut-outs provided on the wheel mounting base (6)
Installing the castors (5) (Fig. D)
- Press the four castors (5) into the holes in the castor mounts (5a).
Installing the machine head (2) (Fig. E)
- Place the machine head (2) on the stainless steel container (8). Secure the machine head (2) with the locking hooks (4). When installing the machine head (2), ensure that the locking hooks (4) latch into place correctly.
Installing the foam filter (b) (Fig. F)Never use the device without filter! Always ensure that the filters are correctly fitted!
- Installing the foam filter (b): For wet vacuuming, slide the foam filter (b) provided over the filter basket with safety float valve (14).
Installing the HEPA filter (d) (Fig. G)For dry vacuuming, slide the HEPA filter (d) provided over the filter basket with safety float valve (14).
Installing the paper filter bag (c) (Fig. H)It is recommended to use an additional paper filter bag (c) when vacuuming fine, dry dirt.
- Slide the paper filter bag (c) over the suction opening in the stainless steel container (8). The paper filter bag (c) is only suitable for dry vacuuming. The paper filter bag (c) makes it easier to dispose of the dust collected.
Installing the suction hose (a) (Fig. I)Connect the suction hose (a) to the corresponding port, depending on the desired use, on the wet and dry vacuum.
Vacuuming (Fig. I):Connect the suction hose (a) to the suction hose port (9). To do so, slide the end of the suction hose (a) with the two nipples into the suction hose port (9) (A). Insert the two nipples into the recesses. Once the suction hose is fully inserted, turn it clockwise (B).
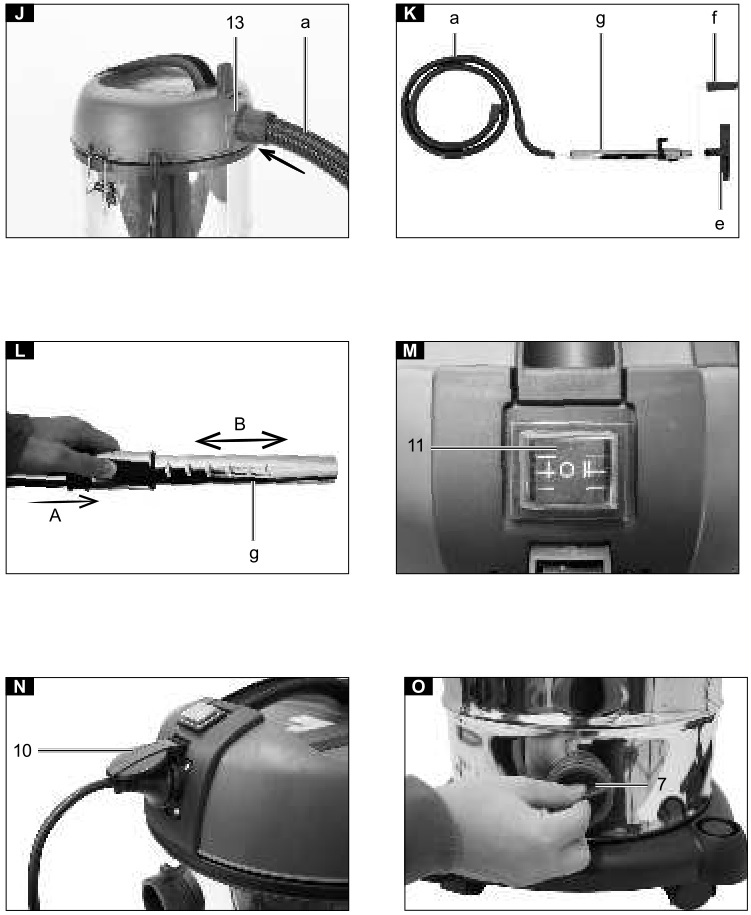
Blowing (Fig. J):Connect the suction hose (a) to the blowing function connection port (13). Slide the end of the suction hose (a) with the two nipples into the blowing function connection port (13). Insert the two nipples into the recesses. It is not necessary to turn it here.
Installing the metal extension tube (g), suction hose (a) and nozzles (e / f) (Fig. K)
- Connect the metal extension tube (g) with the bent end of the suction hose (a).
- Fit the floor nozzle (e) or joint nozzle (f) to the other end of the metal extension tube (g).
- Push the slide piece forwards (A) to change the length of the metal extension tube (g).(Fig. L)
- Pull the tube to the desired length (B). Ensure that the slide lock latches into place. (Fig. L)
Operation
WARNING!Always make sure the device is fully assembled before start-up!
WARNING!Switch the device off if liquid or foam emerges with the exhaust air during wet vacuuming.
Switch on / switch off / automatic (Fig. M, N)The ON/OFF switch (11) has three settings:
- Switch setting 0: Off
- Switch setting II: On– Press the on/off switch (11) on position “II” tu turn on the device.– Press the on/off switch (11) on position “0” to turn off the device.
- Switch setting I: Automatic mode (the vacuum cleaner will be switched on by an electrictool).
- Plug your electrical tool’s cable into the automatic socket (10) (fig. N).
- Connect the suction hose (a) to the suction connection (9) on your electrical tool. Check that the connection is secure and airtight.
- Set the switch on the vacuum system to position “I” = Automatic mode.
Dry vacuuming (Fig. G, H)Use the HEPA filter (d) for dry vacuuming. The paper filter bag (c) can be used in addition. This ensures that the HEPA filter (d) remains free of dust for longer and maintains the vacuum power for longer.In addition, the disposal of the dust is also easier.Always ensure that the filters are correctly fitted.
Wet vacuuming (Fig. F)Use the foam filter (b) for wet vacuuming. Ensure that the foam filter (b) is correctly fitted. If the stainless steel container (8) is full, the safety float valve (14) closes the suction port and suction operation is interrupted.
IMPORTANT! The device is not suitable for vacuuming flammable liquids. For wet vacuuming, use the only the foam filter (b) provided.
Water drain plug (7) (Fig. O)The stainless steel container (8) is equipped with a water drain plug (7) in order to make it easier to drain. Open the water drain plug (7) by turning it counter-clockwise and drain out the liquid.
Cleaning
WARNING!Prior to any adjustment, maintenance or service work disconnect the mains power plug!
CleaningIt is recommended to clean the device after each use. Do not spray the device with water or clean it under running water. This can result in electric shocks and can damage the device.
Empty the stainless steel container (8) after each use: After opening the screw cap (7) to drain out the liquids, the liquid collected can be drained out. Residual liquid remains in the stainless steel container (8).
To remove residual liquid, take off the machine head (2) by releasing the locking hooks (4) from the stainless steel container (8). Pour out the liquid residue. Clean the container with a damp cloth.
- Replace paper filter bag when full
- Always keep the device clean. Do not use cleaning agents or solvents.
- Keep the ventilation slots clean and free of dirt and dust.
- Clean the device only with a soft brush or a damp cloth.
- Clean the foam filter (b) with a little soap and running water and then leave it to air dry.
Storage and Transport
Store the device and its accessories in a dark, dry and frost-proof place that is inaccessible to children. The optimum storage temperature is between 5 and 30°C. Store the electrical tool in its original packaging.
Cover the electrical tool in order to protect it from dust and moisture.Store the operating manual with the electrical tool.
- Wind the mains cable (3) around the top cable holder (12). (Fig. P)
- There are four recesses on the top side of the caster mounting base (6) for storing the floor nozzle (e), the joint nozzle (f) and the metal extension tube (g). (Fig. Q)
- The remaining accessories can be stored in the stainless steel container (8).
Maintenance
Warning!Disconnect the mains plug before carrying out any maintenance work.
Connections and repairsConnections and repairs of electrical equipment may only be carried out by an electrician.
Please provide the following information in the event of any enquiries:
- Type of current for the motor
- Machine data – type plate
- Motor data – type plate
Service informationPlease note that the following parts of this product are subject to normal or natural wear and that the following parts are therefore also required for use as consumables. Wear parts*: Foam filter, Paper filter bag, Folded filter for dry vacuuming* Not necessarily included in the scope of delivery!
Disposal and recycling
![]() The equipment is supplied in packaging to preven it from being damaged in transit. The raw materials in this packaging can be reused or recycled. The equipment and its accessories are made of various types of material, such as metal and plastic. Defective components must be disposed of as special waste. Ask your dealer or your local council.
The equipment is supplied in packaging to preven it from being damaged in transit. The raw materials in this packaging can be reused or recycled. The equipment and its accessories are made of various types of material, such as metal and plastic. Defective components must be disposed of as special waste. Ask your dealer or your local council.
Old devices must not be disposed of with household waste! This symbol indicates that this product must not be disposed of together with domestic waste in compliance with the Directive (2012/19/EU) pertaining to waste electrical and electronic equipment (WEEE). This product must be disposed of at a designated collection point. This can occur, for example, by handing it in at an authorised collecting point for the recycling of waste electrical and electronic equipment. Improper handling of waste equipment may have negative consequences for the environment and human health due to potentially hazardous substances that are often contained in electrical and electronic equipment. By properly disposing of this product, you are also contributing to the effective use of natural resources. You can obtain information on collection points for waste equipment from your municipal administration, public waste disposal authority, an authorised body for the disposal of waste electrical and electronic equipment or your waste disposal company.
Troubleshooting
The following table shows fault symptoms and describes remedial measures in the event of your machine failing to work properly. If you cannot localise and rectify the problem with this, please contact your service workshop.

CE – Declaration of Conformity
![]()
Hereby declares the following conformity under the EU Directive and standards for the following article
The object of the declaration described above fulfils the regulations of the directive 2011/65/EU of the European Parliament and Council from 8th June 2011, on the restriction of the use of certain hazardous substances in electrical and electronic equipment.
Apparent defects must be notifjed within 8 days from the receipt of the goods. Otherwise, the buyerís rights of claim due to such defects are invalidated. We guarantee for our machines in case of proper treatment for the time of the statutory warranty period from delivery in such a way that we replace any machine part free of charge which provably becomes unusable due to faulty material or defects of fabrication within such period of time. With respect to parts not manufactured by us we only warrant insofar as we are entitled to warranty claims against the upstream suppliers. The costs for the installation of the new parts shall be borne by the buyer. The cancellation of sale or the reduction of purchase price as well as any other claims for damages shall be excluded.
www.scheppach.com / [email protected] / +800 4002 4002
References
[xyz-ips snippet=”download-snippet”]