
![]()
 12300265SCI-T6-PRO/S Tube RollersSCI-T6-ProSCI-T6-SUser ManualLCD Digital Tube Roller Analog Tube Roller
Please read the User Manual carefully before use, and follow all operating and safety instructions!Technical specifications and outlines are subject to change without prior notice.www.scilogex.com
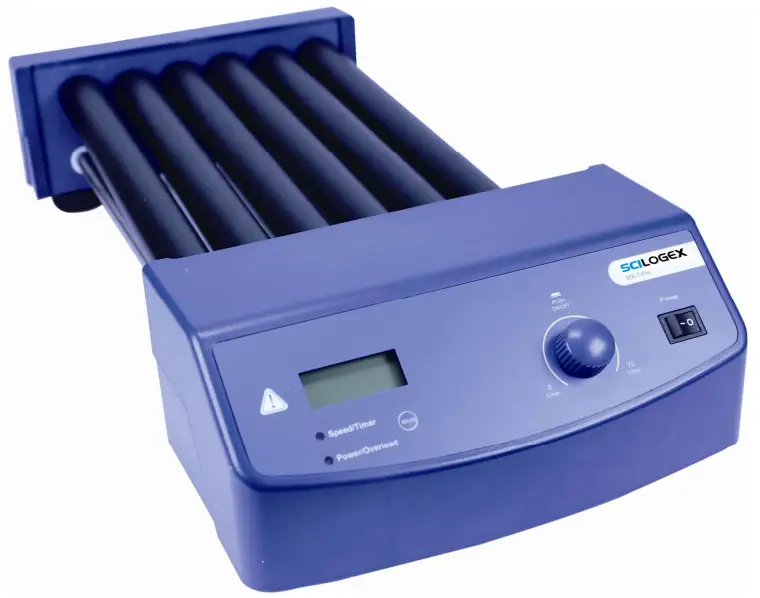
Tube Roller
Preface
Welcome to the “Tube Roller User Manual”. Users should read this manual carefully, follow the instructions and procedures, and beware of all the cautions when using this instrument.
Service
When help is needed, you can always contact the service department of the manufacturer for technical support in the following ways:1 227755 Cro well Ave.Suite C6Rock y Hill, CT 0066006677 USATel: +1 (8 6600) 44336-9 22 1Fax : +1 (8 60 ) 44336-9 77445[email protected]www.sciloggex.com
Please provide the customer care representative with the following information:
- Serial number ( on the rear panel )
- Certification
- Description of problem ( i.e., hardware or software )
- Methods and procedures adopted to resolve the problems
- Your contact information
Warranty
This instrument is warranted to be free from defects in materials and workmanship under normal use and service, for a period of 24 months from the date of invoice. The warranty is extended only to the original purchaser. It shall not apply to any product or parts which have been damaged on account of improper installation, improper connections, misuse, accident, or abnormal conditions of operation. For claims under the warranty please contact your local supplier. You may also send the instrument directly to the manufacturer, enclosing the invoice copy and giving reasons for the claim.
Safety Instructions
 |
Warning!
|
|
Protective ground contact
|
- When working wear personal safety guards to avoid the risk of:– Splashing liquids– Broken glass containers
- Follow the safety instructions, guidelines, and accident prevention regulations.
- Do not touch the running parts, moving the instrument care not rolling your fingers.
- Set up the instrument in a spacious area on a stable, clean, non-slip, dry, and fireproof surface. Do not operate the instrument in explosive atmospheres, with hazardous substances, or underwater.
- If the instrument does not run smo only, please decrease the motor speed.
- Firmly secure the accessories and vessels in place to avoid damage or risk.
- Preparation n of samples may lead to dangerous flammability. Only process samples that will not react to danger.
- Use the standard accessories listed in the “accessories” section, and follow the instructions to use accessories to ensure safety. Please switch off the power before the assembly of accessories, confirm the instrument tan accessories are intact before switch on each time.
- The instrument only is opened by ex part ,pleaseswitch off before use.
- The voltage is estated on the nameplate must correspond to the mains voltage e.
- Do not co over the instrument d in g run in g. Preven the collision and ex trust n to instrument accessories.
- Keep away from the high mag magnetic field.
Proper Use
The instrument is designed for mixing sticky substances in schools, laboratories, or factories. It can be installed on a variety of impellers, for different viscosity of the medium. This instrument is not suitable for use in residential areas or other constraints mentioned in Chapter 1. Do not use the accessories recommended by the manufacturer, or failure to use the instructions may be caused an unsafe situation.
Inspection
3.1 Receiving InspectionUnpack the instrument carefully and check for any damages which may have arisen during the transport. If it happens, please contact the manufacturer/supplier for technical support.
|
Note:If there is any apparent damage to the system, please do not connect to the power line. |
3.2 Listing of Items
| Items | Qty |
| Main unit | 1 |
| Power cable | 1 |
| User manual | 1 |
Table 1
Control and Display
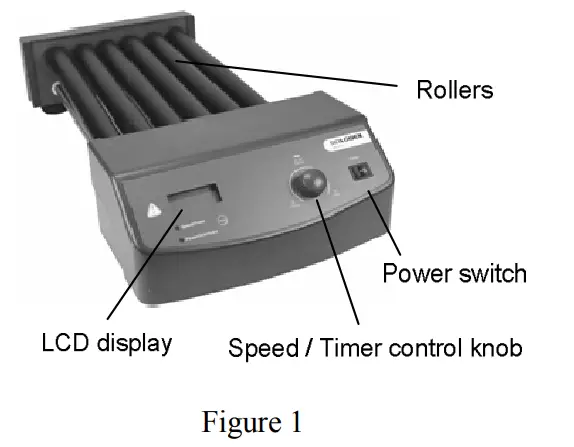
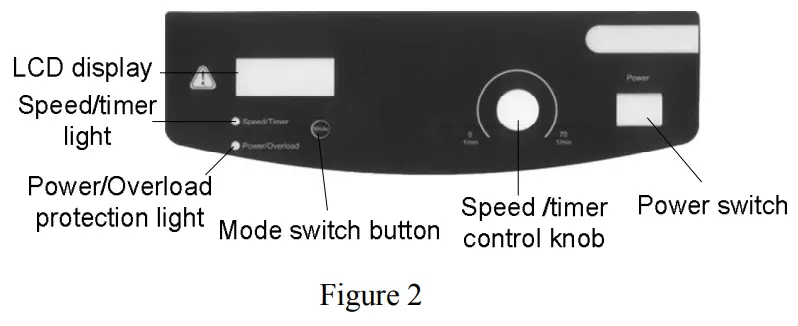
4.1 Control
 |
 |
| Items | Defa ult setting s |
| Mode switch button Mode | Shift speed and time display. |
| Speed/timer control k nob | Setup end and time by rotating gg speed/timer control knob .. Push o n/off to start/stop rotating fu action. |
| Sp eed/timer lig hht Speed/Timer | Green/Red LED display light. Different colors of LED light show the value for speed or time that the LCD screen currently displays. Green LED light shows that the LCD screen currently displays speed. Red LED light sh rows that the LCD screen currently displays the time. |
| Power/Overload protection lig hPower/Overlo aad | Green/Red LED display light. LED light shows green when switching on, LED light shows red when starts overload protection. When the torq use reaches the limited value, overload protection in fu action n will be started. At the same time, overload protection light flashes, while the system stops run ing. |
| LCD display | LCD displays the real working state and all setting values. |
| Power switchI/O | Switch ON or OFF the instrument. |
Table 2
| Items | Defa ult settings |
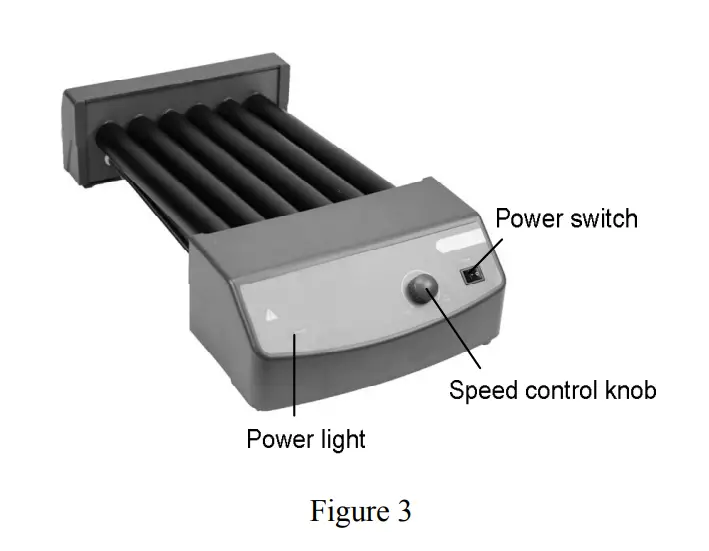
| Speed control knob | Rotating speed control knob to start/stop rotating function. |
| Power light | Green LED display light. |
| Power | LED light shows green when to switch on. |
| Power switch I/O | Switch ON or OFF the instrument. |
4.2 Display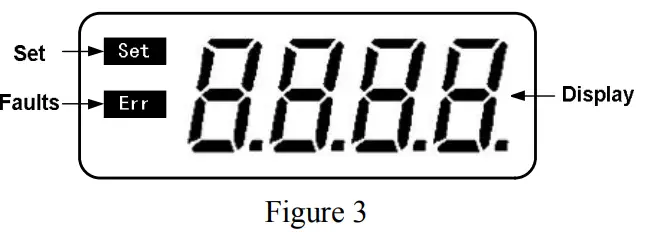
| Display | Descriptio ns |
| Set | Display when setting et value. |
| Err | Display when setting target value. |
| Display area | When Set display, this area sh rows setting value; When Set disappears, this area shows run in g value. |
Table 4
Operation
- Place the Rotator safe and stable surface, ensure the required operating voltage and power supply voltage are matched, and the socket must be earthed reliably.
- Connect the power cable. · Switch ON instrument. · The instrument begins self-checking.
- When initialization is over, LCD displays the last running values of speed.
- Rotate the speed/timer control knob to set the target speed.a. Press the speed/timer control knob to start the rotating function. Press the speed/timer control knob again to stop the rotating function.b. Press the mode switch button, LCD displays time, and then rotating the speed/timer control knob to set target time. Press the speed/timer control knob to start the rotating function at the set time. During operation, motion can be stopped at any time by pressing the speed/timer control knob. If the knob is pressed again, the motion will start again and the timer will restart the countdown. When the timer reaches zero, the unit will be automatically halted and an alert will sound. If these operations above are normal, the instrument is ready to operate. If not, the instrument may be damaged during transportation, please contact the technical support of the manufacturer/supplier.

Note: The set values can be altered at any time.
Faults
- The instrument cannot be powered ON when starting the rotatingfunction.• Check whether the power cable is connected.
- Rotating function suddenly stop• Power/overload protection light changed to red, LCD displays “Er 03”, indicate the current failure is “overload protection”.
- Pressing the speed/timer control knob first to close the rotating function, and then restart the rotating function after lowered load. If the rotating function cannot start, then repeat the process and gradually reduce the load.
Maintenance and Cleaning
- Proper maintenance can keep the instrument working properly and lengthen its lifetime.
- Do not spray cleaner into the instrument when cleaning.
- Do not remove the power line when cleaning. Only use recommended cleansers:
| Dyes | Isopropyl alcohol |
| Construction materials | Water containing tenside Isopropyl alcohol |
| Cosmetics | Water containing tenside Isopropyl alcohol |
| Foodstuffs | Water containing tenside |
| Fuels | Water containing tenside |
- Before using the er meth good for cleaning or decon termination n, the user must ascertain with the man manufacturer that this meth good will not damage theinstrument. Wear the proper protective Glo valves in cleaning the instrument.Note:
- The electronic device cannot clean with a cleanser.
- If you require maintenance service, must be cleaned the instrument in advance to avoid pollution of hazardous substances, and to send it back into original packing.
- If the instrument will not use for a long time, please switch off and place it in a dry, clean, room temperature and stable location.
Associated standards and regulations
Construction in accordance with the following safety standards:EN 61010-1UL 3101-1CAN/CSA C22.2(1010-1)EN 61010-2-10Construction in accordance with the following EMC standards:EN 61326-1
Changes or modifications not expressly approved by the party responsible for compliance could void the user’s authority to operate the equipment. NOTE: This equipment has been tested and found to comply with the limits for a Class A digital device, pursuant to Part 15 of the FCC Rules. These limits are designed to provide reasonable protection against harmful interference when the equipment is operated in a commercial environment. This equipment generates, uses, and can radiate radio frequency energy and, if not installed and used in accordance with the instruction manual, may cause harmful interference to radio communications. Operation of this equipment in a residential area is likely to cause harmful interference in which case the user will be required to correct the interference at his own expense.
Specifications
| Items | Specifications | |
| LCD digital model | Classic model | |
| Voltage [VAC] | 100-240 | |
| Frequency [Hz] | 50/60 | |
| Power [W] | 30 | 25 |
| Number of rollers | 6 | |
| Roller size [length x diameter, mm] | 280 X 30 | |
| Motor type | DC motor | |
| Speed range [rpm] | 10-70 | 0-70 |
| Speed display | LCD | |
| Timer range [min] | 1-1199 | |
| Timer display | LCD | |
| Run type | Timer/Continuousoperation | Continuousoperation |
| Overall Dimensions [mm] | 470X 260X 120 | |
| Weight [kg] | 5.1 | 4.5 |
| Permissible ambient temperature [°C] | 5-40 | |
| Permissible relative humidity | 80% | |
| Protection class acc. to DINEN60529 | IP21 |
 report this ad
Table 5
Ordering Informations
| Ca t. No. |
Descriptio ns |
| 823222019999 | SCI-T6-Pro, LCD Digital Tube Roller, variable speed, 6 rollers, 100V-240V, 50HZ/60HZ, US plug |
| 823222119999 | SCI-T6-Pro, LCD Digital Tube Roller, variable speed, 6 rollers,100V-240V, |
| 50HZ/60HZ, Cn plug | |
| 823222219999 | SCI-T6-Pro, LCD Digital Tube Roller,* variable speed, 6 rollers, 100V-240V,50HZ/60HZ, Euro plug |
| 823222319999 | SCI-T6-Pro, LCD Digital Tube Roller, variable speed, 6 rollers, 100V-240V, 50HZ/60HZ, UK plug |
| 823220019999 | SCI-T6-S, Classic Tube Roller, variable speed,6 rollers, 100V-240V,50HZ/60HZ, US plug |
| 823220119999 | SCI-T6-S, Classic Tube Roller, variable speed, 6 rollers, 100V-240V, 50HZ/60HZ, Cn plug |
| 823220219999 | SCI-T6-S, Classic Tube Roller, variable speed, 6 rollers,100V-240V,50HZ/60HZ, Euro plug |
| 823220319999 | SCI-T6-S, Classic Tube Roller, variable* speed,6 rollers, 100V-240V,50HZ/60HZ, UK plug |
SCILOGEX, LLC1 227755 Cromwell Ave.Suite C6Rocky Hill, CT 0066006677 the USATel: +1 (8 6600) 44336-9 22 1Fax : +1 (8 60 ) 44336-9 77445[email protected]www.sciloggex.com
References
[xyz-ips snippet=”download-snippet”]