![]()
Secur360 Video DoorbellKnowledge Booklet
Quick Start Guide V2.0Troubleshooting Guide
Install VideoScan QR Code for install video or visithttps://youtu.be/WhwwelstLAI
Pre-install Instructions
- Shut off power to your existing doorbell from your fuse panel
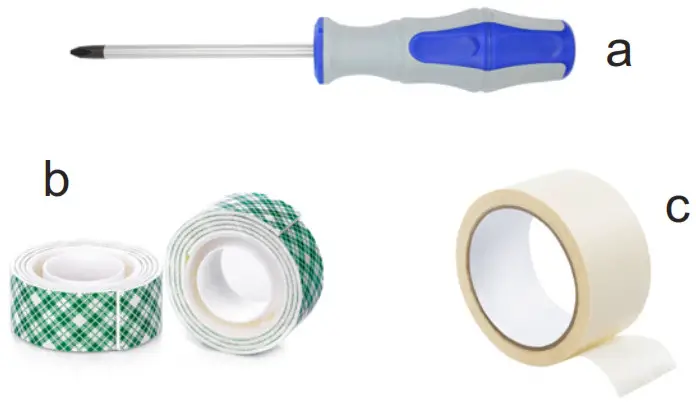
- Required tools: #2 Phillips head screwdriver (a) Double-sided tape (b) Masking tape or wire tags (c)
- Recommended tools:Small flathead screwdriver (d) Powered drill/screwdriver with #2 Phillips bit head (e) Wire stripper (f)

- Go to your phone’s app store and download and install the SECUR360 App.
- Please have your 2.4 GHz Wi-Fi network SSID (name) and password handy!
- Please ensure your phone is connected to the SAME Wi-Fi network to which you will be connecting your doorbell.
- On your mobile device, open the SECUR360 app and press the “Register” button to create a new account.
- Type your email address and select “Get Verification Code.” NOTE: You will use your email address to log into your account in the future.
- The app will send an email with a verification code. Type the verification code in the app.
- Enter a password and select “Done” NOTE: Most special characters are acceptable. However, there might be some that will not be allowed such as the “@” symbol.
Video Doorbell Components

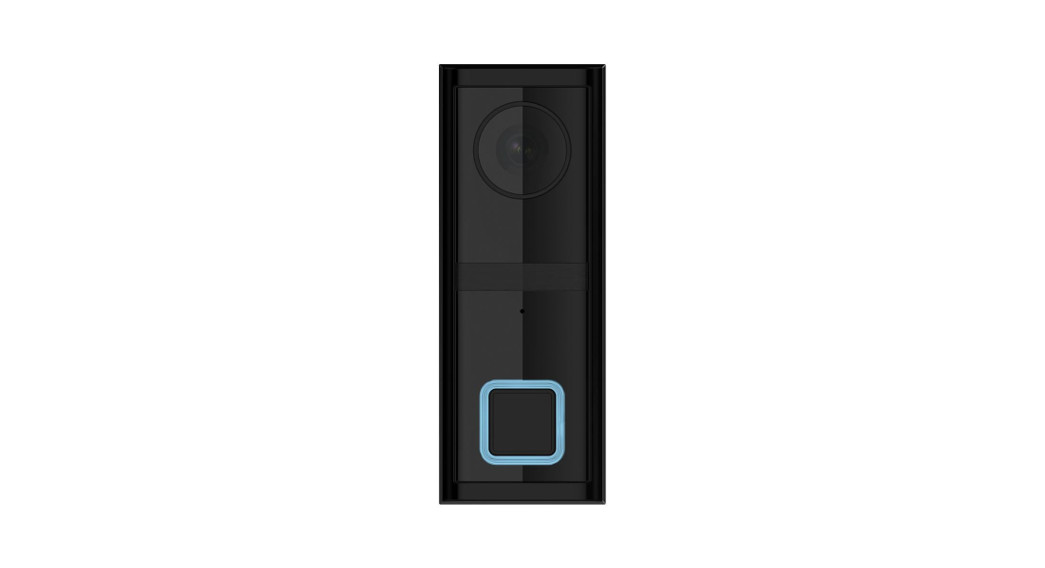
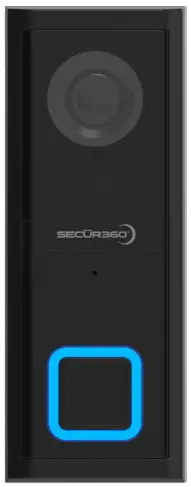
Video Doorbell

Quick Connectors
Power Module
Know Your Existing DoorbellComponents
Exterior doorbell buttons are usually mounted next to your front door and will look similar to the below image.

You may have a doorbell button with no exposed screws. In this situation, the body of the doorbell button is snapped onto a baseplate that is screwed to the door trim/wall.

Your interior doorbell chime will typically be mounted on a wall in a plastic or wood cover similar to below. If you are unsure where it is located press the doorbell button to locate.

Remove your existing doorbell button by unscrewing it from your exterior wall.After unscrewing, you may have to firmly pull it from the wall if mounted to a painted surface. Try rocking it side to side to loosen if this is the case. Gently pull away from the wall to avoid breaking the wires. If your button has no exposed screws, it is clipped onto a baseplate that is screwed to the wall/trim.
Use a flathead screwdriver to release the pushbutton from the baseplate. Unscrew baseplate from the wall/trim. Detach the two wires by unscrewing the screws holding them down. Gently disconnect the wires by unhooking them from around the screw. You will RE-USE the old wires. Discard the old doorbell pushbutton.
Mounting The Backplate Of Video Doorbell

Unscrew the small screw on the bottom with a small Phillips head screwdriver. Separate the backplate from the video doorbell.DO NOT LOSE THE SMALL SCREW!
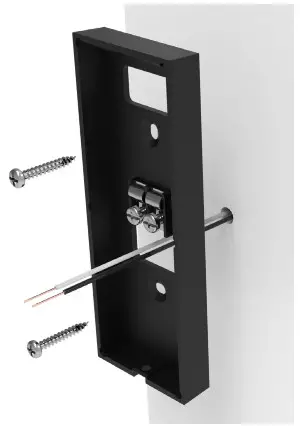
Hold the backplate in the SAME location as the old doorbell pushbutton. Gently pull the old wires through the middle openingof the backplate. Screw the backplate into the old screw holes using the provided new screws. If you cannot use both original holes, secure the backplate with one of the original holes first and use a powered screwdriver/drill to secure the second mount hole in its new location.
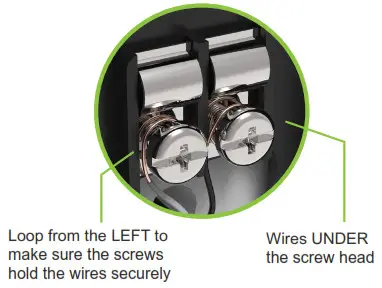
Gently loop (from the LEFT) one of the old wires UNDER a screw head and ABOVE the metal tab below it and tighten the screw to secure the wire. You may have to loosen screw with the screwdriver to make room, but be careful to not fully remove the screw. Repeat the above for the other remaining existing wire.NOTE: Wires can be connected to either screw!NOTE: Try and slide any wire slack back into the hole in the wall/trim that they are coming out of before tightening everything down!NOTE: Make sure wires are not touching after attaching!
Switching On and Attaching Video Doorbell To The Backplate
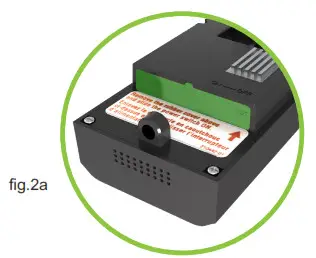
While looking at the bottom of the video doorbell, use your fingernail or small flathead screwdriver and gently pry open the lack rubber door (highlighted in green in fig. 2a).

On the RIGHT side gently slide the power switch to the LEFT (fig. 2b). If you have a Micro SD card (not provided), insert thecard on the LEFT side slot labeled Micro SD.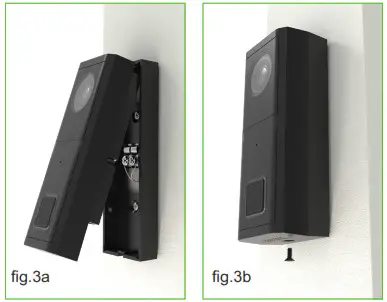
Attach the Video Doorbell to the backplate by inserting the TOP and then rotating down (fig. 3a). Secure by installing the small screw that you removed in step 5a while holding the video doorbell against the backplate (fig. 3b).
Prepare For Power Module Installation
Remove the cover of your chime by gently pulling towards you or gently lifting up and out. Set aside.

You will now see something similar to one of the above pictures.

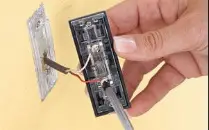
Write “TRANS”, and “FRONT” on 2 pieces of masking tape or wire tags. Carefully label the wires with the wire tags tocorrespond where they are attached (fig. 4a). Remove wires by unscrewing from the screw terminals and gently unhooking from the screw.NOTE: Wires could be ANY color. Please make sure to label according to where they were originally located!\
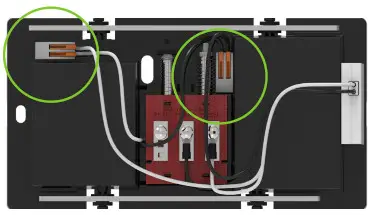
Wire The Power Module
Ensure that orange arms on quick connectors are completely upright, 90 degrees to gray body. Some force may be necessary.
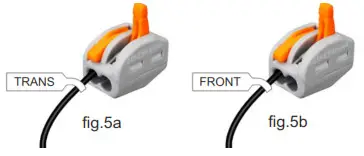
Insert the wire you labeled “TRANS” into one quick connector opening (ANY opening) and lower the orange arm until flush with the gray body. You will have room for one more wire on this quick connector. Set aside (fig. 5a). Insert the wire you labeled “FRONT” into the 2nd quick connector (ANY opening) and lower the orange arm until flush with the gray body (fig. 5b). You will have room for one more wire on this quick connector. Set aside.
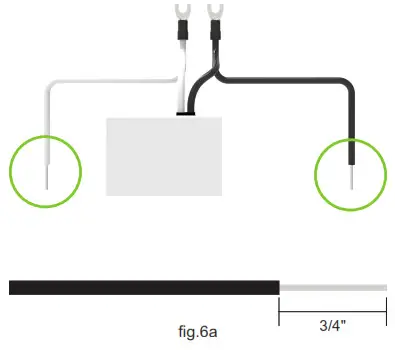
Make sure that each bare wire on the power module has a 3/4″ wire showing (fig. 6a). Use wire strippers to trim back if necessary.

Insert either of the bare wires from the power module into the empty opening of the quick connector with the wire you labeled “TRANS” (fig. 7a) and lower the orange arm fully.Insert the remaining bare wire from the power module into the empty opening of the quick connector with the wire you labeled “FRONT” (fig. 7b) and lower the orange arm fully.
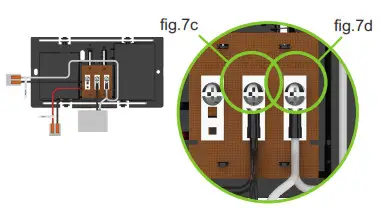
Connect the spade connector (fig. 7c) that is connected to the wire you labeled “TRANS” to the “TRANS” screw terminal on the chime and tighten the screw. Connect the spade connector that is connected to the wire you labeled “FRONT” (fig. 7d) to the “FRONT” screw terminal on the chime and tighten the screw.
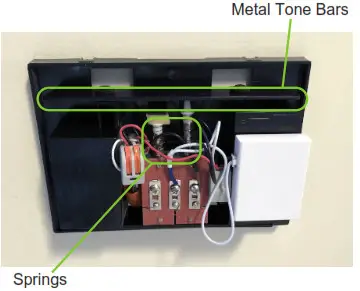
Using the double-sided tape, attach the power module inside the chime (if space is available and without touching any of the metal tone bars or springs) or on the exterior of the plastic cover.
Tuck the quick connectors and wires out of the way of the springs or tone bars of the chime. Replace the cover over chime, taking care to ensure wires are tucked inside.
Restore Power

RESTORE power at your breaker box. Your video doorbell button should be flashing RED now. If it is not flashing red, your doorbell may be having intermittent power issues or may not be receiving power at all. Check the troubleshooting guide under“Video doorbell has intermittent or no power” for solutions. Follow below link for FAQs:https://www.heath-zenith.com/secur360/chimeFAQFor customer service call: 1-800-858-8501
Add Video Doorbell To Your App
IMPORTANT: Before adding the video doorbell to the app, ensure your mobile device is connected to the same 2.4 GHz wi-fi network that the video doorbell will be using. (MUST be 2.4 GHz)On your mobile device, open the SECUR360 app. Ensure the app is showing the Home screen. If not, press the Home icon at the bottom of the screen. To add a device, press the “+” icon at the top of the screen.Ensure “Add Manually” is selected at the top of the screen.Select “HeathZenith” in the left-hand column and then select “Doorbell”.Press NEXT on the video help screens FOUR times. Press CONFIRM and then NEXT.Enter the login information for your 2.4 GHz wi-fi network.Hold up the QR code displayed on the phone screen to the camera of the video doorbell and wait for a chime.After the chime, the button will flash blue to indicate the video doorbell is connecting to your network. When the button turns solid blue, the video doorbell is ready to use.
Secur360 Video Doorbell Troubleshooting Guide
Cannot Connect Device To Network
QR Code Will Not ScanIf your QR code will not scan, you can easily connect to your network using AP mode.
- Launch your Secur360 app.
- Select the “+” button in the upper right corner.
- Select the doorbell icon.
- In the upper right corner, select “QR Code” to access the drop-down menu.
- Select “AP Mode”.
- Select “Next” until you get to step 5, select confirm and then select “next”.
- Connect your smartphone to your 2.4GHz network. The 2.4GHz network will likely have a 2, 2.4, or 2G in the name”.NOTE: Please make sure you connect to ONLY your 2.4GHz network. Like most connected products, your Secur360 video doorbell will NOT work on a 5GHz network.
- You are now prompted to select the hotspot network of your Secur360 video doorbell. This name will be “SL-xxxxxx”.
- Your Secur360 video doorbell will now automatically connect to your network and your LED ring will be solid blue.
Video doorbell too far away from the routerIn some instances, your router is too far away from the video doorbell to get a strong wi-fi signal. Please try the following solutions to improve your wi-fi signal strength.
- If possible, move your router closer to where your video doorbell is installed or try and minimize the number of walls between the router and video doorbell.
- Elevate the router to minimize interference. Do not leave the router on the floor or under any furniture.
- If the signal strength is still too weak, it may be necessary to purchase a Wi-Fi extender.
You are connected to a 5 GHz networkYou may be connected to a 5 GHz network instead of the required 2.4 GHz networks.
- Navigate to your wi-fi settings on your phone.
- You will see all detectable networks in your area.
- Locate your SSID names in the list of networks.
- One of your SSID names should include a “2G” or “2.4” notation. Connect to this network.
Video doorbell does not have powerYour Secur360 video doorbell may not be receiving sufficient power to operate correctly. First check to see if your power module is correctly installed.
- Disconnect the bare wires from the power module that are inserted into the quick connectors.
- Ensure that the exposed wire is at least 3/4″.
- If the exposed wire is not 3/4″, use wire strippers to expose 3/4″ of wire.
- Re-insert the bare wires into the quick connectors.
- Check to see if video doorbell has power (LED on front of the doorbell should be flashing red or blue).Continue to the next page if you do not have wire strippers.
If you do not have wire strippers, please follow the below procedure for a workaround.
- Disconnect the bare wires from the power module that are inserted into the quick connectors.
- CUT the bare wires just below where the bare wires are exposed (you will be cutting through the insulation).
- Loosen the screw terminals for “TRANS” and “FRONT” in your chime box.
- Disconnect the wire labeled “TRANS” from the quick connector and re-install it over the spade of a connector that is already connected to the “TRANS” terminal in your chime box. Tighten down the screw to hold both wire and spade securely.
- Disconnect the wire labeled “FRONT” from the quick connector and re-install it over the spade of a connector that is already connected to the “FRONT” terminal in your chime box. Tighten down the screw to hold both wire andspade securely.
- Check to see if video doorbell has power (LED on front of the doorbell should be flashing red or blue).
You need to reset your Secur360 video doorbell
- Remove the Secur360 video doorbell from the backplate by unscrewing the small screw on the bottom.
- Pry open the black rubber door on the back of the video doorbell (the same door you opened to switch the doorbell on).
- Next to the power switch is a small hole. Insert a paperclip or something similar into the hole to press the reset button. Keep it pressed for 10 seconds to reset the video doorbell.
- Reinstall Secur360 video doorbell and retry connecting to network.You may have entered the wrong password for your wi-fi networkIf you have entered the wrong password for your wi-fi network, it will not allow you to connect to the network and will not connect unless you reset your Secur360 video doorbell. Please follow the above instructions to reset your video doorbell.
Video Doorbell Keeps Going Offline
Video doorbell too far away from the router
In some instances, your router is too far away from the video doorbell to get a strong wi-fi signal. Please try the following solutions to improve your wi-fi signal strength.
- If possible, move your router closer to where your video doorbell is installed or tries and minimize the number of walls between the router and video doorbell.
- Elevate the router to minimize interference. Do not leave the router on the floor or under any furniture.
Video doorbell has intermittent or no powerYour Secur360 video doorbell may not be receiving sufficient power to operate correctly. First, check to see if your power module is correctly installed.
- Disconnect the bare wires from the power module that are inserted into the quick connectors.
- Ensure that the exposed wire is at least 3/4″.
- If the exposed wire is not 3/4″, use wire strippers to expose 3/4″ of wire.
- Re-insert the bare wires into the quick connectors.
Video doorbell has intermittent or no power – continuedIf you do not have wire strippers, please follow the below procedure for a workaround.1. Disconnect the bare wires from the power module that are inserted into the quick connectors.2. CUT the bare wires just below where the bare wires are exposed (you will be cutting through the insulation).3. Loosen the screw terminals for “TRANS” and “FRONT” in your chime box.4. Disconnect the wire labeled “TRANS” from the quick connector and re-install it over the spade connector that is already connected to the “TRANS” terminal in your chime box. Tighten down the screw to hold both wire and spade securely.5. Disconnect the wire labeled “FRONT” from the quick connector and re-install it over the spade connector that is already connected to the “FRONT” terminal in your chime box. Tighten down the screw to hold both wire and spade securely.6. Check to see if video doorbell has power (LED on front of the doorbell should be flashing red or blue).
If you are still experiencing intermittent power, adjust the bend in the terminals on the Secur360 video doorbell backplate.
- Remove the video doorbell by unscrewing the small screw on the bottom.
- GENTLY bend the metal tabs of the contacts slightly toward you ( approximately 3/16”). This will ensure a solid contact to the back of the Secur360 video doorbell.
- Reinstall the video doorbell and check to see if power remains constant. If none of the above solutions work, please doublecheck to make sure that you have turned on the doorbell by sliding the power switch to the left (see step 6a from the install guide).
Follow below link for FAQs:https://www.heath-zenith.com/secur360/chimeFAQFor customer service call:1-800-858-8501
FCC Statement
This device complies with Part 15 of the FCC Rules. Operation is subject to the following two conditions: (1) this device may not cause harmful interference, and (2) this device must accept any interference received, including interference that may cause undesired operation.Warning: Changes or modifications to this unit not expressly approved by the party responsible for compliance could void the user’s authority to operate the equipment.Note: This equipment has been tested and found to comply with the limits for a Class B digital device, pursuant to part 15 of the FCC Rules. These limits are designed to provide reasonable protection against harmful interference in a residential installation. This equipment generates, uses, and can radiate radio frequency energy and, if not installed and used in accordance with the instructions, may cause harmful interference to radio communications. However, there is no guarantee that interference will not occur in a particular installation. If this equipment does cause harmful interference to radio or television reception, which can be determined by turning the equipment off and on, the user is encouraged to try to correct the interference by one or more of the following measures:– Reorient or relocate the receiving antenna.– Increase the separation between the equipment and receiver.– Connect the equipment into an outlet on a circuit different from that to which the receiver is connected.– Consult the dealer or an experienced radio/TV technician for help.This device contains license-exempt transmitter(s)/receiver(s) that comply with Innovation, Science, and Economic Development Canada’s license-exempt RSS(s). Operation is subject to the following two conditions:
- This device may not cause interference.
- This device must accept any interference, including interference that may cause undesired operation of the device. FCC Responsible Party Name: HeathCo LLCAddress: 2445 Nashville Road, Bowling Green, KY 42101 U.S.A.Telephone Number: 800-858-8501
 report this ad
![]()
1 year limited warranty211037-01
References
[xyz-ips snippet=”download-snippet”]