Seek Reveal FirePRO X User Manual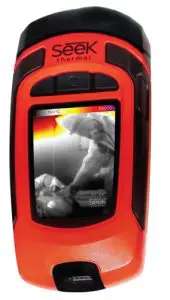
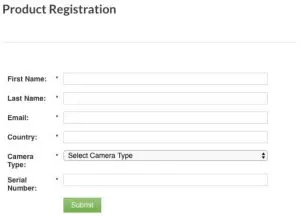
Registering your product
- By sharing your name, email, and serial number, you enable us to send you product updates and tips and techniques. We can also expedite your warranty inquiries by knowing when and where you purchased your FirePRO X.
- NOTE: We do not – and will not – sell any personal data to any third-party!
- Go to thermal.com/register in your Internet browser to register your FirePRO X.
Quick Start
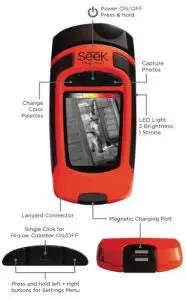
The Reveal FirePRO X has a custom-designed interface for enabling speed and efficiency during Fire and Rescue situations. Here is a list of steps to get you started:
Charging your Battery
For the best results, fully charge your Reveal FirePRO X using the included USB cable before each use. When the thermal camera is ‘off’, the Battery Charging screen will appear for a short period of time, and can be refreshed by pressing and releasing ANY button.
NOTE: Reveal FirePRO X will provide up to 4 hours of imaging time with a full charge.
Setting up your Device
To turn on your device, press the CENTER button and hold until the screen lights up. The button-function ribbon at the top of the screen defines the meaning of the three buttons above it. For each of the setup screens, use the LEFT and RIGHT buttons to navigate, and the CENTER button as the selector. For numerical fields, the LEFT button subtracts from the displayed value, while the RIGHT button adds to it, as the button function ribbon indicates. To switch the device off, press and hold down the CENTERbutton for 2 seconds until the screen goes dark.
Next you will be directed to a screen that asks you to set up some basic information, including language, and date & time formats. Using the RIGHT and LEFT buttons, scroll down and select the appropriate fields, using the CENTER button to select and continue, concluding with the ‘setup complete’ screen.
NOTE: If you need to change any of the information input in the initial setup, or settings afterwards, you can always restore your device back to its factory settings by selecting Restore in the Device menu. This option will reboot your device and ask you to input the same information as when it’s first turned on. To conduct a hard reset, press and hold the CENTER button for 30 seconds until the screen flashes on and off. The unit will power cycle a number of times during this process. This option can be useful for recalibrating the battery power settings if the device will not turn on.
Home Screen
Once you have completed the initial setup, you will be taken to Active Imaging, as shown by the following screen:
Temperature Color Bar
Press and release the center button to turn ‘on’ or ‘off’ extra overlay information in the displayed image image while you scan.
The temperature color bar visually displays a temperature range up to 1022°F (550°C). The lower number in the temperature bar tells you at what temperature the image begins to colorize. In Fire Mode, anything below the bottom temperature (150˚C) will appear black and white, with high dynamic range, and anything above it will begin to colorize in shades of yellow, orange, red, and purple. A title indicator will briefly note which mode you are viewing the image through, and the numerical temperature located at the focal point of the reticle. The Seek Thermal watermark is located at the left-hand corner of the screen, and the battery life at the bottom right-hand corner of the screen.
Reveal FirePRO X Interface
Modes
The Reveal FirePRO X has three different modes which have been optimized for Firefighters and First Responders. Press the LEFT button to cycle through the different modes.
Fire ModeDisplays an image in shades of gray, which turn bright orange/red when areas of extreme heat are present and correspond to the temperature bar mapping at the top. This mode is specifically designed for locating active fire and caution areas that may be about to flashover. This mode is also useful for detecting hotspots during 360 size-ups and Overhaul.
Survey ModeSurvey is a monochromatic filter palette of different shades of blue which turn white then yellow then red around hotter areas. This mode is optimal for helping locate downed personnel and victims during search and rescue.
Color ModeThis is a demonstration mode and is best-suited for the classroom, which highlights areas of heat in red with colorful borders as the temperature decreases. While it’s seldom used in the field, this is a useful demo mode for third-party observers.
To access the menu, simultaneously press and hold both the LEFT and RIGHT buttons for one second. You will then be directed to the following screen:
The Menu gives you access to your gallery of saved images, switching temperature units from Fahrenheit to Celsius, and device settings and information.
Gallery
Entering the gallery allows you to view or delete your saved photos.
Temperature
Click on this option and use the CENTER button to choose between °F and °C for temperature viewing.
Device
Selecting ‘device’ opens a new screen that gives you the option of adjusting date, time and language, accessing flashlight and power settings, enabling or disabling the Seek Thermal watermark, and restoring the device back to factory settings.
Date & TimeThis option allows you to go back and adjust formats selected when you first set up the device. You may change time between military and standard time, preferred date format, and set the current time.
LanguageChoose between English, Spanish, French, German, Dutch, Italian, Portuguese, Polish, Korean, Simplified Chinese, and Japanese for your cameras native language.
PowerSelecting the ‘power’ option will enable you to modify two settings, ‘auto’ & ‘display’. In ‘auto’ you can choose whether the device will turn off after no interaction has been had for a selected period of time.
The default for ‘auto’ is set to ‘off’ to ensure the device will not trigger an automatic power off during an emergency. When on, it’s set at a default of 15 minutes and can be adjusted higher or lower depending on your preferences. This function can be disabled at any time by setting to ‘off’, regardless of how much time is selected.
Display allows you to adjust the brightness of the LCD screen between 1-100%. Hold the LEFT or RIGHT button down to adjust the brightness lower or higher.
FlashlightWhile other Reveal devices are limited to ‘high’, ‘low’ and settings, the Reveal FirePRO X includes a Strobe light option. This feature has been designed for helping locate downed firefighters in visually compromised scenarios.
In the flashlight setting, you can adjust the brightness level of the ‘high’ and ‘low’ settings, and toggle the strobe feature, which always uses 100% brightness to ‘on’ or ‘off.
To engage the flashlight, press the SIDE button on the right side of the camera. Pressing it four times will toggle you through the options ‘high, ‘low’, ‘strobe’ and ‘off’. The flashlight will work regardless of whether or not the camera is OFF.
WatermarkPress the CENTER button to turn the Seek Thermal watermark present at the bottom left of the scanning screen ‘on’ or ‘off.’
RestoreThis option will restore your device back to its factory settings. Once you complete this step, you will need to re-enter time, date and language preferences before you return to the scanning screen.
AboutProvides information about your devices serial number and firmware, and includes additional instructions for how to register your device on the Seek Thermal website.
Capturing a Photo
Taking a Photo
- To take a photo, press the RIGHT button to capture an image.
- The camera will immediately freeze frame and form a white border around the perimeter of the image. Because photo capture occurs instantly, the quality of the image will not be degraded if you accidentally or abruptly move your camera while the bar is still loading. The temperature value at the center of the screen will be saved to the image’s metadata, which can be seen when viewed within .PNG files on a PC.
Reviewing your Photos
- Take a look at your photos by pressing the LEFT and RIGHT buttonsimultaneously to access the main menu, and pressing the RIGHT button to go to ‘gallery’. Press the CENTER button to view the photos you have just taken.
- Photos are displayed with the numerical temperature that was recorded at the point of the reticle, the date and time it was taken in the footer at the lower half of the screen, and the selected photograph number out of the entirety of photos present in your gallery. Use the LEFT and RIGHT buttons to scroll through them.
- To exit gallery, press the CENTER button. This gives you the option to ‘cancel’ and go back to the gallery. Return to thermal imaging by pressing the ‘exit’ button, or delete your selected photo.
Deleting Photos
- While reviewing photos, press and release the center button for “options”
- Use the left and right buttons to scroll down to the “Delete” option
- Press the center button the confirm delete for the selected photo. The next saved image will appear in the display.
Downloading Images
Images taken with Reveal FirePRO X may be directly downloaded by connecting the USB cable from your computer to the device. The cable uses a magnetic connection to the compatible port on the bottom of the Reveal FirePRO X, it can only be inserted in one orientation. You can copy or drag photos to your computer (Mac or PC) for storage. These are located in the DCIM\100SEEKT folder. The photos are a standard (.png) format and can be edited, annotated, and inserted into documents easily. Reveal FirePRO X will always save (.png) metadata such as temperature units, but only display spot temperature data if the reticle is switched to ‘ON’.
NOTE: Always perform an eject or dismount on your computer before disconnecting the USB cable to prevent corruption of the SD memory card.
Charging the FirePRO X
The unit is supplied with a cable that supports USB-A connections on the “source” end and a magnetic attach cable on the “device” end. The Device end of the cable is keyed and can only be attached to the FirePRO X in one orientation for simplicity.
Please make sure whenever charging, updating, or downloading images, that themagnetic attach cable is properly seated in the mating port on the FirePRO X. After working in harsh environments, the magnetic port on the FirePRO X may need to be cleaned with a cotton swab or similar with a bit of isopropyl alcohol.

Cleaning the lens
At times, thermal images may begin to look cloudy or low quality despite having afocused camera. This may be due to particles of dirt on the lens. Cleaning your camera lens may help to clear up images and give higher quality images.
Required materials for cleaning:
- Q-tip
- isopropyl alcohol
- Apply a small amount of isopropyl alcohol to the clot of the Q-tip until slightlydamp.
- Use the Q-tip to lightly rub the reflective inner lens of the camera until clean.
- Lightly pat and dry the lens with a clean cloth and let air dry.
NOTE: Never use window cleaners, harsh chemicals, or cleaning solvents on yourReveal FirePRO X, and never spray anything directly onto the screen.
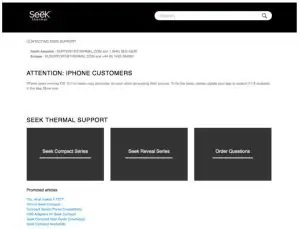
Help and customer support
We’re here to help! If you need customer support for an issue not addressed here with your product, you may email your request directly to [email protected]. Your request will be answered within 3-5 business days.
Note: Please include the information from the ‘About’ screen when contactingsupport if you have an issue.
For more information, visit support.thermal.com.
Troubleshooting
The device will not power on.
- Try plugging the device in with the supplied wall charger or another 1-amp-rated (or greater) charger to ensure there is enough battery remaining.
- Try performing a hard system reset by holding down the CENTER button forthirty seconds, release and wait. The system should power cycle a number oftimes.
- If the device gets stuck at the welcome screen, please perform a hard reset tosee if it fixes the problem. Battery power should be at least 40% to achieveoptimal performance.
- If the flashlight works but the thermal imager does not turn on, try charging the device with a wall charger. The flashlight function can run longer than the thermal imaging function of the device
If the battery is completely discharged and thermal imaging won’t start.
- Charge battery and power on your thermal camera.
- If screen displays all black, power-cycle your Reveal.
The thermal image appears blurry.
- Check that the lens is clear and clean.
- Check that the screen is clean.
The thermal image appears noisy.
- Has your flashlight been on for a long time? The image may be noisy at elevated temperature.
- Have you suddenly cooled or heated the device quickly? The image shouldstabilize in a short period of time.
I cannot find the device on my computer when I plug it into my USB port.
Check your file system (Explorer in Windows, Finder in Mac OS) and check yourexternal memory devices.
The flashlight is dimmer than usual.
Is your battery charged? The flashlight is an extremely high-powered light consuming a considerable amount of power. When the battery voltage drops to near empty, the flashlight will begin to dim to preserve battery life and allow the thermal imager to work.
report this adTHANK YOU!
References
[xyz-ips snippet=”download-snippet”]