Seek Scan Kiosk User Manual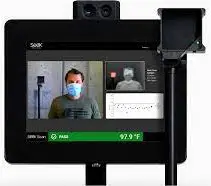
WHAT’S IN THE BO

OTHER ITEMS INCLUDED:
- Seek Scan Software pre-installed on tablet
- Fasteners and tools for assembly
- Two enclosure keys
- US, EU & UK AC plugs
- User Manual
- Warranty* Items shown above are not to scale.
ASSEMBLY INSTRUCTIONS
- Remove all components from the box.
- Connect the baseplate to the Kiosk stand using the included tools and fasteners. Ensure the power cable is not binding or pinched
- Using the included L-Key tool, extend the height of the kiosk stand as desired by loosening the screw located on the stand near where the upper and lower sections of the stand join, and retighten. Seek recommends setting this to maximum height (extension).

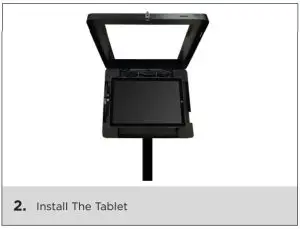
- Unlock and open the tablet frame case using the included keys.
- Carefully remove the tablet from its packaging and hold the tablet up to tablet frame case and connect the 2 USB-C cables to the tablet.
- Seat the tablet carefully within the foam casing.
- Power on the tablet by pressing and holding the power button. The tablet will start up into the Seek Scan software within approximately 30 seconds.
- Place the included display mask over the tablet (optional) and carefully close the tablet frame case cover to enclose the tablet. Ensure the tablet frame case cover clicks into the locking mechanism.

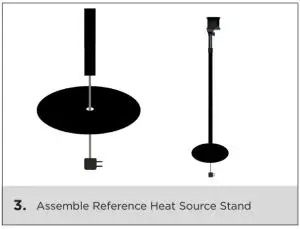
- Screw in the Reference Heat Source pole stand to the base plate.
- Open Reference Heat Source box and attach Heat Source to the 1/4 20 head on the Heat Source stand.
- Set desired height. This is typically set to the maximum height for adult screening.

SYSTEM SETUP
- Locate a screening area where the camera will be pointed at a wall or surface free from temperature variations. Avoid windows, lights, and reflective materials in the camera’s view.
- Plug the Heat Source into an AC power outlet.
- The Heat source will automatically turn on once plugged in and is ready when the light stops blinking.Read “Tips for Optimal Performance” for more information on the ideal screening area.

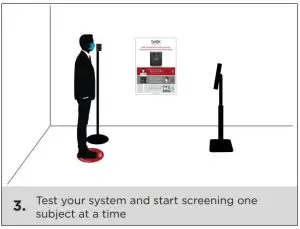
- Place the Kiosk NO FURTHER than 5 feet from the reference Heat Source.
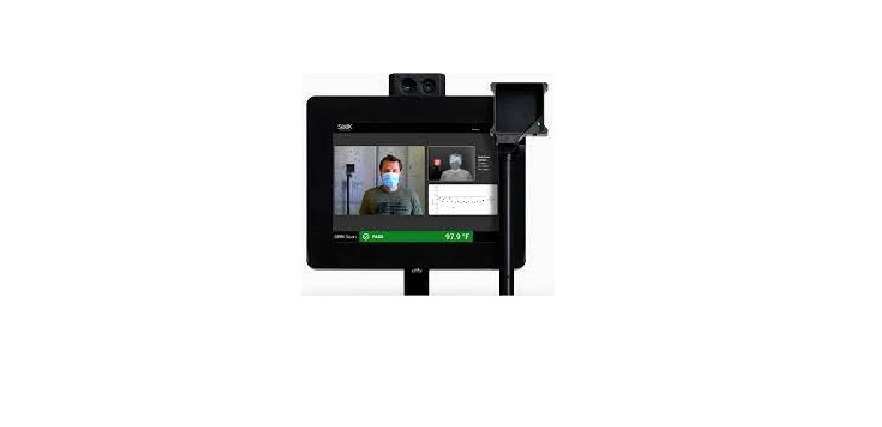
- Plug the Kiosk into an AC power outlet and ensure the tablet is powered on and running Seek Scan software.
- Frame the camera such that a subject and the Heat Source are in the camera’s view.NOTE: The subject should stand directly next to the Heat Source during screening.
- Place the included floor decal next to theHeat Source stand to ensure all subjects are measured from the same distance to camera (no further than 5 feet) and directly next to the Heat Source.
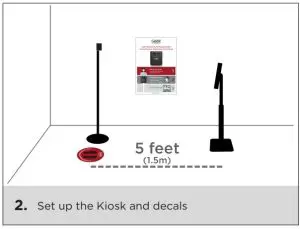
- Complete up to 10 test measurements with different subjects to ensure proper installation and results.
- If you have any questions, contact us at support.thermal.com and someone will assist you.

SOFTWARE OVERVIEW
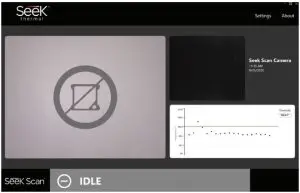
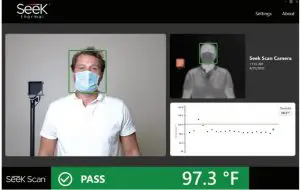
- The heat source is not detected in the scene and measurements will not be taken.

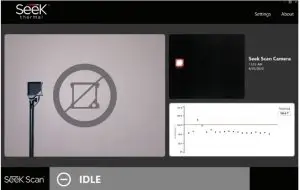
- The heat source has shifted in temperature and measurements will not be taken.

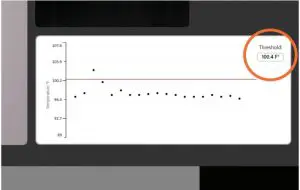
- This is your current alarm temperature. Adjust this threshold in the General Settings menu.

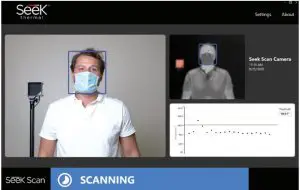
- Blue box means the camera has detected a face and is measuring skin temperature.

- Green box means estimated body temperature is below the alarm temperature.

- Red box means estimated body temperature is above the alarm temperature.

VIEW SETTINGS

- Choose between 5 viewing modes.
- Classic View includes a large visible image, a smallthermal image, and a graph of recent scans.
- Split View displays large visible and thermal imagesside-by-side.
- Original View displays a full screen visible image.
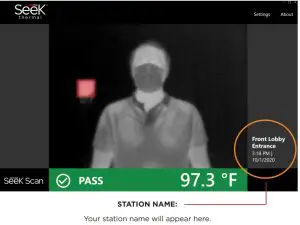
- Thermal View displays a full screen thermal image.
- Text view displays only text.
- Image Mirroring makes it easier for subjects to step in and out of the frame like looking into a mirror.
- Color Mode lets you decide the color of the thermal image being displayed.
- Choose to enable or disable temperature readings.
CLASSIC VIEW Color mode shown: White Hot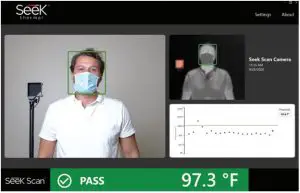
SPLIT VIEW Color mode shown: Spectra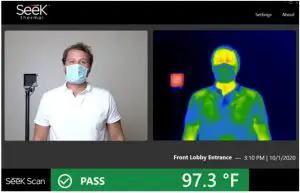
TEXT VIEW
ORIGINAL VIEW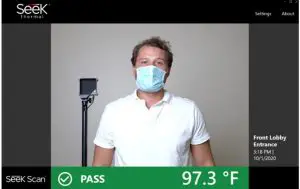
THERMAL VIEW Color mode shown: White Hot
GENERAL SETTINGS

- Change between Celsius and Fahrenheit.
- Turn alert sounds on or off.
- Customize your temperature alarm threshold.
- This allows the user to adjust the skin temperature to estimated body temperature offset for their own environment. Manual uses a fixed offset that is configurable by the user. Adaptive will automatically adjust the offset based on your population.
- Enabling Kiosk Mode locks the tablet to avoid tampering or changing and disabling settings.
- Check for the latest software updates at startup.
KIOSK MODE
KIOSK MODE DISABLED

KIOSK MODE ENABLED
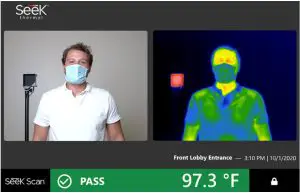 UNLOCKING KIOSK MODE: To unlock Kiosk Mode, click the lock icon in the bottom right corner and enter CTRL + U. Kiosk Mode works with all viewing and color modes.
STATION SETTINGS
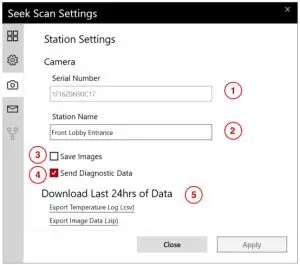
- Camera software serial number.
- Customizable camera station name.Note: The station name is displayed in the Seek Scan user interface.
- Enable “Save Images” to store .jpg images of the thermal camera, visible camera, and a screenshot of the software screen at time of scan.
- Enabling this feature sends anonymous system data to Seek Thermal to help improve Seek Scan software.
- Export the last 24 hours of scan data and images (if ‘Save Images’ was enabled).

- The camera serial number and station name fields will be grayed out until the thermal video (black & white) is live in the Seek Scan software. Open the settings menu to access these fields after the camera is connected and live in the Seek Scan software.

EMAIL SETTINGS
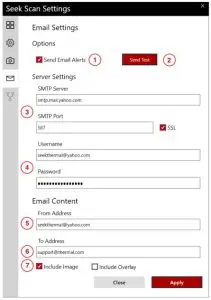
- Select the Send Email Alerts check box to send email alert messages for scan measurements that are over the Alarm Threshold.
- Press this button to send a test email.
- Fill in the appropriate email server settings for your email provider.This example shows the Microsoft Outlook email providers SMTP Server address, SMTP Server port, and Secured Socket Layer (SSL) setting. Please see support.thermal.com for Gmail & Yahoo email provider examples.
- Please enter the User Name (often email address) and Password associated with the Email Provider’s Email Account that will be sending the emails.
- List the email address for the email account that will be sending the email messages out.
- List the email addresses for the Email Alert to be sent to, please separate email addresses with a comma.
- Select the Include Images check box to include a visible image .png file of the Alert Scan. Select Include overlay to include the temperature result overlaid on the image emailed.All of the Server Settings and Email Content fields need to be properly filled out before a Test email can be sent.Images sent over email are not stored in Seek Scan’s new encrypted database at this time.
ABOUT MENU
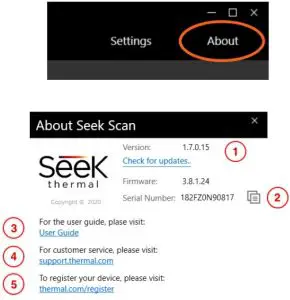
- Displays your version of Seek Scan Software/Firmware and camera software serial number. Click ‘Check for updates’ to check for the latest Seek Scan software.
- Click the clipboard icon to copy your serial number.
- Access the latest User Manual.
- Visit our support site to resolve technical issues and receive support if needed.
- It is important to register your product to activate your warranty and receive the latest product information from Seek Thermal.

DATA OPTIONS
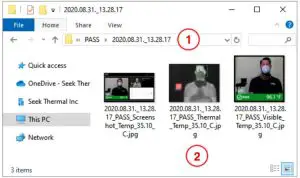
JPG IMAGESSeek Scan lets you to save images to its encrypted database running on the Windows PC C-Drive. From the Station Settings menu, you can export a .zip file containing two folders, ‘PASS’ & ‘FAIL,’ of scan image data from the last 24 hours.The zip file will be empty if the ‘Save images’ check box is unchecked in the Station Settings menu.
- Images included in emails are not saved to the Seek Scan database.

- Inside the ‘PASS’ & ‘FAIL’ folders, individual folders are created for each scan and are named by the date and time of the scan.
- Three different .jpg images are saved with each scan: a screenshot of the Seek Scan software, a thermal image, and a daylight camera image.Each file name contains the time stamp, ‘PASS’ or ‘FAIL,’ and skin temp in °C.
CSV TEMPERATURE LOG FILE
Seek Scan saves temperature log data to its encrypted database running on the Windows PC C-Drive.From the Station Settings menu, you can export a .csv file containing 6 columns of scan information from the last 24 hours.
- The CSV temperature log file is named ‘Temperature Data, date, time of download.’ E.g. Temperature Data 2020-09-01 091937.csv
- There are six columns of scan information: customizable camera name, skin temperature, estimated body temperature, customizable threshold temperature, ‘PASS’ or ‘FAIL’ disposition, and time of scan.
- ‘PASS or ‘FAIL’ disposition is denoted as follows: 1 = ‘PASS’ and 0 = ‘FAIL’
TIPS FOR OPTIMAL PERFORMANCE
IDEAL SCREENING AREA
- Locate a screening area in a stable, well-lit indoor controlled environment with a temperature range 68-76°F (20-24°C) and relative humidity range from 10% to 50%.
- Locate a screening area to avoid significant convective airflow from blowing onto or into the screening area (e.g. from air conditioning ducts, or open doors or windows).
- Locate a screening area to avoid thermal sources either hot or cold (i.e. sun-facing or cold windows, radiant heaters, outside walls, strong lighting), particularly within the field of view of the Seek Scan camera.
- Backdrops and side screens can help ensure a controlled screening area. If used, they should be thermally uniform, non-reflective, and not dark in color in the visible spectrum (closer to white than black). Reflective panels such as glass panels should be avoided or covered with opaque materials.
IDEAL SEEK SCAN SETUP
- EMOVE GLASSES. Seek Scan targets the eyes first to make the most accurate measurement.
- Set up your screening area with the camera pointed at the Heat Source in front of a wall. This will help create a flat thermal background and allow for faster scan times and more reliable readings. Warm objects in the background that are near a person’s skin temperature or warmer than 104°F (40°C) may reduce system performance and stability.
- Make sure that the subjects being scanned and the Fixed Heat Source are in the same position in the scene during every scan. We recommend marking the ground with tape or floor decals to ensure all subjects are measured from the exact same spot.
- Confirm the distance from the Heat Source to the Camera is no further than 5 feet (1.5 meters). Seek Scan has been qualified to work at 5 feet (1.5 meters) to accommodate people of different heights. Seek Scan can work as close as 4 feet (1.2 meters) as well. In such a setup, Seek Scan algorithms will work more efficiently but not cover has many different height variations.
- It is very important to place the fixed heat source and the subject at the same relative distance from the camera. Placing the heat source slightly behind or in front of the subject is acceptable, try not to create more than 8 inches (0.2 meters) of separation. The heat source must remain complete exposed and visible by the camera during every measurement.
- It is important to remember that Seek Scan will focus primarily on the eyes to make a measurement; therefore, only a person’s eyes and up need to be present in the scene.
SCREENING RECOMMENDATIONS
- Subjects should look directly at the camera and remain still during measurement.
- For more consistent readings, ensure the subject’s eyes are clearly exposed by removing any eye wear. Subjects wearing a face mask should pull it down slightly, and subjects wearing a hat should lift the brim to fully expose the eyes.
SKIN TEMPERATURE VS BODY TEMPERATURE
SEEK SCAN MEASURES SKIN TEMPERATURE AS A PROXY FOR BODY TEMPERATUREHere are a few things to know about skin temperature measurement:
- Skin temperature is typically a few degrees less than body temperature. Similar to an infrared temporal thermometer, Seek Scan measures skin temperature and then adds an offset to provide an estimated body temperature.
- Seek Scan is programed to measure the most reliable parts of the face to produce the best results with high accuracy.
- A person’s skin temperature may vary based on a variety of circumstances such as ambient temperature, sweat and eye wear. For this reason, Seek Scan is intended for indoor use only and in environmentally controlled rooms.
ADAPTIVE VS MANUAL ESTIMATED BODY TEMPERATURE OFFSET
There are two modes that Seek Scan uses to estimates body temperature: Adaptive and Manual.
ADAPTIVE MODEThe Adaptive Mode will automatically adjust the estimated body temperature offset based on the scans of your population. This mode uses statistical analysis to determine the appropriate average offset for your population in real time. This should allow the system to adjust automatically with your environment and throughout the day.
MANUAL MODEBy default, the system uses a Manual Mode offset of 2.16 °F (1.2 °C) offset. This is typically the ideal offset in most temperature-controlled environments and setups. When using Manual Mode, we strongly encourage you to fine tune the offset for your specific environment.To learn more about these modes, visit support.thermal.com.
REGULATORY AND COMPLIANCE INFORMATIONSeek Scan has been designed to be used in conjunction with ISO/TR 13154:2017 and IEC 80601-2-59. Seek Scan is not 510(k) cleared or intended to replace a medical thermometer. However, based on new FDA guidelines published April 2020, the FDA stated that it accepts the use of thermal cameras for initial body temperature assessment for triage use without a 510(k) clearance during the health emergency, provided the thermal imaging system meets the standards set forth in the guidance. Seek Scan meets all of these applicable standards. Seek Scan should not be solely or primarily relied upon to diagnose or exclude a diagnosis of COVID-19, or any other disease. While this device can be used by anyone for initial body temperature assessment for triage use, only public health officials, through their experience with the device in the particular environment of use, can determine the significance of any fever or elevated temperature based on a skin telethermographic temperature measurement. Elevated body temperature in the context of use should be confirmed with secondary evaluation methods (e.g., an NCIT or clinical grade contact thermometer).Seek Scan should be used “as designed” to measure only one subject’s temperature at a time. The thermal image displayed in the software is a heat map representation of the temperature data collected from the thermal sensor and only intended for locating the points from which to extract the thermal measurement. The reference body site used for temperature measurement is primarily the inner canthus although other areas of the face may also be used for measurement.
FCC: This equipment has been tested and found to comply with the limits for a Class A digital device, pursuant to part 15 of the FCC Rules. These limits are designed to provide reasonable protection against harmful interference when the equipment is operated in a commercial environment. This equipment generates, uses, and can radiate radio frequency energy and, if not installed and used in accordance with the instruction manual, may cause harmful interference to radio communications. Operation of this equipment in a residential area is likely to cause harmful interference in which case the user will be required to correct the interference at his own expense. Note: Any changes or modifications not expressly approved by the Seek Thermal Inc. could void the user’s authority to operate the equipment.
WEEE: This symbol on the product(s) and / or accompanying documents means that used electrical and electronic equipment should not be mixed with general household waste. For proper treatment, recovery and recycling, please take this product(s) to designated collection points where it will be accepted free of charge. Alternatively, in some countries, you may be able to return your products to your local retailer upon purchase of an equivalent new product. Please contact your local authority for further details of your nearest designated collection point. Penalties may be applicable for incorrect disposal of this waste, in accordance with you national legislation.
ROHS: This RoHS-compliant product conforms to the European Union Restriction of the Use of Certain Hazardous Substances (RoHS) in Electrical and Electronic Equipment. Seek Thermal Inc. ensures RoHS conformance by requiring supplier Declarations of Conformity, monitoring incoming materials, and maintaining manufacturing process controls.Industry Canada: This Class A digital apparatus complies with Canadian ICES-003. Cet appareil numérique de la classe A est conforme à la norme
![]()
[xyz-ips snippet=”download-snippet”]

