

MECHANICAL WATCH INSTRUCTIONS
Please refer to the Instruction Manuals of other languages by accessing “Customer Service” “Instruction” on our Website from PC or Smartphone.
Thank you very much for choosing a SEIKO watch. For proper and safe use of your SEIKO watch, please read carefully the instructions in this booklet before using it.
Keep this manual handy for easy reference.
- Length adjustment service for metallic bands is available at the retailer from whom the watch was purchased. If you cannot have your watch repaired by the retailer from whom the watch was purchased because you received the watch as a gift, or you moved to a distant place, please contact SEIKO CUSTOMER SERVICE CENTER. The service may also be available on a chargeable basis at other retailers, however, some retailers may not undertake the service.
- If your watch has a protective film for preventing scratches, make sure to peel it off before using the watch. If the watch is used with the film on it, dirt, sweat, dust, or moisture may be attached to the film and may cause rust.
Handling cautions
HOW TO USE
![]() WARNINGPlease note that there is a risk of serious consequences such as severe injury if the following safety regulations are not strictly observed.
WARNINGPlease note that there is a risk of serious consequences such as severe injury if the following safety regulations are not strictly observed.
Immediately stop wearing the watch in following cases:
- If the watch body or band becomes edged by corrosion etc.
- If the pins protrude from the band.
- Immediately consult the retailer from whom the watch was purchased or SEIKO CUSTOMER SERVICE CENTER.
Keep the watch and accessories out of the reach of babies and children. Care should be taken to prevent a baby or a child accidentally swallowing the accessories. If a baby or child swallows the battery or accessories, immediately consult a doctor, as it will be harmful to the health of the baby or child.
![]() CAUTION
CAUTION
Please note that there is a risk of minor injury or material damage if the following safety regulations are not strictly observed.
Avoid the following places for wearing or keeping the watch:
- Places where volatile agents (cosmetics such as polish remover, bug repellent, thinners etc.) are vaporizing
- Places where the temperature drops below Places affected by strong vibrations 5°C or rises above 35°C for a long time
- Places of high humidity
- Places affected by strong magnetism or static electricity
- Dusty places
If you observe any allergic symptoms or skin irritation Stop wearing the watch immediately and consult a specialist such as a dermatologist or an allergist.
Other cautions
- For adjusting the length of the metallic band, specialized knowledge and expertise are necessary. Therefore, in such a case, contact the retailer from whom the watch was purchased. If you attempt to adjust the metallic band, injury may occur to your hand or fingers, or parts of the band may be lost.
- Do not disassemble or tamper with the watch.
- Keep the watch out of the reach of babies and children. Extra care should be taken to avoid risks of any injury or allergic rash or itching that may be caused when they touch the watch.
- If your watch is of the fob or pendant type, the strap or chain attached to the watch may damage your clothes, or injure the hand, neck, or other parts of your body.
 CAUTION
Please note that there is a risk of minor injury or material damage if the following safety regulations are not strictly observed.
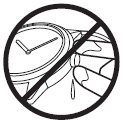 Do not turn or pull out the crown when the watch is wet.Water may get inside of the watch. * If the inner surface of the glass is clouded with condensation or water droplets appear inside of the watch for a long time, the water resistant performance of the watch is deteriorated. Immediately consult the retailer from whom the watch was purchased or SEIKO CUSTOMER SERVICE CENTER.
 Do not leave moisture, sweat and dirt on the watch for a long time. Be aware of a risk that a water resistant watch may lessen its water resistant performance because of deterioration of the adhesive on the glass or gasket, or the development of rust on stainless steel.
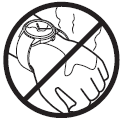 Do not wear the watch while taking a bath or a sauna.Steam, soap or some components of a hot spring may accelerate the deterioration of water resistant performance of the watch.
WARNING
 Do not use the watch in scuba diving or saturation diving.The various tightened inspections under simulated harsh environment, which are usually required for watches designed for scuba diving or saturation diving, have not been conducted on the water resistant watch with the BAR (barometric pressure) display. For diving, use watches specifically designed for diving.
CAUTION
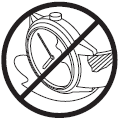
 Do not pour running water directly from faucet. The water pressure of tap water from a faucet is high enough to degrade the water resistant performance of a water resistant watch for everyday life.
Mechanical watch characteristics (Hand-wound, auto-wound)
- This is a mechanical watch powered by a spring.
- To use it from a stopped state, turn the crown 20 turns by hand to wind up the spring before starting the watch.
- Although the accuracy of quartz watches is measured in differences over months or years, in mechanical watches it is measured in differences per day (i.e., the amount the watch speeds up or slows down in a single day).
- Additionally, mechanical watches are subtly affected by the conditions in which they are used (e.g., duration worn, temperature, arm movement, the amount wound, etc.) ; thus, the amount of error is not constant.
- When affected by a strong magnetism from outside, a mechanical watch may lose/gain time temporarily. The parts of the watch may become magnetized depending on the extent of the effect. In such a case, consult the retailer from whom the watch was purchased since the watch requires repair including demagnetizing.
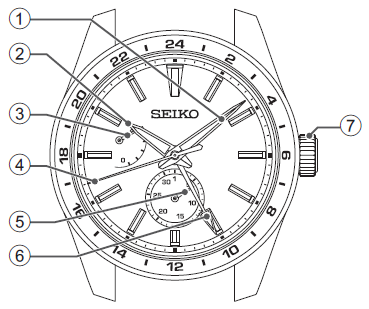
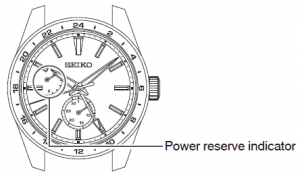
Names of the parts and their functions
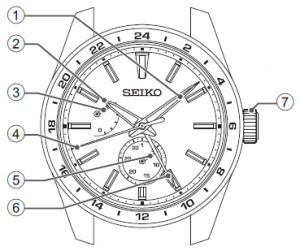
- Minute hand
- Hour hand
- Power reserve indicator
- Seconds hand
- Date hand
- 24-hour hand
- Crown
- Normal position (not locked): Wind up the watch (hand-wound)
- First click position: Time difference adjustment/Date setting
- Second click position: Time setting
* The position and design of the display may vary depending on the model.* The direction of the power reserve indicator is different depending on the model.
How to wind the mainspring
- This is an automatic mechanical watch with a manual winding mechanism.
- When the watch is worn on the wrist, the mainspring is wound automatically through normal wrist movement. The watch can also be wound up by turning the crown.
- To start the watch after it stops completely, wind it up either by turning the crown or swinging it from side to side until the seconds hand starts moving. Then, set the time and date before putting the watch on the wrist. To wind up the watch, turn the crown clockwise slowly. The watch cannot be wound by turning the crown counterclockwise. In this way, the watch can be wound up fully. Furthermore, turning the crown further will not break the spring.* For the watch with screw down crown, please unlock the crown before operating it and be sure to lock the crown after operating it.
- Wind the mainspring until the power reserve indicator shows a fully-wound state. Once the watch is wound up fully, it operates for about 45 hours.* To check the winding state of the mainspring, refer to “Power reserve indicator” P.13.
Crown
There are two types of crowns, a normal crown and a screw down crown. Please check the type of the crown of your watch.
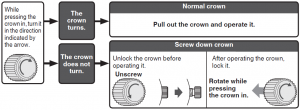
* By locking the crown by screw, a screw down crown can prevent malfunction and increase water resistance.* Be careful not to screw the crown in by force as it may damage the slots of the crown.* If the watch is used without being wound up fully, gain or loss of time may result. To avoid this, wear the watch for more than 10 hours a day. If the watch is used without being worn on the wrist, be sure to wind it up fully every day at a fixed time.* If you use a watch that has stopped with the mainspring unwound, winding the mainspring with the crown will not start the watch immediately. That is because the mainspring torque or force is low at the beginning of its winding due to the characteristics of mechanical watches. The seconds hand will start to move when a certain degree of torque is reached after the mainspring has been wound up. However, swinging the watch from side to side to forcibly turn the balance can start the watch sooner.
Power reserve indicator
- The power reserve indicator lets you know the winding state of the mainspring.
- Before removing the watch from your wrist, observe the power reserve indicator to check if the watch has stored enough power to keep running until the next time you wear it. If necessary, wind the mainspring. (To prevent the watch from stopping, wind the mainspring to store the excess power that will allow the watch to run for extra time.)
 * The continuous operating time of the watch may vary depending on the conditions of your usage (such as the number of hours you wear the watch or the extent of your movement while wearing it).* In a case where you wear the watch for a short period of time each day, observe the power reserve indicator to check the level of the remaining power. If necessary, manually wind the mainspring.
How to set the time and date
How to set the time and dateTo set both time and date, set the 24-hour hand and minute hand first, and then set the date and the hour hand.
* To adjust the date only on a day such as the next day after the completion of a month that has less than 31 days (February, April, June, September and November), please refer to “Date adjustment at the end of the month” P.19.
First, set the 24-hour hand and the minute hand.
1 Make sure that the watch is working.* To carry out the procedure, please make sure that the watch is in working state. Please wind the mainspring when the watch is not working.
2 Pull out the crown to the second click when the seconds hand is pointing at the 0 second position. The seconds hand stops moving.* For models with screw down crown, please unlock the crown before operating it.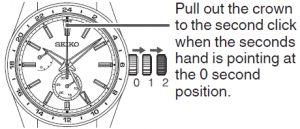
Pull out the crown to the second click when the seconds hand is pointing at the 0 second position.
How to read the power reserve indicator
- As shown in the diagram below, when the indicator is pointing near 45 or F on the scale, it is fully wound. As the mainspring unwinds, the indicator will move toward 0 or E. * The accuracy of a mechanical watch is affected by the winding amount of the mainspring. If the watch is used for a long time when the winding amount is 20 hours or less, stable accuracy may not be obtained. Therefore, it is recommended that the winding amount be between 20 hours and full winding when you use the watch.
* Once the mainspring is fully wound, it will slip if you wind it further, so there is no chance of the mainspring breaking even if it is over wound.* The indicator may move beyond 0 or E, but this is not a malfunction.
|
The Power Reserve Indicator
|
|||
| The winding state of the mainspring | Fully wound | Half wound | Unwound |
| The number of hours the watch can run | Approximately 45 hours | Approximately 20 hours |
The watch either stops or is running down.
|
* Designs vary depending on the model. Refer to the above diagram to read the approximate continuous operating time.
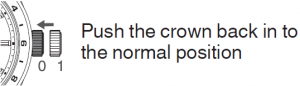
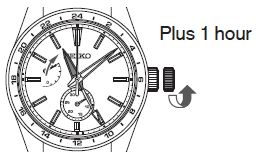
3 For advancing the hands clockwise, turn the crown in the direction of the arrow and set the time of the 24-hour hand and the minute hand. In order to set the time accurately, turn the minute hand 4 to 5 minutes ahead and then return it to the correct time.* As the hour hand moves together, it may point to a different time from the one you wish to set, or the date may change. Please set the minute hand and the 24 hour hand first. 4 Push the crown back in to the normal position. Thereby, the 24-hour hand, the minute hand and the seconds hand will be in alignment.* Time signal service is useful for second setting.
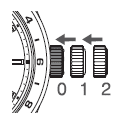
Next, set the date and the hour hand.
5 Pull out the crown to the first click. The seconds hand continues moving.

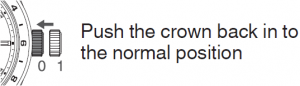
6 Turn the crown to set the date and the hour hand. Each time the hour hand makes two full rotations, the date is adjusted one day. While turning the crown, the moment the date changes is midnight. Please be sure that AM/PM is set correctly and then set the time.* The crown can be turned in either direction, however, it is recommended that you turn the crown in the direction which enables you to set the date with smaller adjustments.* Turn the crown slowly, checking that the hour hand moves in one-hour increments.* When adjusting the hour hand, the other hands may move slightly. However, this is not a malfunction. 7 Push the crown back in to the normal position.* For models with screw down crown, please be sure to lock the crown after operating it.
Date adjustment at the end of the month
It is necessary to adjust the date at the end of February and 30-day months. The hour hand and the date move in tandem.
1 Make sure that the watch is working.
* To carry out the procedure, please make sure that the watch is in working state. Please wind the mainspring when the watch is not working.
2 Pull out the crown to the first click. The seconds hand continues moving. * For models with screw down crown, please unlock the crown before operating it.

Date setting
The date is linked to the time and changes once every 24 hours, whether the watch is running or the crown is used to adjust the time. When the time is advanced across a day, the date is also advanced, and when the time is set back across a day, the date is also set back.
- When the watch is running, the date changes at around midnight (between 11:45 PM and 0:30 AM).
- When the crown is used to adjust the time, the date changes between 9:00 PM and 3:00 AM of the nextday, although the timing differs for advancing and setting back the date. The date will then change at around midnight (between 11:45 PM and 0:30 AM) when the watch is running normally.
When setting the time between 9:00 PM and 3:00 AM the next day
- When setting the time between 9:00 PM and 3:00 AM the next day, first set the time back before 9:00 PM (or ahead of 3:00 AM) and make sure that the date is correct before setting the time.
- When the time is advanced or set back to between 9:00 PM and 3:00 AM the next day, the date may not change at around midnight. However, the date will change to the day after the date at 9:00 PM (i.e., the date at 3:00 AM) after 3:00 AM. Also, when the watch is running, the timing at which the date changes will return to the normal timing.
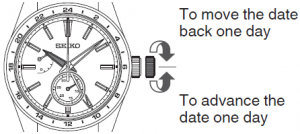
3 Turn the crown to set the date and day. Turn the crown to rotate the hour hand. Each time the hour hand makes two full rotations, the date is adjusted one day.Turn the crown counterclockwise: the date is advanced one day.
- The crown can be turned in either direction, however, it isrecommended that you turn the crown in the direction which enables you to set the date with smaller adjustments.
- Turn the crown slowly, checking that the hour hand moves in one-hour increments.
- When adjusting the hour hand, the other hands may move slightly. However, this is not a malfunction.
Turn the crown clockwise: the date is set back one day. To move the date back one day
4 Turn the crown to set the hour hand to the current time.Please set it while making sure that AM/PM is set correctly. The moment the date changes is midnight. * When you set the time to any time between 9:00 PM and midnight, by turning the hour hand counterclockwise passingmidnight, move the hour hand back to 8:00 PM, and then carry out the setting. (It is an operation to move the date back.)
5 Push the crown back in to the normal position.* For models with screw down crown, please be sure to lock the crown after operating it.

How to use the 24-hour hand
There are two ways to use the 24-hour hand as follows.
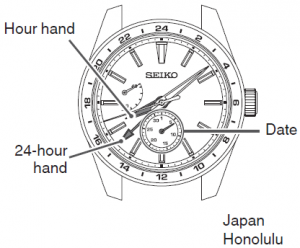
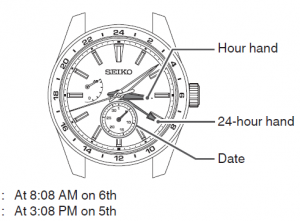
- Distinguishing between AM and PM (Standard usage type)The time indicated by the hour and minute hand is shown in 24-hour format.Example Hour hand, date : Japan 24-hour hand : JapanJapan : At 10:08 AM on 6th
Time difference adjustment function
When using the watch in a region with a different time zone, you can easily set the watch to indicate the local time. The time can be adjusted without stopping the watch. The hour hand and the date move in tandem. By setting the hour hand, it is adjusted to indicate the date of your desired region having different time zone. The time difference can be adjusted in one-hour increments.
How to use the time difference adjustment function
1 Make sure that the watch is working.* To carry out the procedure, please make sure that the watch is in working state. Please wind the mainspringwhen the watch is not working.
2 Make sure that the hour hand, minute hand and the date correctly indicate the time and date of the region before changing the time zone.
* “How to set the time and date” P.15
3 Pull out the crown to the first click. The seconds hand continues moving. * For models with screw down crown, please unlock the crown before operating it.

Indicating the time of two different regions (As a dual time indicator)
It is possible to indicate the time of a region that is different from the time indicated by the hour and minute hand. The watch offers two display modes. You can choose it depending on your needs and preferences. “Time difference adjustment function” P.23 “How to set the time and date” P.15
Example 1Hour hand, date : A region (Japan) 24-hour hand : B region (Honolulu)
Example 2Hour hand, date : B region (Honolulu) 24-hour hand : A region (Japan)
4 Turn the crown to set the hour hand and the date to indicate the time of the region you wish to set.
Please set it after making sure that the date and AM/PM are correctly set.
- Please set it by referring to “List of time zone differences in major regions of the world” P.25.
- During this operation, the hour hand and the date move in tandem. If AM/PM is not correctly set, the date may be off by 12 hours. While turning the crown, the moment the date changes is midnight.

- Turn the crown slowly, checking that the hour hand moves in one-hour increments.
- When adjusting the hour hand, the other hands may move slightly. However, this is not a malfunction.
- When you set the time to any time between 9:00 PM and midnight, by turning the hour hand counterclockwise passing midnight, move the hour hand back to 8:00 PM, and then carry out the setting. (It is an operation to move the date back.)
5 Push the crown back in to the normal position.
- For models with screw down crown, please be sure to lock the crown after operating it.
List of time zone differences in major regions of the world
- To adjust the time difference, please refer to “How to use the time difference adjustment function” P.23.
| City display | Name of therepresentingcities | Time differencefrom Japan | Time differencefrom GMT | Other cities |
| WLG | Wellington★ | +3 hours | +12 hours |
Fiji islands★, Auckland★
|
| NOU | Noumea | +2 hours | +11 hours |
Solomon Islands
|
| SYD | SydneyH | +1 hour | +10 hours |
Guam Island, Khabarovsk
|
| TYO | Tokyo | ±0 hour | +9 hours |
Seoul, Pyongyang
|
| HKG | Hong Kong | -1 hour | +8 hours |
Manila, Beijing, Singapore
|
| BKK | Bangkok | -2 hour | +7 hours | Jakarta |
| DAC | Dhaka | -3 hour | +6 hours | |
| KHI | Karachi | -4 hour | +5 hours | Tashkent |
| DXB | Dubai | -5 hour | +4 hours | |
| JED | Jeddah | -6 hour | +3 hours |
Mecca, Nairobi, Istanbul
|
| CAI | Cairo | -7 hour | +2 hours | Athens★ |
EN 25
HOW TO USE
1 How to use the rotating bezel with 24-hour scale (For models with rotatingbezel having 24-hour scale)By turning the rotating bezel, another time can be read at the 24-hour hand.In the case of 24-hour hand being set to 24 hours of the hour and minute hands<The direction and the amount to turn the rotating bezel can be determined by the following method> [The direction and the amount to turn the rotating bezel] E is calculated as, [Time difference from GMT of 24-hour hand, C] – [Time difference from GMT of the region you wish to know, D] E = C – D In this example, the 24-hour hand indicates Japan time, and therefore, C = +9.
EN 27
HOW TO USE
City display
Name of the representingcities
Time difference Time difference
from Japan
from GMT
Other cities
1
PAR
ParisH
-8 hours
+1 hour
RomeH, AmsterdamH
GMT PDL
LondonH Azores IslandsH
-9 hours -10 hours
±0 hour -1 hour
RIO SDQ NYC CHI DEN LAX
Rio de JaneiroH Santo Domingo New YorkH ChicagoH DenverH Los AngelesH
-12 hours -13 hours -14 hours -15 hours -16 hours -17 hours
-3 hours -4 hours -5 hours -6 hours -7 hours -8 hours
WashingtonH, MontrealH Mexico CityH EdmontonH San FranciscoH
ANC HNL MDY
AnchorageH Honolulu Midway Island
-18 hours -19 hours -20 hours
-9 hours -10 hours -11 hours
* In the regions marked with H, daylight saving time is introduced. (As of Oct, 2018) * Daylight saving time, being defined as time difference +1 hour, is a system that advances the time by 1 hour duringsummer time to prolong the daylight hours. * Time difference and daylight saving time are subject to change depending on the conditions of the respectivecountries or regions.
EN 26
a) As an example, if the time of a region you wish to know belongs to the time zone of GMT, the time difference from GMT is “0” and hence, D = 0 E = C – D = (+9) – (0) = +9 GMT can be read as “1:00” on the rotating bezel scale. * If E is a positive number “+”, turn the rotating bezel clockwise. If it is a negative number “-“, turn it counterclockwise.b) As another example, if you wish to know the time of the region “Los Angeles”, the time difference from GMT is “-8 hours”, so D = -8 E = C – D = (+9) – (-8) = +17 Turn the rotating bezel 17 hours clockwise. (Result: Same as the counterclockwise rotation of 7 hours) Los Angeles time can be read as “17:00”. * When this intended usage is no longer needed, please return the original position “24” mark of rotating bezel to 12 o’clock position.* “List of time zone differences in major regions of the world” P.25
124-hour hand 1:00 24-hour hand 17:00EN 28
HOW TO USE
1 In the case of 24-hour hand being set to different time
1
zone
HOW TO USE
HOW TO USE
Three different time zones can be read by turning the rotating bezel. Example When displaying 10:08 AM Japan time with the hour and minute hands, and displaying Paris time with the 24-hour hand, Time difference from GMT of “Paris” where the 24-hour hand is set, C = +1 Time difference from GMT of “Bangkok” that you wish know from now on, D = +7 E=C-D= (+1) – (+7) = -6 Turn the rotating bezel counterclockwise and set.
Turn counterclockwise for 6 gradations in 24-hour format: 6 hours minus
Bangkok “8 AM”Paris “2 AM”24-hour hand
EN 29
1 How to use the compass (Only for models with the compass bezel (ring))
HOW TO USE
· Please use the compass in places where the sun is visible or its location is known. * The compass is so designed to provide only a rough indication of directions, and should not be used where accuracy is critical.
Using the 24-hour hand
· Before using the compass, it is necessary to set the 24-hour hand to the current time of your area.
· If daylight saving time (summer time) is in effect in your area, be sure to set your watch one hour behind the
current time before using the rotating compass.
In the Northern Hemisphere* In low latitude areas (south of the Tropic of Cancer), the compass
North 12 o’clock marker
may not function properly at certain times of the year.
1 Set “N (North)” on the rotating compass bezel (ring) to the 12 o’clock marker.
* “N” may be another mark.
* In the case of a ring, it may have a crown, etc. for
West
East
operation.
2 While keeping the dial level, point the 24-hour hand in the direction of the sun. The direction marks on the rotating compass indicate the corresponding directions.EN 31
South
24-hour handSun
EN 30
In the Southern Hemisphere* In low latitude areas (north of the Tropic of Capricorn), the compass may not function properly at certain times of the year.
1Sun
North
12 o’clock marker
HOW TO USE
1 Set “S (South)” on the rotating compass bezel (ring) to the 24-hour
East
hand.
* In the case of a ring, it may have a crown, etc. for operation.
2 While keeping the dial level, point the 12 o’clock marker in the direction of
West
the sun.
The direction marks on the rotating compass indicate the corresponding directions.
24-hour handSouth
EN 32
1 Using the hour hand
HOW TO USE
· Before using the compass, it is necessary to set the hour hand to the current time of your area.
· If daylight saving time (summer time) is in effect in your area, be sure to set your watch one hour behind the
current time before using the rotating compass.
In the Northern Hemisphere* In low latitude areas (south of the Tropic of Cancer), the compass may not function properly at certain times of the
South
Sun
12 o’clock marker
year.
West1 While keeping the dial level, point the hour hand in the direction of the sun.
2 Set “S (South)” on the rotating compass bezel (ring) to the middle point of the arc between the 12 o’clock marker and the time scale indicated by the hour hand.The direction marks on the rotating compass indicate the corresponding directions. * In the case of a ring, it may have a crown, etc. foroperation.
East Hour hand
North
EN 33
Daily care2 The watch requires good daily care· Do not wash the watch when its crown is in the extended position. · Wipe away moisture, sweat or dirt with a soft cloth. · After soaking the watch in seawater, be sure to wash the watch in clean pure water and wipe it drycarefully. Do not pour running water directly from a faucet onto the watch. Put some water into a bowl first, and then soak the watch in the water to wash it. * If your watch is rated as “Non-water resistant” or “water resistant for daily use,” please do not wash the watch.“Performance and type” P.36 “Water resistant performance” P.38Turn the crown from time to time· In order to prevent corrosion of the crown, turn the crown from time to time. · The same practice should be applied to a screw down crown.“Crown” P.10
TO PRESERVE THE QUALITY OF YOUR WATCH
EN 35
In the Southern Hemisphere* In low latitude areas (north of the Tropic of Capricorn), the compass may not function properly at certain times of the year.
1
North
Sun
12 o’clock marker
HOW TO USE
1 While keeping the dial level, point the
East
12 o’clock marker in the direction of
the sun.
2 Set “N (North)” on the rotating compass bezel (ring) to the middle point of the arc between the 12 o’clock marker and the time scale indicated by the hour hand.The direction marks on the rotating compass indicate the corresponding directions. * “N” may be another mark. * In the case of a ring, it may have a crown, etc. foroperation.
West Hour hand
South
EN 34
Performance and type
The case back shows the caliber and performance of your watch
2
Water resistant performance
JAPAN
WATER RESIS
MADE IN S SSTEEL
TO PRESERVE THE QUALITY OF YOUR WATCH10 BARTANT 6R64-0AA0
6R64-0AA0
Magnetic resistant performanceCase Number
000000
STAINLE
· Water resistant performance Please refer to P.38.· Case Number The number to identify the type of your watch.
· Magnetic resistant performance Please refer to P.39 and P.40.
* The above illustration is provided as an example, therefore it may not be exactly the same as your watch.
EN 36
Lumibrite
2
If your watch has Lumibrite
Lumibrite is a luminous paint that absorbs the light energy of sunlight and lighting apparatuses in a short
TO PRESERVE THE QUALITY OF YOUR WATCH
time and stores it to emit light in the dark. For example, if exposed to a light of more than 500 lux for approximately 10 minutes, Lumibrite can emit light for 3 to 5 hours. Please note, however, that, as Lumibrite emits the light it stores, the luminance level of the light decreases gradually over time. The duration of the
emitted light may also differ slightly depending on such factors as the brightness of the place where the
watch is exposed to light and the distance from the light source to the watch.
* In general, when coming from a place that is bright to a place that is dark, it takes human eyes some time to adapt to the darkness making it difficult to see objects initially. (Dark adaptation)* Lumibrite is luminous paint that stores and emits light, which is harmless to human beings and the environment, containing no toxic materials such as radioactive substances.<Brightness levels>
Condition
Illumination
Sunlight
Fine weather Cloudy weather
100,000 lux 10,000 lux
Indoor (Window-side during daytime)
Fine weather Cloudy weather Rainy weather
More than 3,000 lux 1,000 to 3,000 lux Less than 1,000 lux
Lighting apparatus (40-watt daylight fluorescent light)
Distance to the watch: 1 m Distance to the watch: 3 m Distance to the watch: 4 m
1,000 lux 500 lux (Average room luminance) 250 lux
EN 37
TO PRESERVE THE QUALITY OF YOUR WATCH
Magnetic resistant performance
2
Affected by nearby magnetism,
a watch may temporarily gain or lose time or stop operating.
b DANGER
Indication on the case back
Condition of use
No indication
Keep the watch more than 5 cm away from magnetic products. (JIS level-1 standard)
Keep the watch more than 1 cm away from magnetic products. (JIS level-2 standard)If the watch becomes magnetized and its accuracy deteriorates to an extent exceeding the specified rate under normal use, the watch needs to be demagnetized. In this case, you will be charged for demagnetization and accuracy readjustment even if it happens within the guarantee period.The reason why a watch is affected by magnetism The built-in balance spring may be influenced by a strong external magnetic field.
EN 39
TO PRESERVE THE QUALITY OF YOUR WATCH
Water resistant performance
Refer the table below for the description of water resistant performance of your watch before using.
2
(Please look at P.36.)
Indication on the case back
Water resistant performance
Conditions of Use
No indication Non-water resistance Avoid drops of water or sweat
WATER
Water resistance for
RESISTANT everyday life
The watch withstands accidental contact with water in everyday life.
b WARNINGPlease do not use it for swimming.
WATER
Water resistance for
RESISTANT everyday life at 5-BAR The watch is suitable for sports such as swimming.
5 BAR
water resistant
WATER
Water resistance for
RESISTANT everyday life at 10 (20)-BAR The watch is suitable for diving not using an air cylinder. 1020BAR water resistant
EN 38
Examples of common magnetic products that may affect watches2
Smartphone, cellular phone, tablet terminal (Speaker, magnet of cover)
AC adapter
Bag (With magnetbuckle)
TO PRESERVE THE QUALITY OF YOUR WATCH
AC-powered shaver
Magnetic cooking device
Portable radio (Speaker)
Magnetic necklace
Magnetic health pillow
EN 40
TO PRESERVE THE QUALITY OF YOUR WATCH
Band
2
The band touches the skin directly and becomes dirty with sweat or dust. Therefore, lack of care may accelerate deterioration of the band or cause skin irritation or stain on the sleeve edge.
The watch requires a lot of attention for long usage.
Metallic band· Moisture, sweat or soil will cause rust even on a stainless steel band if they are left for a long time. · Lack of care may result in a rash or cause a yellowish or gold stain on the lower sleeve edge of shirts. · Wipe off moisture, sweat or soil with a soft cloth as soon as possible. · To clean the soil around the joint gaps of the band, wipe it out in water and then brush it off with a softtoothbrush. (Protect the watch body from water splashes by wrapping it up in plastic wrap etc.) Clean it off with a soft cloth. · Because some titan bands use pins made of stainless steel, which has outstanding strength, rust may form in the stainless steel parts. · If rust advances, pins may poke out or drop out, and the watch case may fall off the band, or the clasp may not open. · If a pin is poking out, personal injury may result. In such a case, refrain from using the watch and request repair.
EN 41
Silicone band
· As for material characteristics, the band is easily dirtied, and may be stained and discolored.
Wipe off dirt with a wet cloth or cleaning tissue.
2
· Unlike bands of other materials, cracks may result in the band being cut. Take care not to damage the
band with an edged tool.
Notes on skin irritation and allergy
Skin irritation caused by a band may result from various factors such as allergy to metals or leathers, or skin reactions against friction on dust or the band itself.
Notes on the length of the band
Adjust the band to allow a little clearance with your wrist to ensure proper airflow. When wearing the watch, leave enough room to insert a finger between the band and your wrist.
TO PRESERVE THE QUALITY OF YOUR WATCH
Leather band
· A leather band is susceptible to discoloration and deterioration from moisture, sweat and direct sunlight.
· Wipe off moisture and sweat as soon as possible by gently blotting them up with a dry cloth.
· Do not expose the watch to direct sunlight for a long time.
2
· Please take care when wearing a watch with light-colored band, as dirt is likely to show up.
· Refrain from wearing a leather band watch other than Aqua Free bands while bathing, swimming, and
when working with water even if the watch itself is water resistant enforced for daily use (10-BAR/20-BAR
water resistant).
Polyurethane band· A polyurethane band is susceptible to discoloration from light, and may be deteriorated by solvent or atmospheric humidity.· Especially a translucent, white, or pale colored band easily adsorbs other colors, resulting in color smears or discoloration.· Wash out dirt in water and clean it off with a dry cloth. (Protect the watch body from water splashes by wrapping it up in plastic wrap etc.)· When the band becomes less flexible, have the band replaced with a new one. If you continue to use the band as it is, the band may develop cracks or become brittle over time.
EN 42
How to use tri-fold type clasp for leather band (Special clasps)
There are 3 types of special clasps as described below;
2
If the clasp of the watch you purchased is one of them, please refer to the indications.
A A Type P.45
C C Type P.47
B B Type P.46
TO PRESERVE THE QUALITY OF YOUR WATCH
TO PRESERVE THE QUALITY OF YOUR WATCH
EN 43
EN 44
TO PRESERVE THE QUALITY OF YOUR WATCH
A A Type 1 Lift up the clasp to release the buckle. 2Buckle
Fixed loop
Flap
Movable loop
2 Open the flap.
3 Remove the pin from the adjustment hole. Slide the band left and right, and reinsert the pin into the adjustment hole at an appropriate length. Pin Adjustment hole4 Fasten the flap.* Do not push the flap in too hard.
EN 45C C Type 2
* When fastening the clasp, insert the tip of the band into the movable loop and fixed loop, and then, securely tighten the clasp.
TO PRESERVE THE QUALITY OF YOUR WATCH
How to wear or take off the watch
1 While pressing the push buttons on both sides of the flap, pull the band out of the movable loop and fixed loop. Then open the clasp.
2 Place the tip of the band into the movable loop and fixed loop, and fasten the clasp by pressing the frame of the buckle.
Buckle
Fixed loop Movable loop
Push button Flap
EN 47
B B Type 2
TO PRESERVE THE QUALITY OF YOUR WATCH
1 While pressing the push buttons on both sides of the flap, lift to open the clasp. Push button
2 Remove the pin from the adjustment hole. Slide the band left and right, and insert the pin into the adjustment hole at an appropriate length. Push the buckle and fasten the clasp.Buckle
Adjustment hole
Pin
EN 46
How to adjust the length of the band
1 2 While pressing the push buttons on both sides
Press the push buttons again to unfasten the
2
of the flap, pull the band out of the movable
flap.
loop and fixed loop. Then open the clasp.
Buckle
Fixed loop Movable loop
Push button Flap
TO PRESERVE THE QUALITY OF YOUR WATCH
EN 48
TO PRESERVE THE QUALITY OF YOUR WATCH
3 Pull the pin out of an adjustment hole of the band. Slide the band to adjust its length and
4 Fasten the flap.
find an appropriate hole. Place the pin into the
2
hole.
Pin Adjustment hole
Adjustment hole Pin
EN 49
How to wear the band (Opening and closing the clasp)
2
1. Lightly press the push buttons to open the clasp.
* Note that pressing the push buttons too
firmly (deeply) actuates the adjuster, which
lengthens the band.
Push button
Buckle
2. Fasten the clasp by pressing the frame of the buckle.
TO PRESERVE THE QUALITY OF YOUR WATCH
EN 51
How to use an easy adjust type clasp
Some bands are provided with an easy adjust type clasp for fine adjustment of the band’s length.
2
If the clasp of the watch you purchased is as follows, please refer to the following instructions.
* The band can be lengthened by up to about 5 mm.
This is useful if the band feels too tight or is uncomfortable for some reason.
TO PRESERVE THE QUALITY OF YOUR WATCH
EN 50
How to adjust the length of the band
1. You can lengthen the band by up to about 5 mm 2. Fasten the clasp by pressing the frame of the
(2 stages) by firmly pressing the push buttons from both sides to actuate the adjuster.
buckle.
2
* Even while the clasp is closed, you can still retract
the length of band extended by the adjuster.
TO PRESERVE THE QUALITY OF YOUR WATCH
* The above illustrations are provided as examples. Some details may differ depending on the model.EN 52
TO PRESERVE THE QUALITY OF YOUR WATCH
TO PRESERVE THE QUALITY OF YOUR WATCH
After sales service2 Notes on guarantee and repair· Contact the retailer from whom the watch was purchased or SEIKO CUSTOMER SERVICE CENTER for repair or overhaul.· Within the guarantee period, present the certificate of guarantee to receive repair services. · Guarantee coverage is provided in the certificate of guarantee.Read carefully and retain it. · For repair services after the guarantee period has expired, if the functions of the watch can be restoredby repair work, we will undertake repair services upon request and payment.Replacement with functional parts· Please keep in mind that if original parts are not available, they may be replaced with substitutes whose outward appearance may differ from the originals.
Inspection and adjustment by disassembly and cleaning (Overhaul)
· Periodic inspection and adjustment by disassembly and cleaning (overhaul) is recommended
approximately once every 2 to 3 years in order to maintain optimal performance of the watch for a long time.
2
· The power transmission gear of the movement of this watch constantly receives force. To ensure that
this mechanism works properly all the time, washing parts, changing oil, adjusting accuracy, checking
functions and replacing consumable parts on a regular basis are important. The first overhaul after the
purchase of your watch is particularly important for preserving long-time use of your watch. According
to use conditions, the oil retaining condition of your watch mechanical parts may deteriorate, abrasion
of the parts due to contamination of oil may advance or delay the time significantly, or the watch itself
may stop.
As the parts such as gasket may deteriorate, water resistant performance may be impaired due to
intrusion of perspiration and moisture.
Inspection and adjustment by disassembly and cleaning (overhaul) should be performed by the retailer
from whom the watch was purchased, and who specifies “SEIKO GENUINE PARTS.” At this time, also
request replacement of the gasket and the spring bar.
· When your watch is inspected and adjusted by disassembly and cleaning (overhauled), the movement
of your watch may be replaced.
TO PRESERVE THE QUALITY OF YOUR WATCH
EN 53Accuracy of mechanical watches2 The accuracy of mechanical watches is indicated by the “daily rate.”The accuracy of mechanical watches may not fall within the specified range of time accuracy because loss/gain changes according to the position of the watch, which is dependent on the conditions of use, such as the length of time during which the watch is worn on the wrist, arm movement, and whether the mainspring is wound up fully or not, etc.The loss/gain of mechanical watches is not measured by a daily rate, but by daily rates of one week or so.Accuracy variation according to temperatureThe parts that compose the accuracy of mechanical watches are made of metals. It is well known that metals expand or contract depending on temperatures due to metal properties. This exerts an effect on the accuracy of the watches. Mechanical watches tend to lose time at high temperatures while they tend to gain time at low temperatures.EN 55
EN 54
Mainspring wound condition and accuracy
In order to improve accuracy, it is important to regularly supply energy to the balance that controls the speed
of the gears. The driving force of the mainspring that powers mechanical watches varies between when fully wound and immediately before it is unwound. As the mainspring unwinds, the force weakens.
2
Relatively steady accuracy can be obtained by wearing the watch on the wrist frequently for the self-winding
type and winding up the mainspring fully everyday at a fixed time to move it regularly for the wind-up
mechanical type.
Effect of magnetismWhen affected by a strong magnetism from outside, the mechanical watch may lose/gain time temporarily. The parts of the watch may become magnetized depending on the extent of the effect. In such a case, consult the retailer from whom the watch was purchased since the watch requires repair including demagnetizing.
TO PRESERVE THE QUALITY OF YOUR WATCH
EN 56
Troubleshooting
2
Troubles
Possible causes
Solutions Wind up the watch as per “How to wind the
TO PRESERVE THE QUALITY OF YOUR WATCH
The watch stops operating.
The mainspring has not been wound.
mainspring” (P.11), and set the time. If the watch still does not operate, consult the
retailer from whom the watch was purchased.
Return the watch to a normal temperature so
that it works accurately as usual, and then
The watch has been left in extremely high or reset the time. The watch has been adjusted
low temperatures for a long time.
so that it works accurately when it is worn on
your wrist under a normal temperature range
between 5°C and 35°C.
Correct this condition by moving and keeping
The watch temporarily gains/loses time.
The watch has been left close to an object with a strong magnetic field.
the watch away from the magnetic source, and reset the time. If this action does not correct the condition, contact the retailer from
whom the watch was purchased.
You drop the watch, hit it against a hard If accuracy does not return after setting the
surface, or wear it while playing active sports. time, consult the retailer from whom the watch
The watch is exposed to strong vibrations. was purchased.
The watch has not been overhauled for more Consult the retailer from whom the watch was
than 3 years.
purchased.
EN 57
Specifications
2
Cal.
6R64
1. Features
6 hands (Time display (Hour, minute and seconds hands), date hand, power
reserve indicator and 24-hour hand)
2. Vibrations per hour
28,800 vibrations/hour (8 vibrations/sec)
3. Loss/gain (daily rate)
+25 to -15 seconds at normal temperature range Only if worn on the wrist in a temperature range of 5°C to 35°C
4. Driving system
Automatic winding type with manual winding mechanism
5. Duration
Approx. 45 hours
6. Jewels
29 jewels
* The accuracy above is factory-adjusted. * Due to the characteristics of mechanical watches, any actual daily rate may not fall within the range of time accuracyspecified above dependent on the conditions of use, such as the length of time during which the watch is worn on the wrist, temperature, arm movement, and whether the mainspring is wound up fully or not, etc.
Troubles
Possible causes
Solutions
The date changes at 12 o’clock noon.
AM/PM is not properly set.
Advance the hands by 12 hours.
Blur in the display A small amount of water has got inside the Consult the retailer from whom the watch was
2
persists.
watch due to deterioration of the gasket, etc. purchased.
* For a solution to a problem other than listed above, contact the retailer from whom the watch was purchased.
TO PRESERVE THE QUALITY OF YOUR WATCH
EN 58
TO PRESERVE THE QUALITY OF YOUR WATCH
EN 59
EN 60
References
[xyz-ips snippet=”download-snippet”]