SEIKO N857 Wena 3
Thank you very much for choosing wiredwena N857.This product includes “wena 3” provided by Sony Corporation and a watch head capable of operating and displaying the wena 3 functions.
Please make sure to read the following instructions before use.
– Startup Guide and Reference Guide supplied with “wena 3”– Help Guide on the wena support page– QUICK MANUAL (this document) supplied with the watch head– The instruction on the Customer Service page on the Seiko Watch Corporation’s website
|
For proper and safe use of your SEIKO watch, please carefully read the instructions before use.Also, please carefully read the instructions on maintenance. (https://www.seikowatches.com/global-en/customerservice/instruction?language=English) |
* In the places where use of radio waves is prohibited, such as in airplanes and hospitals, turn off wena 3 to disconnect the communication between the watch head and wena 3.* The watch head is compliant with or certified by the radio law of various countries and regions. Use of it in areas other than those may be illegal and subject you to punishment. For details, refer to the Instruction Manual on our website. (https://www.seikowatches.com/global-en/customerservice/instruction?language=English)
 |
This product is in compliance with the essential requirements and other relevant provisions of the RE Directive (2014/53/EU) & RoHS Directive (2011/65/EU). https://www.seikowatches.com/global-en/products/declaration-conformity |
Contact Information
Please note that the warranty and contact information are different for the clasp section (wena 3) of this watch. For repair and other concerns, refer to the warranty certificates and the instructions, and contact the respective service centers.* Before requesting to have your watch head repaired, be sure to remove the clasp section (wena 3) in the manner illustrated below.
Watch head and band (not including wena 3)
|
Inquiries regarding use, repair, and maintenance of the watch headSEIKO CUSTOMER SERVICE CENTER0120-181-671 |
Reception hours: 9:30-17:30 (Monday through Friday)For reception hours during the summer and New Year’s holidays, please visit our website (https://www.seikowatches.com/jp-ja/contact)* If your phone is set to “number withheld,” add “186” to the above phone number.Clasp section (wena 3)
| Repair inquiries for wena 3Repair Service CenterToll-free:0120-252-645Mobile phone/PHS/some IP phones: 050-3754-9592 |
Reception hours: 9:30-18:00 (Monday through Friday)9:30-17:00 (Saturday, Sunday and public holiday)For details, refer to the Reference Guide supplied with wena 3 and the wena support page. (http://wena.jp/support.html)
Functions of This Watch
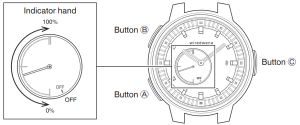
The wena 3 app can be set to display the information of wena 3 in a simple way using the indicator hand and operate part of the functions with the watch buttons.
- The information retained by wena 3 can be indicated with the indicator hand of the watch head.* The rough ratio or level for the set target value and upper limit amount is displayed.
- The watch buttons can be used to operate wena 3 and call various settings screens.
- Incoming calls/mails and notifications received by wena 3 can be indicated with the movement of the hand.* To link the watch head with the wena 3 functions, the link head setting on the wena 3 app needs to be set.
Initial Settings
When using this product for the first time, perform the following operations and settings.
STEP 1: Charge wena 3.STEP 2: Install the wena 3 app.STEP 3: Pair wena 3 with the smartphone.
For STEP 1 to 3:Refer to the Startup Guide supplied with wena 3 and the wena support page. (http://wena.jp/support.html)
* The design of the watch head differs from model to model, and the design illustrated above may not be the same as that of your watch.
STEP 4: Pair wena 3 with the watch head.
- Set “Connect watch head setting” on the wena 3 app.Tap
 (Menu) > “Device settings” > “Connect watch head setting”. Follow the screen instructions to proceed with the connection operation.* When the link head setting is complete, “connect watch head” is displayed on wena 3.
 - Press and hold the watch Button for 2 seconds or more. The indicator hand moves back and forth between “OFF” and 0% for 60 seconds.
- Press the power button of wena 3 to display the home screen.
- On the tool screen of wena 3, tap “settings” > “connect watch head”. Swipe the home screen down to display the tool screen. Swipe the screen left to display the “settings” icon.
- On the screen that displays “Pair with watch head.”, tap “OK”. When the pairing is successful, “completed” is displayed on wena 3 and the indicator hand moves to a location between 0% and 100%. * Perform this step while the indicator hand of the watch head is moving back and forth between “OFF” and 0%.
Function Link
How to set the function link
The wena 3 app can be used to set the contents to be indicated by the indicator hand, as well as the functions to be activated when the watch button is pressed once or is pressed and held for 1 second or more.
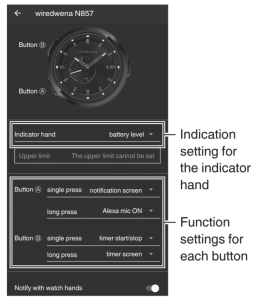
- Display “Connect watch head setting” on the wena 3 app.Tap (Menu) > “Device settings” > “Connect watch head setting”. The settings screen for the function link is displayed.
- Set the function link.Tap the ▼ symbol for the indicator hand and each button to select and set the function.
- Indication setting for the indicator handThe following information of wena 3 can be set to the indicator hand.– battery level– Steps achievement rate– Body Energy– Heart Rate– Stress & Recovery– Suica balance– Edy balance
- Function settings for each buttonThe function to be enabled by pressing each button can be set.For the following items, pressing the button activates the function.– Alexa mic ON– Qrio Lock-unlock– Qrio Lock-lock– NFC ON/OFF– do not disturb ON/OFF– timer start/stopFor the following items, pressing the button calls the wena 3 screen.– find your phone screen– Qrio Lock screen– weather screen– schedule screen– activity log screen– notification screen– Suica balance screen– Edy balance screen– alarm screen– timer screen
The initial settings for individual items are as follows.
| Item | Initial value | |
| Indicator hand | battery level | |
| Button Ⓐ | single press | notification screen |
| long press | Alexa mic ON | |
| Button Ⓑ | single press | timer start/stop |
| long press | timer screen | |
| Notify with watch hands | ON |
* The setting items for the link function are those as of January 2021.The selection items may be changed with the version upgrade of the wena 3 main unit.
Troubleshooting
| Troubles | Possible causes | Solutions |
| Paring with wena 3 has failed. | The watch head is not in the connection standby mode. | Press and hold Button Ⓒ of the watch head for 2 seconds or more to activate the connection standby mode (the indicator hand starts to move back and forth). |
| The watch head connection function of wena 3 is not ON. | When the watch head is in the connection standby mode (the indicator hand is moving back and forth), proceed to “settings” > “connect watch head” > “Pair with watch head.” on wena 3, and then tap “OK” to enable the watch head connection function. When “Already paird.” appears, tap “delete” and delete the pairing information before performing the operation above. | |
| The item “connect watch head” is not displayed on wena 3. | On the wena 3 app, tap “Device settings” and perform “Connect watch head setting” to complete the link head setting. | |
| Pairing is incorrect. | Delete the pairing information from the watch head and wena 3 respectively, and try the pairing operation again. | |
| The time on the watch head is not accurate. | wena 3 and the watch head are not connected. | Connect the watch head with wena 3 or manually adjust the time. |
| The time on wena 3 is not accurate. | Connect wena 3 to the smartphone, and tap the update button on the wena 3 app to correctly adjust the time on wena 3. | |
| The hands have become misaligned from the original position due to strong magnetism, shock or other external cause. | Refer to “How to adjust the hand positions” in the instruction to activate the correction mode and check the original positions of the hands. If the original position is misaligned, adjust it to the correct position. | |
| wena 3 is disconnected. The indicator hand points the OFF position. | Pairing is incorrect. | Delete the pairing information from the watch head and wena 3 respectively, and try the pairing operation again. |
| Disconnection has occurred due to the impact from devices that generate strong radio waves. | Set the watch head to the connection standby mode (press and hold Button Ⓒ for 2 seconds or more), and then tap “settings” > “connect watch head” of wena 3 to enable the watch head connection function. | |
| “Sleep & Alarm Settings” is ON. | Connection with wena 3 is disabled when “Sleep & Alarm Settings” is ON. Turn “Sleep & Alarm Settings” OFF or change the set time. |
How to use the function link
- Example of indicating the information of wena 3 on the watch head○ Displaying the account balance ratio of electronic money on the watch head From the “Connect watch head setting” menu of the wena app 3, set “Suica balance” or “Edy balance” for the indicator hand and input the upper limit value of the account balance. The account balance ratio of electronic money is displayed for the set upper limit value.E.g.) When the upper limit value of the indicator hand is set to 10,000 yen and the balance is 5,000 yen, the indicator hand indicates 50%.
| For details on other items, refer to the wena support page. (http://wena.jp/support.html)For details on the watch head link function, refer to the Instruction Manual. (https://www.seikowatches.com/global-en/customerservice/instruction?language=English) |
Others
How to remove the clasp section (wena 3)
① Use the provided tool to slowly push out the pin in the direction of an arrow engraved on the back surface of the band link. While bending the band as shown in the illustration, insert the tool from the connecting section (outer hole) all the way to the end to push out the pin. If the pin does not come off easily, bend the band several times and try again. ② Pull out the extruded pin from the side of the band. When the pin is pulled out, the band link is removed from the connecting section.③ The spring comes out when the band link is removed from the connecting section. If the spring remains inside, poke it lightly with the tool.④ Repeat the steps ① to ③ to remove the remaining band links.* Safely store the removed band links, pins, springs, and the tool.* The design of the band differs from model to model, and the design illustrated above may not be the same as that of your watch.
Specifications
- Basic functions– Basic watch function (Hour and minutes)– Bluetooth link function with wena 3Indicating the information of wena 3Operating wena 3 with the watch buttonsAuto time-synchronization with wena 3
- Loss/gain (monthly rate) Less than 15 seconds (When the watch head is used without being linked with wena 3 and when the watch is worn on the wrist at normal temperature range between 5°C and 35°C)
- BatteryLithium battery, 1 piece: SB-T14 (CR2025)
- Battery life2 years
Trademarks
 report this ad
– Bluetooth® is a trademark or registered trademark of Bluetooth SIG, Inc.Seiko Watch Corporation uses this logo mark under license.– App Store is a service mark of Apple Inc.– iOS is a trademark or registered trademark of Cisco Systems, Inc. in the U.S. and other countries.– Google Play and Android are trademarks of Google LLC.– wena is a trademark and registered trademark of Sony Corporation.– FeliCa is a contactless IC card technology developed by Sony Corporation and is also a registered trademark of Sony Corporation.–![]() (FeliCa mark) is a registered trademark of FeliCa Networks, Inc.– “Osaifu-Keitai” is a trademark or registered trademark of NTT DOCOMO, INC.– “Rakuten Edy” is a prepaid e-money service offered by the Rakuten Group.– Suica is a registered trademark of East Japan Railway Company.– Alexa is a trademark of Amazon.com, Inc. or its affiliates.
(FeliCa mark) is a registered trademark of FeliCa Networks, Inc.– “Osaifu-Keitai” is a trademark or registered trademark of NTT DOCOMO, INC.– “Rakuten Edy” is a prepaid e-money service offered by the Rakuten Group.– Suica is a registered trademark of East Japan Railway Company.– Alexa is a trademark of Amazon.com, Inc. or its affiliates.
References
[xyz-ips snippet=”download-snippet”]