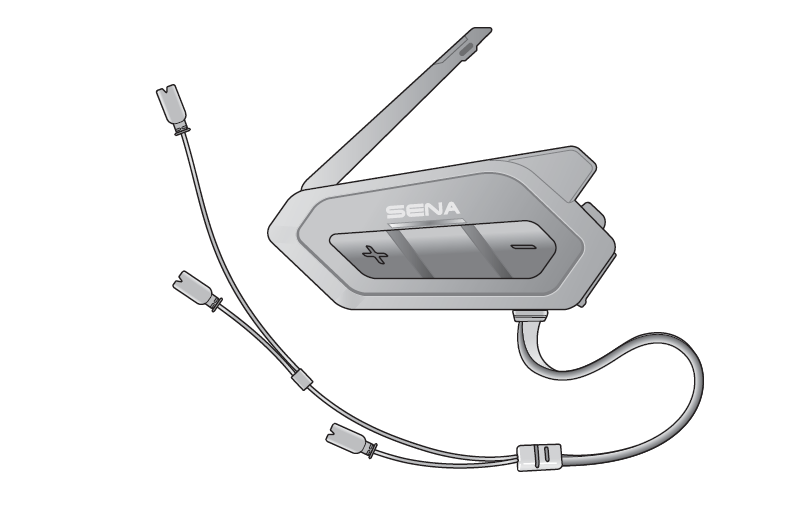
Setup Guide

LOW PROFILE MOTORCYCLE BLUETOOTH®COMMUNICATION SYSTEMWITH MESH INTERCOM™
LEGEND:

1. ABOUT THE Motorcycle Bluetooth CommunicationSystem with Mesh Intercom ™
1.1 Product Details1.1.1 Headset Main Unit
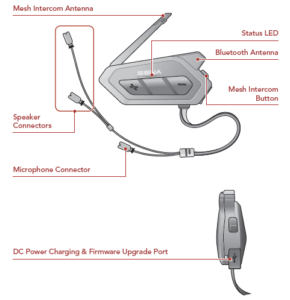
1 ABOUT THE Motorcycle Bluetooth Communication System with Mesh Intercom ™
1.2 Package Contents
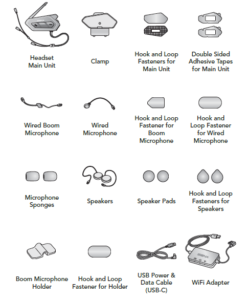
2. Installing the Headset on Your Helmet
2.1 Installing the Main Unit2.1.1 Using the Hook and Loop Fasteners for Main Unit
- Clean the area on the left side of the helmet where you will attach thehook and loop fasteners for main unit with a moistened towel and drythoroughly.
- Peel off the cover of the adhesive tape of the loop fastener for mainunit and attach it to the helmet.

3. Peel off the cover of the adhesive tape of the hook fastener for mainunit and attach it to the back plate of the main unit.

4. Attach the main unit using the hook and loop fasteners that youfitted. Make sure that the main unit is firmly attached to the helmet.

2 Installing the Headset on Your Helmet
2.1.2 Using the Double Sided Adhesive Tapes for Main UnitIf you cannot attach the hook and loop fasteners to the helmet, you canuse double sided adhesive tape.
- Clean the area on the left side of the helmet where you will attachthe double sided adhesive tapes with moistened towel and drythoroughly.
- Peel off the cover from one side of the double sided adhesive tapesfor main unit and attach it to the back plate of the main unit.

3. Peel off the cover from the other side of the double sided adhesivetapes and attach the main unit on the left side of your helmet

4. Make sure that the main unit sticks on the helmet firmly. Maximumadhesion occurs after 24 hours.
Caution: Sena recommends using the hook and loop fastenersfor main unit. The double sided adhesive tape is provided forconvenience, but is not the recommended mounting method. Senais not responsible for its use.
2.1.3 Using the Clamp for Main Unit
- Clean the area on the back plate of clamp where you will attachthe double sided adhesive tapes with moistened towel and drythoroughly.
2 Installing the Headset on Your Helmet
2. Peel off the cover from one side of the double sided adhesive tapesfor main unit and attach it to the back plate of the main unit.
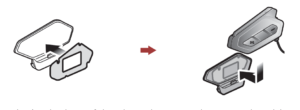
3. Insert the back plate of the clamp between the internal padding andexternal shell on the left side of the helmet.
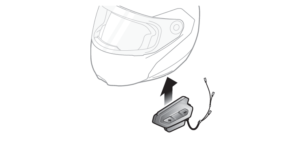
2.2 Installing the Speakers
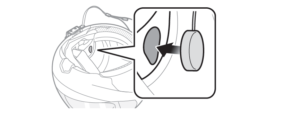
- Peel off each cover of the hook and loop fasteners for speakers toexpose the adhesive surface. Then, attach the fasteners to the earpockets inside the helmet.

2. Attach the speakers to the hook and loop fasteners for speakersinside the helmet.
2 Installing the Headset on Your Helmet
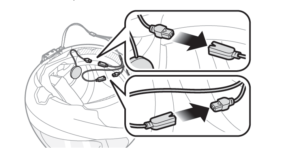
3. Align the arrows on the main unit and speaker cables and insertspeaker cables into each speaker connector.
Note:
- The cable for the speakers has two leads. The longer lead is for theright speaker and the shorter lead is for the left speaker.
- If the helmet has deep ear pockets, you can use the speaker padsto bring the speakers closer to your ears.
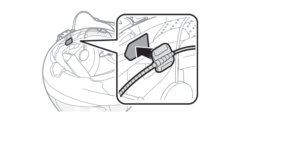
2.3 Installing the Microphones2.3.1 Using the Wired Boom Microphone

2. Attach the wired boom microphone’s mounting plate to the hook andloop fastener.
2 Installing the Headset on Your Helmet
Note:
- After you install the wired boom microphone, make sure youreinstall the helmet’s internal padding.
- You can use the boom microphone holder after attaching the hookand loop fastener for boom microphone holder on it to ensuresecure installation.
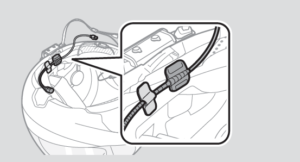
3. Make sure that the microphone’s receiver is located near your mouth.4. Adjust the head of the microphone so that the tab is facing away fromyour mouth.
5. Align the arrows on the main unit and microphone cables and insertthe microphone cable into the microphone connector.
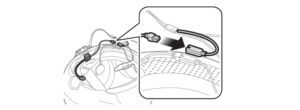
Note: The shortest cable is for the microphone.
2 Installing the Headset on Your Helmet
2.3.2 Using the Wired MicrophoneIf you have a full face helmet, you can use the wired microphone.1. Peel off the cover of the hook and loop fastener for wired microphoneto expose the adhesive tape. Then, attach the hook and loop fasteneron the inside of the helmet’s chin guard.

2. Attach the wired microphone to the hook and loop fastener for wiredmicrophone.
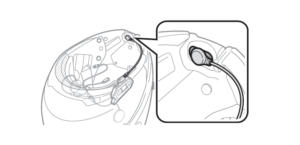
3. Align the arrows on the main unit and microphone cables and insertthe microphone cable into the microphone connector.
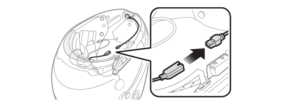
Note: The shortest cable is for the microphone.
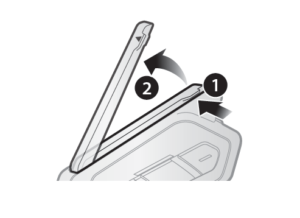
2.4 External Mesh Intercom AntennaPull the Mesh Intercom Antenna inwardsslightly to unfold it.
3. GETTING STARTED3.1 Button

3.2 Downloadable Sena Software3.2.1 Sena 50 Utility AppBy simply pairing your phone with your headset, you can use the Sena50 Utility App for quicker and easier set up and management.
- App Features: Mesh Intercom, Bluetooth Intercom, Music, Devicesettings, Quick Start Guide, and User’s Guide.
- Download– Android: Google Play Store > ‘Sena 50 Utility’– iOS: App Store > ‘Sena 50 Utility’

3 GETTING STARTED
3.2.2 Sena Device ManagerThe Sena Device Manager allows you to upgrade the firmwareand configure its settings directly from your PC or Apple computer.Download the Sena Device Manager from sena.com.
Click Here to Visit sena.com
3.3 Powering On and OffPress and hold the Center Button and (+) Button for 1 second at thesame time to turn the headset on or off.Powering On Powering Off

3.4 Charging
The headset will be fully charged 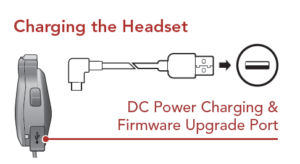 in about 1 hour. (The chargingtime may vary depending on thecharging method.)
Note:
- The headset includes a Fast Charging feature which allows it tocharge quickly over a short period of time. For example, a user canget up to 3.5 hours of Mesh communication or 6 hours of Bluetoothintercom after charging the headset for 20 minutes.
- Any 3rd party USB charger can be used with Sena products if thecharger is approved by either the FCC, CE, IC or other locallyapproved agencies that Sena accepts.
- The 50R is compatible with 5 V input USB-charged devices only.
3 GETTING STARTED
3.5 Checking the Battery LevelInstructions are for when powering the headset on.
Visual Method
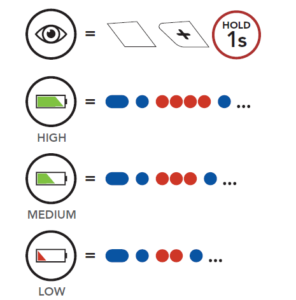
Note: When the battery is low while in use, you will hear a voiceprompt saying “Low battery”.
3.6 Volume Adjustment
You can raise or lower the volume by tapping the (+) Button or the(-) Button. Volume is set and maintained independently at differentlevels for each audio source (i.e., phone, intercom), even when theheadset is rebooted.

4. Pairing the Headset with OtherBluetoo th Devices
When using the headset with other Bluetooth devices for the first time,they will need to be “paired.” This enables them to recognize andcommunicate with one another whenever they are within range.The headset can pair with multiple Bluetooth devices such as a mobilephone, GPS, MP3 player or Sena SR10 Two-Way Radio Adapter viaMobile Phone Pairing, Second Mobile Phone Pairing and GPSPairing. The headset can also be paired with up to three other Senaheadsets.
Pairs with up to Three Sena Headsets
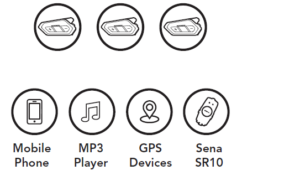
Also Pairs with:
4.1 Phone Pairing
There are two ways to pair the phone.
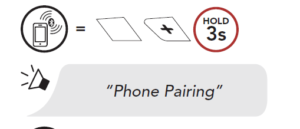
4.1.1 Pairing When the 50R is Turned Off1. Press and hold the Center Button and (+) Button for 3 secondswhen the 50R is turned off.Phone
Phone Pairing
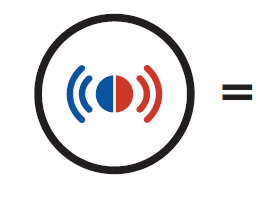 Alternating blue and red flashing lights indicate device isnow discoverable.
4 Pairing the Headset with Other Bluetoo th Devices
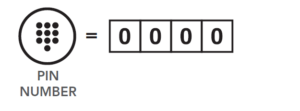
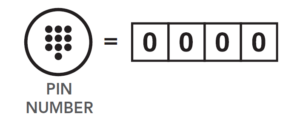
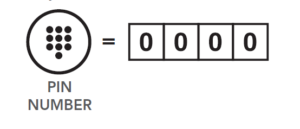
2. With your mobile phone in Bluetooth-pairing mode, select Sena 50Rin the list of devices detected.3. If your mobile phone asks for a PIN, enter 0000.
4.1.2 Pairing When the 50R is Turned On1. Execute Phone Pairing in the Configuration Menu.
Phone Pairing

 Alternating blue and red flashing lights indicate device isnow discoverable
4.2 Second Mobile Phone Pairing – Second MobilePhone, GPS, and SR10
1. Execute Second Mobile Phone Pairing in the Configuration Menu.
Second Mobile Phone Pairing

 = Blue flashing light indicates device is now discoverable
2. With your mobile phone in Bluetooth-pairing mode, select Sena 50Rin the list of devices detected.3. If your mobile phone asks for a PIN, enter 0000.
4.3 Advanced Selective Pairing: Hands-Free or A2DPStereoPhone Pairing allows the headset to establish two Bluetooth profiles:Hands-Free or A2DP Stereo. Advanced Selective Pairing allows theheadset to separate the profiles to enable connection with two devices.
4 Pairing the Headset with Other Bluetoo th Devices
4.3.1 Phone Selective Pairing – Hands-Free Profile1. Execute Phone Selective Pairing in the Configuration Menu.
Phone Selective Pairing

 Red flashing light indicates device is now discoverable.
2. With your mobile phone in Bluetooth-pairing mode, select Sena 50Rin the list of devices detected.3. If your mobile phone asks for a PIN, enter 0000.

4 Pairing the Headset with Other Bluetoo th Devices
4.4 GPS Pairing
1. Execute GPS Pairing in the Configuration Menu.
GPS Pairing

 = Green flashing lights indicates device is now discoverable.
2. With your Bluetooth device on the GPS navigation screen, selectSena 50R in the list of devices detected.3. If your Bluetooth device asks for a PIN, enter 0000.

Note: If you pair your GPS device via GPS Pairing, its instruction willnot interrupt your Mesh Intercom conversations, but overlay withthem. Bluetooth intercom conversations will be interrupted by GPSinstructions.
5. MOBILE PHONE USAGE
5.1 Making and Answering Calls
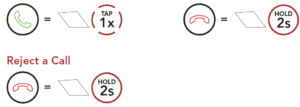
Note: If you have a GPS device connected, you will not hear its voicenavigations during a phone call.
5.2 Siri and Google Assistant
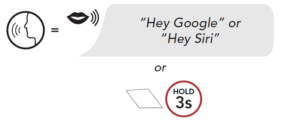
The 50R supports the Siri and Google Assistant access directly.You can activate the Siri or Google Assistant using the voice throughthe headset’s microphone, a wake word will be used. This is a word orgroups of words such as “Hey Siri“ or “Hey Google”.
Activate the Siri or Google Assistant Installed on Your Smartphone
5 MOBILE PHONE USAGE
5.3 Speed Dialing5.3.1 Assigning Speed Dial PresetsSpeed Dial Presets could be assigned in the settings menu, accessiblethrough Sena Device Manager or Sena 50 Utility App.5.3.2 Using Speed Dial Presets1. Enter into the Speed Dial menu.
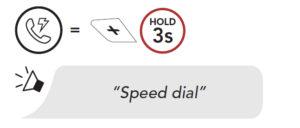
2. Navigate between the Speed Dial Preset.
Navigate Forward or Backward through Speed Dial Preset Numbers

3. Call one of your Speed Dial Presets.Call a Speed Dial Preset Number
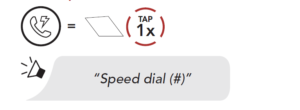
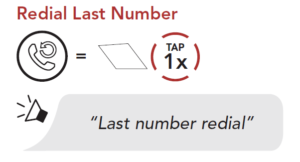
4. Redial the last number called.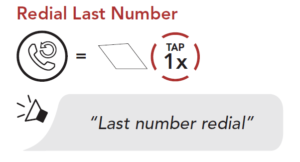
6. STEREO MUSIC
6.1 Playing Music with Bluetooth Devices
1. Play or pause music.
Play/Pause Music
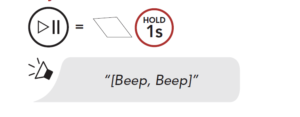
2. Adjust the volume.
Volume Up/Down

3. Track forward or back.Track Forward/Backward

6.2 Music Sharing
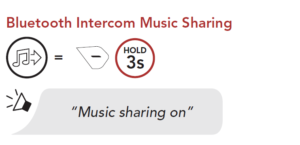
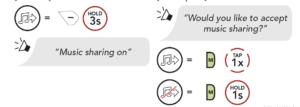
You can start sharing music with one intercom friend using Bluetoothstereo music during a two-way intercom conversation and oneparticipant of a Mesh. Both you and your intercom friend can remotelycontrol music playback such as track forward and track back. If you startsharing music while Bluetooth intercom and Mesh Intercom are runningat the same time, then music shared during Bluetooth intercom will takepriority over music shared during Mesh Intercom. The Creator will senda request message to a headset connected during Mesh Intercom andwill share music with the first participant that accepts the request.
6 STEREO MUSIC
6 STEREO MUSIC
Mesh Intercom Music Sharing[Creator] [Participant]
7. MESH INTERCOM
7.1 What is Mesh Intercom?Mesh Intercom™ is a dynamic communication system created by Senathat provides instant and effortless bike-to-bike communication withouta pre-grouping process. Mesh Intercom allows riders to connect andcommunicate with nearby users without the need to pair each headsettogether.The working distance between each 50R in Mesh Intercom can be upto 2 km (1.2 miles) in open terrain. In open terrain, the Mesh can beextended up to 8 km (5 miles) between a minimum of six users. Withinthe same channel in Open Mesh™ or the same private group in GroupMesh™, six users can talk at the same time and enjoy the optimalquality for their conversation.
Mesh Intercom

7 MESH INTERCOM
7.1.1 Open Mesh
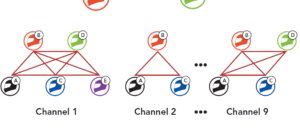
Open Mesh is an open group intercom function. Users can freelycommunicate with each other in the same Open Mesh channel andselect which channel (1-9) to use through the headset.It can connect with a virtually unlimited number of users in each channel.

7.1.2 Group Mesh
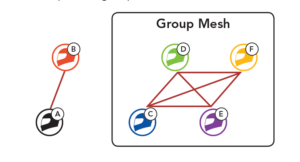
Group Mesh is a closed group intercom function that allows users tojoin, leave, or rejoin a group intercom conversation without pairing eachheadset. Users can freely communicate with each other in the sameprivate group in Group Mesh.For closed intercom conversations using Mesh Intercom, a GroupMesh needs to be created by the users. When users create a privategroup in Group Mesh by Mesh Grouping, the headset automaticallyswitches from Open Mesh to Group Mesh. Up to 24 users can all beconnected in each private group.
7.2 Starting Mesh Intercom
When Mesh Intercom is enabled, the 50R will automatically connect tonearby 50R users and allow them to talk to each other by pressing theMesh Intercom Button.
Mesh Intercom On Mesh Intercom Off

7.3 Using the Mesh in Open Mesh
When Mesh Intercom is enabled, the headset will be in Open Mesh(default: channel 1) initially.
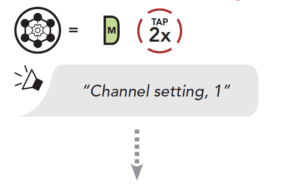
7.3.1 Channel Setting (Default: channel 1)
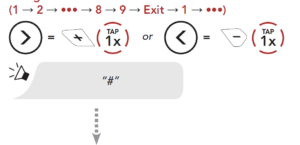
If the Open Mesh communication experiences interference becauseother groups are also using channel 1 (default), change the channel.You can select from channels 1 to 9.

Enter into the Channel Setting
Navigate Between Channels
Save the Channel

Note:
- Channel Setting always starts with channel 1.
- If you do not press any button for approximately 10 seconds in aspecific channel, the channel is automatically saved.
- The channel will be remembered even if you turn off the 50R.
7.4 Using Mesh in Group Mesh
7.4.1 Creating a Group MeshCreating a Group Mesh requires two or more Open Mesh users.
Open Mesh
1. Enter into Mesh Grouping to create a Group Mesh.
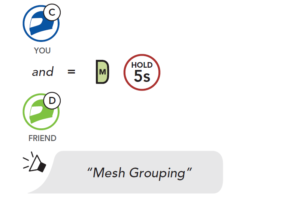
2. The headsets complete Mesh Grouping and automatically switchfrom Open Mesh to Group Mesh.
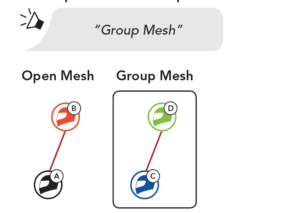
Note:
- If the Mesh Grouping is not completed within 30 seconds, userswill hear a voice prompt, “Grouping failed”.
- If you want to cancel during the Mesh Grouping, tap the MeshIntercom Button.
7.4.2 Joining an Existing Group MeshOne of the members in an Existing Group Mesh can allow newmembers in Open Mesh to join the Existing Group Mesh.
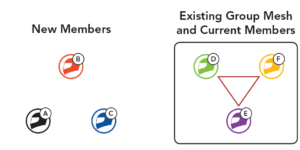
1. One of the current members and a new member enter into MeshGrouping to join the Existing Group Mesh.
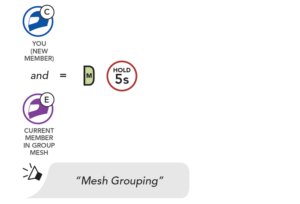
2. The headsets complete Mesh Grouping. The new members will heara voice prompt as their headsets automatically switch from OpenMesh to Group Mesh.

Note: If the Mesh Grouping is not completed within 30 seconds,the current members will hear a low tone double beep and the newmember will hear a voice prompt, “Grouping failed”.
7.5 Reset Mesh
If a headset in an Open Mesh or Group Mesh resets the Mesh, it willautomatically return to Open Mesh (default: channel 1).

7.6 Toggling Open Mesh/Group Mesh
Users are able to toggle between Open Mesh and Group Meshwithout resetting the Mesh. This allows users to keep the Group MeshNetwork connection information while in Open Mesh.Users can toggle to Group Mesh to communicate with participants fromthe stored Group Mesh Network connection information.
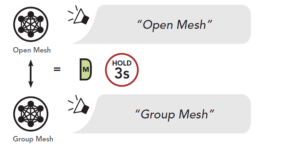
Note: If you have never participated in Group Mesh, you cannottoggle between Open Mesh and Group Mesh. You will hear a voiceprompt, “No Group Available”.
7.7 Enable/Disable Mic (Default: Enable)
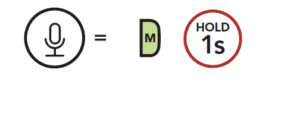
Users can enable/disable the microphone when communicating in aMesh Intercom.
8. BLUETOOTH INTERCOM8.1 Intercom Pairing
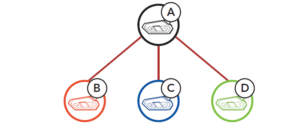
Up to three people can communicate via intercom with the headsetsimply by pairing their headsets.Pairing with Intercom Friends
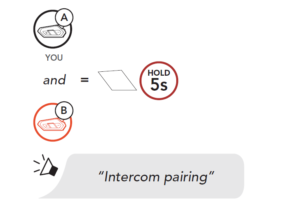
1. Press and hold the Center Buttons of two headsets for 5 secondsuntil you hear a voice prompt, “Intercom pairing”.Pairing Headset A with Headset B
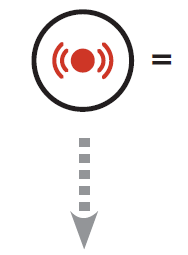 Red flashing light indicates device is now discoverable.
The 50R will automatically pair with a Sena headset.
![]() Flashing blue LED confirms intercoms are paired.
Flashing blue LED confirms intercoms are paired.
2. Repeat step 1 to pair with Intercom Friends C & D.Last-Come, First-Served
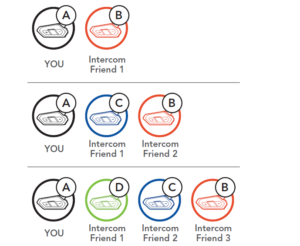
8.2 Two-Way Intercom
You can start or end an intercom conversation with an Intercom Friendby tapping the Center Button.1. Tap once for Intercom Friend 1.
Start/End with Intercom Friend 1

2. Tap twice for Intercom Friend 2.Start/End with Intercom Friend 2

3. Tap three times for Intercom Friend 3.Start/End with Intercom Friend 3

8.3 Multi-Way Intercom
Multi-Way Intercom enables conference-call-style conversationswith up to three Intercom Friends at the same time. While Multi-Way Intercom is in progress, mobile phone connection is temporarilydisconnected. However, as soon as Multi-Way Intercom terminates, themobile phone connection will be reestablished.
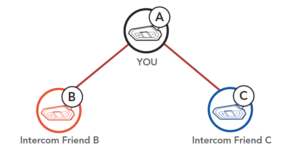
8.3.1 Starting a Three-Way Intercom ConferenceYou (A) can have a Three-Way Intercom Conference with two otherIntercom Friends (B & C) by establishing two intercom connectionssimultaneously.1. Pair your headset (A) with those of two other Intercom Friends (B & C).
Pair with Intercom Friends B & C
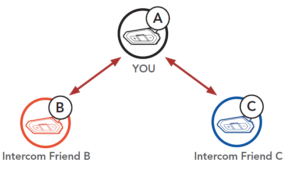
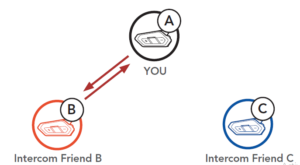
2. Start an intercom conversation with one of the two friends inyour intercom group. For example, you (A) may start an intercomconversation with the Intercom Friend (B). Or, Intercom Friend (B)may start an intercom call with you (A).
Starting an Intercom Conversation with Intercom Friend B
8 BLUETOOTH INTERCOM
3. Then, you (A) can call the second Intercom Friend (C), or the secondIntercom Friend (C) may join the intercom by making an intercomcall to you (A).
Starting an Intercom Conversation with Intercom Friend C
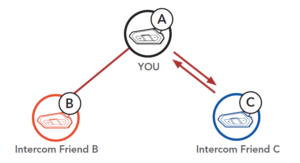
4. Now you (A) and two Intercom Friends (B & C) are having a Three-Way Intercom Conference.Three-Way Intercom
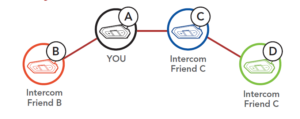
8.3.2 Starting a Four-Way Intercom ConferenceWith three Intercom Friends connected, a new participant (D) canmake it a Four-Way Intercom Conference by making an intercom callto either (B) or (C).
Starting a Four-Way Intercom
8.3.3 Ending Multi-Way Intercom1. Press and hold the Center Button for 3 seconds until you hear abeep to terminate all intercom connections.2. Tap the Center Button to disconnect from your first Intercom Friend.Double tap the Center Button to disconnect from your secondIntercom Friend.
8.4 Three-Way Conference Phone Call with IntercomUsersYou can have a Three-Way Conference Phone Call by adding anIntercom Friend to the mobile phone conversation.1. During a mobile phone call, tap the Center Button once, twiceor, three times to invite one of your Intercom Friends to the conversation.
Invite an Intercom Friend into Phone Conference
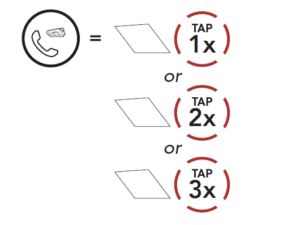
2. To disconnect the intercom during a conference phone call, tap theCenter Button once, twice or three times.Disconnect Intercom Friend from Conference
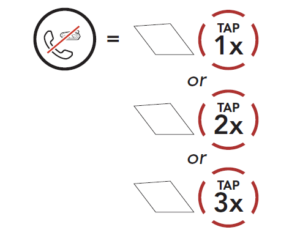
3. To disconnect the mobile phone call during a conference phone call,press and hold the Center Button for 2 seconds.End Phone Call from Conference

Note: When you have an incoming intercom call during a mobilephone call, you will hear high tone double beeps.
8.5 Group IntercomGroup Intercom allows you to instantly create a Multi-Way ConferenceIntercom with three of the most recently paired headsets.
- Go through intercom pairing with up to three headsets you want tohave Group Intercom with.
- Tap the (+) Button and (-) Button to begin Group Intercom. The LEDwill flash green and you will hear a voice prompt, “Group intercom”.
Start Group Intercom

3. When all of the headsets are connected together, everyone will heara voice prompt, “Group intercom connected”.

8 BLUETOOTH INTERCOM
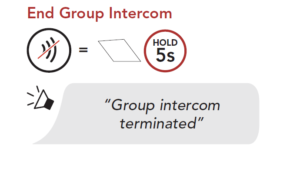
4. To terminate Group Intercom, press and hold the Center Buttonfor 5 seconds during Group Intercom. You will hear a voice prompt,“Group intercom terminated”.
End Group Intercom
8.6 Mesh Intercom Conference with BluetoothIntercom Participant
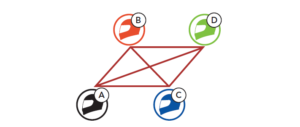
Users can use the existing Bluetooth intercom and Mesh Intercomfunction at the same time. In this case, it is recommended tocommunicate with other Sena headsets via Bluetooth intercomconnection and use Mesh Intercom between 50R headsets. A user whois in Open Mesh or Group Mesh when using Mesh Intercom is able toinclude up to 3 of their Bluetooth intercom friends. You can start a Two-Way Intercom conversation with one of your three Intercom Friends toinclude them in the Mesh.
Note:
- The audio quality will be reduced if a 50R connects to 2 or moreBluetooth intercom friends while in Open Mesh or Group Meshwhen using Mesh Intercom.
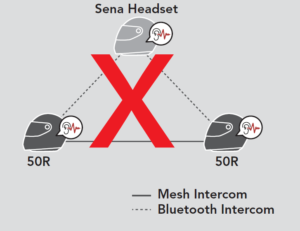
- If a closed loop is created, as shown below, each user willexperience severe noise issues. Sena recommends that a closedloop not be created.
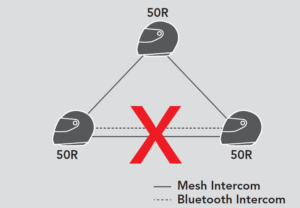
- If Bluetooth intercom is accidentally turned on during MeshIntercom communication between 50R headsets, as shown below,you will hear a voice prompt, “Mesh intercom disabled, Bluetoothintercom connected” every 1 minute. If you turn off the BluetoothIntercom or turn off the Mesh Intercom, the voice prompt will nolonger come out.
8.7 Universal Intercom
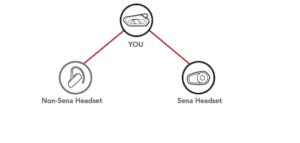
Universal Intercom allows you to have intercom conversations withusers of non-Sena Bluetooth headsets. You can pair your headset withonly one non-Sena headset at a time. The intercom distance dependson the performance of the Bluetooth headset to which it is connected.When a non-Sena Bluetooth headset is paired with the Sena headset, ifanother Bluetooth device is paired via Second Mobile Phone Pairing, itwill be disconnected.1. Execute Universal Intercom in the Headset Configuration Menu.
Access Universal Intercom in the Configuration Menu

2. Put the non-Sena Bluetooth headset in Pairing Mode. The headsetwill automatically pair with a non-Sena Bluetooth headset.3. You can have Two-Way Intercom or Multi-Way Intercomcommunication with up to three Intercom Friends using non-Senaheadsets by following the procedures described below.
Example of a Three-Way Universal Intercom
Example of a Four-Way Universal Intercom

Note: Some non-Sena headsets may not support Multi-Way UniversalIntercom.
8.8 Mesh Intercom Conference with Two-way UniversalIntercom ParticipantUsers can use the existing Two-way Universal Intercom and MeshIntercom function at the same time. In this case, it is recommended tocommunicate with non-Sena headset via Two-way Universal Intercomconnection and use Mesh Intercom between 50R headsets.A user who is in Open Mesh or Group Mesh when using MeshIntercom is able to include one Universal Intercom friend. You canstart a Two-way Universal Intercom conversation with your UniversalIntercom Friend to include it in the Mesh.
9. USING THE FM RADIO
9.1 FM Radio On/Off
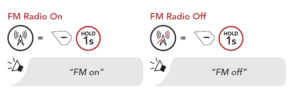
9.2 Seek and Save Radio StationsThe “Seek” feature searches for radio stations.1. Search for radio stations.
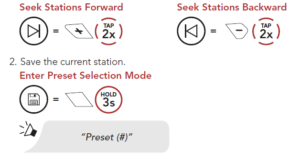
3. Navigate through the preset numbers that you want to store.Navigate Forward/Backward Through Preset Stations

4. Save the station in the preset number you choose or delete thestation from memory.
Save Station to the Delete Station fromPreset Number Memory
9.3 Scan and Save Radio Stations
The “Scan” function automatically searches for radio stations, startingwith the current station’s frequency, then up from there.1. Scan for stations.
Start Scanning

2. The Sena tuner pauses at each station it finds for 8 seconds beforemoving to the next.3. Save the current station. The station will be saved as the next presetnumber.
Save the Current Station
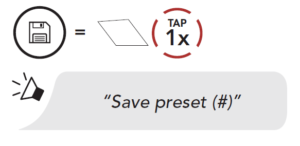
4. Stop scanning.
Stop scanning

9.4 Temporary Station Preset
The Temporary Preset feature automatically finds and saves the nearest10 radio stations without changing your existing preset stations.1. Automatically find and save 10 stations.
Temporary Stations

2. The temporary preset stations will be cleared when the headsetreboots.
9.5 Navigating Preset Stations
Using the methods above, up to 10 radio stations can be stored. Youcan navigate through the saved stations.
Navigate through Preset Stations

Note: You can use the Sena Device Manager or the Sena 50 UtilityApp to save the preset stations.
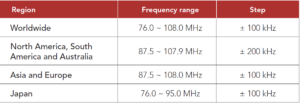
9.6 Region Selection
You can select the proper FM frequency range for your location fromthe Sena Device Manager or the Sena 50 Utility App. Using theregion setting, you can optimize the seek function to avoid unnecessaryfrequency ranges.
10. Voice Command
The Voice Command of the headset allows you to operate certainoperations by simply using your voice. You can control the headsetcompletely handsfree using the voice recognition. Multi-languageVoice Command supports English, French, German, Spanish, Italian,Chinese, Japanese, and Russian.Speak a Voice Command List
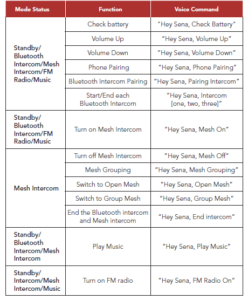
10 Voic e Comm and

Note:
- You can set a language to another language by using the UnitLanguage feature on the Sena 50 Utility App.
- If you set a language that does not support voice commands, thevoice command will works only with English commands.
- You can see the another language’s voice command list on theSena 50 Utility App.
- Voice command performance may vary based on theenvironmental conditions including riding speed, helmet typeand ambient noise. To improve the performance, minimize windnoise on the microphone by using a large microphone sponge andclosing the visor.
11. FUNCTION PRIORITY ANDFIRMWARE UPGRADES11.1 Function Priority
The headset prioritizes connected devices in the following order:(highest) Mobile phoneVoice command modeMesh Intercom/Bluetooth IntercomMusic sharing via Bluetooth stereoFM radioStereo music by audio cable(lowest) Bluetooth stereo musicA lower-priority function gets interrupted by a higher-priority function.For example, stereo music will be interrupted by an IntercomConversation; an Intercom Conversation will be interrupted by anincoming mobile phone call.
11.2 Firmware UpgradesThe headset supports firmware upgrades. You can upgrade the firmwareusing the Sena Device Manager. Please visit sena.com to check for thelatest software downloads.
12. CONFIGURATION SETTING
12.1 Headset Configuration Setting

Headset Configuration Menu
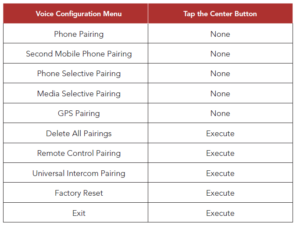
12.1.1 Delete All PairingsDelete All Bluetooth Pairing Information stored in the Bluetoothsystem.12.1.2 Remote Control Pairing
You can remotely control the headset using Sena Remote Controldevices (sold separately).
- Turn on the headset and the Remote Control device.
- Execute Remote Control Pairing.
- Enter pairing mode in the Remote Control device. The headset willautomatically connect with the Remote Control device in pairingmode.
12.2 Software Configuration SettingYou can change the settings of the headset through the Sena DeviceManager or the Sena 50 Utility App.12.2.1 Speed DialAssign phone numbers for speed dialing to make a phone call quickly.12.2.2 Channel Setting (Default: channel 1)If the Open Mesh communication experiences interference becauseother groups are also using the channel 1 (default), change thechannel. You can select one of 1 to 9 channels.
12.2.3 Unit LanguageYou can select the device language. The selected language ismaintained even when the headset is rebooted.
12.2.4 Audio Equalizer (Default: Off)You can use the Audio Equalizer to increase/decrease the decibel levelof different frequency ranges of audio.Balance will adjust all of the frequency ranges to be the same volumelevel (0 dB). Bass Boost will increase the bass range of audio (20 Hz –250 Hz). Mid Boost will increase the mid range of audio (250 Hz – 4 kHz).Treble Boost will increase the high range of audio (4 kHz – 20 kHz).12.2.5 VOX Phone (Default: Enable)If this feature is enabled, you can answer incoming calls by voice. Whenyou hear a ringtone for an incoming call, you can answer the phoneby saying a word such as “Hello” loudly or by blowing air into themicrophone. VOX phone is temporarily disabled if you are connectedto intercom. If this feature is disabled, you have to tap the CenterButton to answer an incoming call.12.2.6 VOX Intercom (Default: Disable)If VOX Intercom is enabled, you can initiate an intercom conversationwith the last connected intercom friend by voice. When you wantto start intercom, say a word such as “Hello” loudly or blow air intothe microphone. If you start an intercom conversation by voice, theintercom terminates automatically when you and your intercom friendremain silent for 20 seconds. However, if you manually start an intercomconversation by tapping the Center Button, you have to terminate theintercom conversation manually. However, if you start the intercom byvoice and end it manually by tapping the Center Button, you will notbe able to start intercom by voice temporarily. In this case, you haveto tap the Center Button to restart the intercom. This is to preventrepeated unintentional intercom connections by strong wind noise.After rebooting the headset, you can start the intercom by voice again.12.2.7 VOX Sensitivity (Default: 3)VOX sensitivity can be adjusted depending on your ridingenvironment. Level 5 is the highest sensitivity setting and level 1 is thelowest.
12.2.8 Bluetooth Intercom Audio Multitasking(Default: Disabled)Audio Multitasking (Bluetooth Intercom Audio Multitasking andMesh Intercom Audio Multitasking) allows you to have an intercomconversation while simultaneously listening to music, FM radio, orGPS instructions. The overlaid audio is played in the background withreduced volume whenever there is an intercom conversation and willreturn to normal volume once the conversation is finished.The Mesh Intercom Audio Multitasking feature is always on.
Note:
For Bluetooth Intercom Audio Multitasking to work properly, youneed to power the headset off and on. Please restart the headset.
- Bluetooth Intercom Audio Multitasking will be activated duringtwo-way intercom conversations with a headset that also supportsthis feature.
- Some GPS devices may not support this feature.
- The Audio Multitasking feature can be configured through theIntercom-Audio Overlay Sensitivity and the Audio OverlayVolume Management settings.
12.2.9 Intercom-Audio Overlay Sensitivity (Default: 3)The music, FM radio and GPS volume will be lowered to play in thebackground if you talk over the intercom while the overlaid audiois playing. You can adjust the intercom sensitivity to activate thisbackground audio mode. Level 1 has the lowest sensitivity and level 5has the highest sensitivity.
Note: If your voice is not louder than the sensitivity of the selectedlevel, the overlaid audio will not be lowered.
12.2.10 Audio Overlay Volume Management (Default: Disable)The music, FM radio and GPS overlaid audio reduces in volumewhenever there is an ongoing intercom conversation. If Audio OverlayVolume Management is enabled, the volume level of the overlaidaudio will not be reduced during an intercom conversation.
12.2.11 HD Intercom (Default: Enable)
HD Intercom enhances the two-way intercom audio from normal qualityto HD quality. HD Intercom will become temporarily disabled when youenter into a multi-way intercom. If this feature is disabled, the two-wayintercom audio will change to normal quality.Note:
- The intercom distance of HD Intercom is relatively shorter thanthat of normal intercom.
- HD Intercom will become disabled temporarily when BluetoothIntercom Audio Multitasking is enabled.
12.2.12 HD Voice (Default: Enable)HD Voice allows you to communicate in high-definition during phonecalls. This feature increases the quality so that the audio will be crispand clear during phone call conversations.If this feature is enabled, incoming phone calls will interrupt intercomconversations and audio from the SR10 will not be heard duringintercom conversations. Three-Way Conference Phone Call withIntercom Participant will not be available if HD Voice is enabled.
Note:
- Refer to the manufacturer of your Bluetooth device that will beconnected to the headset to see if it supports HD Voice.
- HD Voice is active only when Bluetooth Intercom AudioMultitasking is disabled.
12.2.13 Smart Volume Control (Default: Disable)Enabling Smart Volume Control automatically changes the level of thespeaker volume based on the level of the environment noise. You canenable it by setting the sensitivity to low, medium or high.
12.2.14 Sidetone (Default: Disable)Sidetone is audible feedback of your own voice. It helps you to naturallyspeak at the correct level according to varying helmet noise conditions.If this feature is enabled, you can hear what you are speaking during anintercom conversation or a phone call.
12.2.15 Voice Prompt (Default: Enable)You can disable voice prompts by software configuration settings, butthe following voice prompts are always on.– Headset configuration settings menu, battery level indicator, speeddial, FM radio functions
12.2.16 RDS AF Setting (Default: Disable)Radio Data System (RDS) Alternative Frequency (AF) Setting allowsa receiver to re-tune to the second frequency location when the firstsignal becomes too weak. With RDS AF enabled on the receiver, a radiostation with more than one frequency can be used.
12.2.17 FM Station Guide (Default: Enable)When FM Station Guide is enabled, FM station frequencies are givenby voice prompts as you select preset stations. When FM Station Guideis disabled, the voice prompts on FM station frequencies will not begiven as you select preset stations.
12.2.18 Advanced Noise Control™ (Default: Enable)When Advanced Noise Control is enabled, the background noiseis reduced during an intercom conversation. When it is disabled, thebackground noise is mixed with your voice during intercom.
13. TROUBLESHOOTING
Please visit sena.com for answers to frequently asked questions. Thisdetailed online FAQ section deals with troubleshooting, illustrates casestudies and contains tips on using the headset.
13.1 Fault ResetWhen the headset is not working properly, you can easily reset the unit:
- Locate the pinhole reset button at the bottom of the main unit.
- Gently insert a paperclip into the hole and tap the Fault ResetButton with light pressure.

3. The headset will shut down.Note: Fault Reset will not restore the headset to factory defaultsettings.
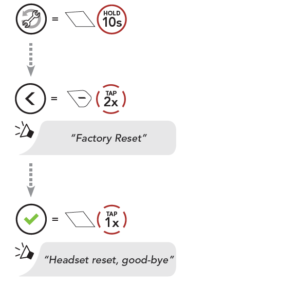
13.2 Factory Reset
To erase all of your settings and start fresh, the headset can be restoredto factory default settings using the Factory Reset feature.
Read More About This Manual & Download PDF:
Motorcycle Bluetooth Communication System With Mesh Intercom 50R HD Speaker User Manual – Motorcycle Bluetooth Communication System With Mesh Intercom 50R HD Speaker User Manual –

