SENA Bluetooth Communication Headset for Helmets Pi User Guide
1. ABOUT pi
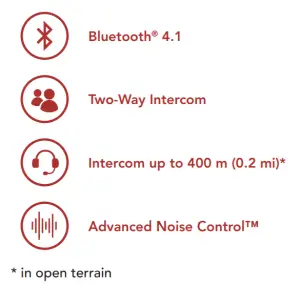
1.1 Product Features
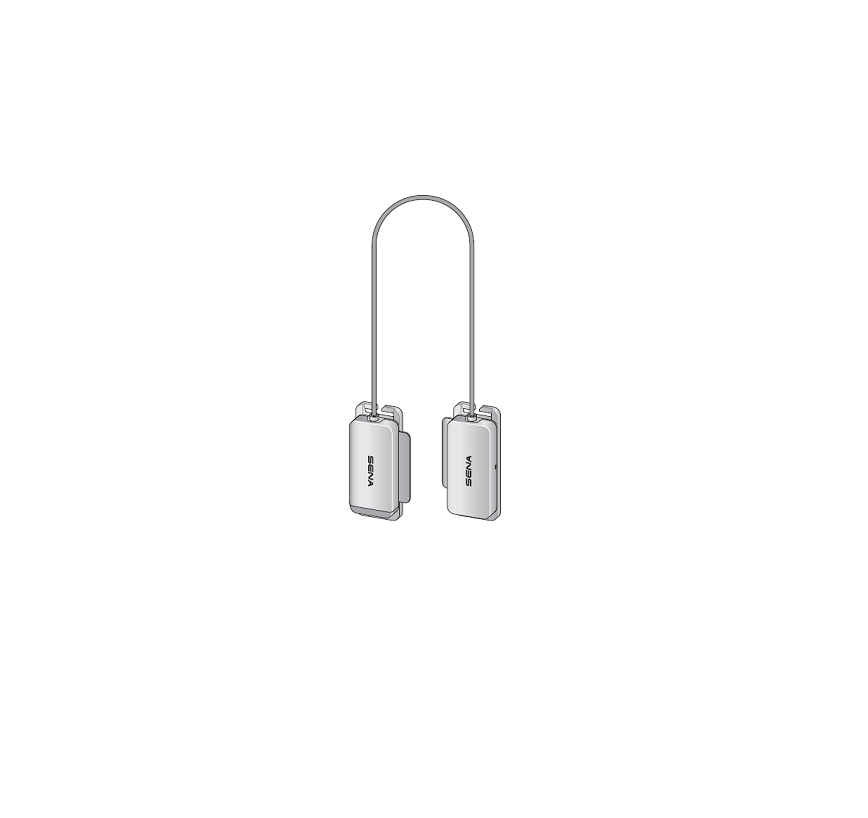
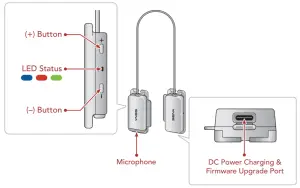
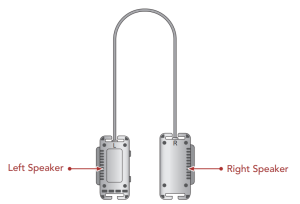
1.2 Product Details
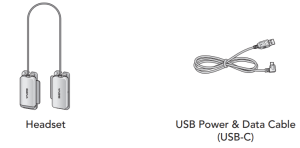
1.3 Package Contents
2. INSTALLING THE HEADSET ON YOUR HELMET
① Secure the headset to the chinstrap using the strap hooks on both sides.② Slide the headset as close to the helmet as possible.
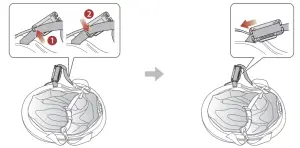
Note:• The (R) and (L) markings are located on the back of the headset.• Make sure that the cable is facing toward the helmet.
③ Hide the cable under the inner pad in the front of the helmet.④ Adjust the headset upward or downward so that the speakers are facing your ears.
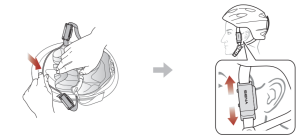
Note: The SENA logo will appear as above after proper installation.
3. GETTING STARTED
3.1 Downloadable Sena Software3.1.1 Sena Utility AppBy simply pairing your phone with your headset, you can use the Sena Utility App for quicker, easier set up and management.
• Download Sena Utility App on Google Play Store or App Store.
3.1.2 Sena Device ManagerThe Sena Device Manager allows you to upgrade firmware and configure settings directly from your PC. • Download the Sena Device Manager at sena.com.
3.1.3 Firmware UpgradesThe headset supports firmware upgrades. Please visit sena.com to check for the latest software downloads.• Download the firmware at sena.com.
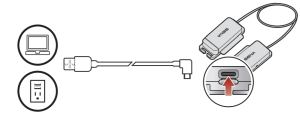
3.2 Charging
Charging the Headset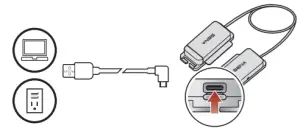
Depending upon the charging method, the headset will be fully charged in about 2.5 hours.
Note:• Please make sure to take off your headset while charging. The headset automatically turns off during charging.• Any 3rd party USB charger can be used with Sena products if the charger is approved by either the FCC, CE, IC or other locally approved agencies that Sena accepts.• The pi is compatible with 5 V input USB-charged devices only.
3.3 Powering On and OffPowering On• Press and hold the (+) Button and the (-) Button for 1 second.Powering Off• Tap the (+) Button and the (-) Button.
3.4 Checking the Battery LevelThere are two ways to check battery level:
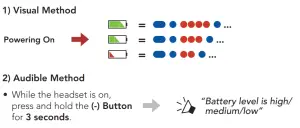
Note:• The battery performance may be reduced over time with usage.• Battery life may vary depending on conditions, environmental factors, functions of the product in use, and devices used with it.
3.5 Volume AdjustmentVolume is set and maintained independently at different levels for each audio source, even when the headset is rebooted. Volume Up/Down• Tap the (+) Button or the (-) Button.
4. PAIRING THE HEADSET WITH OTHER BLUETOOTH DEVICES
When using the headset with other Bluetooth devices for the first time, they will need to be “paired.” This enables them to recognize and communicate with one another whenever they are within range.The pairing operation is required only once for each Bluetooth device. The headset can pair with multiple Bluetooth devices such as a mobile phone, GPS, or MP3 player via Mobile Phone Pairing and Second Mobile Phone Pairing.
4.1 Phone PairingThere are three ways to pair the phone.4.1.1 Initially Pairing the piThe headset will automatically enter the phone pairing mode when you initially turn on the headset or in the following situation:• Rebooting after executing Factory Reset.
Note:• The phone pairing mode lasts for 3 minutes.• To cancel pairing, tap the (+) Button or (-) Button.
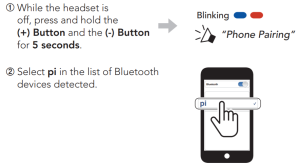
4.1.2 Pairing When the pi Is Turned Off
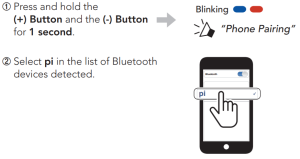
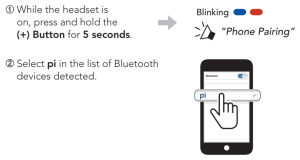
4.1.3 Pairing When the pi Is Turned On
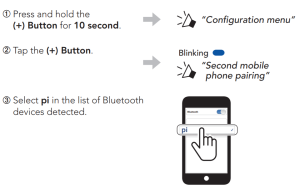
4.2 Second Mobile Phone Pairing – Second Mobile Phone and GPS
5. MOBILE PHONE USAGE
5.1 Making and Answering Calls
Answer a Call• Tap the (+) Button.End a Call• Press and hold the (+) Button for 2 seconds.Reject a Call• Press and hold the (+) Button for 2 seconds.Voice Dial• Press and hold the (+) Button for 3 seconds in stand-by mode.5.2 Bluetooth Stereo MusicPlay/Pause• Press and hold the (+) Button for 1 second.Track Forward• Press and hold the (+) Button for 2 seconds.Track Backward• Press and hold the (-) Button for 2 seconds.
6. BLUETOOTH INTERCOM
The headset can be paired with another headset for Bluetooth intercom conversation.
6.1 Intercom PairingThere are two ways to pair the headset.6.1.1 Using the Smart Intercom Pairing (SIP)SIP allows you to quickly pair with your friends for intercom communication by scanning the QR code on the Sena Utility App without remembering the button operation.① Pair the mobile phone with the headset.② Open the Sena Utility App.③ Click the Smart Intercom Pairing Menu.④ Click the Add Button to open the QR scanning screen.⑤ Scan the QR code displayed on your friend (B)’s mobile phone.• Your friend (B) can display the QR code on the mobile phone by opening the Sena Utility App and clicking the Smart IntercomPairing Menu.
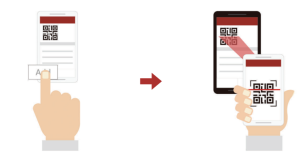
⑥ Click the Confirm Button and check that your friend (B) is paired with you (A) correctly.
Note: The Smart Intercom Pairing (SIP) is not compatible with Sena products that use Bluetooth 3.0 or below.
6.1.2 Using the Button
① Press and hold the (-) Button on the headsets (A and B) for 5 seconds.
② The two headsets (A and B) will be automatically paired.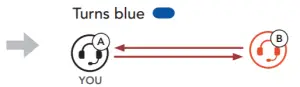
6.2 Two-Way IntercomStart/End Conversation with the Intercom Friend• Press and hold the (-) Button for 1 second.6.2.1 HD IntercomHD Intercom enhances the two-way intercom audio from normal quality to HD quality. If this feature is disabled, the two-way intercom audio will change to normal quality.
7. UNIVERSAL INTERCOM
Universal Intercom allows you to have Two-way intercom conversations with users of non-Sena Bluetooth headsets. Non-Sena Bluetooth headset can be connected to the Sena headset if they support the Bluetooth Hands-Free Profile (HFP). You can pair the headset with only one non-Sena headset at a time. The intercom distance depends on the performance of the headset to which it’s connected. When a non-Sena headset is paired with the headset, if another Bluetooth device is paired via Second Mobile Phone Pairing, it will be disconnected.
7.1 Universal Intercom Pairing
① Press and hold the (+) Button for 10 seconds to enter the configuration menu. ② Double tap the (+) Button.
③ Tap the (-) Button to enter into Universal Intercom Pairing mode.④ Put the non-Sena Bluetooth headset in Hands-free Pairing Mode. The headset will automatically pair with a non-Sena Bluetooth headset.
7.2 Two-Way Universal IntercomYou can initiate the Universal Intercom connection with non-Sena Bluetooth headsets using the same intercom connection method as you would between other Sena headsets.

You may start/end a Two-Way Universal Intercom using the same way as you do in a normal Two-Way Intercom. Please refer to section 6.2, “Two-Way Intercom”.
8. FUNCTION PRIORITY
The headset operates in the following order of priority:(highest) Mobile phone Bluetooth Intercom(lowest) Bluetooth stereo musicA lower priority function is always interrupted by a higher priority function.
9. CONFIGURATION SETTING
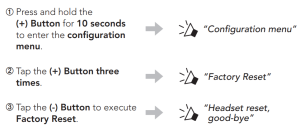
9.1 Headset Configuration MenuAccessing the Configuration Menu• Press and hold the (+) Button for 10 seconds.Navigating Between Menu Options• Tap the (+) Button.Execute Menu Options• Tap the (-) Button.
| Voice Configuration Menu | Tap the (-) Button |
| Second Mobile Phone Pairing | None |
| Universal Intercom Pairing | Execute |
| Factory Reset | Execute |
| Exit Configuration | Execute |
9.2 Software Configuration SettingYou can change the settings of the headset through the Sena Device Manager or the Sena Utility App.

9.2.1 Unit LanguageYou can select the device language. The selected language is maintained even when the headset is rebooted.9.2.2 Voice Prompt (Default: Enable)You can disable voice prompts by software configuration settings, but the following voice prompts are always on.– Headset configuration menu9.2.3 Advanced Noise Control™ (Always on)The background noise is reduced during an intercom conversation.
10. TROUBLESHOOTING
Please visit sena.com for more troubleshooting information.• Customer Support: sena.com10.1 Fault ResetWhen the USB charging & data cable connects a power supply to the headset, the headset will automatically be turned off and a fault reset will occur.
Note: Fault Reset will not restore the headset to the factory default settings.
10.2 Factory ResetTo erase all of your settings and start fresh, use the Factory Reset. The headset automatically restores the default settings and turns off.
 report this ad
Copyright © 2021 Sena Technologies, Inc. All rights reserved.© 1998–2021 Sena Technologies, Inc. All rights reserved. Sena Technologies, Inc. reserves the right to make any changes and improvements to its product without providing prior notice. Sena™ is a trademark of Sena Technologies, Inc. or its subsidiaries in the USA and other countries. SF1™, SF2™, SF4™, SFR™, SRL™, Momentum™, Momentum INC™, Momentum Lite™, Momentum Pro™, Momentum INC Pro™, Momentum EVO™, Cavalry™, Latitude SR™, Latitude SX™, Latitude S1™, 30K™, 33i™, 50S™, 50R™, 5S™, 20S EVO™, 20S™, 10S™, 10C™, 10C PRO™, ProRide EVO™, 10C EVO™, 10U™, 10Upad™, 10R™, 3S™, 3S PLUS™, SMH5™, SMH5-FM™, SMH5 MultiCom™, SMH10™, SMH10R™, SPH10™, SPH10H-FM™, Savage™, Prism Tube WiFi™, Prism™, Bluetooth Audio Pack for GoPro®, R1™, R1 EVO™, R1 EVO CS™, M1™, M1 EVO™, RUMBA™, RC1™, RC3™, RC4™, Handlebar Remote™, Wristband Remote™, PowerPro Mount™, Powerbank™, FreeWire™, WiFi Docking Station™, WiFi Sync Cable™, WiFi Adapter™,+mesh™, +Mesh Universal™, MeshPort Blue™, MeshPort Red™, Econo™, OUTRUSH™, OUTRUSH R™, OUTSTAR™, EcoCom™, Parani A10™, Parani A20™, Parani M10™, pi™, Snowtalk™, Snowtalk2™, SR10™, SR10i™, SM10™, SPIDER RT1™,SPIDER ST1™, X1™, X1 Pro™, X1S™, Expand™, Expand Boom™, Bluetooth Mic & Intercom™, Tufftalk™, Tufftalk Lite™, Tufftalk M™ are trademarks of Sena Technologies, Inc. or its subsidiaries. These trademarks may not be used without the express permission of Sena. GoPro® is a registered trademark of Woodman Labs of San Mateo, California. Sena Technologies, Inc. (“Sena”) is not affiliated with Woodman Labs, Inc. The Sena Bluetooth Pack for GoPro® is an aftermarket accessory specially designed and manufactured by Sena Technologies, Inc. for the GoPro® Hero3 and Hero4 allowing for Bluetooth capabilities. The Bluetooth® word mark and logos are owned by the Bluetooth SIG, Inc. and any use of such marks by Sena is under license. iPhone® and iPod® touch are registered trademarks of Apple Inc.Address: 152 Technology Drive Irvine, CA 92618
Read More About This Manual & Download PDF:
References
[xyz-ips snippet=”download-snippet”]