
Sandwich MakerUser’s manual

Prior to using this appliance, please read the user’s manual thoroughly, even in cases, when one has already familiarised themselves with previous use of similar types of appliances. Only use the appliance in the manner described in this user manual. Keep the user’s manual in a safe place where it can be easily retrieved for future use.We recommend saving the original shipping cardboard box, packaging material, receipt and warranty card for the duration of warranty. In the case of transportation, pack the appliance using the original packaging materials only.
IMPORTANT SAFETY INSTRUCTIONS
This appliance may be used by children 8 years of age and older and by persons with physical or mental impairments or by inexperienced persons if they are properly supervised or have been informed about how to use of the product in a safe manner and understand the potential dangers. Children must not play with the appliance. This appliance may be cleaned by children 8 years of age and older if they are properly supervised. Keep this appliance and the power cord out of reach of children younger than 8 years of age.
![]() Caution:This appliance is not designed to be controlled using a programmed device, external timer switch or remote control.
Caution:This appliance is not designed to be controlled using a programmed device, external timer switch or remote control.
READ CAREFULLY AND STORE THESE INSTRUCTIONS FOR FUTURE USE.
- Before connecting the appliance to a power socket check that the technical details on the appliance label match the electrical voltage in the socket.
- Only plug the appliance into a correctly grounded socket.
- This appliance is designed for use indoors. Do not use this appliance for commercial purposes.
- Do not use the appliance in industrial surroundings or outdoors!
- Do not use the appliance for any other than its intended purpose.
- Do not place the appliance on or near an electric or gas stove or other sources of heat.
- Do not place the appliance at the edge of a utility surface or on an unstable surface. The appliance must be located on a stable and even surface.
- After connecting the appliance into an electric power supply the cooking surface and the outer surface of the appliance begins to heat up. Do not touch the hot surface. To close or open the top cooking plate use the thermally insulated handle and for removing the sandwich use a wooden or heat resistant plastic spatula.
- Allow adequate air circulation around the appliance when in use. Do not place any objects on the heated surface of the appliance.
- Always turn off the appliance and disconnect it from the power socket if you leave it without supervision or if you will not be using it and before cleaning.
- Allow the appliance to fully cool down before moving, cleaning or storing it.
- Clean the grilling surfaces after each use, see the chapter Cleaning and maintenance.
- To avoid any injury by electrical shock, do not clean the appliance under running water and do not submerge in water or any liquid.
- Ensure that the power cord does not come into contact with water or moisture or heated surface.
- Do not disconnect the appliance from the power socket by pulling on the power cord. This could damage the power cord or the power socket. Disconnect the cord from the power socket by gently pulling out the plug of the power cord.
- If the power cord is damaged, have it replaced at a technical service centre. It is forbidden to use the appliance if it has a damaged power cord or plug.
- To avoid the danger of injury by electrical shock, do not repair the appliance yourself or make any adjustments to it. Have all repairs or adjustments of the appliance done at an authorised service centre. Tampering with the appliance during the warranty period may void the warranty policy.
DESCRIPTION OF THE SANDWICH MAKER
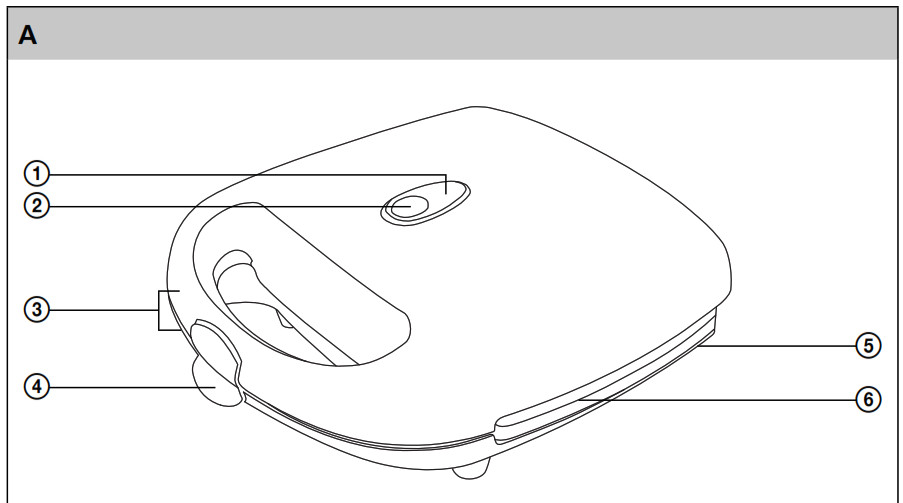
- Green indicator lightIndicates heating of the cooking plates
- Red indicator lightIndicates connection into the electric power supply
- Thermally insulated handles
- LockTo lock and unlock the handles easily
- Power cord storage (at the bottom part of the appliance)
- Cooking plates with a special non-stick coating
BEFORE FIRST USE
1) Remove the Sandwich Maker from the packing material.2) Wipe the cooking plates with a wet cloth or sponge and dry completely with a paper towel or dry cloth.3) Connect the Sandwich Maker to the power supply and leave it turned on for at least 5–7 minutes to dissipate any odour.Note:When first turned on, there may be light smoke emitted. This is due to the heating of internal components and it will pass in a moment.
USING THE SANDWICH MAKER
- Coat the cooking plates 6 with butter or cooking oil.
- Connect the Sandwich Maker to a power supply. Both indicator lights on the top panel will light up. Red indicator light 2 indicates connection into the electric power supply. Green indicator light 1 indicates heating of the cooking plates.
- Close the Sandwich Maker for more effi cient pre-heating of the cooking plates.
- While the cooking plates are heating up, prepare the sandwich. For one sandwich you will need two slices of toasting bread and fi lling. Place the fi lling exactly between the slices of bread. Too much of the fi lling may make it hard to close the Sandwich Maker. In this case, it may be necessary to remove some of the fi lling. Do not use force to close the Sandwich Maker, this may lead to a damage.
 Tip:Try some of the recipes listed bellow.
 - When the cooking plates are heated to the operating temperature, the Green indicator light 1 is turned off.Note:The heating indicator light turns on and off. This signalizes that the operating temperature of cooking plates is maintained.
- Open the Sandwich Maker and place one or two sandwiches on the bottom plate. Using the handle 3 close and press the top cooking plate to the bottom plate. Secure handles 3 with the lock 4. After 2 to 3 minutes release the lock 4, open the top plate and remove the sandwiches or continue cooking if necessary. To remove sandwiches use a wooden or heat resistant plastic spatula. Do not use a fork or knife or anything made of metal. Otherwise, the non-stick coating may be damaged.Note:The cooking time depends on the type of bread, filling and your taste.
- Before cooking another sandwich, close the Sandwich Maker and wait until the Green indicator light 1 is turned off.
- After you fi nish using the Sandwich Maker, disconnect the power cord from the el. power supply.
CLEANING AND MAINTENANCE
• Before cleaning the appliance disconnect it from the el. power supply and allow it to cool down.• Clean the non-stick surface of the cooking plates after each use. This will prevent a build-up of burnt pieces of food residue. To clean, use a moist, soft cloth. If some burnt food residue is left on the cooking plates, sprinkle with water and mild dish detergent. Wipe clean afterwards with a clean, moist cloth.
![]() Tip:The cooking plates are easier to clean if lukewarm.
Tip:The cooking plates are easier to clean if lukewarm.
- Wipe outer surface of the Sandwich Maker with a soft wet cloth and dry completely off.
- Never rinse the Sandwich Maker under running water or submerge it in water or another liquid.
- Do not use abrasive cleaning products, petrol or solvents for cleaning.
STORAGE
- If the cooking plates are cold, close the top plate and secure the handles with the lock. Wind the power cord around the bracket at the bottom of the Sandwich Maker.
- Store the device in a clean, dry place out of reach of children.
![]() Tip:Storing the Sandwich Maker vertically will save space in your kitchen.
Tip:Storing the Sandwich Maker vertically will save space in your kitchen.
TECHNICAL SPECIFICATIONS
Nominal voltage range …………………………………………………………………………………………………… 220−240 VNominal frequency ………………………………………………………………………………………………………………… 50 HzRated power input ……………………………………………………………………………………………………………….. 700 WWe reserve the right to change text and technical specifi cations.
TIPS FOR PREPARING DELICIOUS SANDWICHES
- The basic ingredient for the fi lling can be meat, fi sh, cheese, smoked meat, sliced cooked egg or fruit and vegetables, like banana, apple, pineapple, tomato, cucumber, onion or mushrooms.Do not use excessive amount of fi lling, to prevent spilling on the cooking plates.
- The fi lling can be fl avoured with spices, herbs, mustard or ketchup.
- To achieve the golden crust colour, the bread can be coated with butter prior to cooking.
RECIPES
Sandwich with ham, cheese and pineapple (2 pieces)4 slices of toasting bread2 slices of cheese4 slices of ham2 slices of pineapple
Preheat the cooking plates. Between two slices of bread place a slice of cheese, pineapple and two slices of ham. Prepare the second sandwich the same way. It takes 2 to 3 minutes to cook the sandwiches.
Sandwich with tomato and cheese (2 pieces)4 slices of toasting bread1 medium tomato sliced2 spoons of grated cheeseGround sweet paprika
Preheat the cooking plates. Between two slices of bread place a few slices of tomato and sprinkle with grated cheese. Flavour the fi lling with ground paprika and prepare the second sandwich the same way. It takes 2 to 3 minutes to cook the sandwiches.
Sandwich with chocolate cream and banana (2 pieces)4 slices of toasting bread1/2 of banana sliced thinlychocolate cream (peanut butter)
Preheat the cooking plates. Lightly spread the chocolate cream on two slices of toasting bread, top with several slices of banana and put together. Prepare the second sandwich the same way. It takes 2 to 3 minutes to cook the sandwiches.Good Appetite
INSTRUCTIONS AND INFORMATION REGARDING THE DISPOSAL OF USED PACKAGING MATERIALS
Dispose of packaging material at a public waste disposal site.DISPOSAL OF USED ELECTRICAL AND ELECTRONIC EQUIPMENT
 The meaning of the symbol on the product, its accessory or packaging indicates that this product shall not be treated as household waste. Please, dispose of this product at your applicable collection point for the recycling of electrical & electronic equipment waste. Alternatively in some states of the European Union or other European states you may return your products to your local retailer when buying an equivalent new product. The correct disposal of this product will help save valuable natural resources and help in preventing the potential negative impact on the environment and human health, which could be caused as a result of improper liquidation of waste. Please ask your local authorities or the nearest waste collection centre for further details. The improper disposal of this type of waste may fall subject to national regulations for fines.
For business entities in the European UnionIf you wish to dispose of an electrical or electronic device, request the necessaryinformation from your seller or supplier.Disposal in other countries outside the European UnionIf you wish to dispose of this product, request the necessary information about thecorrect disposal method from local government departments or from your seller. This product meets all the basic EU regulation requirements that relate to it.
[xyz-ips snippet=”download-snippet”]