
senville SENTF-19JRA 42-Inch (107 cm) Oscillating Tower Fan User Manual
RULES FOR SAFE OPERATION
PLEASE READ AND SAVE THESE IMPORTANT SAFETY INSTRUCTIONS
![]() WARNING:
WARNING:
- Do not leave the fan running unattended.
- Keep electrical appliances out of reach of children or in!rm persons. Do not let them use the appliances without supervision.
- This appliance has a polarized plug (one blade is wider than the other). To reduce the risk of electric shock, this plug is intended to !t in a polarized outlet only one way. If the plug does not !t fully in the outlet, reverse the plug. If it still does not !t, contact a quali!ed electrician. Do not attempt to defeat this safety feature.
- If the supply cord is damaged, it must be replaced by manufacturer or its service agent or a similarly quali!ed person in order to avoid a hazard.
- This appliance is not intended for use by persons (including children) with reduced physical, sensory or mental capabilities, or lack of experience and knowledge, unless they have been given supervision or instruction concerning use of the appliance by a person responsible for their safety. Young children should be supervised to ensure that they do not play with the appliance.
- After the fan is assembled, the rotor blade guard shall not be taken o” again.
- Prior to cleaning, unplug the fan.
- The rotor guard shall not be dissembled/opened to clean the rotor blades.
- Wipe the fan enclosure and rotor blade guard with a slightly damp cloth.
- WARNING—To reduce the risk of !re or electric shock, do not use this fan with any solid-state speed control device.
- This product employs overload protection (fuse). A blown fuse indicates an overload or short-circuit situation. If the fuse blows, unplug the product from the outlet. Replace the fuse as per the user servicing instructions (follow product marking for proper fuse rating) and check the product. If the replacement fuse blows, a short-circuit may be present and the product should be discarded or returned to an authorized service facility for examination and/or repair.
- Do not operate any fan with a damaged cord or plug. Discard fan or return to an authorized service facility for examination and/or repair.
- Do not run cord under carpeting. Do not cover cord with throw rugs, runners, or similar coverings. Do not route cord under furniture or appliances. Arrange cord away from traffic area and where it will not be tripped over.
PARTS LIST
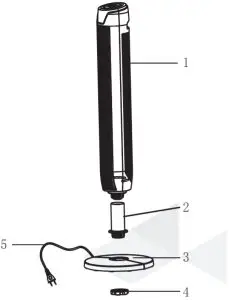
- Body
- Pole
- Base
- Plastic nut
- Power cord
Note: All the pictures in this manual are for explanation purposes only.Your product may not be exactly as shown.
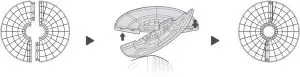
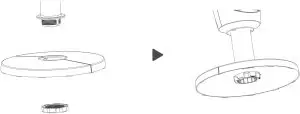
ASSEMBLY
- Take out the two parts of the base from packing box. Then, align the centres of the two parts of the base and place them in a crossed form. Align the holes with the pegs and rotate to connect the two pieces.

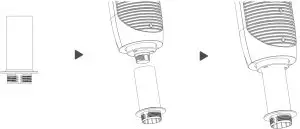
- Take out the pole from the packing box, and align the pole with the threaded structure at the bottom of the body. Then rotate the pole clockwise to tighten the pole to the body.
- Attach the fan body to the base with the plastic nut.
OPERATIONG INSTRUCTION
Remote Controller
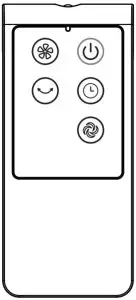 Fig. 1
KEY INSTRUCTION
- “” ON/OFF KEYPress the ON/OFF button to turn the fan on.Press again to turn the fan off.
- “” SPEED KEYWhen the fan is on, press this button to progress through the three speeds:low (), medium (), high (), then back to low again.
- “” MODE KEYPress the mode button to progress through the three modes:continuous (), natural (), sleep () then back to continuous again. The display will indicate what mode the fan is in.LED Display
- “ ” OSC/LOUVER KEYWhen the fan is on, press this button to start or stop the fan oscillating. The display will indicate whether the fan is oscillating or not.
- “ ” TIMER KEYPress the timer button to select the length of time before the fan automatically shuts off.The timer can be increased in one hour increments from one to 7 hours.Set 1 hour, displays; set 2 hours, displays; set 3 hours, displays; … set 7 hours, displays.
 ” MODE KEYPress the mode button to progress through the three modes:continuous (
 ), natural (
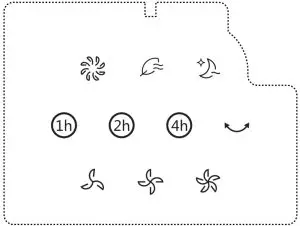 LED Display
  ” TIMER KEYPress the timer button to select the length of time before the fan automatically shuts off.The timer can be increased in one hour increments from one to 7 hours.Set 1 hour,
 BATTERIES
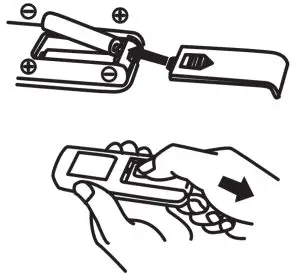
(Battery not included in the packaging)
- Slide the battery compartment cover open.
- Insert the batteries, ensuring that the batteries are placed as shown in Fig.2.Fig. 2
- Slide the battery cover back into place.
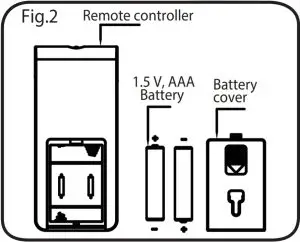 Fig. 2
NOTES: Use manganese or alkaline batteries of type “AAA”. DO NOT use rechargeable batteries.
BATTERY WARNINGS
- Do not dispose of batteries in !re; batteries may explode or leak.
- Do not mix old and new batteries.
- Do not mix alkaline, standard (carbon-zinc) or rechargeable (nickel-cadmium) batteries.
REMOTE CONTROLLER OPERATION
Point the remote controller at the receptor on body of the fan and press the desired button. The remote controller will work at distances of up to roughly 16′ (5 m) and at an angle of 30º to the right and left of the receptor.The batteries must be removed from the remote controller when it is disposed of, and the batteries must be disposed of safely.
The buttons on the body such as ON/OFF,SPEED, MODE, TIMER, OSCILLATION have the same functions as those of the corresponding keys on the remote controller.
 Fig. 3
USER SERVICING INSTRUCTIONS
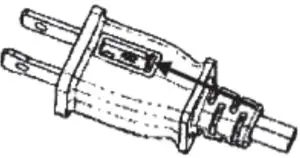
- Grasp plug and remove from the receptacle or other outlet device. Do not unplug by pulling on cord.
- Open fuse cover. Slide open fuse access cover on top of attachment plug towards blades.
- Remove fuse carefully. Push the fuse from the other side or turn fuse holder over to remove fuse.
- Risk of !re. Replace fuse only with 2.5 A, 125 V fuse.
- Close fuse cover. Slide closed the fuse access cover on top of attachment plug.
- Risk of !re. Do not replace attachment plug. It contains a safety device (fuse) that should not be removed. Discard product if the attachment plug is damaged.
Note:
- Do not force the fuse when replacing to reduce the risk of damage.
- If the fuse is difficult to insert, please ensure it is aligned correctly.
MAINTENANCE INSTRUCTIONS
The fan requires little maintenance. Do not try to fix it by yourself. Refer it to qualified service personnel if service is needed.
- Before cleaning and assembling, unplug the fan.
- To ensure adequate air circulation to the motor, keep vents at the rear of the motor housing free from dust and fluff. Unplug before cleaning vents with a vacuum cleaner. Do not disassemble the fan to remove fluff.
- Do not allow water or any other liquid into the motor housing or interior parts.
CLEANING
- Be sure to unplug from the electrical supply source before cleaning.
- Plastic parts should be cleaned with mild soap and a damp cloth or sponge.Thoroughly remove soap !lm with clean water.
- Be sure not to allow water or other liquid to enter motor.
CUSTOMER SUPPORT
Customer SatisfactionQuestions or concerns? Please call is at 1.800.242.4935 or email [email protected].If you have any issues with your product, please contact us immediately. and we we be more that happy to help. Were dedicated to delivering the highest quality products and the highest levels of customer satisfaction.
visit us at senville.com
Follow Us on
facebook.com/senvilleofficialinstagram.com/senvilleofficial
Call UsToll-Free: 1-800-242-4935


 report this ad
References
[xyz-ips snippet=”download-snippet”]