![]() USER’S MANUAL
USER’S MANUAL![]() Model CA-360Visual Alert System
Model CA-360Visual Alert System
Operating GuideThank you for purchasing this product, please read before use (Keep this manual for future reference)Copyright © 2011 Serene Innovations, Inc. All rights reserved. 8-8-11![]()
CentralAlert”Features;.
- 4 GHz Wireless Smart-Code Technology —360° full coverage of your entire home.
- Advanced Visual alert system alerts you to daily sounds:
- Alarm clock
- Phone/fax/cell/video call
- Baby’s crying
- Weather alerts (external alarm)
- Doorbell
- Audio alarms
- Motion sensor
- SOS paging and more
- Multiple alerting outputs:
- Loudspeaker
- Visual icons
- Bright flasher
- Digital messages
- Bed shakers
- A bright 1.25″ digital display with dual-alarm settings (12/24 hr format).
- Auto clock-dimming for a softer display at night.
- Dual bed shaker output jacks (one bed-shaker is included).
- Wireless Smart-Code technology supports thousands of systems.
- Internal antenna design for long-range operation.
- Two phone jacks for separate telephone/fax/video phones.
- Output jack to control a 100-watt lamp module (module is optima).
- Use 520 Hz square-wave technology for maximum audio alert output.”
- Built-in flashlight.
- Input jack for direct NOAA (weather alert radio) or external alarm system interface.
- 2-way SOS (help) paging.
- Simple installation —just plug and use.
- 48-hour full-function battery backup (batteries not included)
- 110/240 VAC, 50/60 Hz operation.
Note:
- A June 2007 study by the Fire Protection Foundation found that a low-frequency square wave signal (such as 520 Hz) is more effective in alerting a hard-of-hearing person.
Important Safety Instructions:
When using a CentralAlertTM Model CA-360, in order to reduce the risk of fire, electric shock or injury to persons, basic safety precautions should always be followed, including the following:
- Read all instructions before using the appliance.
- Do not mount or place Master-Unit on a metal surface. Metal can reduce wireless signal transmission.
- This product uses rechargeable batteries. Do not use non-rechargeable batteries as charging of this type can cause battery leakage.
- Always disconnect phone cord from wall jack before changing/ installing batteries.
- To reduce injury risk, close supervision is necessary when the appliance is used near children.
- Do not contact moving parts or exposed metal surfaces.
- Only use attachments recommended/sold by the manufacturer.
- Do not use outdoors. Do not use near water.
- To disconnect, turn all controls to the “Off” position, then remove the plug from the outlet.
- Do not unplug the unit by pulling the cord -grasp plug, not the cord.
- Unplug the unit from the outlet when not in use/before servicing or cleaing.
- Do not operate any appliance with a damaged cord or plug; do not operate any appliance after it malfunctions, is dropped, or is damaged in any manner. Return appliance to a nearest authorized service facility for examination, repair, or electrical/mechanical adjustment.
- Avoid using telephone products during electrical storms. There’s an electric shock risk from lightning.
- Don’t use the telephone to report a gas leak while in the vicinity of the leak.
- Specifications of this product are subject to change without notice.
General:
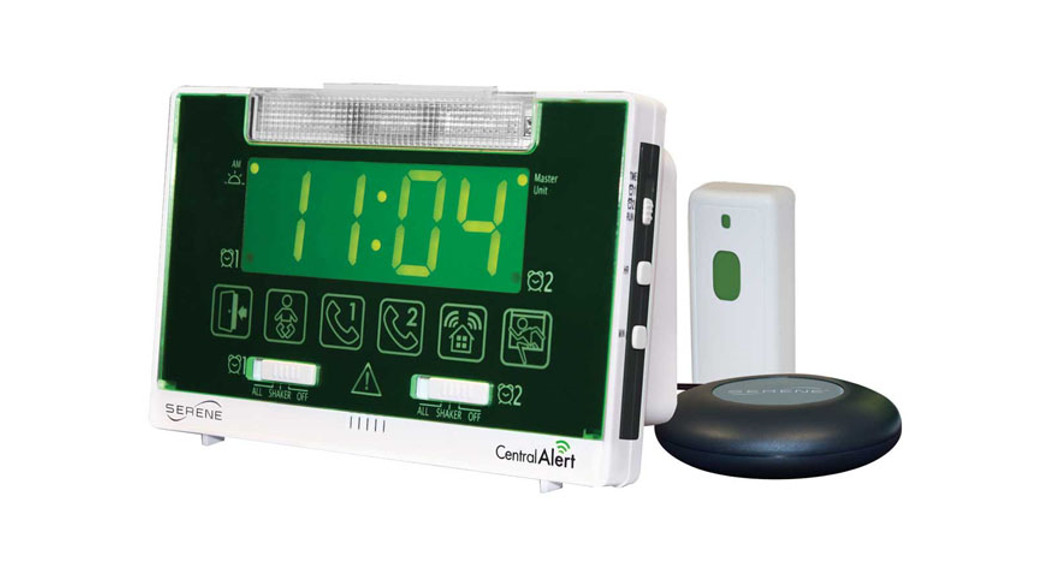
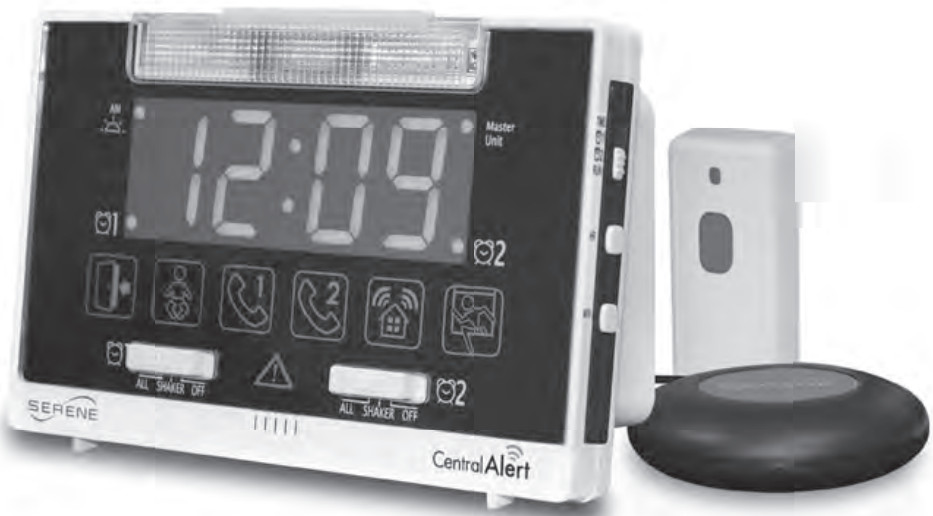
Model CA-360 is an advanced wireless visual alert system for hard-of-hearing (HOH). It also serves as a dual-alarm clock with a 1.25″ tall digital display (green in color). It uses exclusive Smart-Code technology and operates in the 2.4 GHz band. This technology offers a fast response and long-range operation. It can support thousands of systems without the need for channel-setting switches.
The system alerts users to ten (10) different household functions/events using five (5) alerting outputs: Speaker, flasher, bed-shaker, icons, and digital messages. The digital display shows the name of an activated function. (Some functions require an optional accessory to be purchased.)
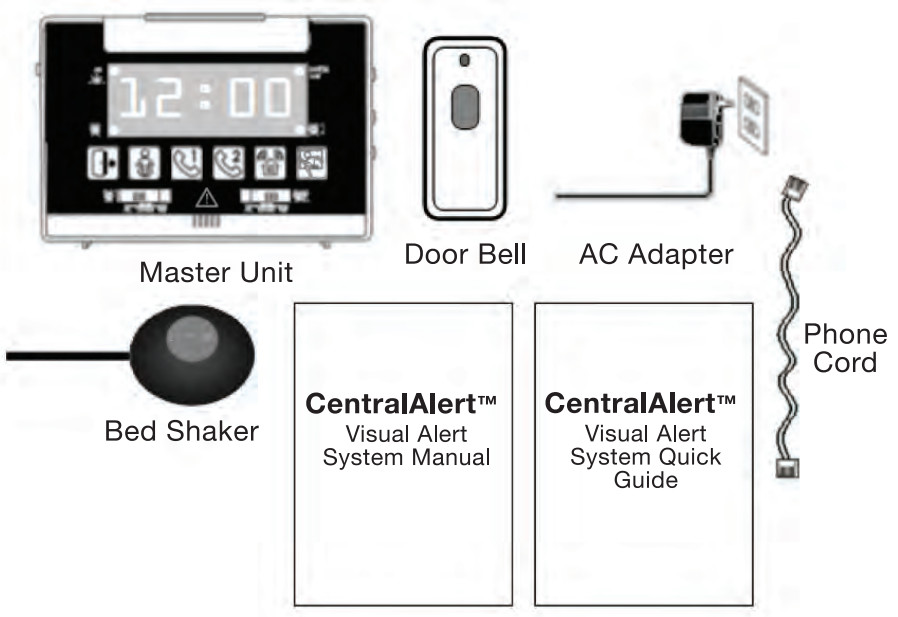
The standard system comes with: A Master-Unit, a wireless doorbell, a bed-shaker, an AC adapter, a phone cord, this manual, and a Quick Guide. The wireless doorbell has already been registered to the Master-Unit. The entire system is ready for use.
Additional wireless sensors, bed-shakers, and remote receivers may be purchased to cover a larger home or office. New sensors must be registered to the Master-Unit before they can be recognized (See Adding an Extra Doorbell).
Four M-size rechargeable NiMH batteries (not included) provide 48-hours of power outage backup. This backup duration is the longest in its class.
Package Contents:
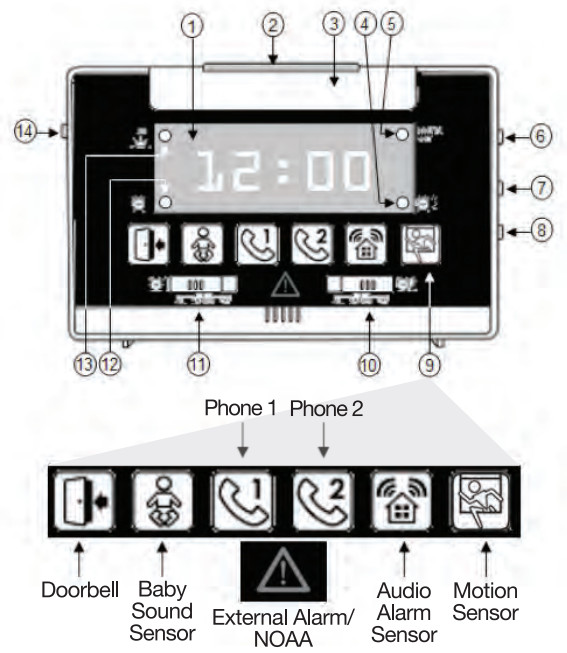
 Detailed Controls:
 Detailed Controls:
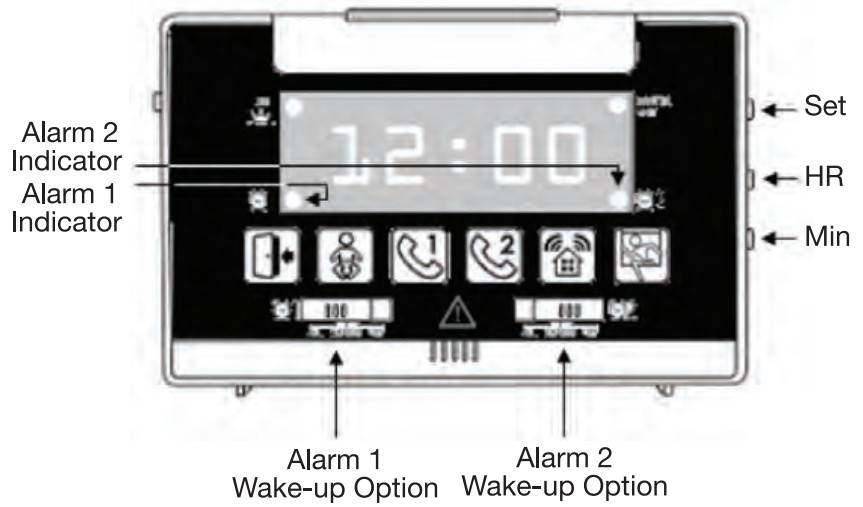
- Clock display (1.25″ tall)
- Reset/Snooze button
- Flasher
- Alarm 2 “ON” indicator
- Master-Unit indicator
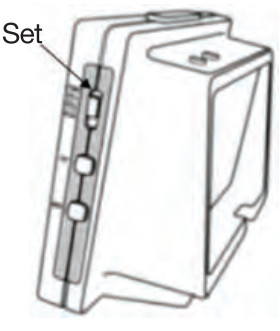
- Set switch
- Hour
- Minute
- Accessory icons (7)
- Alarm 2 wake-up option switch
- Alarm 1 wake-up option switch
- Alarm 1 “ON” indicator
- M. indicator
- Hi-Low — Off (speaker)
- Motion sensor (ON/OFF button)
- SOS /test button
- Holes for wall mount
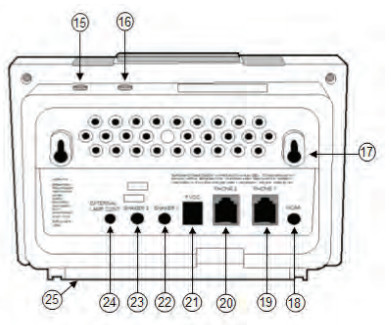
- Alarm/NOAA input jack(for connection to weather alert radio and external alarm system
- Phone 1 jack
- Phone 2 jack
- AC Adapter jack (9vdc, 1000mn
- Shaker 1 jack
- Shaker 2 jack
- External lamp module connection jack (lamp module is an optional accessory)
- Battery compartment (underneath)
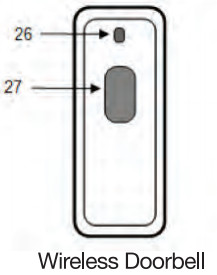
- Transmit indicator (doorbell)
- Doorbell push button (doorbell)
Master-Unit Installation And Testing

- Install four AA-size rechargeable NiMH batteries (user-provided) in the battery compartment at bottom of the unit.Warning: Do not use regular batteries as charging of this type can cause battery leakage and damage to the CentralAlerttM Master-Unit.(The unit works without batteries; they may be inserted later against power outage)
- Plug AC adapter into nearest electrical outlet and connect adapter plug to CentralAlertn^ Master-Unit as shown.
- Connect bed shaker to the SHAKER-1 output jack.
- Connect phone cord to PHONE-1 outlet at the back of Master-Unit, then plug the other end into wall phone jack.
- Set the SPEAKER ( on left side of unit) to desired volume setting (Hi-Lo-Off).
- Press SOS/Test button on top of unit to test. Verify that alert outputs (speaker, flasher, shaker, and display) last for 45 seconds, then stop. (Press SNOOZE/RESET button to stop early)
- Verify that flasher can be toggled ON and OFF using SNOOZE / RESET
- Verify “Master-Unit” indicator is always “ON.”
Set the Clock:
- Slide SET switch (on right side of unit) to TIME position and push HR & MIN buttons to set time. Each press advances one count. Pressing and holding button advances count
- After completing time setting, slide SET switches to RUN position or normal clock operation.
Set the Alarm Time:
- Slide SET switch (on right side of unit) to Alarm-1 (AL 1) position and set alarm time using HR and MIN
- After completing the setting, slide SET switches to RUN position for normal clock operation.
- Select the front panel wake-up option switch on SHAKER or ALL SHAKER means to wake up via the “bed-shaker and flasher only.” ALL means waking up via “bed-shaker, flasher, and speaker.” The unit will read “AL 1” (or AL 2) when the alarm goes off.(Note: Alarm 1 & 2 indicators will stay on when ALL or SHAKER is selected.)(Note: To activate both bed shaker outputs at the same alarm time, both Alarm–1 and Alarm–2 must be set to the same wake-up time.)
- The alarm clock activates for 45-seconds at a set time then stops for 5 minutes. This pattern will repeat for an entire hour.
- While the alarm clock is being activated, a quick press of the SNOOZE / RESET button allows for a 5-minute snooze.
- A long (2-second) press of the same button turns off the alarm until the next day.(Display shows “Stop”)
- Slide front panel wake-up option switch to OFF position to permanently turn off.
 (Note: To activate both bed shaker outputs at the same alarm time, both Alarm–1 and Alarm–2 must be set to the same wake-up time.)
Select 12 / 24 Hour Mode:
- The clock may be set for either 12 or 24-hour mode (the U.S. or Europe).
- The factory default clock setting is on 12-hour mode.
- To change the mode, move SET switch to the TIME position and then press and hold the SOS/TEST button for 5 seconds.
- Repeat Step 3 to change the setting back to 12-hour mode.
- Slide SET switch to RUN position for normal clock operation.
Telephone Function Test:
- Place a call to the phone number corresponding to PHONE -1.
- Verify that all alerting outputs respond correctly while the phone is ringing.
- Verify that by answering the call (from any phone), all alerting outputs stop immediately.
- The PHONE –2 jack is available for connection to a second phone line. This second line can be a regular phone line, FAX line, or video-phone line.
Doorbell and Test:
- Activate doorbell button 50 ft from CentralAlertTM Master- Confirm that all alerting outputs respond correctly and last for 45 seconds. Verify that display shows dr — n, where nis the doorbell number (If not, see “Adding an extra wireless doorbell to the system” on page 9)
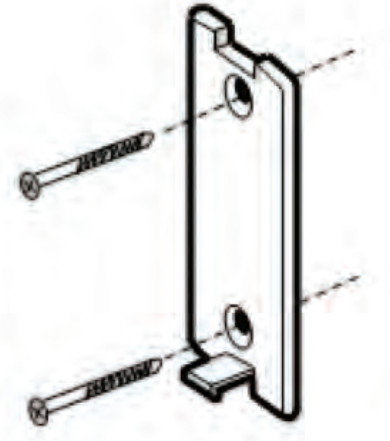
- Separate mounting plate from doorbell and install plate near door using two wood screws (user-provided) as shown below.
- Complete installation by snapping the doorbell back onto the mounting plate.
 |
 |
 |
| 1. Press on the latch to Separate the door-bell from the plate | 2. Mount plate to door or wall-user provides 2 small screws | 3. Snap the door-bell Back on onto the plate |
Note: Do not mount the doorbell on a metal surface as this weakens wireless signal transmission.
Replacing doorbell battery:
The battery (CR2032, 3 volt lithium) in the doorbell normally lasts 8 to 12 months This battery needs to be replaced if the doorbell does not operate consistently or if its transmit indicator becomes dim.
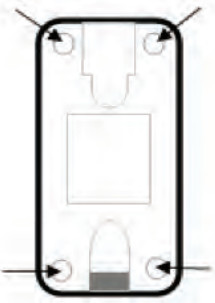
To replace the battery (see diagram below):
 |
 |
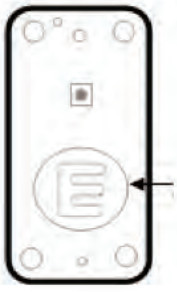 |
| 1. Press on the latch to separate the door-bell from the plate | 2. Unscrew screws from corners, the separate center section from unit | 3. Slide coin battery all the way into battery compartment; reassemble the unit |
Note: The battery is in the right position if the lettering on it is facing up.
SOS/TEST (Help) Function
Pressing the SOS/Test button, or a personal pendant (Model CA-SOS), sends a wireless signal to activate SOS alert outputs on all CentralAlertTM units in your system.
Direct Connect to an NOAA (Weather Alert) Radio or to an external alarm system
- CentralAlert”‘ is compatible with NOM radios that offer a 3.5-mm alert output jack. (Midland Model WR-120; Radio Shack Model 12-382; First Alert Model WX-150; Sangean CL-100 may offer an alert jack feature).
Please note that setting up an NOAA radio for proper operation requires a good understanding of how a weather alert radio works. Please consult with the radio manufacturer for technical help. Neither Serene Innovations. Inc.. nor its dealer is responsible for env conger:. creme relating to the purchase or the rise of these radios.
The “Alarm/NOAA” in the jack is also compatible to an alarm system where a “Normal Open” relay contact is available. When properly connected, a momentary “Close” or “Short” on the relay contact activates ![]() icon and all alerting outputs. Please consult with an alarm installer on the alarm connection.
icon and all alerting outputs. Please consult with an alarm installer on the alarm connection.
Installation:
- Connect one end of a 3.5-mm plug cable (user-provided) to the Alarm/NOAA input jack on.
- Connect the other end of the plug cable to an NOAA in radio alert output jack.
- Verify that the alert output from the radio can trigger during a National Weather Service test alert broadcast. The National
Weather Service (NWS) broadcasts a test alert every week, on Wednesdays between 11 AM and 12 PM (noon).
Direct Connect to an External Lap Module, Model CA-LX
CentralAlertTM can control an external lamp via an optional external lamp module (Model CA-LX). A user can control the lamp ON/OFF using the SNOOZE/RESET button on CentralAlertTM. The operation of this lamp is synchronized with the flasher.
Adding an extra wireless doorbell to the system
- A new wireless doorbell (or any other wireless sensor) must be learned (registered) by the Master-Unit before it can be recognized.
- With SET switch in RUN position, press and hold the SOS/Test button for 5-seconds until it beeps. Its digital display flashes “LEAr” indicating the Master-Unit is ready to learn or register a new device.
- While the Master-Unit is in the LEARN mode, press and holdthe new doorbell button for about 5-seconds until theMaster-Unit beeps, confirming registration is successful.
- Press the RESET/SNOOZE button to end the Learn process
- Test the new doorbell by pressing its button.
Technical Specifications
- Technology: 2.4 GHz Smart-Code
- Phone Ringing input: >40 Vrms, 20 to 65 Hz
- Phone jack type: RJ-11
- Bed-shaker output jack: 9vdc, 150 ma
- Alarm/NOAA input jack: Input impedance greater than 6K ohm, 15 VDC max input (active low)
- External Lamp Control output jack: 9vdc, 150 ma
- Back-up batteries: 4 M size NiMH batteries (user-provided); 48 hours backup
- Doorbell battery: (CR2032 lithium) lasts 8-12 months
- DC input: 9vdc, 1000 madc
- Operating temperature 10 to 30° C
- Storage temperature -10 to 40° C
Display Messages:
| 1. | bOSS: | Indicates CentralAlertTm is a “Master-Unit.” |
| 2. | Sub: | Indicates an accessory unit or a subordinate unit |
| 3. | dr-n: | Indicates a doorbell unit number |
| 4. | AS-n: | Indicates an audio sensor unit number |
| 5. | bAtt: | Low battery warning for radio sensors |
| 6. | bS-n: | Indicates a baby sound sensor unit number |
| 7. | CELL: | Indicates a cell phone sensor |
| 8. | NOAA: | Indicates a weather alert radio input or sensor |
| 9. | SOS: | SOS signal input or activated |
| 10. | LEAr: | Master-Unit is in Learn mode |
| 11. | AL 1: | Alarm 1 setting |
| 12. | AL 2: | Alarm 2 setting |
| 13. | ALL: | Speaker, shaker, and flasher are all selected |
| 14. | SHA: | Shaker and flasher are selected |
| 15. | OFF: | The alarm is switched to “OFF” |
| 16. | Stop: | Stopped (for an alarm clock or audio sensor low battery) |
| 17. | PH 1: | Phone 1 ringing |
| 18. | PH 2: | Phone 2 ringing |
| 19. | SEt: | Set time |
| 20. | rUN: | Normal clock RUN more |
| 21. | ON: | Optional motion sensor input is ON or enabled |
| 22. | OFF: | Optional motion sensor input is OFF or inactive |
| 23. | dEL: | Delete or un-register all accessories learned |
FAQ:
- Must I install batteries in CentralAlertTM?Ans: Batteries are for power outage back-up. The unit works without any batteries but it is strongly recommended that you install batteries.
- What type of batteries does it need?Ans: Please install rechargeable batteries only. Use of regular or non-rechargeable batteries will cause battery leakage, damage unit, and void the product warranty!
- What is the battery backup time?Ans: About 48 hours.
- Is it alright to place CentralAlertTM on a metal surface? Ans: No! Only place CentralAlertTM on a non-metallic A metal surface attenuates wireless signal transmission and reduces CentralAlertTM operating distance.
- Is the wireless doorbell water-resistant?Ans: Yes, it is water-resistant because it is protected with a rubber gasket. However, do not submerge in water.
- How long does the doorbell battery last?Ans: About 8 to 12 months. Replace the battery when its transmit indicator becomes dim or if its operation becomes less consistent.
- How many doorbell units can CentralAlertTM support? Ans: It can support a total of 4 units in any combination of doorbell (Model CA-DB) and door knock sensor(Model CA-DX).
- How about other accessories?Ans: In addition to the doorbel, the system can support up to 10 Remote-Receivers (CA-RX), 10 Personal pagers (CA-PX),10 audio sensors (CA-AX), 4 SOS pendants (CA-SOS), 3 Baby-Sound sensors (CA-BX), 1 Cell-phone sensor (CA-CX), and 1 NOAA sensor (CA-NOAA).
- I just bought an extra doorbel for my CentralAlertTM but it did not work. What do I need to do?Ans: All new accessory devices must be registered or leaned by a CentralAlertTM Master-Unit before they can be recognized or worked. See page 10 in this manual for instructions as how to register an accessory device.
- I bought four CentralAlertTM systems for my home. Can I combine them into a single system?Ans: Yes you can. You need to convert three of the CentralAlertTM units from “Master-Unit” into a “Remote-Receiver” so they can be registered or learned by the remaining “Master-Unit.” This is a two step process:The first step below (A) is to clear any previously learned accessory device. The second step (B) changes the unit into a “Remote-Receiver.” Please follow these steps or contact Serene’s Customer Service Department for help.
A). Clear internal memory:
- Power up the unit and place SET switch on the RUN
- Press and hold SOS/Test button on the unit for 6 seconds until display reads “LEAr.” Now press and release SOS/Test button 16 times in quick succession to clear its internal memory.
B). Change into a Remote-Receiver.
- Now slide SET switch to TIME position, then press & hold MOTION button for 6 seconds until display reads “SUb” (subordinate) indicating it is now a “Remote-Receiver.”Verify that its “Master-Unit” indicator is now off.
- A Remote-Receiver is an accessory device; it must be learned or registered by a “Master-Unit” before it can be recognized. See page 10 in this manual for instructions as how to register an accessory device.
- When implemented correctly, this combined system will have one “Master-Unit,” three “Remote-Receivers,” and four doorbells.
Accessories For the CentralAlertTM Master unit:
Model CA-AX: A wireless audio alarm sound monitorModel CA-BX: A real-time wireless baby-crying sound monitorModel CA-CX: A wireless cell phone ringing detectorModel CA-DB: An wireless door-bell unitModel CA-DX: A wireless door knocking sensorModel CA-LX: An external lamp module allowing CenlralAfertn™ to control a 100-watt desk lampModel CA-MX: A wireless motion sensor to detect a person walkingModel CA-NOAA: A wireless NOM (weather alert) radio output monitorModel CA-RX: A compact personal receiver unit (with no clock display) that performs the same receiving and alerting functions as a CenlralAfertn™ unit. Model CA-SOS: A wireless personal pendent for paging help.Model BS-100: An extra bed-shakerModel 4M-BAIT: A pack of four M size NiMH rechargeable batteries
FCC Information for USA customers only
This equipment complies with Part 68 of the FCC rules and the requirements adopted by the ACTA. On the bottom of this equipment is a label that contains, among other information, a product identifier of [US: XXXXXXXXX]. If requested, this number must be provided to the telephone company. If this equipment, Model CA-xx, causes harm to the telephone network, the telephone company will notify you in advance that temporary discontinuance of service may be required.
But if advanced notice isn’t practical, the telephone company will notify the customer as soon as possible. Also, you will be advised of your right to file a complaint with the FCC if you believe it is necessary. The telephone company may make changes in this facility’s equipment, operations or procedures that could affect the operation of the equipment. If this happens the telephone company will provide advanced notice in order for you to make the necessary modifications to maintain uninterrupted service. If you experience trouble with this equipment, disconnect it from the network until the problem has been corrected or until you are sure that the equipment is not malfunctioning. Please follow instructions for repair, if any (e.g., battery replacement section); otherwise do not alternate or repair any parts of device except as specified. Connection to party line service is subject to state tariffs. Contact the State Public Utility Commission, Public Service Commission or Corporation Commission for information. If the telephone company requests information on what equipment is connected to their lines, inform them:
- The telephone number that this unit is connected to,
- The ringer equivalence number (REN],
- The USOC jack required (RJ11C), and
- The FCC Registration Number (US:
hems (B) and (D) are indicated on the label. The ringer equivalence number (REN) is used to determine how many devices can be connected to your telephone line. In most areas, the sum of the RENs of all devices on any one line should not exceed five (5.0). If too many devices are attached, they may not ring properly.
- Warranty service information
Your CentratAlertTM comes with a one-year limited warranty. We warrant during this warranty period — from the date of purchase to the original consumer — the CentralAlertTM is free from defects in materials and workmanship under intended home use. In the event that CentralAlerttM fails to function properly within one year of the original purchase, due to defects in materials or workmanship, return the unit (freight prepaid) with proof of purchase (sales receipt or packing slip, no exceptions) to Serene Innovations. Serene Innovations will either repair or replace the unit (with a refurbished unit or a unit of equal condition) and return it to you (using UPS/USPS ground shipping) at no cost to you, if the unit is returned within 30 days of purchase. If the unit is returned after 30 days of purchase, but within the warranty period, there will be a warranty handling charge of $9.95 for each return.Incidental or Consequential Damages: Neither Serene Innovations, Inc., nor the retailer, dealer, or selling distributor has any responsibility for any incidental or consequential damages, including, without limitation, commercial loss of profit, or for any incidental expense, loss of time, or inconvenience. Some states do not allow exclusion or limitation of incidental or consequential damage, so the above limitation or exclusion may not apply to you.
This warranty does not apply to any product that has been accidentally damaged, abused, misused, or neglected, used on electrical frequency or voltage other than marked on the product and/ or described in the manual. Defects or errors caused by unauthorized alterations, repairs, and/or tampering are also not covered by this warranty.
This Warranty gives you specific legal rights, and you may also have other legal rights that vary from state to state.
If a defect covered by this warranty should occur, promptly contact a Customer Care Representative by phone, or log onto www.sereneinnovations.com to obtain a Return Authorization Number (RAN) and shipping instructions before shipping the product to us. Any shipment without a RAN will not be accepted and will be returned to you at your expense. Any authorized returned product must be accompanied by proof of purchase and a brief explanation of the problem.
For out-of-warranty repair and service, please contact our Customer Care Department for instructions.
- This equipment complies with Part 68 of the FCC Rules.
On the equipment is a label that contains, along with other information, the FCC Registration Number and Ringer Equivalence Number (REN) for this equipment. If requested, this information must be provided to your telephone company.This equipment uses the following Universal Service Order Codes (“USOC”) jacks: RJ-11. Connection to the telephone network should be made by using standard modular telephone jack type RJ11.The REN is useful to determine the number of devices you may connect to your telephone line and still have all of those devices ring when your telephone number is called. In most, but not all areas, the sum of the RENs of all devices connected to one line should not exceed five (5.0). To be certain of the number of devices you may connect to your line, as determined by the REN, contact your local telephone company to determine the maximum REN for your calling area.If your telephone equipment causes harm to the telephone network, the telephone company may discontinue your service temporarily. If possible, they will notify you in advance. But if advanced notice is not practical, you will be notified as soon as possible. You will be informed of your right to file a complaint with the FCC.Your telephone company may make changes in its facilities, equipment, operations or procedures that could affect the proper functioning of your equipment. If they do, you will be notified in advance to give you an opportunity to maintain uninterrupted telephone service.
In the event, this equipment should fail to operate properly, disconnect the unit from the telephone line. Try using another FCC-approved telephone in the same telephone jack. If the trouble persists, call the telephone company repair service bureau.
If the trouble persists and appears to be with this unit, disconnect the unit from the telephone line and discontinue use of the unit until it is repaired. For repair or warranty information, please contact Serene Innovations, Inc. at 562- 407 5400. Please note that the telephone company may ask that you disconnect this equipment from the telephone network until the problem has been corrected or until you’re sure that the equipment is not malfunctioning.
There are no user-serviceable parts in this equipment.
This equipment may not be used on coin service provided by the telephone company. Connection to patty Ines is subject to state tariffs. Contact the state Public Utility Commission, Public Service Commission for information.
If your home has specially wired alarm equipment connected to the telephone line, ensure the installation of this equipment does not disable your alarm equipment. If you have questions about what will disable alarm equipment, consult your telephone company or a qualified installer.
Part 15 of FCC Rules Information
This device complies with Part 15 of the FCC rules. Operation is subject to the following two conditions: (1) this device may not cause harmful interference, and (2) this device must accept any interference received, including interference that may cause undesired operation. This equipment has been tested and found to comply with the limits of a Class B digital device, pursuant to Part 15 of FCC rules. These limits are designed to provide reasonable protection against harmful interference in a residential installation.
This equipment generates, uses, and can radiate radio frequency energy and, if not installed and used in accordance with the instructions, may cause harmful interference to radio communications. However, there is no guarantee that interference will not occur in a particular installation. If this equipment does cause harmful interference to radio or television reception, which can be determined by turning the equipment off and on, you may try one the following methods to correct the interference:
- Where it can be done safely, re-orient the receiving television or radio antenna.
- To the extent possible, relocate the television, radio, or another receiver, with respect to the cordless phone.
- Connect the cordless phone AC adapter into a different electrical outlet.
- Consult the dealer or an experienced radio/TV technician for Modification: Any modification not expressly approved by the manufacturer of this device could void the user’s authority to operate the device.
- NOTICE: The Industry Canada label identifies certified equipment.
This certification means that the equipment meets telecommunications network protective, operational, and safety requirements as prescribed in the appropriate Terminal Equipment Technical Requirements document(s). The Department does not guarantee the equipment will operate to the user’s satisfaction.
Before installing this equipment, users should ensure that it is permissible to be connected to the facilities of the local telecommunications company. The equipment must also be installed using an acceptable method of connection. The customer should be aware that compliance with the above conditions may not prevent the degradation of service in some situations.
Repairs to certified equipment should be coordinated by a representative designated by the supplier. Any repairs or alterations made by the user to this equipment, or equipment malfunctions, may give the telecommunications company cause to request that the user disconnect the equipment. Users should ensure, for their own protection, that the electrical ground connections of the power utility, telephone lines, and internal metallic water pipe system, if present, are connected together. This precaution may be particularly important in rural areas.
Caution: Users should not attempt to make such connections themselves, but should contact the appropriate electric inspections authority, or electrician, as appropriate. The REN for this amplified telephone is stated on the IC regulatory label located on the bottom of the product.
NOTICE: The Ringer Equivalence Number (REN) assigned to each terminal device provides an indication of the maximum number of terminals allowed to be connected to a telephone interface. The termination on an interface may consist of any combination of devices, subject only to the requirement that the sum of the Ringer Equivalence Numbers of all the devices does not exceed 5.
This Class B digital device complies with Canadian ICES-003.
[xyz-ips snippet=”download-snippet”]