![]() SLOHT28Wall Mounting Patio HeaterRemote Control Wall Patio Heaterwith High Rated Aluminum Reflector and LED IndicatorUser Manual
SLOHT28Wall Mounting Patio HeaterRemote Control Wall Patio Heaterwith High Rated Aluminum Reflector and LED IndicatorUser Manual
PLEASE MAKE SURE THAT YOU HAVE READ THE MANUAL CAREFULLY BEFORE USING IT.
IMPORTANT INSTRUCTIONS
When using electrical appliances, basic precautions should always be followed to reduce the risk of FIre, electric shock, and injury to persons, including the following:
- Read all instructions before using this heater.
- Extreme caution is necessary when any heater is used by or near children or invalids and whenever the heater is left operating and unattended.
- Do not operate any heater after it malfunctions. Disconnect power at service panel and have heater inspected by a reputable electrician before reusing.
- Do not insert or allow foreign objects to enter any ventilation or exhaust opening as this may cause an electric shock or fire, or damage the heater.
- To prevent a possible fire, do not block air intakes or exhaust in any manner.
- A heater has hot and arcing or sparking parts inside. Do not use it in areas where gasoline, paint, or flammable vapors or liquids are used or stored.
- The unit must be placed with a clearance of 100cm to the wall and 30cm to the ceiling.
- This heater is hot when in use. To avoid burns, do not let bare skin touch hot surfaces. High temperature, keep combustible material such as furniture, papers, clothes, curtains at least 3 feet (0.9m) from the front of the heater and away from the side and rear.
- The heater must be installed at least 2.1m above the floor.
- The unit is at high temperature during operation. It keeps hot for a period after shut down. The potential danger would occur when touching it during this period.
- Don’t place the unit close to the curtain and/or other flammable objects. Otherwise, there will be a danger of catching fire.
- Don’t cover the unit with anything during operation or a short time after it’s shut down.
- Don’t wrap the power supply cord on the unit.
- The unit must be handled with care, and avoid of vibration or hitting.
- The unit must be securely grounded during operation.
- When damaged, the unit must be repaired by a professional repairing team.
- If the supply cord is damaged, it must be replaced by the manufacturer, its service agent, or similarly qualified persons in order to avoid a hazard.
- The heater must not be located immediately below a socket outlet.
- When assembling, keep clear from any board or flammable material.
- Do not use this heater with a programmer, timer or any other device that switches the heater on automatically, since a fire risk exists if the heater is covered or positioned incorrectly.
- This appliance is not intended for use by persons (including children) with reduced physical, sensory or mental capabilities, or lack of experience and knowledge unless they have been given supervision or instruction concerning use of the appliance by a person responsible for their safety.
- Children should be supervised to ensure that they do not play with the appliance.
- The head of the unit is at a high temperature during operation. Unplug the unit and wait till it’s cool before cleaning.
- Don’t use this heater in the immediate surroundings of a bath, a shower or a swimming pool.
- Don’t use this unit in a place where causticity or volatile air exists, i.e. dust, steam, gas, etc.
- Don’t use this unit as a cloth drier or towel drier.
- Don’t use this unit as a sauna heater.
- Don’t use this unit as a room heater of heat storage.
- Don’t use this unit in place of animal propagating and raising.
- Don’t use this unit in the heating system of the hot air center.
- Don’t immerse this unit into the water for cleaning.
- The unit should be plugged in a socket, which is easily visible and reachable.
- Two Dark points may exist on the surface of the heating elements, or the surface of the heating element may turn white during the first few minutes after it’s turned on. This is normal, and may not enact the performance of the unit
- To avoid potential fire hazards, never place your heater or its electrical cord under rugs, or carpeting. Place the electrical cord away from busy areas to avoid accidental tripping and contact.
- To disconnect the heater, turn controls to off, and turn off power to the heater circuit at the main disconnect panel. then remove the plug from the outlet.
- Use this heater only as described in this manual. Any other use not recommended by the manufacturer may cause fire, electricshock, or injury to persons.
- Avoid the use of an extension cord because the extension cord may overheat and cause a risk of fire. However, if you have to use an extension cord, the cord shall be No. 14AWG minimum size and rated not less than 1875 watts.
- Surface temperatures become very hot when operating the heater. Children and adults should stay away to avoid burns or clothing ignition.
- Young children should be carefully supervised when they are in the area of the heater.
- SAVE THESE INSTRUCTIONS.
PREPARATION
- Prepare a cross-head screwdriver.
- Read this instruction manual carefully before installation and use. Keep this instruction manual in a proper and safe place for future use in case needed.PARTS DESCRIPTIONS:
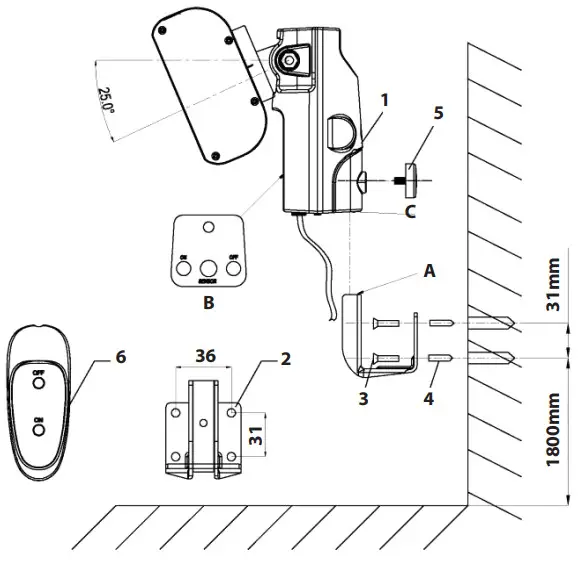
PARTS DESCRIPTIONS:
| No. | Part Name | No. | Part Name |
| 1 | Control Box | 4 | Plastic Plug |
| 2 | Wall Bracket | 5 | Screw Knob M6•12 |
| 3 | Tapping Screw ST4’30 | 6 | Remote Controller |
INSTALLATION
- Drill 4 wholes positioned as shown above. Insert Plastic Plug (#4), (4 PCs totally) to the holes respectively. Align Wall Bracket (#2) to the holes, and then fix it with Tapping Screw (#3).
- Insert the wall bracket into the hole (Section C) of the Control Box. Fix them with the Screw Knob M6*12 (#5).
OPERATIONS:
- Plugin the unit to a socket. Make sure the power supply is the same as rated. The blue indicator light starts flashing, which means it’s in standby status.
- Press the button “On” on the control panel or the remote controller to switch on the heater. Then the blue indicator lights up.
- When the heater is no longer required, switch off, using the off button on the unit or the off button on the remote controller and unplug the unit.
MAINTENANCE AND CLEANING
- Before cleaning, make sure the power has been turned off at the circuit breaker panel and that the heating element of the heater is cool.
- To maintain the external appearance of the radiator, it need only be wiped over occasionally with a dry duster. During the summer months, or at other times when the appliance is not in use and is completely cold, it should be the best opportunity to wipe over with a damp cloth.
- Do not use abrasive cleaning powders or furniture polish. Do not use chemical or abrasive products, metallic scourers and so on, which may deteriorate the surface, to clean the appliance.
- All other servicing should be performed by qualified service personnel.
- No disassembly when cleaning.
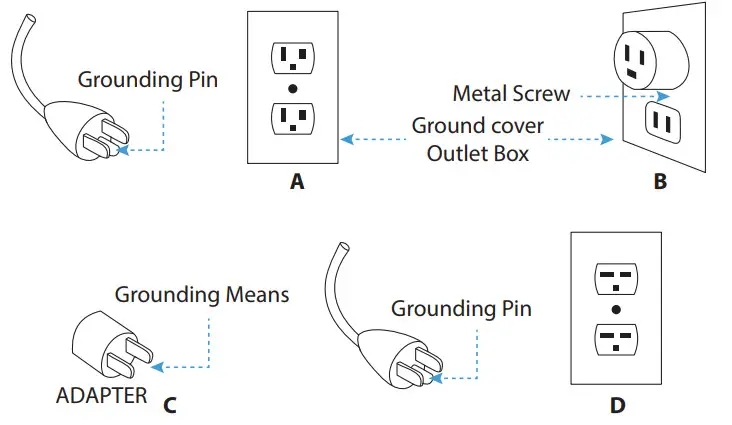
GROUNDING INSTRUCTIONS:
This heater is for use on 120 volts. The cord has a plug as shown at A in Figure below. An adapter as shown at C is available for connecting three-blade grounding-type plugs to two-slot receptacles. The green grounding lug extending from the adapter must be connected to a permanent ground such as a properly grounded outlet box. The adapter should not be used if a three-slot grounded receptacle is available.
Grounding Methods
What’s in the Box:
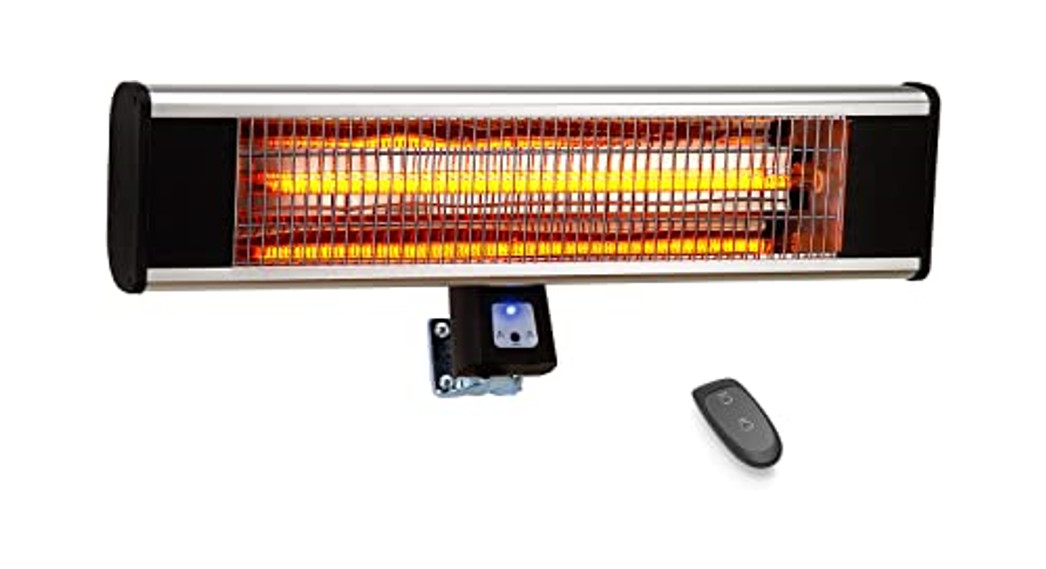
- 1500 Watt Electric Patio Heater
- (1) Wall Bracket
- (4) Plastic Plug
- (4) Tapping Screw ST4 x 30
- (1) Remote Controller
- (1) Screw Knob 6×12
FEATURES:
- Secure Locking System
- High Rated Aluminum Refiector
- Ofiuers Sun-like Infrared Heating
- Includes Mesh Grille Front
- Odorless, No Gas or Propane Use
- Remote Control Wall Mounting Heater
- Dust and Waterproof Design
- Multi-function Disco Light with Remote Control
- Anodized Extruded Aluminum Alloy Housing
- High-Eficiency Carbon Fibre Heating Elements
- One Power Settings
- IP65 Approved
Technical Specs:
- Construction Material: Aluminum Alloy Frame
- Power Supply: 1500W
- 1 Heat Levels: 1500 Watts
- Heating Area: 18 sq. ft.
- Maximum Amperage: 12.5 Amps
- Battery Life: Up to 2+ Hours
- Battery Operated Remote: 1.5V, (2) x ‘AAA’ Batteries (not included)
- Power Cable Length: 2 Meters, 120V
- Product Dimensions (L x W x H): 25.6” x 8.46” x 9.65” -inches
![]() Questions? Issues?We are here to help!Phone: (1) 718-535-1800Email: [email protected]
Questions? Issues?We are here to help!Phone: (1) 718-535-1800Email: [email protected]
References
[xyz-ips snippet=”download-snippet”]