
![]()
![]()
SLOHT40Stand Patio Heater
Height Adjustable Patio Heater with Remote Control and LED Indicator

PLEASE MAKE SURE THAT YOU HAVE READ THE MANUAL CAREFULLY BEFORE USING IT.
IMPORTANT INSTRUCTIONS
When using electrical appliances, basic precautions should always be followed to reduce the risk of fire, electric shock, and injury to persons, including the following:
- Read all instructions before using this heater.
- The unit must be placed with the clearance of 100cm to the wall and 30cm to the ceiling.
- This heater is hot when in use. To avoid burns, do not let bare skin touch hot surfaces. If provided, use handles when moving this heater. High temperature, keep combustible material such as furniture, papers, clothes, curtains at least 3 feet (0.9m) from the front of the heater and away from the side and rear.
- The unit must be securely placed on a horizontal and flat surface.
- The unit is at high temperature during operation. It keeps hot for a period after shut down. Potential danger would occur when touching it during this period.
- Don’t place the unit close to curtain and/or other flammable objects.Otherwise there will be a danger of catching fire.
- Don’t cover the unit with anything during operation or a short time after it’s shut down.
- Don’t wrap the power supply cord on the unit.
- The unit must be handled with care, and avoid of vibration or hitting.
- The unit must be securely grounded during operation.
- When damaged, the unit must be repaired by professional repairing team.
- If the supply cord is damaged, it must be replaced by the manufacturer, its service agent or similarly qualified persons in order to avoid a hazard.
- The heater must not be located immediately below a socket-outlet.
- When assembling, keep clear from any board or flammable material.
- Do not use this heater with a programmer, timer or any other device that switches the heater on automatically, since a fire risk exists if the heater is covered or positioned incorrectly.
- This appliance is not intended for use by persons (including children) with reduced physical, sensory or mental capabilities, or lack of experience and knowledge, unless they have been given supervision or instruction concerning use of the appliance by a person responsible for their safety.
- Children should be supervised to ensure that they do not play with the appliance.
- The unit is for household use only. It’s not allowed to use in building site, greenhouses, barn or stable where there’s flammable dust.
- The head of the unit is at high temperature during operation. Unplug the unit and wait till it’s cool before cleaning.
- This heater is not intended for use in bathrooms, laundry areas and similar indoor locations. Never locate heater where it may fall into a bathtub or other water container.
- Don’t use this unit in place where causticity or volatile air exists, i.e. dust, steam, gas, etc.
- Don’t use this unit as a cloth drier or towel drier.
- Don’t use this unit as a sauna heater.
- Don’t use this unit as a room heater of heat storing.
- Don’t use this unit in place of animal propagating and raising.
- Don’t use this unit in heating system of hot air centre.
- Don’t immerse this unit into water for cleaning.
- The unit should be plugged in a socket, which is easily visible and reachable.
- To avoid potential fire hazards, do not run your heater or its electrical cord under carpeting. Do not cover cord with throw rugs, runners, or similar coverings. Do not route cord under furniture or appliances. Arrange the electrical cord away from traffic areas and where it will not be tripped over.
- To disconnect heater, turn controls to off, then remove plug from outlet.
- Use this heater only as described in this manual. Any other use not recommended by the manufacturer may cause fire, electric shock, or injury to persons.
- Always plug heaters directly into a wall outlet/receptacle. Never use with an extension cord or relocatable power tap (outlet/power strip) because the extension cord may overheat and cause a risk of fire.
- Surface temperatures become very hot when operating heater.Children and adults should stay away to avoid burns or clothing ignition.
- Young children should be carefully supervised when they are in the area of the heater.
- Extreme caution is necessary when any heater is used by or near children or invalids and whenever the heater is left operating and unattended.
- Always unplug heater when not in use.
- Do not operate any heater with a damaged cord or plug or after the heater malfunctions, has been dropped or damaged in any manner. Discard heater, or return to authorized service facility for examination and/or repair.
- Connect to properly grounded outlets only.
- Do not insert or allow foreign objects to enter any ventilation or exhaust opening as this may cause an electric shock or fire, or damage the heater.
- To prevent a possible fire, do not block air intakes or exhaust in any manner.Do not use on soft surfaces, like a bed, where openings may become blocked.
- A heater has hot and arcing or sparking parts inside. Do not use it in areas where gasoline, paint, or flammable liquids are used or stored.
CAUTION: EXTEND OR UNFOLD LEGS BEFORE OPERATING
SAVE THESE INSTRUCTIONS
PREPARATION
- Prepare a cross head screw driver.
- Read this instruction manual carefully before installation and use.Keep this instruction manual in a proper and safe place for future use in case needed.
PARTS DESCRIPTIONS:
Fig. A Fig. B

Fig. C
PART LIST
| No. | Part Name | No. | Part Name |
| 1 | Control Box | 10 | Base |
| 2 | Screw M6*12 | 11 | Washer |
| 3 | Straight Tube | 12 | L Screw |
| 4 | Outer Fastener | 13 | Cord Clip |
| 5 | Upper Tube | 14 | Power Cord |
| 6 | Screw M6*12 | 15 | Grill Guard |
| 7 | Middle Tube | 16 | Tapping Screw ST3*10 |
| 8 | Lower Tube | ||
| 9 | Base Cover |
INSTALLATION
- As shown in Fig. B, fix Grill Guard (#16) by the Screw (#15).
- As shown in Fig. A, put Lower Tube (#8) through the hole of Base Cover (#9) and Base (#10) making sure the end of Lower Tube with welded plate is downward, and the extra tongue is located in the sink of the base. Fix Lower Tube and Base together with Washer (#11) & L Screw (#12).
- Install Middle Tube (#7) on top of Lower Tube. Pullout Straight Tube (#3) upward from inside of Upper Tube (#5). Screw Outer Fastener (#4) clockwise to lock it.Then install Upper Tube (#5) on Middle Tube (#7).
- Turn Outer Fastener counter-clockwise and adjust the unit to a desired height.Turning it clockwise to fix it.
- Insert Straight Tube into the hole on bottom of Control Box (#1).Then fix them together with Screw (#2).
- Clip Power Cord (#14) with Cord Clips (#13). Fix them onto the tubes.
- As shown in Fig. C, the tilting of the heater is adjustable for 25°. Adjust it to a desired angle when necessary.
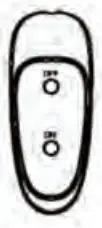
OPERATIONS:
- Plug in the unit to a socket. Make sure the power supply is same as rated.The blue indicator light starts flashing, which means it’s in standby status.
- Press button “On” on the control panel or the remote controller to switch on the heater. Then the blue indicator lights up.
- To switch off the heater, press the button “Off” on the control panel of the heater.If pressing the “Off” button on the control panel of the heater, the blue indicator light is off, and the remote control is not functional. Pressing “Off” button on the remote control will only shift the appliance into standby status, and the blue indicator light stars flashing again.
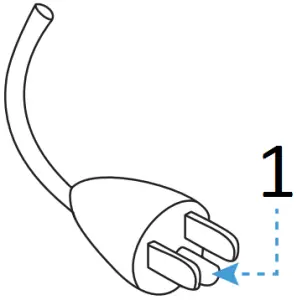
GROUNDING INSTRUCTIONS:
This heater is for use on 120 volts. The cord has a plug as shown at A in Figure below. An adapter as shown at C is available for connecting three-blade grounding-type plugs to two-slot receptacles. The green grounding lug extending from the adapter must be connected to a permanent ground such as a properly grounded outlet box. The adapter should not be used if a three-slot grounded receptacle is available.
Grounding Methods

A B
ADAPTER
 report this ad
C D
- Grounding Pin
- Ground cover
- Metal Screw
- Outlet Box
- Grounding Means
CLEANING:
- Unplug the unit before cleaning. It should be wiped with wet cloth.
- Don’t use too much water.
- Any other servicing should be performed by an authorized service representative.
FEATURES:
- Height Adjustable Patio Heater
- Cable Clips on Stand Poles
- High Rated Aluminum Reflector
- Offers Sun-like Infrared Heating
- Includes Mesh Grille Front
- Odorless, No Gas or Propane Use
- Remote Control Standing Heater
- Dust and Waterproof Design
- Multi-function Disco Light with Remote Control
- Anodized Extruded Aluminum Alloy Housing
- High-Efficiency Carbon Fibre Heating Elements
- One Power Settings
- 360 Degrees Electronic Tip-over Safety Switch
- IP65 Approved
- An Extra Grill Guard Applicable For ETL Standard
- Overheat Protection and Quiet Op
WHAT’S IN THE BOX:
- 1500 Watt Electric Patio Heater
- (1) L Screw
- (1) Washer
- (1) Grill Guard
Technical Specs:
- Construction Material: Aluminum Alloy Frame, Black Powder Coated Base Cover
- Power Supply: 1500W
- 1 Heat Levels: 1500 Watts
- Heating Area: 20 sq. ft.
- Maximum Amperage: 12.5 Amps
- Battery Life: Up to 2+ Hours
- Battery Operated Remote: 1.5V, (2) x ‘AAA’ Batteries (not included)
- Power Cable Length: 2 Meters, 120V
- Base Cover Size: 15.75” -inches (Diameter)
- Heat Warm Range: Around 10-15 Square Meters
- Product Dimensions (L x W x H): 25.6” x 16.15” x 72.83” -inches
![]()
![]()
Questions? Issues?We are here to help!Phone: (1) 718-535-1800Email: [email protected]
References
[xyz-ips snippet=”download-snippet”]