![]()

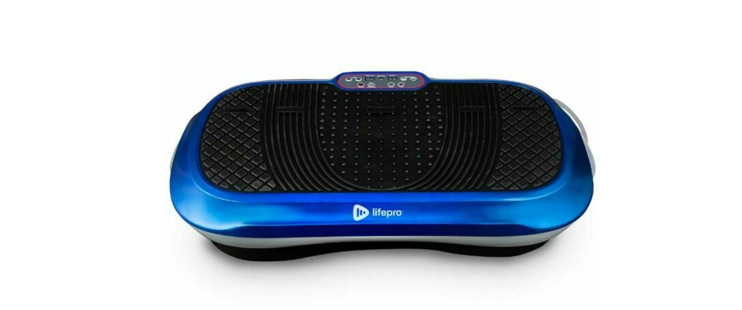
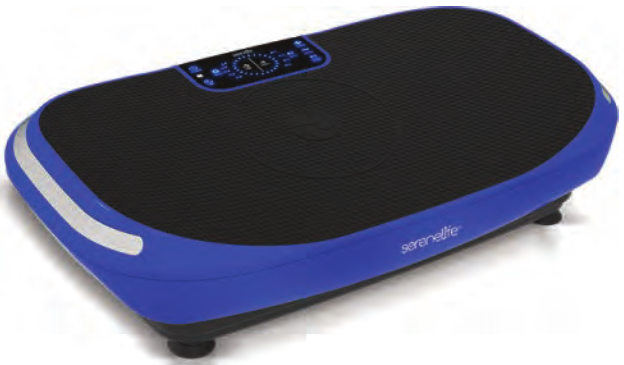
SLVBX4Standing Vibration Fitness MachineVibrating Platform Exercise and Workout Trainerwith Adjustable Speed
SAFETY INSTRUCTIONS
Before operating this unit, please read this manual carefully to ensure optimum performance and safety. This is manual should be kept available for future reference. For product improvement, the company reserves the right to change the design and specification at anytime without prior notice. Pictures are for reference use only and may differ from the actual product.
- Please keep this manual in a safe place for your reference when necessary.
- Please do not assembly or use this equipment until you read this manual thoroughly & carefully. Safety and efficiency only can be achieved when the equipment is assembled, maintained, and used properly. It is your responsibility to ensure that all the users are informed of all the warnings and precautions.
- For totally safe use, a stable, leveled surface is required. Protect your floor with a mat. Do not use the equipment in damp areas such as swimming pool sauna, etc. For safety space, the equipment must have at least 0.5 meter of free space all around it.
- Before starting any exercise program you must consult your doctor to determine if you have any physical or health conditions that could create a risk to your health and safety, or prevent you from using the equipment properly. Your doctor’s advice is essential if you are taking medication that affects your heart rate, blood pressure or cholesterol level.
- Be aware of your body’s signals. Incorrect or excessive exercise can damage your health. Stop exercising if you experienced any of the following symptoms: pain, tightness in your chest, irregular heartbeat, extreme shortness of breath, feeling lightheaded, dizzy or nauseous. If you do experience any of these conditions you must consult your doctor before continuing with your exercise program.
- Do not workout immediately after meals.
- Keep children and pets away from the equipment, the equipment must be assembled and used by adults only.
- The equipment is designed for home use only.
- The equipment is not suitable for therapeutic use, may only be used for exercises indicated in the training instructions
- Wearing proper clothing and athletic shoes while using the equipment. Avoid wearing loose clothing that may get caught in the equipment or that may restrict or prevent movements.
- Keep your back straight while exercising.
- Always use the equipment as indicated. If you find any defective components while assembling or checking the equipment, or if you hear any unusual noises coming from the equipment during use, stop immediately. Do not use the equipment until the problem has been solved.
- Care must be taken when lifting or moving the equipment so as not to injure your back. Always use proper lifting techniques and/or seek assistance if necessary.
- Keep the power cord away from heat sources.
- Do not insert or drop any object into any opening.
- Unplug the exercise bike before moving or cleaning it. To clean, wipe surfaces down with mild detergents and a slightly damp cloth only; never use solvents.
- Do not use the exercise bike in any location that is not temperature controlled, such as, but not limited to, garages, porches, pool rooms, bathrooms, carports or outdoors.
- Use the bike only as described in this manual.
- Incorrect repair and structural modifications (e.g.removal or replacement of original parts) may endanger the safety of the user.
ASSEMBLY INSTRUCTIONS
STEP 1
- Choose a suitable place for your vibration machine. Leave yourself at least 1 meter of space on either side of the machine to avoid injury. Place the machine on a solid, flat-level surface with a suitable cover for your floor or carpet.
- Insert 2 x AAA Alkaline batteries into the remote control unit.
STEP 2
- Roller · There is a roller on the underside of the right-hand edge of the machine, as you look at the display. Hold the left-hand side of the machine and lift to a 45° angle. Then use the roller to position the machine into the optimal spot for your workout.
STEP 3 Resistance Bands
- Attach the resistance bands by locating the metal arm underneath the machine. Move it out so the arm is pointing out from underneath the disc. Loosen the carabiner lock (if required) on the end of the resistance band, clip it through the hole at the end of the metal bar, then screw the lock on the carabiner clip in place.Note: Make sure that the carabiner clip is fastened by screwing the lock in place, to ensure the clip does not come loose during use.
Adjusting Resistance Bands
- If you and you need to adjust the length of your resistance band, take Part A in one hand and start to thread through the band from underneath. This should create a small loop at point B. Pull point D away from Part A (whilst keeping hold of Part A) so that the loop disappears. This will shorten the length of the resistance band overall.
- To lengthen your resistance band, thread a small amount of band through Part A as before to create a loop at point B. Then pull the band at point C so that the handle moves towards Part A. This should increase the loop and now you will need to thread the loop through Part A so it disappears.Note: When not in use please ensure resistance bands are stored away safely so they are not a potential trip hazard.
CONTROL PANEL AND REMOTE CONTROL OPERATIONS
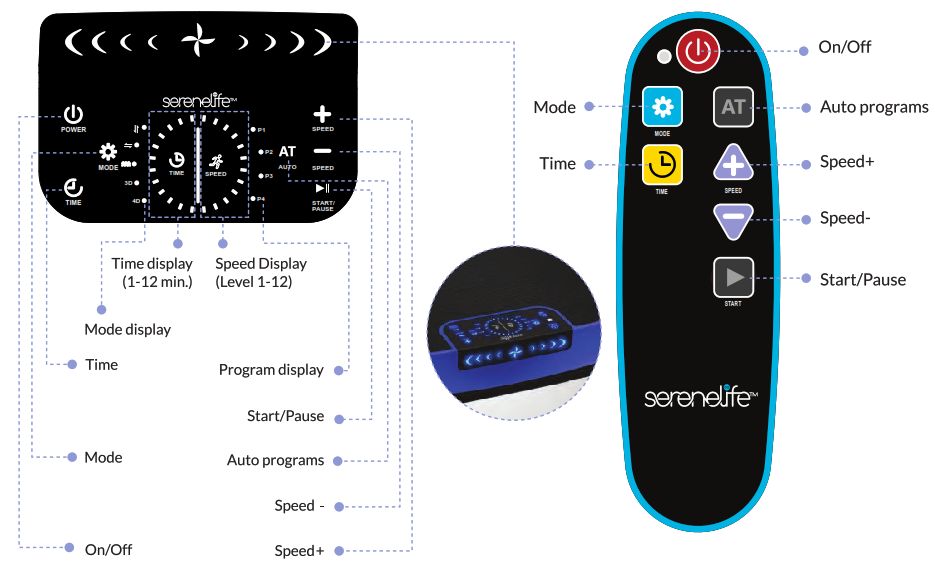 OPERATIONS
Switch on the devicePress the POWER button to turn the unit on and o.MODES
 |
Swing Up/Down |
 |
Swing left/right |
 |
Circulation |
| Swing Up/Down + left/right | |
| Swing Up/Down + Swing left/right + Circulation |
Auto ProgramsThere are 4 preset programs (P1-P4). The exact description of the programs can be found in the program table.Commissioning and Operation• Insert the plug into the socket. All LED lights up briefly once. Then the device in standby mode and only the POWER lamp lights up.• Press the POWER button to start Manual mode (SwingUp/Down). The preset time is 10 minutes, the preset speed is 0 (the speed indicator is not lit).Note: To switch to Auto mode, press the AT button repeatedly to select one of the preset programs (P1-P4). To return to manual mode, press the MODE button repeatedly to select one of the manual modes.• In Manual mode press the TIME button repeatedly to adjust the time in the following order: 3 minutes > 6 minutes > 9 minutes > 12 minutes. Press the MODE button repeatedly to select one of the manual modes. When you change modes, the time is automatically set to 10 minutes.• In Manual mode, the Speed + and Speed – Indicators light and the speed can be set from level 1-12. Time and speed are displayed as segments in the centre of the control panel.Note: Time and speed cannot be set manually In Auto mode. The default time is10 minutes (1 minute per segment) The preset speed depends on the program (see Auto Program Table).• When the vibratory plate is running, the time and speed indicators light up for 7 seconds followed by a 53 second animation corresponding to the vibration mode set.• You can stop the vibration plate at any time by pressing the Start/Pause button. While the unit is paused, only the Power and Start/Pause buttons are active. All other buttons do not respond.• The machine turns off when the time has elapsed or when you press the Power button during training.Auto Program
| TIME (minutes) | 1 | 2 | 3 | 4 | 5 | 6 | 7 | 8 | 9 | 10 | |
| P1 | Mode | 3D | 3D | 4D | 4D | 4D | 3D | 3D | 3D | JQ | |
| Level | 1 | 2 | 3 | 4 | 5 | 4 | 3 | 2 | 1 | 3 | |
| P2 | Mode | 3D | 3D | 3D | 3D | 4D | 4D | 3D | 3D | 3D | |
| Level | 1 | 3 | 5 | 4 | 3 | 4 | 5 | 4 | 3 | 4 | |
| P3 | Mode | 3D | 3D | 3D | 3D | 3D | 3D | 3D | 3D | 4D | 4D |
| Level | 3 | 5 | 3 | 5 | 2 | 6 | 4 | 5 | 3 | 5 | |
| P4 | Mode | 3D | 3D | 4D | 4D | 4D | 4D | 4D | 4D | 4D | 4D |
| Level | 3 | 5 | 3 | 6 | 2 | 6 | 4 | 5 | 3 | 5 |
Perform the movements before each workout to mobilize your joints and activate your muscles. Should a movement be uncomfortable or painful, skip this movement and consult your doctor or fitness instructor about suitable warm-up movements. Each movement should be repeated (right and left) so that you can start the cardio training relaxed.Take about 5 minutes to do the following training routine: 1. Tilt the head sideways, slowly alternating from right to left. Then mobilize your shoulders (circular movements and shrugging the shoulders).2. Turn the hips while the arms are stretched out. The feet are not firmly fixed to the ground (the ankles follow the body’s rotation).3. Bend to the side and raise one arm straight up. Stay in this position for several seconds on each side.4. Bend to the side and raise both arms above your head with palms together. Again, remain on each side for several seconds. The exercise is now a bit more intense with the second arm joining.5. Stand on one leg and hold the instep of the other foot with your hand. Mobilize it so as to stretch the thigh lightly. If necessary, hold onto something to keep your balance. Stand on one leg and trace a circle with your foot in the air in both directions (counterclockwise and clockwise).6. Put one leg forward and with your arms support the weight of your upper body on your thigh. Position your legs so as to provide a stretch for the rear leg’s calf muscles.7. Repeat the previous exercise with more distance between your feet. The stretch will now be more intense.8. Bend forward while keeping your legs straight and alternatingly touch each hand to the opposite foot. Finally, let yourself hang down and relax.
Exercise Guide:
Neutral Stance Increasesbalance, great as a warm-up• Place feet parallel to the sides of the platform.• Widen stance for a greater challenge.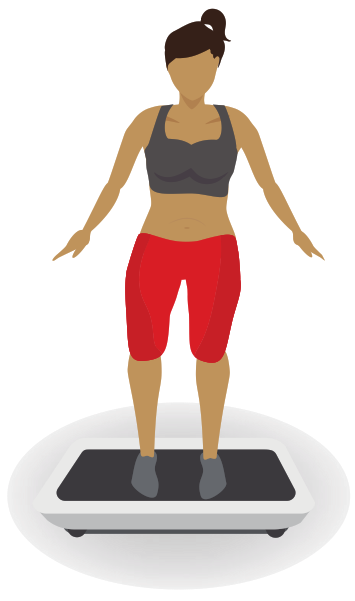 One-Legged StanceStrengthens legs, increase balance• Always place foot either above or below the knee.• Keep hips even and rotate knee out to the side.
 Deep SquatIncreases blood flow to knees, quadriceps, and lower extremities• Bend knees but keep length in the spine, shoulders back, chest forward, and chin parallel to floor,
 Quadricep StretchPromotes flexibility & blood flow to feet, ankles, and calves increase balance• Bend one knee and hold the ankle with your hand.• Keep knees even & length in the spine, shoulders back, and chest forward.
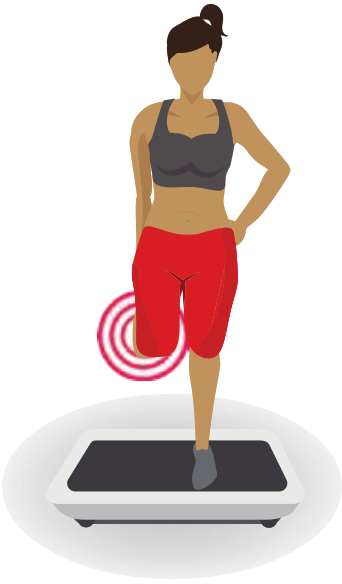 Advanced PushUp Strengthens and tones abdominal region and upper body (biceps, triceps, and pectorals)• Place hands directly underneath shoulders and tighten abdominal muscles so the body is in alignment.
 Back StrengthenerStrengthens back and arms releases tension in shoulders• Place feet slightly pigeon-toed, directly under hips (bend knees slightly if needed).• Tilt the pelvis forward, lengthen through the spine, tuck chin under for alignment.
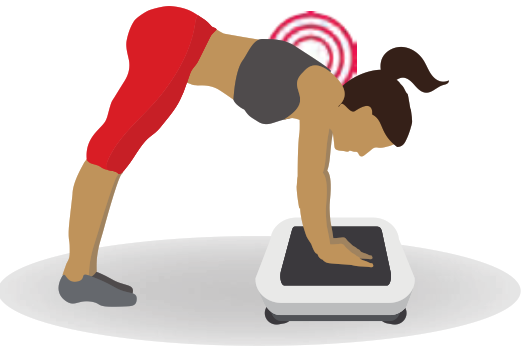 Lower Back ExtensionOpens up lower back, strengthens arms and upper body• Place hands directly underneath shoulders & tighten abdominal muscles so the body is in alignment.• Bring chest forward, shoulders back, & draw up through inner thighs and buttocks. Look straight ahead.
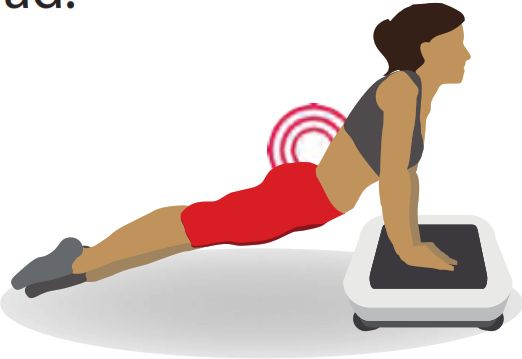 Core StrengthenerImproves balance, tones and strengthens abdominal muscles and lower back• Slowly raise legs with thighs on either side of central bar. Keep chest forward, shoulders back, and lower back straight.• Can be done holding resistance straps for extra support.
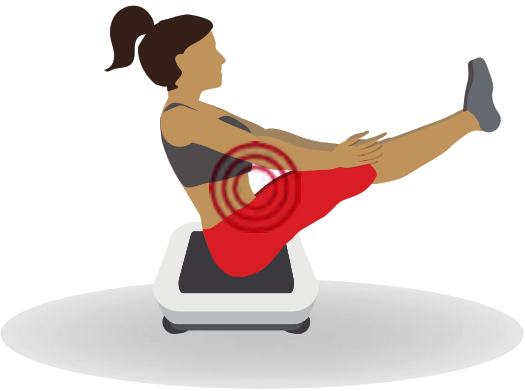 Reverse Push UpStrengthens the body, abdominal and oblique muscles, promotes blood flow into toes and ankles• Slowly raise legs with thighs on either side of central bar. Keep chest forward, shoulders back, and lower back straight.• Can be done holding resistance straps for extra support.

Calf MassageSoothes tired feet and legs, helps improve circulation to lower extremities• Allow upper body to relax and feel grounded of this posture.• Lengthen back of neck along floor.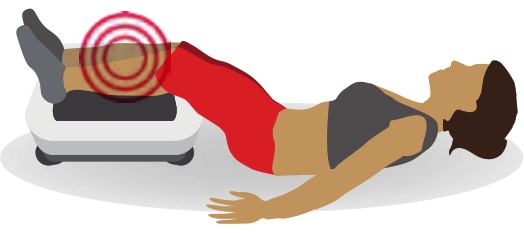 Advanced Tricep CurlStrengthens the whole body and opens up the chest• Place hands parallel and turned toward body. Lift buttocks and lengthen through inner thighs and back.• Lean head back and gaze straight ahead if comfortable, otherwise, tuck the chin in slightly.
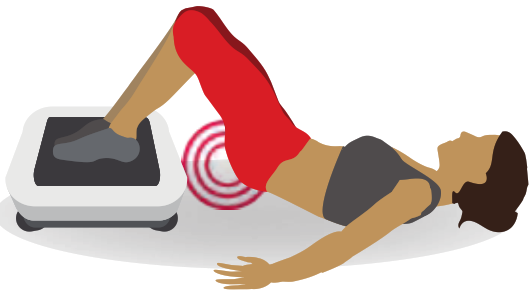
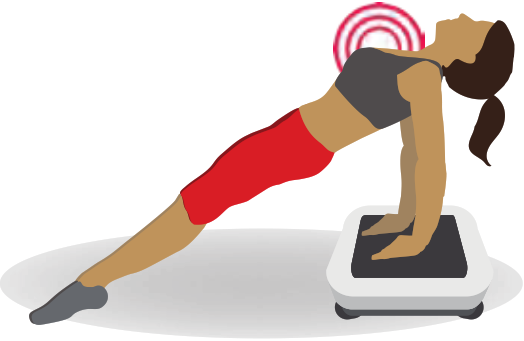 Hip RaiseStrengthens back, stimulates thyroid and parathyroid glands• Keep neck straight and shoulders relaxed, draw up through inner thighs and buttocks.
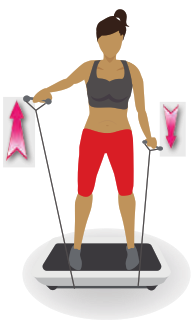
 COMPLIMENTARY WORKOUTStrengthens and tones abs, thighs, biceps and arms• Stand up with legs shoulder-width apart. Grab resistance straps & place hands against outside of legs.• Lift arms up at the same time, as far as you can, while holding straps firmly. Keep elbows straight.• Repeat motion until end of vibration time.
 Strengthens and tones abs, thighs, arms, back and biceps• Begin in same start position as the previous exercise.• Lift right arm to chest height, with elbow bent at 90°, then lower. Repeat with left arm.• Alternate movements until end of vibration time.
 Strengthens and tones abs, thighs, arms, back, and biceps• Begin in the same start position as the previous exercise.• With palms facing up, raise left arm bending at the elbow. Repeat with right arm.• Alternate movements until the end of vibration time.
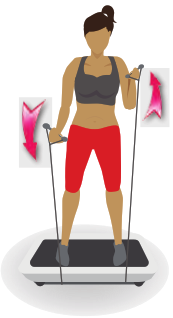
VIBRATION TRAINING AT A GLANCE
Advantages of Vibration TrainingCalm and high-frequency vibrations and oscillations, combined with a range of exercises, stimulate the muscular tissue and reduce fat accumulation. In addition, the elasticity of the muscles will be increased, the body shaped and the general well-being positively influenced. Possible contraindications Your practitioner and the Physiotherapist Berlin point out that the training on the vibration plate is not suitable when the following diagnoses have been made:• Acute thrombosis• Cardiac and brain pacemakers• High degree of osteoporosis• Untreated hypertension• Severe diabetes• PregnancyFREQUENCY RANGES AND TRAINING EFFECTS Low frequencies (approx.1- 12 Hz)Low frequencies between 5 and 12Hz are used for the mobilization. At low frequencies, the movement of the training platform is not fast enough to cause stretch reflexes. Due to the intended compensation of the rocking movement, low frequencies are therefore particularly used for the mobilization and are expressed by a clearly increased movement of the hip. Positive effects:• Relaxation of muscles, “cool-down”.• Improvement of proprioception/balance• Agility• Equilibrium trainingMedium frequencies (approx. 10-20Hz)The training goal at medium frequencies of 10 to 20 Hertz (oscillations per second) is the training of the muscle function as such. At a training frequency of 15 Hertz, for example, the time between two reflex cycles is approx. 67 milliseconds (thousandths of a second). After the reflex-controlled contraction, the remaining time until the next contraction is suflcient for the muscle to relax again. The average physiological time for a complete contraction/relaxation cycle is only about 50 milliseconds. This is particularly important when the basic functions of the muscle, namely the ability to contract and relax as well as coordination, are to be trained effectively. Due to a large number of repetitions (e.g.3 minutes Galileo training at 18 Hertz = 3,240 cycles), the improvement of the muscle functions can be achieved considerably faster than with most other training methods such as machine training in the fitness center. Another decisive factor is that the muscle activity in the Galileo Training does not have to be deliberately controlled, but can be reflex-based and therefore largely uninfluenced by the will of the user. This ensures that the control cycles consisting of muscle bands/tendons/cartilage nerves can be improved independently. At the same time, the entire muscle chain and thus its coordination can always be trained to a large extent. The decisive factor for this coordination training is that the entire muscle chain can be stimulated in a physiologically appropriate pattern similar to the human gait. This is why we also speak of mechano- stimulation of the muscles. Positive effects:• Improvement of muscle function and coordination• Muscle relaxation• Stretching of the muscular and tendon apparatus• Improvement of flexibility• Relaxation of the back muscles• Muscle length training• Fascia training• 12-14Hz: Reduction of sore musclesHigh frequencies (approx. 20 – 36 Hz)At high frequencies, the muscle does not have enough time to achieve complete relaxation within the short time between two cycles. Rather, the muscle is forced to contract again when it is about to relax or is already partially relaxed. As a result, inter-and intramuscular coordination, in particular, is trained with greater forces and within very short periods of time, which ultimately leads to an increase in muscular performance.Positive effects:• Tone increase • Increase of muscle performance • Restoration of muscle strengthFREQUENCY TABLE
| Up/Down (Amplitude: 16 mm) | Motor: 500 W | |
| Level | rpm | Hz |
| 1 | 180 | 3.0 |
| 2 | 205 | 3.4 |
| 3 | 229 | 3.8 |
| 4 | 254 | 4.2 |
| 5 | 278 | 4.6 |
| 6 | 303 | 5.1 |
| 7 | 327 | 5.5 |
| 8 | 352 | 5.9 |
| 9 | 376 | 6.3 |
| 10 | 401 | 6.7 |
| 11 | 425 | 7.1 |
| 12 | 450 | 7.5 |
| Left/Right (Amplitude: 14 mm) | Motor: 300 W | |
| Level | rpm | Hz |
| 1 | 130 | 2.2 |
| 2 | 149 | 2.5 |
| 3 | 167 | 2.8 |
| 4 | 186 | 3.1 |
| 5 | 205 | 3.4 |
| 6 | 223 | 3.7 |
| 7 | 242 | 4.0 |
| 8 | 260 | 4.3 |
| 9 | 279 | 4.7 |
| 10 | 298 | 5.0 |
| 11 | 316 | 5.3 |
| 12 | 335 | 5.6 |
| Circulation | Motor: 20 W | |
| Level | rpm | Hz |
| 1 | 2500 | 41.7 |
| 2 | 2582 | 43.0 |
| 3 | 2664 | 44.4 |
| 4 | 2745 | 45.8 |
| 5 | 2827 | 47.1 |
| 6 | 2909 | 48.5 |
| 7 | 2991 | 49.9 |
| 8 | 3073 | 51.2 |
| 9 | 3155 | 52.6 |
| 10 | 3236 | 53.9 |
| 11 | 3318 | 55.3 |
| 12 | 3400 | 56.7 |
CARE AND MAINTENANCE
![]() WARNINGBefore cleaning or carrying out any maintenance on your vibration machine, ensure the power is turned off and the power cord removed from the plug socket.CleaningClean your vibration machine with a damp cloth and mild detergent only, immediately after use. Use a weak solution of anti-bacterial washing-up liquid in warm water and a microfibre cloth. Be sure to wring out the cloth so that it is just damp.StorageRegularly check the cord/cable for damage before storing. Should the cord/cable be damaged in any way it must ONLY be replaced by an identical cable of the same type and specification. Never pull the cord/cable to disconnect from the power outlet. Always grasp the plug and pull to disconnect. Remove the plug when not in use and store it on its feet at all times. Troubleshooting• No lights; does not respond to Control Panel or Remote Control.Check the machine is plugged in and switched on at the mains. Check socket works with an alternative electrical product.Replace fuse in plug.• Remote Control does not operate machine, but unit does respond to Control Panel. Point Remote Control transmitter directly at the Control Panel’s sensor. Replace batteries in remote control (2 x AAA alkaline batteries are required).• Speed too fast!Adjust speed using the speed buttons on the Remote Control or the Control Panel.
WARNINGBefore cleaning or carrying out any maintenance on your vibration machine, ensure the power is turned off and the power cord removed from the plug socket.CleaningClean your vibration machine with a damp cloth and mild detergent only, immediately after use. Use a weak solution of anti-bacterial washing-up liquid in warm water and a microfibre cloth. Be sure to wring out the cloth so that it is just damp.StorageRegularly check the cord/cable for damage before storing. Should the cord/cable be damaged in any way it must ONLY be replaced by an identical cable of the same type and specification. Never pull the cord/cable to disconnect from the power outlet. Always grasp the plug and pull to disconnect. Remove the plug when not in use and store it on its feet at all times. Troubleshooting• No lights; does not respond to Control Panel or Remote Control.Check the machine is plugged in and switched on at the mains. Check socket works with an alternative electrical product.Replace fuse in plug.• Remote Control does not operate machine, but unit does respond to Control Panel. Point Remote Control transmitter directly at the Control Panel’s sensor. Replace batteries in remote control (2 x AAA alkaline batteries are required).• Speed too fast!Adjust speed using the speed buttons on the Remote Control or the Control Panel.
Features:
• Revolutionary Design for Fitness that’s Fun• Vibration Assisted Exercise for Core & Full Body Training• Next-Generation Dynamic 4D Motion Technology• Three Motors, One for Oscillation Motion, One for Linear Motion, One for Vibrating Motion, and Combination Motion• With LED Light Strips on Two Sides• Excellent Toning for Abs, Thighs & Buttocks• Built-in Preset Workout Program Modes• Adjustable Vibration Speed Intensity & Timer Setting• High-Powered Vibrations for Accelerated Fat Burning, Weight Loss & Blood Circulation• Incorporates Upper Body, Lower Body & Core Workouts• Lab Tested to Improve Muscle Strength, Flexibility & Circulation• Detachable Handheld Resistance Bands for More
Versatile Routines• Reduce Appearance of Cellulite, Improves Metabolic Rates• Digital Clock Display Touch Button Controls• Compact and Portable Design• Rubber Grip ‘Anti-Slip’ Standing Surface Pad• Convenient Rolling Wheels• Ideal for All Body Types & Age GroupsWhat’s in the Box:• Vibration Machine• Resistance Bands• Remote Control• (2) ‘AAA’ Batteries• Power CordTechnical Specs:• High Power Output: 500 Watt• RPM (Revolutions Per Minute): 3300+ RPM for Vibrating• Maximum Session Time Setting: 12 Minutes• Adjustable Vibration Speed Intensity: 12 Levels• Weight Capacity: 265 lbs. Max• Construction Material: Engineered ABS• Battery Operated Remote Control, Requires (2) x ‘AAA’• Batteries, Included• Power Cord Length: 5.9’ ft.• Power Output: 120V• Dimensions (L x W x H):31.69” x 17.71” x 7.48” -inches
 This product can expose you to a chemical or group of chemicals, which may include ”Di (2-Ethylhexyl) phthalate (DEHP)” which is known in the state of California to cause cancer, birth defects, or other reproductive harm.For more info, go to https://www.p65warnings.ca.gov/.
 Questions? Issues?We are here to help!Phone: (1) 718-535-1800Email: [email protected]
References
[xyz-ips snippet=”download-snippet”]