
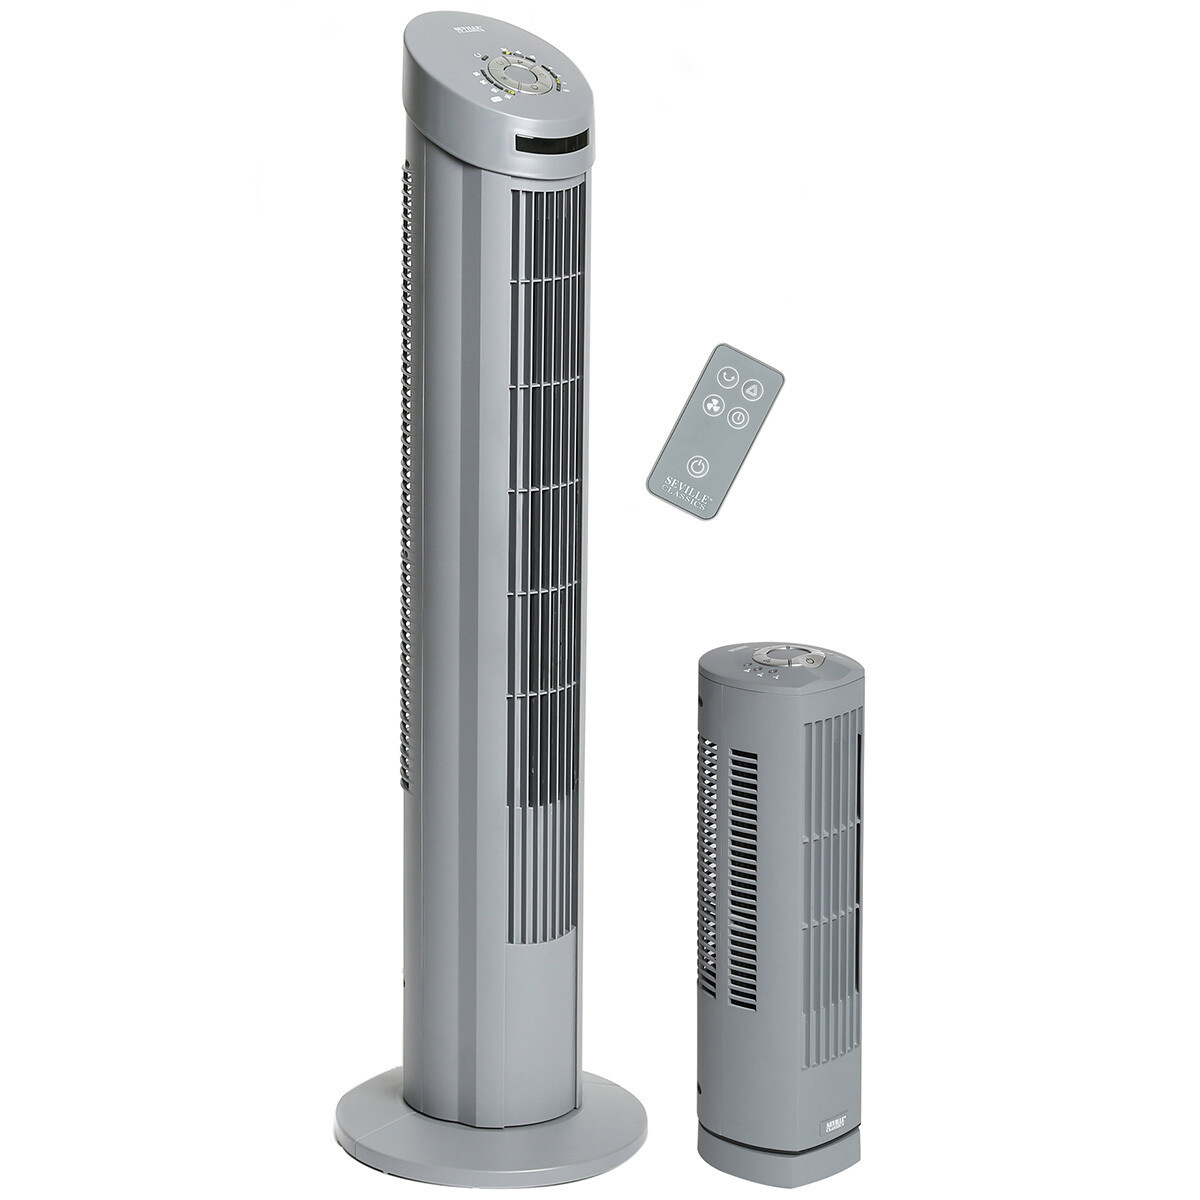
SEVILLE Ultra Slimline Tower Fan
Important Safety Instructions
When using electrical appliances, basic precautions should always be followed to reduce the risk of fire, electric shock and injury.
- Use this fan only as directed in this manual. Non-recommended use may cause fire, shock or injury.
- This fan is intended for personal use INDOORS. It is NOT designed for commercial, industrial or outdoor use. DO NOT USE FAN OUTDOORS.
- Do NOT place fan in or near a window, to avoid contact with the outdoor elements and to avoid exposure to direct sunlight. Rain may create an electrical hazard. Do NOT immerse fan, plug or cord in water or liquid.Do NOT spray with water or liquid.
- Operate fan on a dry, level surface.
- This appliance has a polarized plug (one blade is wider than the other).This plug is designed to reduce the risk of shock by only fitting into a polarized outlet one way. If the plug does not fully fit in an outlet, tryreversing the plug. If it still does not fit, contact a qualified electrician.Do not attempt to OVERRIDE this safety feature.
- A loose plug/outlet connection may cause overheating and distortion of the plug. Contact a qualified electrician to replace a loose or worn outlet.
- Always turn the fan off and unplug it when transporting it to another location and before cleaning.
- When disconnecting fan, turn it off, grip the plug firmly and pull it from the wall outlet. Never pull it out by the cord.
- Do NOT operate the fan if the cord or plug is damaged, the unit is malfunctioning, has been dropped or is damaged in any way.
- Do NOT operate your fan in the presence of flammable and/or explosive fumes.
- Do NOT place the fan or any of its parts near an open flame, cooking appliance or heater.
- Do NOT operate the fan if housing has been removed or damaged.
- Avoid contact with fan’s moving parts.
- Close supervision is necessary when operating fan near children.
- Do NOT mount fan on a wall or hang it from the ceiling.
- Use of attachments of any kind is NOT recommended.
- Suitable for use with solid-state speed controls.
- This appliance is not intended for use by persons (including children) with reduced physical, sensory or mental capabilities, or lack of experience and knowledge, unless they have been given supervision or instruction concerning use of the appliance by a person responsible for their safety.
- Do not operate any fan with a damaged cord or plug. Discard fan or return to an authorized service facility for examination and/or repair.
- Do not run cord under carpeting. Do not cover cord with throw rugs runners, or similar coverings. Do not route cord under furniture or appliances. Arrange cord away form traffic.
Features a Fuse Safety Plug
This product employs overload protection (fuse). A blown fuse indicates an overload or short-circuit situation. If the fuse blows, unplug the product from the outlet. Replace the fuse as per the user serving instructions (follow product marking for proper fuse rating) and check the product. If the replacement fuse blows, a short-circuit may be present and the product should be discarded or returned to an authorized service facility for examination and/or repair.
User Servicing Instructions
- Always unplug this product before installing or replacing fuses.
- Grasp plug and remove from the receptacle or other outlet devise. Do not unplug by pulling on cord.
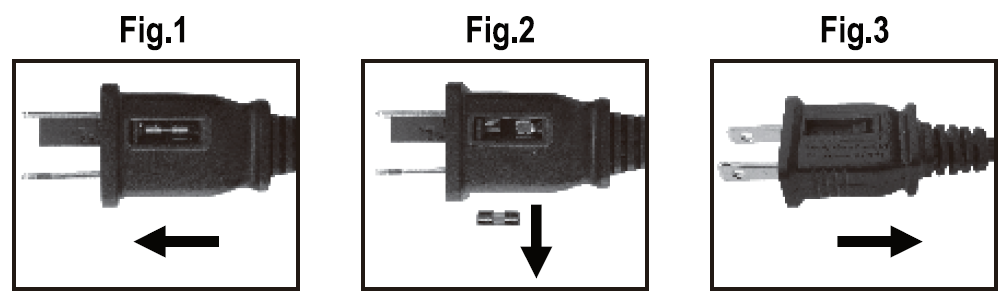
- Open fuse cover (Fig.1) by sliding open fuse access cover on top of the plug before using your thumb or a flathead screwdriver to slide the cover down towards the prongs.
- NOTE: Ensure that fuse cover is completely open before attempting to remove fuse.
- Remove fuse carefully by using a small screwdriver to pry the fuse out of the compartment by the metal ends of the fuse (Fig.2).
- Place plug on a solid flat surface. Insert new 5 Amp, 125 Volt fuse into fuse compartment and use a small screwdriver to secure the metal ends of the fuse into the compartment.
- Close fuse cover (Fig.3) by sliding closed the fuse access cover on top of the plug.
CAUTION: Risk of fire. Replace fuse only with 5 Amp, 125 Volt fuse. “Risk of fire. Do not replace attachment plug. Contains a safety device (fuse, AFCI, LCDI) that should not be removed. Discard product if the attachment plug is damaged.”
Parts List
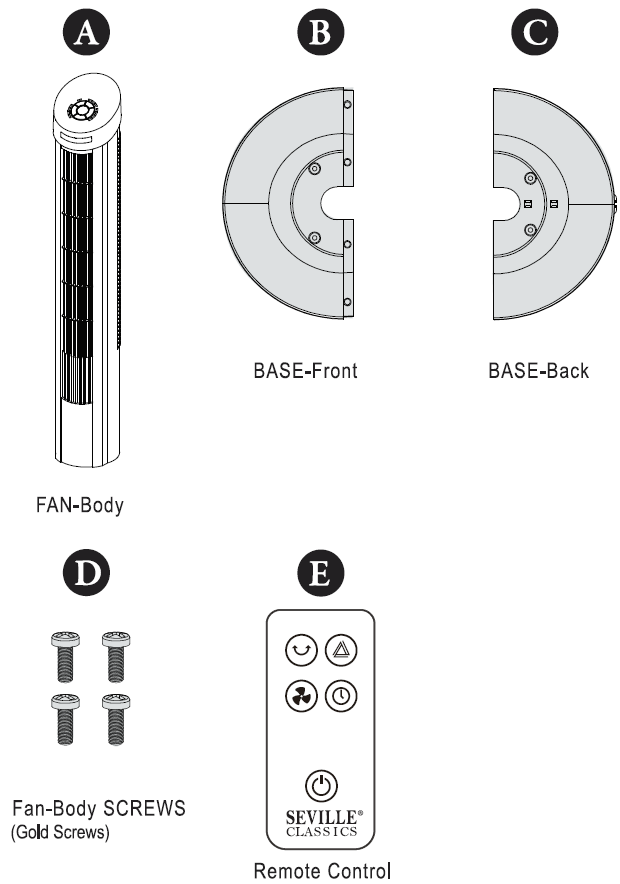
Fan Assembly
STEP 1: Turn the base upside down, Firmly lock the BASE-front 0 onto the BASE-back Ci by aligning the four holes onto the four posts. 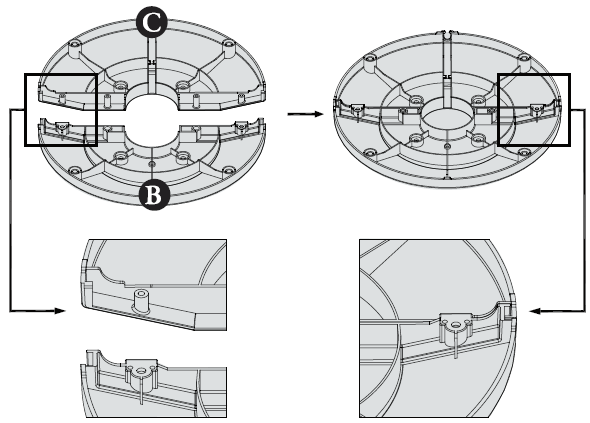 SUGGESTION:When attaching the base to the bottom of the fan, place the FOAM PACKING block from the top of the box on the floor upside down. Then, place the top of the fan into the FOAM PACKING block to secure the top of the fan from moving while attaching the bottom base. This will give you a more secure platform for assembly and better protect the top of the fan.
STEP 2: Remove the 4 Fan-Body SCREWS D) from the center post on the bottom of the FAN – body A.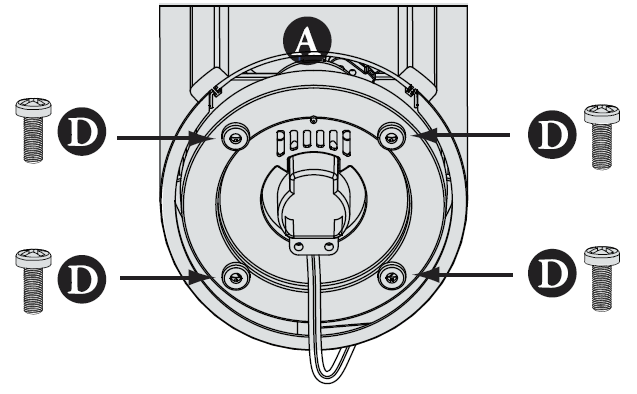
STEP 3: Pass the Power Cord through the center hole of the BASE. Align the BASE front with the FAN front and insert the four posts on the FAN body into the four holes on the top of the BASE. It will only go one way. Place the 4 Fan-Body SCREWS D into the holes through the bottom of the base and securely tighten. 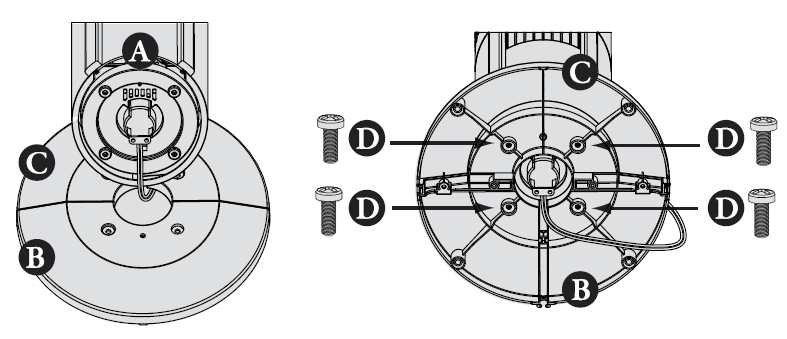
STEP 4: Run the power cord through the guide on the bottom of the BASE-back by tucking the cord under the tabs. Set fan upright on the base and it is ready for use.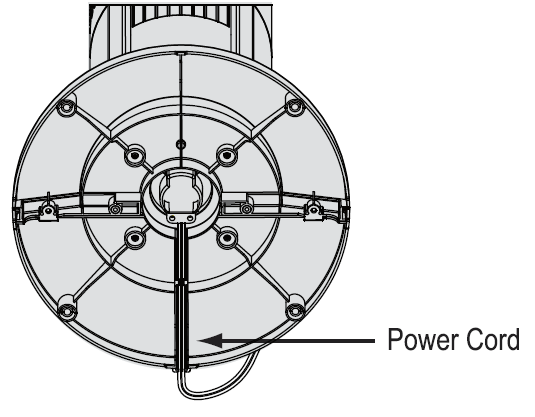
See further instructions on use, care and safety.
Control Panel
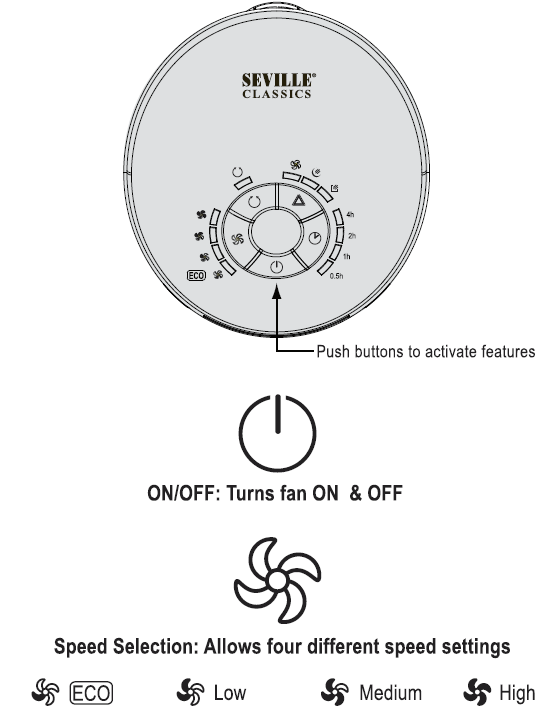
Timing Selection: There are 15 settings, in 1/2 hour increments. Time increases with each push of the button. 1/2 hour, 1 hour, 1-1/2, 2 hours etc. to a maximum time setting of 7- 1/2 hours.The LED Indicators on the control panel are marked 0.5h, 1 h, 2h, 4h. (h for Hour) The total of the lit LEDs is the total time period.
Selection of Wind: Allows for three different wind modes:
Normal Wind:The Normal Wind mode is simply the [ECO], Low, Medium & High fan speed settings.
Sleeping Wind:The Sleeping Wind allows you to set a speed and that speed will gradually lower to [ECO]. fhe air flows as an evening breeze slowing to a light night breeze.
- Sleeping WindThe air flow remains at [ECO].
- Low Sleeping WindThe air flow begins at low for a half an hour and then drops to ECO
- Medium Sleeping WindThe air flow begins with medium speed for a half hour then drops to Low speed for a half an hour and finally drops to ECO
- High Sleeping WindThe air flow begins with High speed for a half hour then drops to Medium speed for a half hour, then to Low for a half an hour and finally drops to ECO
Natural Wind:The Natural Wind mode automatically selects wind speed randomly as you would find outdoors. The speeds are graphically described below.
Low Natural Wind – The wind settings will repeat the following 80 second wind cycle with Low speed being the most common.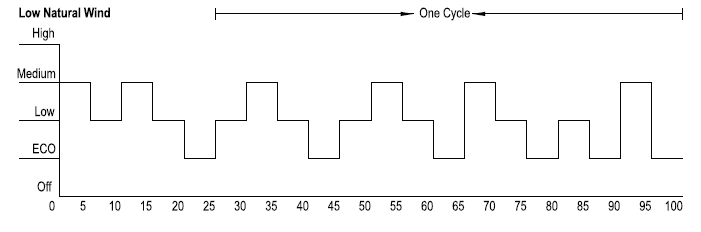
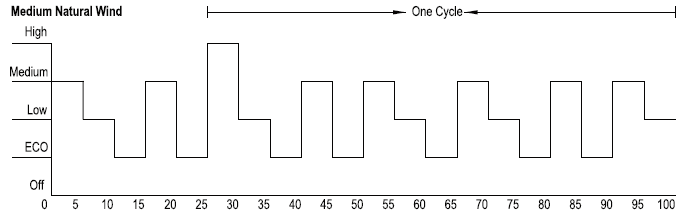
Medium Natural Wind – The wind settings will repeat the following 80 second wind cycle with Medium speed being the most common.
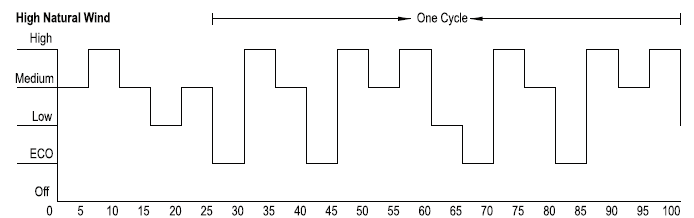
High Natural Wind – The wind settings will repeat the following 80 second wind cycle with High speed being the most common.
Oscillating Selection:
This function starts & stops the oscillation of the fan.
Controlling the Oscillation Angle: To change the wind direction, place both hands on the fan and turn the fan body to the left or right. There are 5 positions to choose from to change the oscillation angle. To have the fan fully oscillate left and right, have the fan in the third or center position.
Remote Control for Tower Fan
To use your remote, point the top end directly at the front of the fan aiming at the little window just below the control panel on the top of the fan.
Functions:

Power Button –Turns fan ON and OFFSpeed Mode – Changes wind speed from Low ILOWI to Medium IMEDI to High to[BO ECOIEC0I.Wind Mode – Changes the wind mode from Normal Wind to Natural Wind to Sleeping Wind.Timer – Changes the time the fan is on from 0.5 hr up to a maximum of 7.5 hr, in 0.5 hr increments.Oscillation – Turns the fan oscillation ON or OFF
Note: This equipment has been tested and found to comply with the limits for Class B digital device, pursuant to part 15 of the FCC Rules. These limits are designed to provide reasonable protection against harmful interference in a residential installation. This equipment generates, uses, and can radiate radio frequency energy, and if not installed and used in accordance with the instructions, may caused harmful interference to radio or television reception, which can be determined by turning the equipment off and on. The user is encouraged to try to correct the interference by one or more of the following measures:
- Reorient or relocate the receiving antenna.
- Increase the separation between the equipment and the receiver.
- Connect the equipment into an outlet on a circuit different from that to which the receiver is connected.
- Consult the dealer or experienced radio/TV technician for help.
WARNING: Changes or modifications to this unit not expressly approved by the party responsible for compliance could void the user authority to operate the equipment.
* The remote control operates on 1 pc cell battery.* It is recommended that the batteries be removed should the remote not be in use for an extended time. 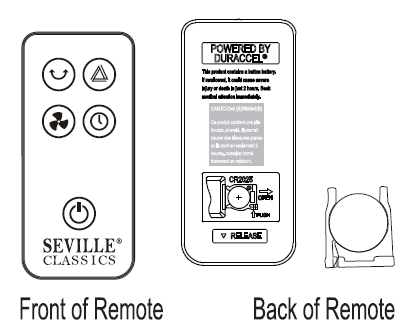
Storage & Cleaning Instructions
- To clean your fan, first turn it OFF & UNPLUG ii.
- Use a soft cloth to wipe the housing. DO NOT use water, gasoline, polish, or any chemical solution. Do NOT soak or immerse fan in water or liquid.
- You can use a vacuum cleaner (narrow hose attachment or with the brush attachment) to clean all intake and exhaust vents. This will remove dirt and lint that may accumulate over time. DO NOT ATTEMPT TO TAKE FAN APART
- For a Super Clean, we suggest you take fan outdoors and use a “can of compressed air”
- Store in a dry place away from excessive heat and direct sunlight.
Customer Service
Should you have any questions, comments or suggestions please contact us at:Seville Classics Inc./[email protected]Tel: (800) 323-5565 or (310) 533-3800 /Hours: 9:00 AM – 4:30 PMPacific Time/ Monday to FridayTo register your ULTRASlimline™ Tower Fan and to become eligible for special promotions or to be informed of new product offerings, simply visit: www.sevilleclassics.com/fan For ULTRASlimline™ Tower Fan Parts & Accessories, please visit: www.sevilleclassics.com
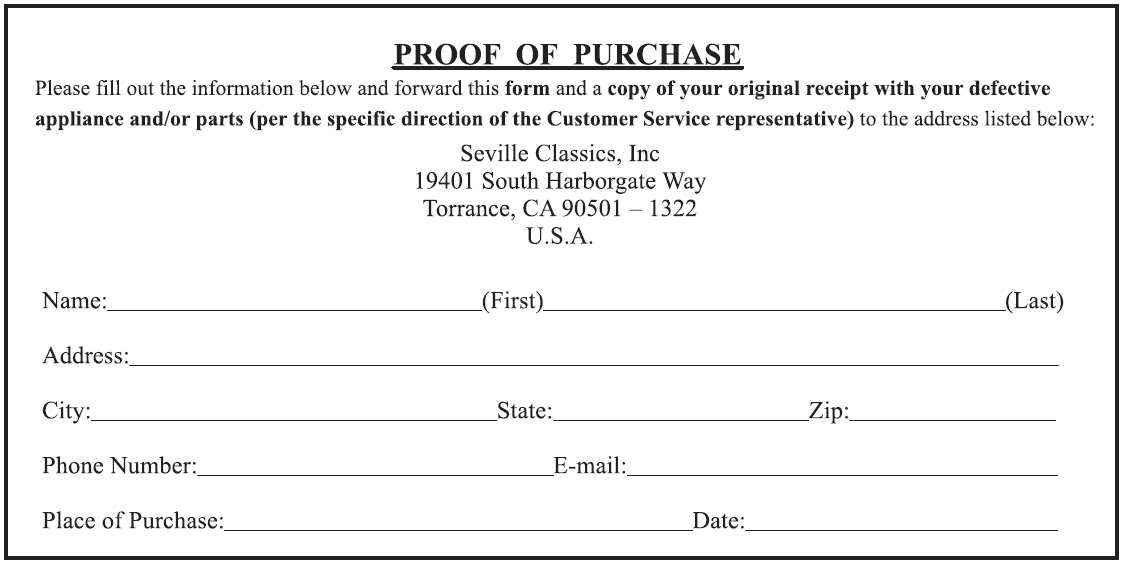
PROOF OF PURCHASE
[xyz-ips snippet=”download-snippet”]