
User GuideMarch 2021
Brushes and how to use them
Available brushes
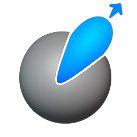 Standard / Standard negative• This brush displaces the vertices outwards or inwards, like if you would add or remove material.
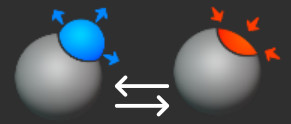
 Inflate/Deflate• An easy way to expand or dent the surface.
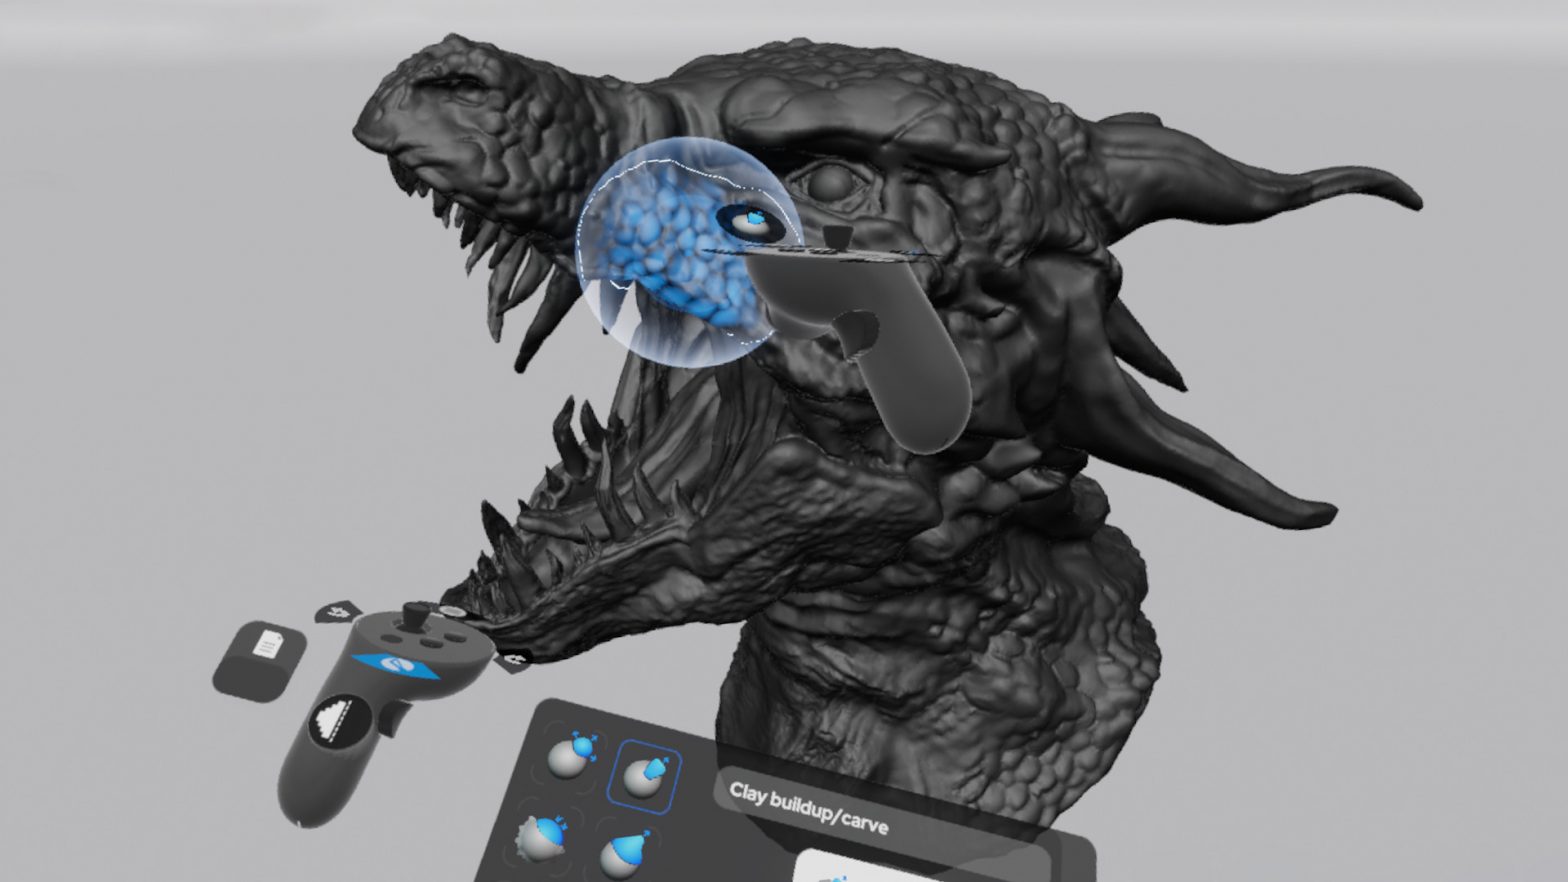
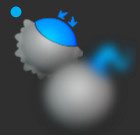
 Clay buildup/carve• Work with this brush to sculpt surfaces using alphas.• You can either build up or carve out “material” in the chosen shape.• You can use this brush to build up your shape layer by layer or to add small details like various types of skin textures.
 Smooth• Use the Smooth brush to even out peaks, troughs and polygons.• It can also be helpful for fixing topology issues when it is used with the dynamic topology turned on.
 Move• You can easily relocate and move geometries with this tool without adding or losing details.• It can be very useful for moving body parts or modifying facial expressions and other features.
 Flatten• Use the Flatten brush to even out the surface by pulling out the area.
 Trim• Use the Trim brush to even out the surface by pushing down the area.
 Snake Hook (or “Tentacle”)• When it comes to creating long tentacles, horns, branches, limbs or other similar shapes, this is probably your go-to brush.
 Pinch/Crease• This brush basically pulls the surface together. Use the Pinch mode to slightly pull out the surface and the Crease mode to push it in.• This tool will come in handy when adding wrinkles or making edges sharper.
 Regularize• Use this tool to change mesh resolution, regularize and even out topology locally by subdividing and decimating the surface.• Set the resolution to achieve the desired polygon density.• Keep in mind that it works relative to brush and object size.
Brush modifiers
- Size
- You can modify your brush size, relative to the scene.
- Strength
- Choose your brush’s intensity. You can use a fixed value if you set the slider or controller trigger pressure sensitivity by checking the “Pressure Sensitivity” checkbox
- Falloff
- You can dim or blur the intensity of the brush around its edge.
- A too high falloff value can significantly change how your brush behaves. Try out multiple settings and see what configuration is best for your goals.
- The higher the falloff value is, the less defined your clay buildup pattern will be.
- Resolution
- You can choose to turn dynamic topology on and off. When the “dynamic” checkbox is checked, the algorithm dynamically adds and removes polygons while you are sculpting.
- “Resolution” refers to the density of the polygons generated. Increase the resolution to add moredetails and reduce it or turn it off completely in case you are just blocking out chunky shapes.
- The resolution slider is disabled when the “dynamic” checkbox is unchecked. In this case, the algorithm doesn’t change the number of polygons at all.
- Constraints: Projected or None
- Brushes can be projected onto the object’s surface (as it is usually done in traditional flat screen design programs) or can be kept attached to the controller.
- All brushes can be used in either ways, however, some of them usually work better with a certain configuration:
- Snake Hook: None
- Move: None
- Clay buildup: Projected
- Edit connected surfaces only
- Check “Edit connected surfaces only” to manipulate areas independently that form a continuous surface with the polygon that is closest to the center of your sphere cursor.
- Edit front faces only
- Check “Edit front faces only” to only manipulate the surfaces that are facing your controller.
 Context menu tools and option
 Context menu tools and option
- How to activateo Point to the model with the Primary Controller and pull the trigger.o Press the Context Menu button on the controller.
- What you can find here
- Topology tab
- Decimate – To simplify and reduce the number of faces.
- Set target number of faces and apply.
- Applies to the entire sculpt object.
- Subdivide – To increase the number of faces.
- Set topology smoothing intensity and apply 4x subdivision.
- Applies to the entire sculpt object.
- Regularize
- To change mesh resolution, regularize and even out topology globally by subdividing and decimating the surface.
- Set the resolution to achieve the desired polygon density.
- Decimate – To simplify and reduce the number of faces.
- Material tab
- Choose from numerous material options and change how the sculpt object looks and feels.
- Both matcap and PBR materials are available.
- Topology tab


- How to activate
- Point to the image with the Primary Controller.
- Press the Context Menu button on the controller.
- What you can find here
- Lock/Unlock image
- Locked images can’t be grabbed, moved, rotated or scaled.
- Delete image
- Lock/Unlock image
Controls and shortcuts
 Controls and shortcuts
Alternate brush
You can define a primary brush and an alternate brush and switch back and forth between them quickly and easily.
- How to activate
- Keep pulling the Secondary Controller Trigger to activate your alternate brush.
- As long as the trigger is being pulled, the alternate brush will remain active.
- As long as the trigger is being pulled, the alternate brush will remain active.
- Use this shortcut to quickly switch between two brushes.
- The “Smooth” brush is your alternate brush by default.
- Keep pulling the Secondary Controller Trigger to activate your alternate brush.
- How to configure
- Just keep pulling the Secondary Controller Trigger while selecting another brush from the brush palette. A small blue dot will appear on the palette next to the selected brush.
- You can make any combination of brushes to suit your sculpting task by assigning another sculpting brush to your alternate brush.
Invert brush
- Invertible brushes
- There are a number of invertible brushes in the application that you can use in two different ways.
- Inflate – Deflate
- Pinch – Crease
- Clay buildup – Carve
- You can select the desired mode in the brush modifier menu, but there is also a shortcut.
- There are a number of invertible brushes in the application that you can use in two different ways.
- The shortcut
- Besides selecting the inverted brush on the brush modifier menu, you can quickly switch between the two modes by double-pressing the “Context Menu” button on your Primary Controller.
Others
- Brush modifier UI
- Open/close brush modifier UI with the “Secondary Controller Down” button/stick.
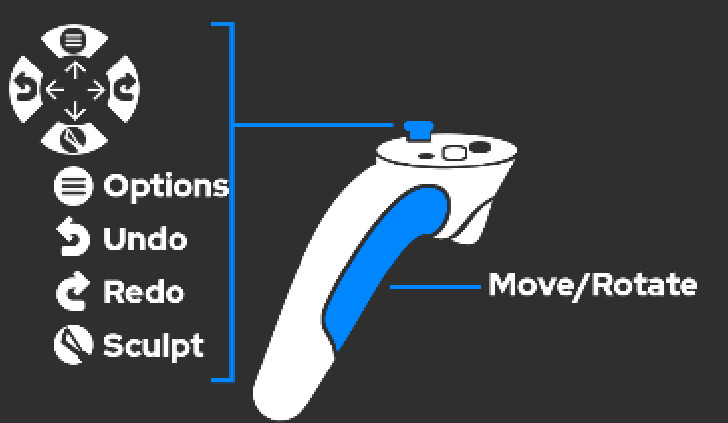
Controls / Oculus
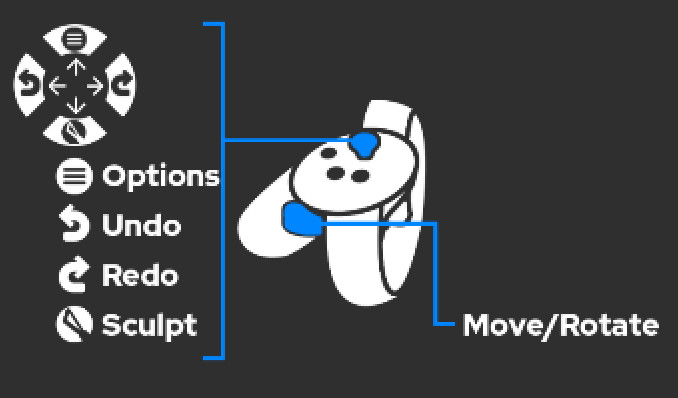
Secondary Controller
- Options
- How to open
- Move “Stick Up” to open Options UI (Sculpt UI panel will close automatically)
- What you can find here
- User preferences – Hand dominance, Polygon wireframe on/off, Mirror plane on/off
- Environment list
- Screenshot feature
- How to open
- Sculpt brushes
- How to open
- Move “Stick Down” to open Sculpt UI panel (Options UI panel will close automatically)
- What you can find here
- Sculpt brushes
- Sculpt brush modifiers (click on the header to open)
- How to open
- Undo/Redo
- Move “Stick Left/Right” to remove/replace your modifications
- File menu
- The file menu is located on the left side of the secondary controller
- Open the panel by pointing to it
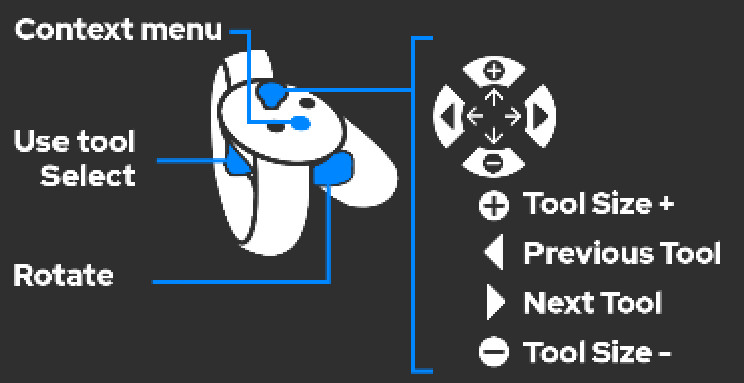
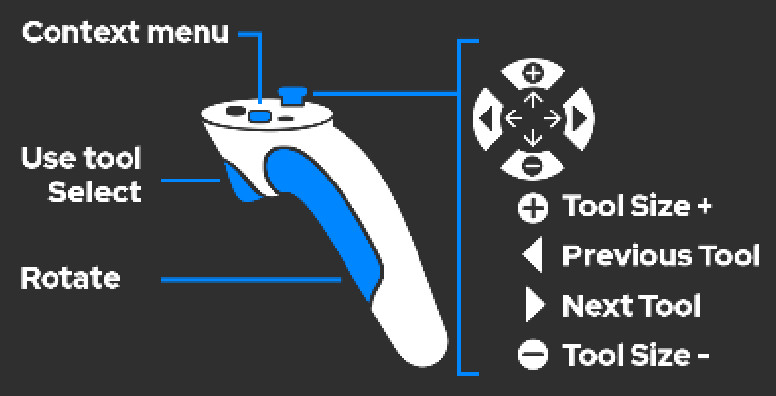
Primary Controller
- Select Object (Model – Reference Image)
- Point to the Model or the Reference Image with the “Primary Controller” and pull the trigger
- Manipulations will be applied to the selected object
- Context menu
- How to open
- Press “Button (A)” (while pointing to the object with the Primary Controller)
- What you can find here
- Model context menu
- Decimate – Set target number of faces and apply
- Subdivide – Set smoothing strength and apply 4x subdivision
- Regularize topology
- Change material
- Reference Image context menu
- Lock/Unlock
- Delete
- Model context menu
- How to open
- Tool size
- Move ”Stick Up/Down”
- Previous/next tool
- Move “Stick Left/Right”
Both ControllersScale, rotate and grabKeep pressing both grip buttons simultaneouslyPull/push objectKeep pressing the grip button while moving the stick up or down
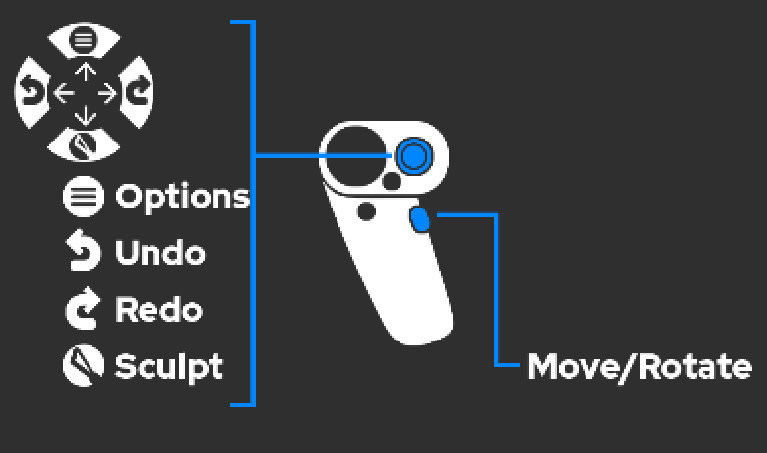
Controls / HTC Vive
Secondary Controller
- Options
- How to open
- Press “Trackpad Up” to open Options UI panel (Sculpt UI panel will close automatically)
- What you can find here
- User preferences – Hand dominance, Polygon wireframe on/off, Mirror plane on/off
- Environment list
- Screenshot feature
- How to open
- Sculpt brushes
- How to open
- Press “Trackpad Down” to open Sculpt UI panel (Options UI panel will close automatically)
- What you can find here
- Sculpt brushes
- Sculpt brush modifiers (click on the header to open)
- How to open
- Undo/Redo
- Press “Trackpad Left/Right” to remove/replace your modifications
- File menu
- The file menu is located on the left side of the secondary controller
- Open the panel by pointing to it
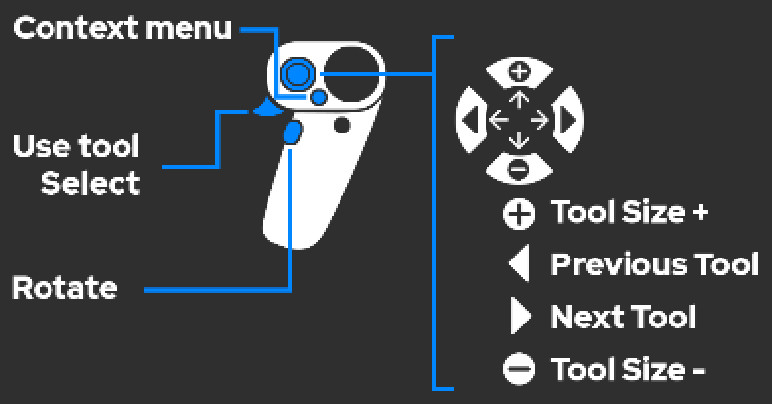
Primary Controller
- Select Object (Model – Reference Image)
- Point to the Model or the Reference Image with the “Primary Controller” and pull the trigger
- Manipulations will be applied to the selected object
- Context menu
- How to open
- Press “Menu Button” (while pointing to the object with the “Primary Controller”)
- What you can find here
- Model context menu
- Decimate – Set target number of faces and apply
- Subdivide – Set auto smoothing intensity and apply 4x subdivision
- Regularize topology
- Change material
- Reference Image context menu
- Lock/Unlock
- Delete
- Model context menu
- How to open
- Tool size
- Press “Trackpad Up/Down”
- Previous/next tool
- Press “Trackpad Left/Right”
Both ControllersScale, rotate and grabKeep pressing both “Grip Buttons” simultaneouslyPull/push objectKeep pressing the “Grip Button” while moving the stick up or down
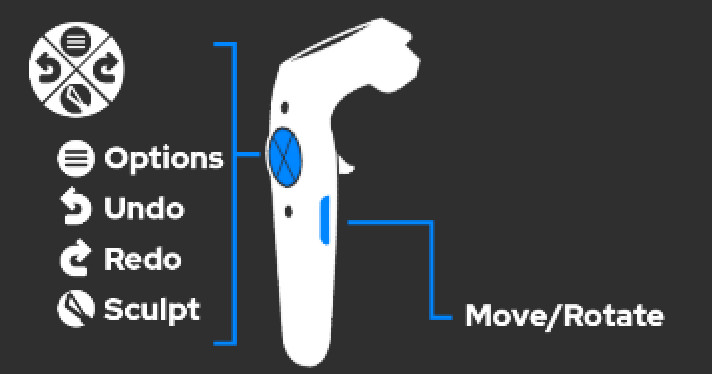
Controls / Valve Index
Secondary Controller
- Options
- How to open
- Move “Stick Up” to open Options UI (Sculpt UI panel will close automatically)
- What you can find here
- User preferences – Hand dominance, Polygon wireframe on/off, Mirror plane on/off
- Environment list
- Screenshot feature
- How to open
- Sculpt brushes
- How to open
- Move “Stick Down” to open Sculpt UI panel (Options UI panel will close automatically)
- What you can find here
- Sculpt brushes
- Sculpt brush modifiers (click on the header to open)
- How to open
- Undo/Redo
- Move “Stick Left/Right” to remove/replace your modifications
- File menu
- The file menu is located on the left side of the secondary controller
- Open the panel by pointing to it
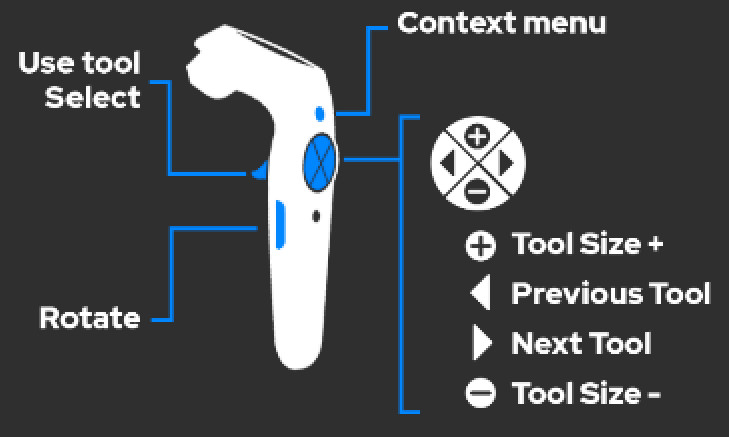
Primary Controller
- Select Object (Model – Reference Image)
- Point to the Model or the Reference Image with the “Primary Controller” and pull the trigger
- Manipulations will be applied to the selected object
- Context menu
- How to open
- Press “Home” (while pointing to the object with the Primary Controller)
- What you can find here
- Model context menu
- Decimate – Set target number of faces and apply
- Subdivide – Set smoothing strength and apply 4x subdivision
- Regularize topology
- Change material
- Reference Image context menu
- Lock/Unlock
- Delete
- Model context menu
- How to open
- Tool size
- Move ”Stick Up/Down”
- Previous/next tool
- Move “Stick Left/Right”
Both ControllersScale, rotate and grabKeep pressing both grip buttons simultaneously
Pull/push objectKeep pressing the grip button while moving the stick up or down
Controls / Windows Mixed Reality
Secondary Controller
- Options
- How to open
- Move “Stick Up” to open Options UI (Sculpt UI panel will close automatically)
- What you can find here
- User preferences – Hand dominance, Polygon wireframe on/off, Mirror plane on/off
- Environment list
- Screenshot feature
- How to open
- Sculpt brushes
- How to open
- Move “Stick Down” to open Sculpt UI panel (Options UI panel will close automatically)
- What you can find here
- Sculpt brushes
- Sculpt brush modifiers (click on the header to open)
- How to open
- Undo/Redo
- Move “Stick Left/Right” to remove/replace your modifications
- File menu
- The file menu is located on the left side of the secondary controller
- Open the panel by pointing to it
Primary Controller
- Select Object (Model – Reference Image)
- Point to the Model or the Reference Image with the “Primary Controller” and pull the trigger
- Manipulations will be applied to the selected object
- Context menu
- How to open
- Press “Menu” (while pointing to theobject with the Primary Controller)
- What you can find here
- Model context menu
- Decimate – Set target number of faces and apply
- Subdivide – Set smoothing strength and apply 4x subdivision
- Regularize topology
- Change material
- Reference Image context menu
- Lock/Unlock
- Delete
- Model context menu
- How to open
- Tool size
- Move ”Stick Up/Down”
- Previous/next tool
- Move “Stick Left/Right”
Both ControllersScale, rotate and grabKeep pressing both “Grip Buttons” simultaneouslyPull/push objectKeep pressing the “Grip Button” while moving the stick up or down
[xyz-ips snippet=”download-snippet”]