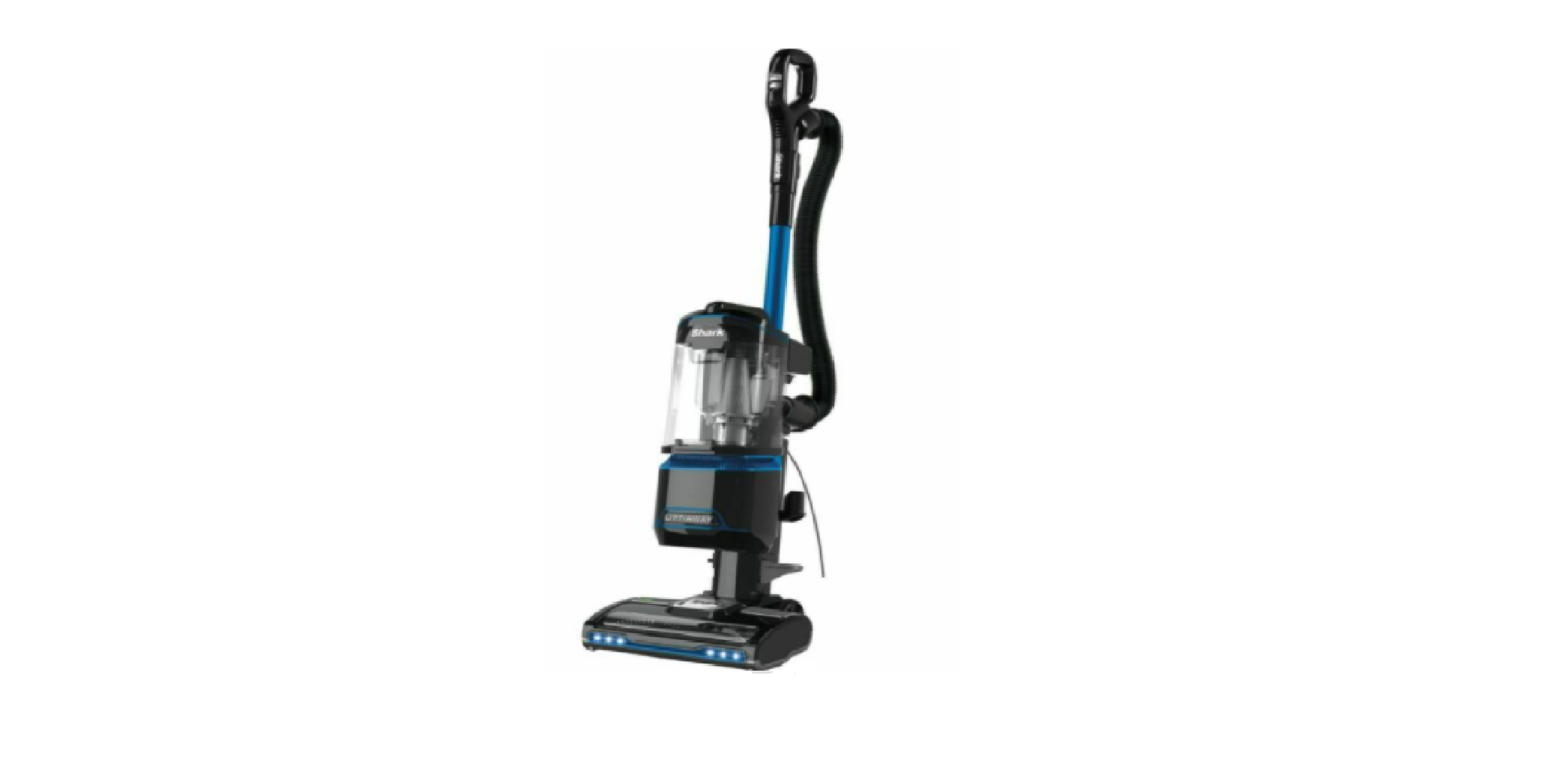
THANK YOUfor purchasing the Shark® Corded Upright Vacuum with Lift-Away™ Technology
REGISTER YOUR PURCHASETO BENEFIT FROM YOUR PRODUCT’S EXTENDEDGUARANTEE, SIMPLY REGISTER YOUR PURCHASEAT:sharkclean.co.uk/register-guarantee+44 (0)800 862 0453Scan QR code using mobile device
TIP: You can findthe model and serial numbers on the QRcode label located onthe back of your unit.
TIP: You can locatethe date code on oneof the prongs of thepower cord plug
Please note, products purchased directly from Sharkare automatically registered.
Benefits of registering your product and creatingan account:
- Get easier, faster product support and access toguarantee information
- Access troubleshooting and product care instructions
- Be among the first to know about exclusive productpromotions
TECHNICAL SPECIFICATIONSVoltage: 220-240V~, 50-60HzBody Motor Watts: 750WNozzle Watts: 80W
PLEASE READ CAREFULLYAND KEEP FOR FUTURE REFERENCE.This instruction manual is designed to help you get acomplete understanding of your new Shark CordedUpright Vacuum with Lift-Away™ Technology.If you have any questions, please call the customerservice line on +44 (0)800 862 0453.
 This marking indicates that this product should not be disposed with otherhousehold wastes throughout the EU. To prevent possible harm to theenvironment or human health from uncontrolled waste disposal, recycle itresponsibly to promote the sustainable reuse of material sources. To returnyour used device, please use the return and collection systems or contactthe retailer where this product was purchased. They can take this productfor environmental safe recycling.
IMPORTANT SAFETY INSTRUCTIONSFOR HOUSEHOLD USE ONLY • PLEASE READ ALL INSTRUCTIONSBEFORE USING THIS VACUUM.
IF YOU HAVE DELICATE OR WOOL CARPETS, PARTICULARLY LOOP PILE,PLEASE TRY THE VACUUM ON A HIDDEN AREA FIRST TO ENSURE THESPINNING BRUSH-ROLLS DO NOT DAMAGE OR UNPICK CARPET FIBRES.
 WARNINGREDUCE THE RISK OF FIRE, ELECTRIC SHOCK, INJURY,OR PROPERTY DAMAGE:
GENERAL WARNINGS
- Your vacuum cleaner may consist ofa motorised nozzle, wand, hose, and/or vacuum pod. This device containselectrical connections, electrical wiring,and moving parts that potentially presentrisk to the user.
- Use only identical replacement parts.
- Carefully observe and follow theinstructions provided below to avoidimproper use of the appliance. DO NOTuse the vacuum for any purpose otherthan those described in this manual.
- Before use, carefully inspect all partsfor any damage. DO NOT use if anyparts are damaged.
- The use of an extension cord is NOTrecommended.
- CAUTION: This vacuum cleaner handlecontains electrical connections. Thisvacuum contains no serviceable parts.USE WARNINGS
- This appliance can be used by personswith reduced physical, sensory or mentalcapabilities or lack of experience andknowledge if they have been givensupervision or instruction concerninguse of the appliance in a safe way andunderstand the hazards involved.
- DO NOT allow the appliance to beused by children. Keep the applianceand its cord out of reach of children.Do not allow to be used as a toy. Closesupervision is necessary when used nearchildren. Cleaning and user maintenanceshall not be done by children.
- Always turn off the vacuum cleanerbefore connecting or disconnecting anymotorised nozzles or other accessories.
- DO NOT handle plug or vacuum cleanerwith wet hands.
- DO NOT use without filters in place.
- If you have delicate or wool carpets,particularly loop pile, turn the spinningbrush-roll off by selecting the Hard Floorsetting when cleaning these surfaces asthe bristles have the potential to damageor unpick carpet fibres.
- DO NOT damage the power cord:a) DO NOT pull or carry vacuum cleanerby the cord or use the cord as a handle.b) DO NOT unplug by pulling on cord.Grasp the plug, not the cord.c) DO NOT run the vacuum cleanerover the power cord, close a door onthe cord, pull the cord around sharpcorners, or leave the cord nearheated surfaces.
- Only use Shark branded filters andaccessories. Use of non-Shark parts mayinvalidate your guarantee.
- DO NOT put any objects into nozzleor accessory openings. DO NOT usewith any opening blocked; keep freeof dust, lint, hair, and anything thatmay reduce airflow.
- DO NOT use if nozzle or accessoryairflow is restricted. If the air pathsor the motorised floor nozzle becomeblocked, turn the vacuum cleaner offand unplug from electrical outlet.Remove all obstructions before youplug in and turn on the unit again.
- Keep nozzle and all vacuum openingsaway from hair, face, fingers, uncoveredfeet, or loose clothing.
- DO NOT use if vacuum cleaneris not working as it should, orhas been dropped, damaged, leftoutdoors, or dropped into water.
- If the supply cord is damaged, itmust be replaced by the manufacturer,its service agent or similar qualifiedpersons in order to avoid a hazard.
- Use extra care when cleaningon stairs.
- DO NOT leave the vacuum cleanerunattended while plugged in.
- When powered on, keep the vacuumcleaner moving over the carpet surfaceat all times to avoid damaging thecarpet fibres.
- DO NOT place vacuum cleaneron unstable surfaces such as chairsor tables.
- Your Shark® vacuum may not bedesigned to stand up on its own.When taking a break from cleaning,you may need to lean it against furnitureor a wall, or lay it flat on the floor. Usingthe vacuum for an application wherethe unit lacks stability may result inpersonal injury.
- DO NOT use to pick up:a) Liquidsb) Large objectsc) Hard or sharp objects(glass, nails, screws, or coins)d) Large quantities of dust (drywall dust,fireplace ash, or embers). DO NOT useas an attachment to power tools fordust collection.e) Smoking or burning objects (hot coals,cigarette butts, or matches)f) Flammable or combustible materials(lighter fluid, gasoline, or kerosene)g) Toxic materials (chlorine bleach,ammonia, or drain cleaner)
- DO NOT use in the following areas:a) Poorly lit areasb) Wet or damp surfacesc) Outdoor areasd) Spaces that are enclosed and maycontain explosive or toxic fumesor vapors (lighter fluid, gasoline,kerosene, paint, paint thinners,mothproofing substances, orflammable dust)
- Turn off all controls before pluggingin or unplugging the vacuum.
- Unplug from electrical outlet whennot in use and before any maintenanceor cleaning.
- Hand wash with water only. Washingwith cleaning chemicals could damagethe unit.
- During cleaning or routine maintenance,DO NOT cut anything other thanhair, fibres, or string wrapped aroundthe brush-roll.
- Allow all filters to air-dry completelybefore replacing in the vacuum toprevent liquid from being drawn intoelectric parts.
- Make sure the dust cup and all filtersare in place after routine maintenance.
- If provided, secure the power cord aroundthe two cord hooks during storage.
GETTING TO KNOW YOUR SHARK® CORDED UPRIGHTVACUUM WITH LIFT-AWAY™ TECHNOLOGY.
WELCOME!Congratulationson your purchase. 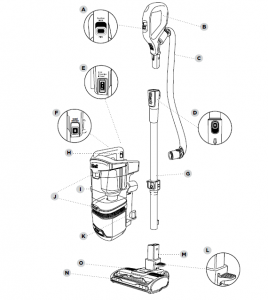 Use this instructionmanual to learn aboutyour new vacuum’sgreat features. Fromassembly to use tomaintenance, you willfind it all in here.
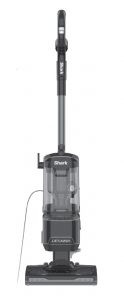
MAIN UNITA Suction Control SliderB HandleC HoseD Handle Release ButtonE Power SwitchF Wand Release ButtonG WandH Dust-Cup Release LatchI Lift-Away™ PodJ Dust-Cup Empty ButtonsK Lower Cord HookL Lift-Away™ Food PedalM Motorised Floor NozzleN HeadlightsO Brush-roll indicator light
ASSEMBLY

- Insert Wand into pod
- Insert Handle into wand.
- Attach Hose to back of vacuum pod.
ASSEMBLY

POWER CORD
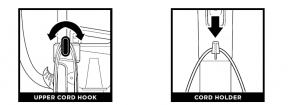
For cord access, rotate upper hook down Use cord holder on the side of wand to holdand remove cord. cord in place while vacuuming
SETTINGS
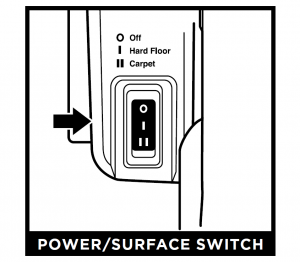
Select surface setting:O Power OffI Hard FloorFor hard floors, small area rugs ordelicate carpets – the brush-roll will notspin in this mode.II CarpetFor carpets
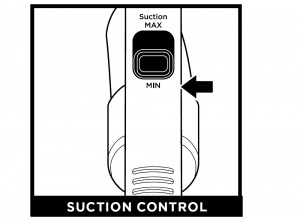
The Suction Control Slider located on thehandle allows you to adjust the suctiondepending on the floor type.MIN: to reduce suction and increasemaneuverability on carpets.MAX: to increase suction on hard floors.
BRUSH-ROLL INDICATOR LIGHT
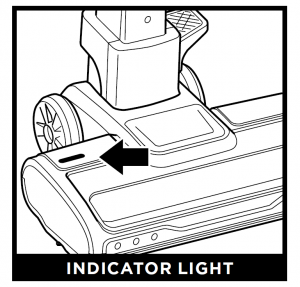
WHAT DOES THE BRUSH-ROLL INDICATOR LIGHT MEAN?Solid Green: The brush-roll is spinning and working as intended.Solid Red: There is a jam in the brush-roll area. Turn off and unplug the vacuum and removeany blockages in the nozzle.Flashing Red: The motorised floor nozzle is overheating. Turn the vacuum off and wait aminimum of 60 minutes for the unit to cool down.
CLEANING MODES
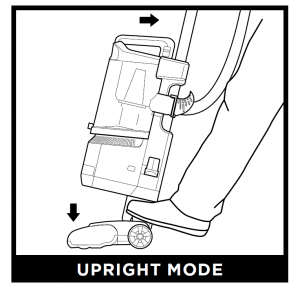
To engage brush-roll, step on floor nozzleand tilt handle back firmly.
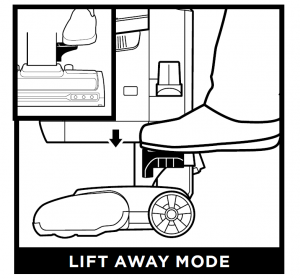
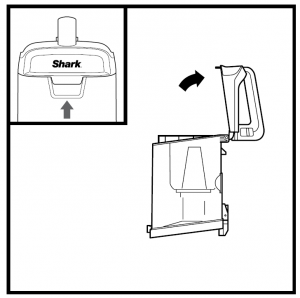
Step on the pedal on the floor nozzle to liftoff the pod.
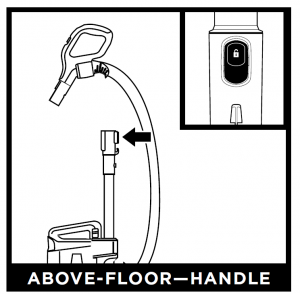
Press the Handle Release button and pull up onthe handle to detach it from the wand.
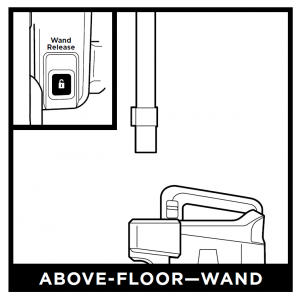
Press the Wand Release button and pull up onthe wand to detach it from the pod.
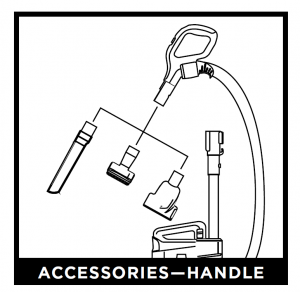
Attach an optional cleaning accessory tohandle or wand.
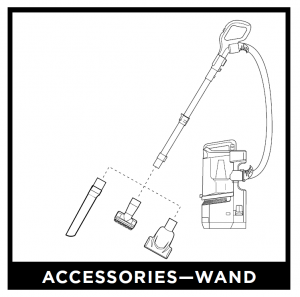
NOTE: All accessories are compatible with both the wand and the handle. Included accessorieswill vary by model.
EMPTYING THE DUST CUP
IMPORTANT: Unplug the power cord before performing any maintenance

To remove Dust Cup, pull up on the releasebutton located on the side of dust cup handle.Tilt dust cup forward, then lift to remove.
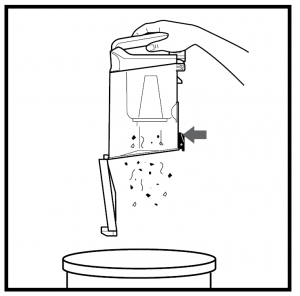
Hold the dust cup over the bin and press therelease button to open bottom of dust cup.
To remove collected debris from Lint Screen,lift the tab at the top of the dust cup toopen the lid. Remove debris from lint screento clean.

To reattach, place the bottom of dust cuponto the pod and then tilt until it clicksinto place.
CLEANING THE FILTERS
Regularly rinse the filters to maintain your vacuum’s suction power.Rinse filters with cold water only. Allow all filters to air-dry for at least 24 hours beforereinstalling them to prevent liquid from being drawn into electronic parts.
IMPORTANT: DO NOT use soap when cleaning the filters.
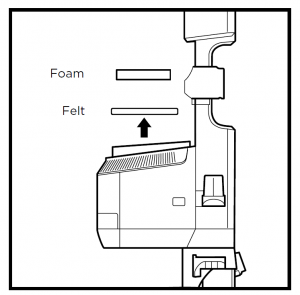
RINSE PRE-MOTOR FILTERSEVERY MONTH1 Pre-Motor (foam and felt):With the dust cup removed, take out thefoam and felt filters, and rinse with water. Taploose dirt off filters between washesas needed.
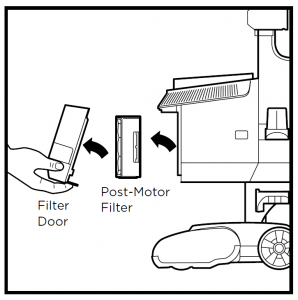
RINSE POST MOTOR FILTER EVERY YEARTo remove the Post motor Filter, first pull thetab on the bottom of the filter door, then liftoff the door. Press the tab on the side of thePost motor filter.To reattach the door, align the top first, thenpress in the bottom until it clicks into place.
CLEANING THE BRUSH-ROLL
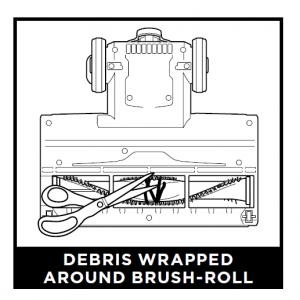
Clean off any debris on the bristles. Carefullyuse scissors within the brush-roll groove to cutaway any hair or debris wrapped around thebrush-roll.
MAINTENANCE
CHECKING FOR BLOCKAGES
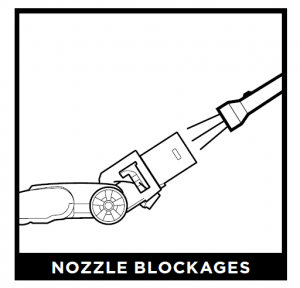
Check the opening at the top of the nozzlefor any blockages.
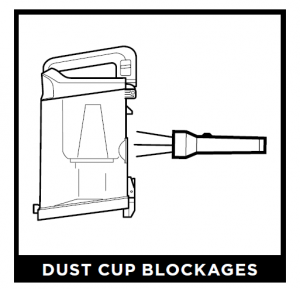
Detach dust cup from vacuum pod. Emptydust cup, remove debris from lint screen, andcheck for blockages.
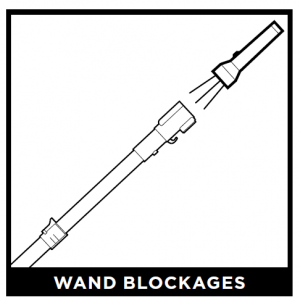
Detach wand from pod and handle, andcheck both ends for blockages.
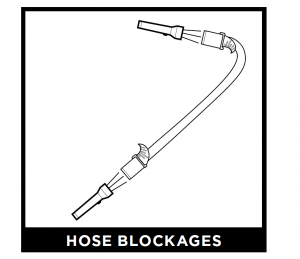
Detach hose from handle by pressing on therelease button at the top of the hose. Detachthe hose from the pod, and check openingsfor blockages.
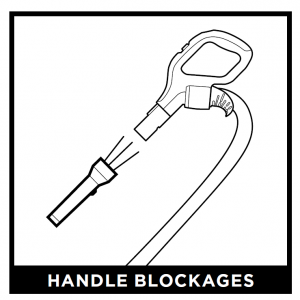
Detach handle from wand and checkopenings for blockages.
NOTE: Torch not included.
AVAILABLE ACCESSORIES
A revice Tool BClean tight spaces, reach skirting boards  and ceilings with this slim crevice tool.
B Upholstery ToolRemove pet hair and dust from curtains andother delicate fabrics and upholstery.
C Dusting BrushDusts and cleans a multitude of delicatesurfaces.
D 2 in 1 Duster Crevice ToolTwo cleaning tools in one—the crevice toolgives you extended cleaning reach for smallspaces, while the soft dusting brush cleansa multitude of surfaces.
E Pet Power BrushPicks up pet hair and loose debris, andpowerfully deep cleans dander out ofupholstery and other surfaces.
F Multi Surface ToolA single convertible tool for cleaning toughpet messes two ways: use the stiff bristlebrush to clean stuck-on debris, or take offthe bristles to reveal an upholstery toolperfect for removing stubborn pet hair andlarge piles of debris.
TROUBLESHOOTING GUIDE
 WARNING: To reduce the risk of shock and unintended operation, turnpower off and unplug unit before servicing.
Vacuum is not picking up debris. No suction or light suction.(Refer to Maintenance section for more information.)
- Check filters to see if they need cleaning. Follow instructions for rinsing and drying thefilters before re-inserting back into the vacuum.
- Dust cup may be full; empty dust cup.
- Check hose, hose connections, nozzles, and accessories for blockages; clear blockagesif required.
- Remove any string, carpet fibres or hair that may be wrapped around the brush-roll.
Vacuum lifts area rugs.
- Turn off the unit to disengage the brush-roll and restart with the POWER buttonfor suction only cleaning.
- Suction is powerful. Take care when vacuuming area rugs or rugs with delicatelysewn edges.
- Turn off the unit and disengage the area rug from the brush-roll and restart the unit.
Brush-roll does not spin.
- If brush roll indicator light on the floor nozzle turns red, the brush roll has stoppedspinning. Immediately turn off and unplug vacuum, disconnect the nozzle and removeblockage before reconnecting and turning vacuum back on.
- Pull the handle toward you and release the floor nozzle to disengage theauto-off feature.
- Make sure that the carpet height selector is not on the HARD FLOOR setting.
- Immediately turn off and unplug vacuum, disconnect the nozzle and remove blockagebefore reconnecting and turning vacuum back on.
Vacuum turns off on its own or brush-roll Indicator Light flashes red.This vacuum cleaner is equipped with a motor protective thermostat. If for some reasonyour vacuum overheats, the thermostat will automatically turn the suction motor off.Should this occur, perform the following steps to restart the thermostat:
- Turn the unit off.
- Unplug the vacuum.
- Empty the dust cup and clean filters (see page previous page)
- Check for blockages in hose, accessories and inlet openings.
- Allow the unit to cool for a minimum of 45 minutes.
- Plug in the vacuum.
- Restart the unit by turning the power on
Note: If vacuum still does not start, visit sharkclean.co.uk/customer-care or contactcustomer service on: 0800 862 0453.

When a consumer buys a product in the UK, they get the benefit of legal rights relating to the quality of theproduct (your “statutory rights”). You can enforce these rights against your retailer. However, at Shark we areso confident about the quality of our products that we give you an additional manufacturer’s Guarantee of upto five years upon registration with Shark. Offer valid only in United Kingdom and Republic of Ireland. Theseterms and conditions relate to our manufacturer’s Guarantee only – your statutory rights are unaffected.The conditions below describe the prerequisites and scope of our Guarantee. They do not affect yourstatutory rights or the obligations of your retailer and your contract with them.
Shark® GuaranteesA household appliance like a vacuum cleaner constitutes a sizeable investment. Your new machine needsto work properly for as long as possible. The guarantee it comes with is an important consideration – andreflects how much confidence the manufacturer has in its product and manufacturing quality.Every Shark machine comes with a free parts and labour guarantee. Our customer service helpline (0800862 0453) is open from 9.00am to 6.00pm Monday – Friday. It’s free to call, and you’ll be put straightthrough to a Shark representative. You’ll also find online support at sharkclean.co.uk.
How do I register my extended Shark guarantee?You can register your guarantee online within 28 days of purchase. To save time, you’ll need the followinginformation about your machine:
- Date you purchased the machine (receipt or delivery note)
- To register online, please visit sharkclean.co.uk/uk/register-guarantee
- Serial Number
IMPORTANT
- Both the 12 months and the extended 4 years guarantee will only cover your product from the date of purchase.
- Please keep your receipt at all times. Should you need to use your extended guarantee we will need yourreceipt to verify the information you have supplied to us is correct. The inability to produce a valid receiptmay invalidate your guarantee.
What are the benefits of registering my free Shark guarantee?When you register your guarantee we’ll have your details to hand if we ever need to get in touch. You can alsoreceive tips and advice on how to get the best out of your Shark vacuum and hear the latest news about newShark® technology and launches.If you register your guarantee online, you’ll get instant confirmation that we’ve received your details.
How long are new Shark machines guaranteed for?Our confidence in our design and quality control means that your new Shark vacuum cleaner is guaranteedfor a total of five years. (12 months plus an extended Guarantee of 4 years).
What is covered by the free Shark guarantee?Repair or replacement of your Shark machine (at Shark’s discretion), including all parts and labour. A Sharkguarantee is in addition to your legal rights as a consumer.
What is not covered by the free Shark guarantee?
- Blockages – For details of how to unblock your vacuum cleaner, please refer to the Operating Manual.
- Normal wear and tear such as brush bar, fuse, belt, batteries etc.
- Accidental damage, faults caused by negligent use or care, misuse, neglect, careless operation orhandling of the vacuum cleaner which is not in accordance with the Shark Operating Manual suppliedwith your machine.
- Use of the vacuum cleaner for anything other than normal domestic household purposes.
- Use of parts not assembled or installed in accordance with the operating instructions.
- Use of parts and accessories which are not Shark Genuine Components.
- Faulty installation (except where installed by Shark).
- Repairs or alterations carried out by parties other than Shark or its agents.
What happens when my guarantee runs out?Shark does not design products to last for a limited time. We do appreciate that there may be a desire forour customers to want to repair their vacuum cleaners after the Guarantee has elapsed. In this case pleasecontact our free phone customer service help line and ask about our out Guarantee program,on 0800 862 0453.
Where can I buy genuine Shark spares and accessories?Shark spares and accessories are developed by the same engineers who developed your Shark vacuum.You’ll find a full range of Shark spares and replacement parts for all Shark machines at sharkclean.co.uk/uk/parts. Accessories are at sharkclean.co.uk.Please remember that the use of non-Shark parts may invalidate your guarantee
Euro-Pro Europe Limited,3150 Century Way,Thorpe Park, Leeds,LS15 8ZB, UK0800 862 0453www.sharkclean.co.uk
Illustrations may differ from actual product. We are constantly striving to improveour products, therefore the specifications contained herein are subject to changewithout notice.SHARK is a registered trademark of SharkNinja Operating LLC.LIFT-AWAY is a trademark of SharkNinja Operating LLC.© 2020 SharkNinja Operating LLCNV602UKSeries_66_IB_MP_200527_Mv1PRINTED IN CHINA
Read More About This Manual & Download PDF:
Shark NV602UK Series Corded Upright Vacuum Cleaner Instruction Manual – Shark NV602UK Series Corded Upright Vacuum Cleaner Instruction Manual –