TIP: You can find the model and serial numbers on the QR code label located on the back of your unit.TIP: You can locate the date code on one of the prongs of the power cord plug.
REGISTER YOUR PURCHASETO BENEFIT FROM YOUR PRODUCT’S EXTENDED GUARANTEE, SIMPLY REGISTER YOUR PURCHASE AT:
Please note, products purchased directly from Shark® are automatically registered.
Benefits of registering your product and creating an account:
- Get easier, faster product support and access to guarantee information
- Access troubleshooting and product care instructions
- Be among the first to know about exclusive product promotions.
RECORD THIS INFORMATION
Model Number: ______________________________Serial Number _______________________________Date Code: __________________________________Date of Purchase (Keep receipt): ________________Store of Purchase: ____________________________
TECHNICAL SPECIFICATIONS
Voltage: 220-240V~, 50-60HzBody Motor Watts: 750WNozzle Watts: 80W
PLEASE READ CAREFULLY AND KEEP FOR FUTURE REFERENCE.This instruction manual is designed to help you get a complete understanding of your new Shark® Corded Upright Vacuum with Lift-Away® Technology. If you have any questions, please call the customer service line on 0800 862 0453.
This marking indicates that this product should not be disposed with other household wastes throughout the UK. To prevent possible harm to the environment or human health from uncontrolled waste disposal, recycle it responsibly to promote the sustainable reuse of material sources. To return your used device, please use the return and collection systems or contact the retailer where this product was purchased. They can take this product for environmentally safe recycling.
IMPORTANT SAFETY INSTRUCTIONS
FOR HOUSEHOLD USE ONLY • PLEASE READ ALL INSTRUCTIONS BEFORE USING THIS VACUUM.
IF YOU HAVE DELICATE OR WOOL CARPETS, PARTICULARLY LOOP PILE, PLEASE TRY THE VACUUM ON A HIDDEN AREA FIRST TO ENSURE THE SPINNING BRUSH-ROLLS DO NOT DAMAGE OR UNPICK CARPET FIBRES.
WARNING: REDUCE THE RISK OF FIRE, ELECTRIC SHOCK, INJURY, OR PROPERTY DAMAGE:WARNING: Children should be supervised to ensure that they do not play with the appliance.
GENERAL WARNINGS
- Inspect power cord and plug for any damage before use. DO NOT use vacuum cleaner with a damaged cord or plug. Turn off all controls before plugging in or unplugging the vacuum cleaner. Store your vacuum cleaner with the power cord secured around the two cord hooks. To minimize the risk of power cord damage, do not allow the motorised brush-roll to ingest the cord. If this occurs, immediately shut off power to the vacuum and remove the cord.
- Your vacuum cleaner consists of a motorised nozzle, wand, hose, and/ or vacuum pod. This device contains electrical connections, electrical wiring, and moving parts that potentially present risk to the user.
- Use only identical replacement parts.
- Carefully observe and follow the instructions provided below to avoid improper use of the appliance. DO NOT use the vacuum for any purpose other than those described in this manual.
- Before use, carefully inspect all parts for any damage. DO NOT use if any parts are damaged.
- The use of an extension cord is NOT recommended.
- CAUTION: This vacuum cleaner contains electrical connections. This vacuum contains no serviceable parts.USE WARNINGS
- This appliance can be used by persons with reduced physical, sensory or mental capabilities or lack of experience and knowledge if they have been given supervision or instruction concerning use of the appliance in a safe way and understand the hazards involved.
- DO NOT allow the appliance to be used by children. Keep the appliance and its cord out of reach of children. Do not allow to be used as a toy. Close supervision is necessary when used near children.CLEANING AND USE
- Always turn off the vacuum cleaner before connecting or disconnecting any motorised nozzles or other accessories.
- DO NOT handle plug or vacuum cleaner with wet hands.
- DO NOT use without filters in place.
- Only use Shark® branded filters and accessories. Damage caused by the use of non-Shark® parts may not be covered by your guarantee.
- DO NOT damage the power cord:
- DO NOT pull or carry vacuum cleaner by the cord or use the cord as a handle.
- DO NOT unplug by pulling on cord. Grasp the plug, not the cord.
- DO NOT run the vacuum cleaner over the power cord, close a door on the cord, pull the cord around sharp corners, or leave the cord near heated surfaces.
- DO NOT put any objects into nozzle or accessory openings. DO NOT use with any opening blocked; keep free of dust, lint, hair, and anything that may reduce airflow.
- DO NOT use if nozzle or accessory airflow is restricted. If the air paths or the motorised floor nozzle become blocked, turn the vacuum cleaner off and unplug from electrical socket. Remove all obstructions before you plug in and turn on the unit again.
- Keep nozzle and all vacuum openings away from hair, face, fingers, uncovered feet, or loose clothing.
- DO NOT use if vacuum cleaner is not working as it should, or has been dropped, damaged, left outdoors, or dropped into water.
- If the supply cord is damaged, it must be replaced by the manufacturer, its service agent or similar qualified persons in order to avoid a hazard.
- Use extra care when cleaning on stairs.
- DO NOT leave the vacuum cleaner unattended while plugged in.
- When powered on, keep the vacuum cleaner moving over the carpet surface at all times to avoid damaging the carpet fibres.
- DO NOT place vacuum cleaner on unstable surfaces such as chairs or tables.
- DO NOT use to pick up:
- Liquids
- Large objects
- Hard or sharp objects (glass, nails, screws, or coins)
- Large quantities of dust (drywall dust, fireplace ash, or embers). DO NOT use as an attachment to power tools for dust collection.
- Smoking or burning objects (hot coals, cigarette butts, or matches)
- Flammable or combustible materials (lighter fluid, petrol, or kerosene)
- Toxic materials (chlorine bleach, ammonia, or drain cleaner)
- DO NOT use in the following areas:
- Poorly lit areas
- Wet or damp surfaces
- Outdoor areas
- Spaces that are enclosed and may contain explosive or toxic fumes or vapors (lighter fluid, petrol, kerosene, paint, paint thinners, mothproofing substances, or flammable dust)Turn off all controls before plugging in or unplugging the vacuum.
- Unplug from electrical socket when not in use and before any maintenance or cleaning.
- To clean: Wipe down the unit with water only. Washing with cleaning chemicals could damage the unit.
- During cleaning or routine maintenance, DO NOT cut anything other than hair, fibres, or string wrapped around the brush-roll.
- Allow all filters to air-dry completely before replacing in the vacuum to prevent liquid from being drawn into electrical parts.
- Make sure the dust cup and all filters are in place after routine maintenance.
- Secure the power cord around the two cord hooks during storage.
SAVE THESE INSTRUCTIONS
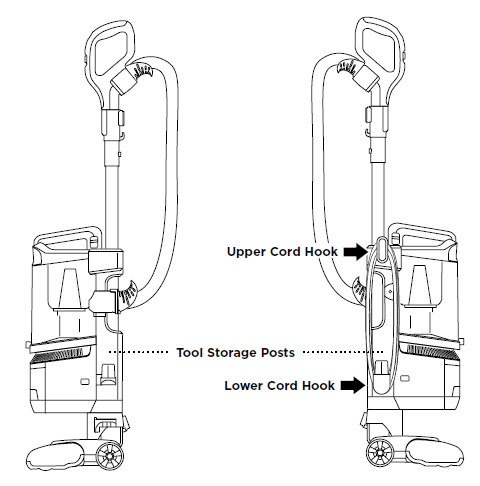
GETTING TO KNOW YOUR SHARK® CORDED UPRIGHT VACUUM WITH LIFT-AWAY® TECHNOLOGY.
WELCOME!Congratulations on your purchase. Use this instruction manual to learn about your new vacuum’s great features. From assembly to use to maintenance, you will find it all in here.
MAIN UNIT
A Suction Control SliderB HandleC HoseD Handle Release ButtonE Power SwitchF Wand Release ButtonG WandH Dust-Cup Release LatchI Lift-Away® PodJ Dust-Cup Empty ButtonsK Lower Cord HookL Lift-Away® Foot PedalM Motorised Floor NozzleN HeadlightsO Brush-roll indicator light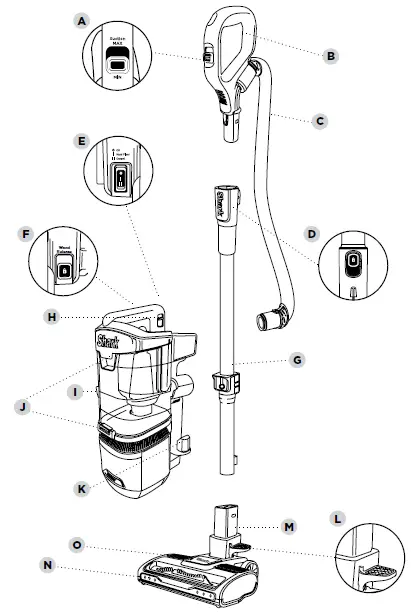
ASSEMBLY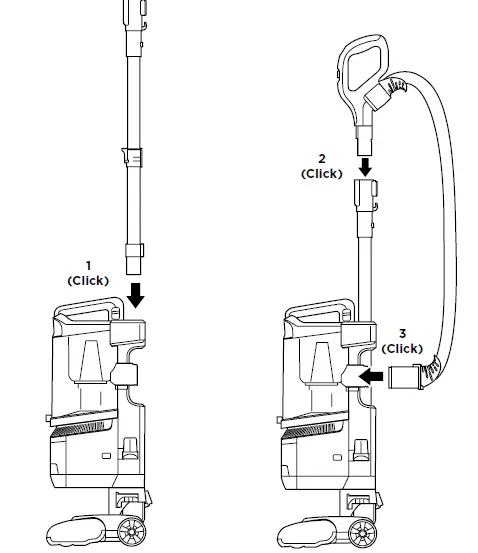
- Insert Wand into pod
- Insert Handle into wand.
- Attach Hose to back of vacuum pod.NOTE: Ensure all parts firmly CLICK into place before operating.

POWER CORD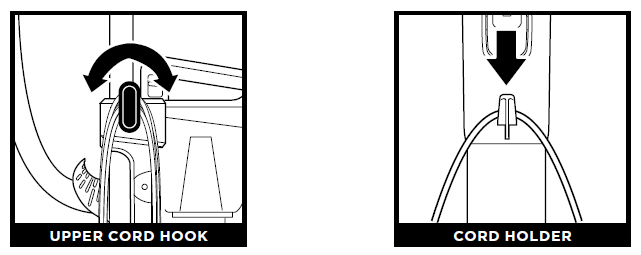
For cord access, rotate upper hook down and remove cord. Use cord holder on the side of wand to hold cord in place while vacuuming.
SETTINGS
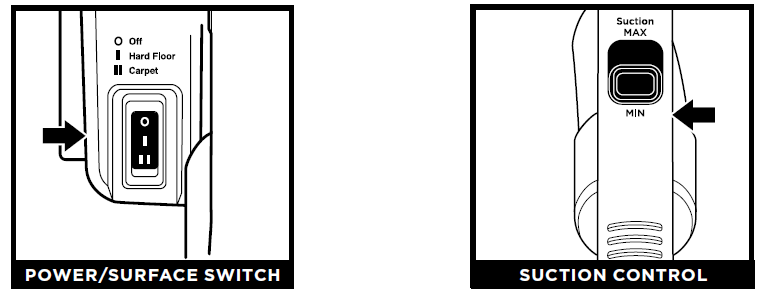
Select surface setting:
- Power Off
- Hard FloorFor hard floors, small area rugs or delicate carpets – the brush-roll will spin but at a slower speed.
- Carpet For carpets.
The Suction Control Slider located on the handle allows you to adjust the suction depending on the floor type.MIN: to reduce suction and increase maneuverability on carpets.MAX: to increase suction on hard floors.NOTE: Brush bar will continue to spin in all modes.
BRUSH-ROLL INDICATOR LIGHT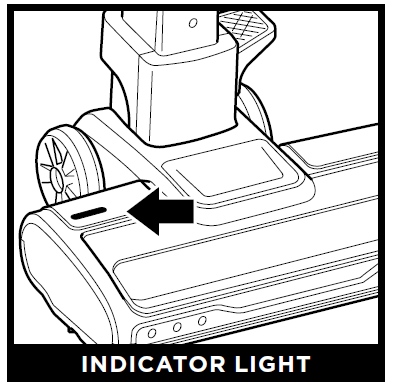
WHAT DOES THE BRUSH-ROLL INDICATOR LIGHT MEAN?Solid Green: The brush-roll is spinning and working as intended.Solid Red: There is a jam in the brush-roll area. Turn off and unplug the vacuum and remove any blockages in the nozzle.Flashing Red: The motorised floor nozzle is overheating. Turn the vacuum off and wait a minimum of 60 minutes for the unit to cool down.
CLEANING MODES
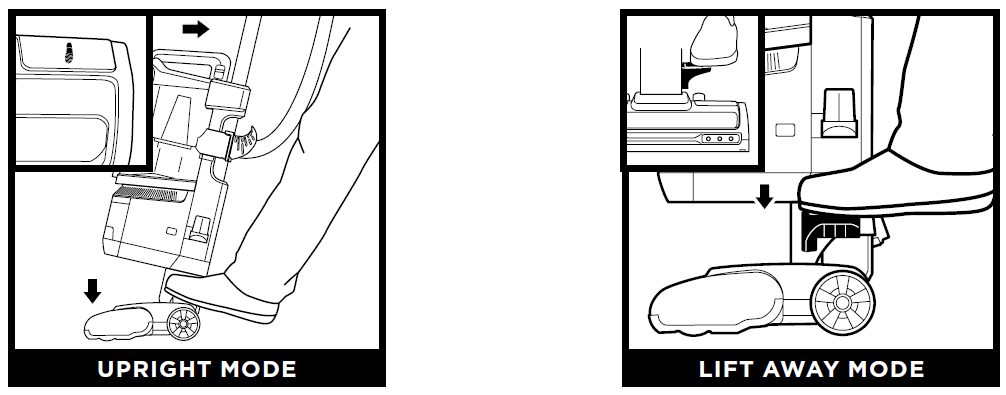
To engage brush-roll, step on floor nozzle and tilt handle back firmly. Step on the pedal on the floor nozzle to lift off the pod. 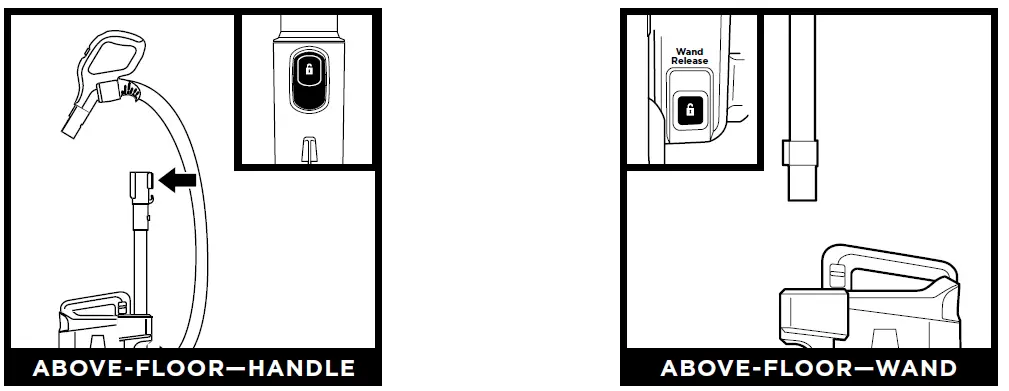
Press the Handle Release button and pull up on the handle to detach it from the wand. Press the Wand Release button and pull up on the wand to detach it from the pod.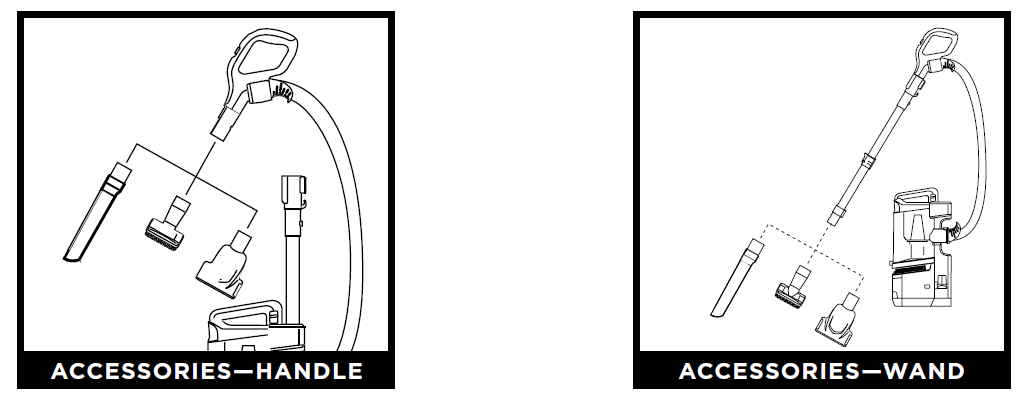
Attach an optional cleaning accessory to handle or wand.
NOTE: All accessories are compatible with both the wand and the handle. Included accessories will vary by model.
EMPTYING THE DUST CUP
IMPORTANT: Unplug the power cord before performing any maintenance.
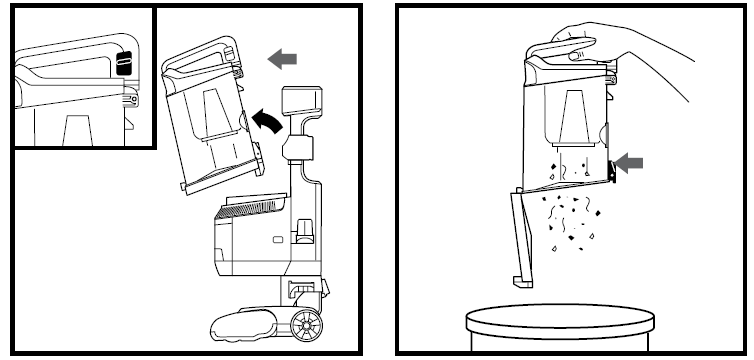
To remove Dust Cup, pull up on the release button located on the side of dust cup handle. Tilt dust cup forward, then lift to remove. To remove Dust Cup, pull up on the releasebutton located on the side of dust cup handle. Tilt dust cup forward, then lift to remove.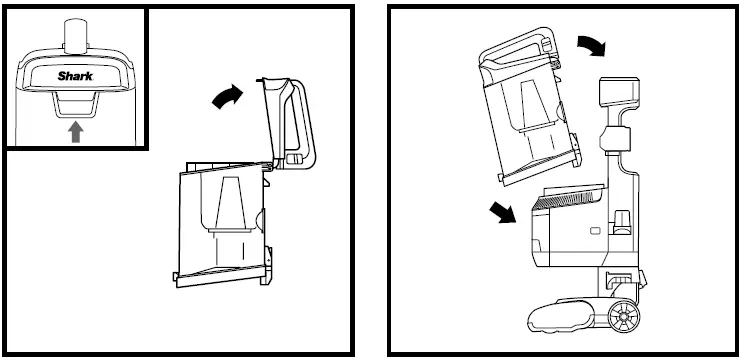
To remove collected debris from Lint Screen, lift the tab at the top of the dust cup to open the lid. Remove debris from lint screen to clean. To reattach, place the bottom of dust cuponto the pod and then tilt until it clicks into place.
CLEANING THE FILTERS
Regularly rinse the filters to maintain your vacuum’s suction power.Rinse filters with cold water only. Allow all filters to air-dry for at least 24 hours before reinstalling them to prevent liquid from being drawn into electronic parts.
IMPORTANT: DO NOT use soap when cleaning the filters.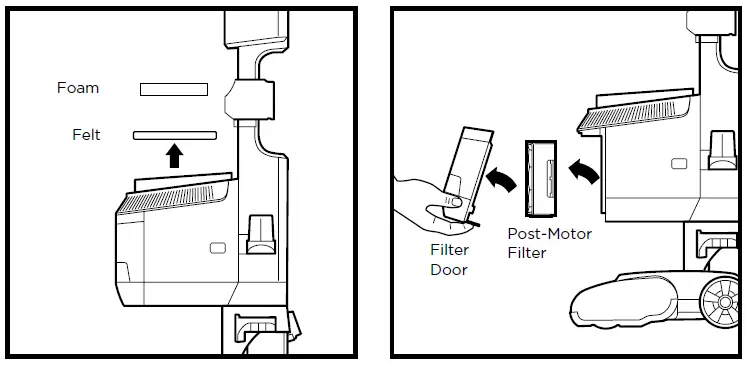
RINSE PRE-MOTOR FILTERS EVERY MONTH.
- Pre-Motor (foam and felt): With the dust cup removed, take out the foam and felt filters, and rinse with water. Tap loose dirt off filters between washes as needed.
RINSE POST MOTOR FILTER EVERY YEARTo remove the Post motor Filter, first pull the tab on the bottom of the filter door, then lift off the door. Press the tab on the side of the Post motor filter. To reattach the door, align the top first, then press in the bottom until it clicks into place.
CLEANING THE BRUSH-ROLL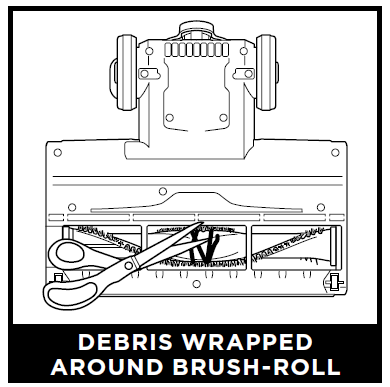
Clean off any debris on the bristles. Carefully use scissors within the brush-roll groove to cut away any hair or debris wrapped around the brush-roll.
MAINTENANCE
CHECKING FOR BLOCKAGES
IMPORTANT: Unplug the cord before performing any maintenance.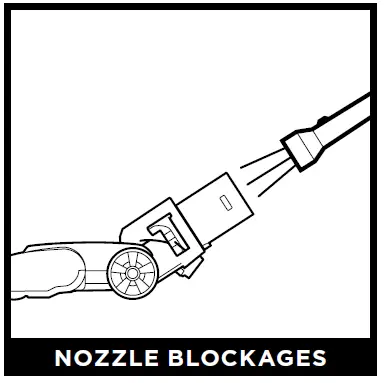 Check the opening at the top of the nozzle for any blockages.
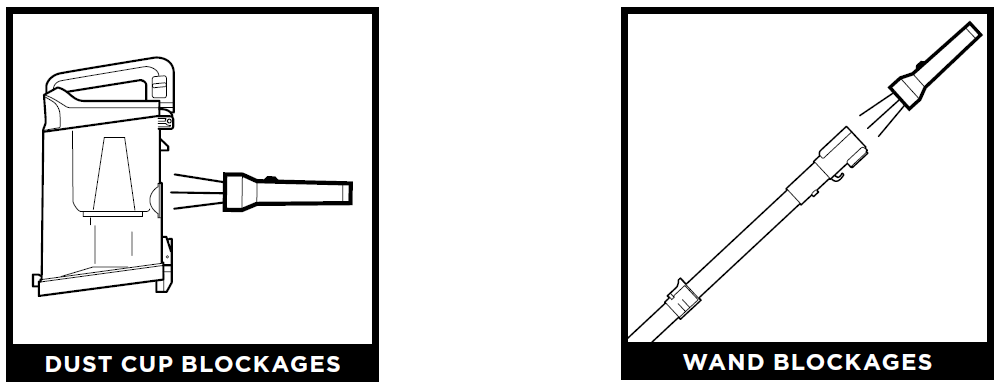
Detach dust cup from vacuum pod. Empty dust cup, remove debris from lint screen, and check for blockages. Detach wand from pod and handle, and check both ends for blockages.
Detach hose from handle by pressing on the release button at the top of the hose. Detach the hose from the pod, and check openings for blockages.Detach handle from wand and check openings for blockages.NOTE: Torch not included.
AVAILABLE ACCESSORIES
A Crevice Tool Clean tight spaces, reach skirting boards and ceilings with this slim crevice tool.B Upholstery ToolRemove pet hair and dust from curtains and other delicate fabrics and upholstery.C Dusting BrushDusts and cleans a multitude of delicate surfaces.D 2 in 1 Duster Crevice ToolTwo cleaning tools in one—the crevice tool gives you extended cleaning reach for small spaces, while the soft dusting brush cleans a multitude of surfaces.E Pet Power BrushPicks up pet hair and loose debris, and powerfully deep cleans dander out of upholstery and other surfaces.F Multi Surface ToolA single convertible tool for cleaning tough pet messes two ways: use the stiff bristle brush to clean stuck-on debris, or take off the bristles to reveal an upholstery tool perfect for removing stubborn pet hair and large piles of debris.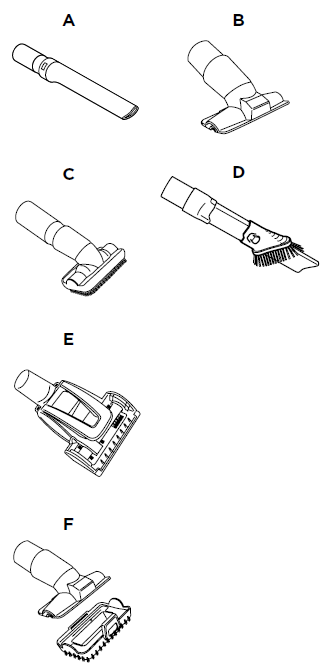
NOTE: Not all accessories come with all units. Please refer to the packaging panels for your unit’s configuration. To order additional accessories, visit sharkclean.co.uk.
TROUBLESHOOTING GUIDE
WARNING: To reduce the risk of shock and unintended operation, turn power off and unplug unit before servicing.
Vacuum is not picking up debris. No suction or light suction. (Refer to Maintenance section for more information.)
- Check filters to see if they need cleaning. Follow instructions for rinsing and drying the filters before re-inserting back into the vacuum.
- Dust cup may be full; empty dust cup.
- Check hose, hose connections, nozzles, and accessories for blockages; clear blockages if required.
- Remove any string, carpet fibres or hair that may be wrapped around the brush-roll.
Vacuum lifts area rugs.
- Turn off the unit to disengage the brush-roll and restart with the POWER button for suction only cleaning.
- Suction is powerful. Take care when vacuuming area rugs or rugs with delicately sewn edges.
- Turn off the unit and disengage the area rug from the brush-roll and restart the unit.
Brush-roll does not spin.
- If brush-roll indicator light on the floor nozzle turns red, the brush-roll has stopped spinning. Immediately turn off and unplug vacuum, disconnect the nozzle and remove blockage before reconnecting and turning vacuum back on.
- Pull the handle toward you and release the floor nozzle to disengage the auto-off feature.
- Immediately turn off and unplug vacuum, disconnect the nozzle and remove blockage before reconnecting and turning vacuum back on.
Vacuum turns off on its own or brush-roll Indicator Light flashes red.
This vacuum cleaner is equipped with a motor protective thermostat. If for some reason your vacuum overheats, the thermostat will automatically turn the suction motor off. Should this occur, perform the following steps to restart the thermostat:
- Turn the unit off.
- Unplug the vacuum.
- Empty the dust cup and clean filters (see page previous page)
- Check for blockages in hose, accessories and inlet openings.
- Allow the unit to cool for a minimum of 45 minutes.
- Plug in the vacuum.
- Restart the unit by turning the power on.Note: If vacuum still does not start, visit sharkclean.co.uk/customer-care or contact customer service on: 0800 862 0453.
FIVE (5)YEAR LIMITED GUARANTEE
When a consumer buys a product in the UK, they get the benefit of legal rights relating to the quality of the product (your “statutory rights”). You can enforce these rights against your retailer. However, at Shark® we are so confident about the quality of our products that we give you an additional manufacturer’s warranty of up to five years upon registration with Shark®. Offer valid only in United Kingdom and Republic of Ireland. These terms and conditions relate to our manufacturer’s guarantee only – your statutory rights are unaffected. The conditions below describe the prerequisites and scope of our guarantee.
Shark® Guarantees
A household appliance like a vacuum cleaner constitutes a sizeable investment. Your new machine needs to work properly for as long as possible. The guarantee it comes with is an important consideration – and reflects how much confidence the manufacturer has in its product and manufacturing quality. Every Shark® machine comes with a free parts and labour guarantee. Our customer service helpline (0800 862 0453) is open from 9.00am to 6.00pm Monday – Friday. It’s free to call, and you’ll be put straight through to a Shark® representative. You’ll also find online support at sharkclean.co.uk.
How do I register my extended Shark® guarantee?If you have purchased your vacuum directly from sharkclean.co.uk your extended guarantee is registered automatically. You can also register your guarantee online within 28 days of purchase. To save time, you’ll need the following information about your machine:
- Date you purchased the machine (receipt or delivery note)
- Model Number
IMPORTANT
- Both the 1 year and the extended 4 years guarantee will only cover your product from the date of purchase.
- Please keep your receipt at all times. Should you need to use your extended guarantee we will need your receipt to verify the information you have supplied to us is correct. The inability to produce a valid receipt may invalidate your ability to claim against your guarantee.
What are the benefits of registering my free Shark® guarantee?When you register your guarantee we’ll have your details to hand if we ever need to get in touch. You can also receive tips and advice on how to get the best out of your Shark® vacuum and hear the latest news about new Shark® technology and launches. If you register your guarantee online, you’ll get instant confirmation that we’ve received your details.
How long are new Shark® machines guaranteed for?Our confidence in our design and quality control means that your new Shark® vacuum cleaner is guaranteed for a total of five years (1 year plus an extended guarantee of 4 years).
What is covered by the free Shark® guarantee?
At Shark’s discretion repair or replacement of your Shark® machine, including all parts and labour. A Shark® guarantee is in addition to your legal rights as a consumer.
What is not covered by the free Shark® guarantee?
- Blockages – for details of how to unblock your vacuum cleaner, please refer to the Operating Manual.
- Normal wear and tear such as brush bar, fuse, belt etc.
- Accidental damage, faults caused by negligent use or care, misuse, neglect, careless operation or handling of the vacuum cleaner which is not in accordance with these instructions.
- Use of the vacuum cleaner for anything other than normal domestic household purposes.
- Use of parts not assembled or installed in accordance with the operating instructions.
- Use of parts and accessories which are not Shark® genuine components.
- Faulty installation (except where installed by Shark®).
- Repairs or alterations carried out by parties other than Shark® or its agents.
What happens when my guarantee runs out?
Shark® does not design products to last for a limited time. We do appreciate that there may be a desire for our customers to want to repair their vacuum cleaners after the guarantee has lapsed. In this case please contact our Freephone customer service help line and ask about our out of guarantee program, on 0800 862 0453.
Where can I buy genuine Shark® spares and accessories?
Shark® spares and accessories are developed by the same engineers who developed your Shark® vacuum. You’ll find a full range of accessories, spares and replacement parts for all Shark® machines at sharkclean.co.uk Only use Shark® branded filters and accessories. Damage caused by use of non-Shark® parts may not be covered by your guarantee.
SharkNinja Europe Limited,3150 Century Way, Thorpe Park,Leeds, LS15 8ZB, UK+44 (0)800 862 0453www.sharkclean.co.uk![]()
References
[xyz-ips snippet=”download-snippet”]