![]()
Refrigerator – Freezer Operation manual
SJ-FX660W-CGSJ-FX660W-BKSJ-FX660W-RDSJ-FX660S2-BK
 Refrigerant: R600aInsulation blowing gas: Cyclopentane ·:R600a ·:
 “Plasmacluster” and “Device of a cluster of grapes” are trademarks of Sharp Corporation.
Thank you very much for buying this SHARP product. Before using your SHARP refrigerator, please read this operation manual to ensure that you gain the maximum benefit from it.
- This refrigerator is intended for making ice cubes, refrigerating and freezing food.
- This refrigerator is for household use only, with ambient temperature indicated in the table. The climate class is specified on the rating plate. The refrigerator is fully functional at the ambient temperature range of the indicated climate class. If the refrigerator is used at colder temperatures, the refrigerator will not be damaged up to a temperature of +5°C.
- The refrigerator should not be subjected to temperatures of -10°C or below for a long period of time.
Household use only
| Climateclass | Acceptable range ofambient temperature |
| SN | +10`C to 32`C |
| N | +16°C to 32°C |
| ST | +16°C to 38°C |
| T | +16°C to 43°C |
Safety information
 |
Warning | This means that there are high risks of death or serious injury. |
|
Caution | This means that there are high risks of material damage or personal injury. |
 |
Caution | Fire marks means this refrigerator has risk of fire accident. |
![]() WarningRefrigerantThis refrigerator contains flammable refrigerant (R600a: isobutane) and insulation blowing gas (cyclopentane). Observe the following rules to prevent ignition and explosion.
WarningRefrigerantThis refrigerator contains flammable refrigerant (R600a: isobutane) and insulation blowing gas (cyclopentane). Observe the following rules to prevent ignition and explosion.
- Do not damage the refrigerant circuit.
- Do not allow any pointed objects to have contact withthe refrigeration system. The refrigeration system behind and inside the refrigerator contains refrigerant.
- Do not use mechanical devices or other means to accelerate the defrosting process. (This refrigerator has adopted automatic defrosting system.)
- Do not use electrical appliances inside the refrigerator.
- Do not block the space around the refrigerator.
- Do not use flammable sprays, such as spray paint near the refrigerator.
- Do not store flammable sprays, such as spray paint in the refrigerator.
- In the case of failure of the refrigeration system, do not touch the wall socket and use open flames. Open the window and let out the air from the room. Then ask a service agent approved by SHARP for service.
Power cord, Plug, Socket
Read carefully the following rules to prevent electric shock or fire.
- Make sure to protect the power cord from being damaged during installation or moving. If the power plug or cord is loose, do not insert the power plug.
- Do not place multiple portable socket-outlets or portable power supplies at the rear of the refrigerator.
- Connect the power plug into the wall socket firmly and directly. Do not use an extension cord or adapter plug.
- Connect the power plug to the socket with the required rated voltage.
- Connect the earth pin to the earth terminal properly.
- Do not touch the power plug with wet hands. Disconnect from the main electricity supply by removing the main plug from the socket. Do not remove by pulling the power cord.
- Dust deposited on the power plug may cause fire. Wipe it off carefully.
- Pull out the plug if the refrigerator is not used for a long time.
- If the flexible supply cord is damaged, it must be replaced by service agent approved by SHARP in order to avoid a hazard.
Installation
- Do not install the refrigerator in a damp or wet location. It may cause the damage to the insulation or electrical leak. Dew may also appear on the outer cabinet and it causes rust.
- The refrigerator should be installed flatly and firmly on the floor.
In use
- Do not store volatile and flammable materials such as ether, petrol, propane gas, aerosol cans, adhesive agents and pure alcohol etc. These materials are easy to explode.
- Do not store temperature-sensitive products such as pharmaceutical products in the refrigerator. There are high risks of changes in product quality .
- Do not attempt to change or modify this refrigerator. This may result in fire, electric shock or injury.
- Do not place any object on the top of refrigerator. If the object falls down from the top, it may cause injury.
- Do not touch the machinery parts (upper section of the ice storage box) of the automatic ice maker. Bodily injury may occur as result when the ice tray turns.
- Do not hit the glass doors hard. (Only for SJ-FX660W) Otherwise, they may break and cause physical injury.
- Do not touch the dispenser door when it is rotating. If you catch your fingers in the door, it may cause injury. (Only for SJ-FX660W)
- This appliance can be used by children aged from 8 years or above and persons with reduced physical, sensory or mental capabilities or lack of experience and knowledge if they have been given supervision or instruction concerning use of the appliance in a safe way or understanding the hazards involved. Children shall not play with the appliance. Cleaning and user maintenance shall not be done by children without supervision.
Care and Cleaning
- Unplug the refrigerator first to prevent electric shock.
- Do not splash water directly on the outer cabinet or the interior. This may lead to rusting and deterioration of the electrical insulation.
Trouble
- If you smell something burning, pull out the power plug immediately. Then ask a service agent approved by SHARP for service.
- In case of gas leak, ventilate the area by opening window. Do not touch the refrigerator or the power socket.
Disposal
- Ensure that the refrigerator presents no danger to children while being stored until disposal. (e.g. remove the magnetic door seals to prevent child entrapment.)
- This refrigerator should be disposed appropriately. Take the refrigerator to a professional recycling plant for flammable refrigerant and insulation blowing gases.
![]() CautionTransportation
CautionTransportation
- When you install or move your refrigerator, use curing mat to protect the floor from being damaged.
- Carry the refrigerator by holding the handles located on the rear and bottom side. If you lift up the refrigerator improperly, it may cause injury.

In use
- Do not touch food or metal containers in the freezer compartment with wet hands. This may cause frostbite. It is exactly the same when multi temperature room is set at -8°C or -18°C.
- Do not place bottled drinks and cans in the freezer compartment.It is exactly the same when multi temperature room is set at -8°C or -18°C.
- Do not use other than potable water to make ice cubes.
- Do not open or close the door when somebody put a hand near the door. There is a risk that the other people may catch their fingers in the door.
- Do not put oversized object in the pockets of the door. If the object falls down from the pockets, it may cause injury.
- Make sure to handle the glass shelves with care to install or uninstall. If you drop the glass shelves, it may break or cause injury.
Installation
- Keep adequate ventilation space around the refrigerator.• The picture shows the minimum required space for installing the refrigerator. The measurement condition of energy consumption is conducted under a different space dimension.• By keeping greater space, the refrigerator may consume a less amount of power consumption.• If use the refrigerator in the smaller space dimension than pictured above, it may cause temperature rise in the unit, loud noise, and failure.Overall space required in use
SJ-FX660W SJ-FX660S2 a 1440mm 1432mm b 1330mm 1330mm - Use the two front the adjustable feet to place the refrigerator flatly and firmly on the floor.
- Use the adjustable feet when right and left doors are not properly aligned.• Turn the adjustable feet until the opposite foot is slightly off from the ground.
- Connect the appliance via a correctly installed socket.Note• Place your refrigerator to access the plug.• Keep your refrigerator out of direct sunlight and do not place next to heat generating appliance.• Do not place your refrigerator directly on the ground.Insert suitable stand such as wooden board under the refrigerator.• When you insert the power plug with the door opened, door alarm sounds but it is normal. This sound stops after closing the door.• Do not push the refrigerator against the wall. The wall surrounding the refrigerator may get dirty or discolored because of the air flow caused by heat radiation.
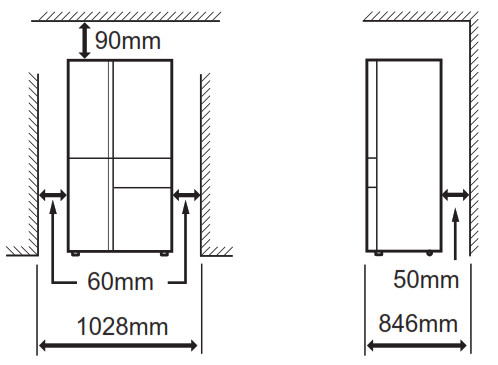 • By keeping greater space, the refrigerator may consume a less amount of power consumption.• If use the refrigerator in the smaller space dimension than pictured above, it may cause temperature rise in the unit, loud noise, and failure.Overall space required in use
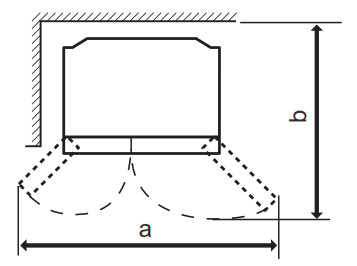
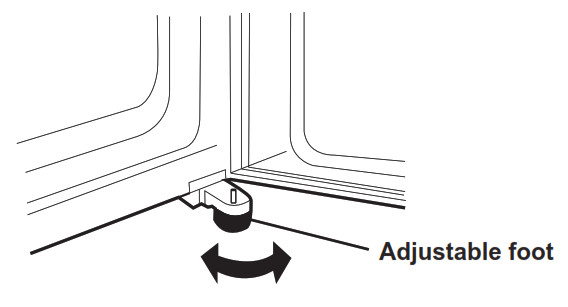
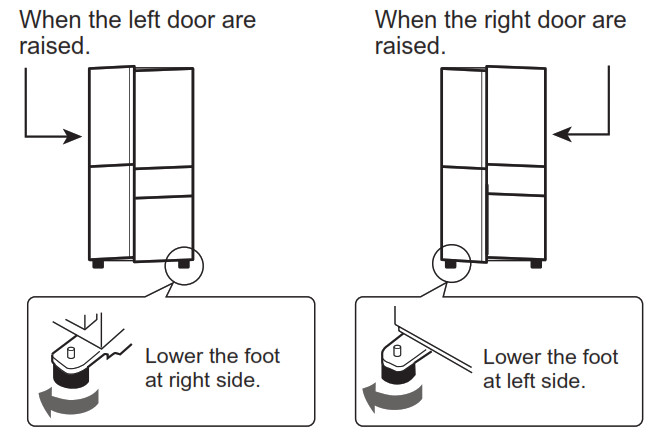 • Turn the adjustable feet until the opposite foot is slightly off from the ground.
Four casters are located on the bottom of the refrigerator
• The casters allow the refrigerator to move back and forth.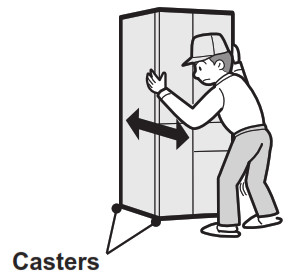
Before using your refrigerator
- Clean the inside parts with a cloth soaked in warm water.
- If you use soapy water to clean, wipe it off thoroughly with water.
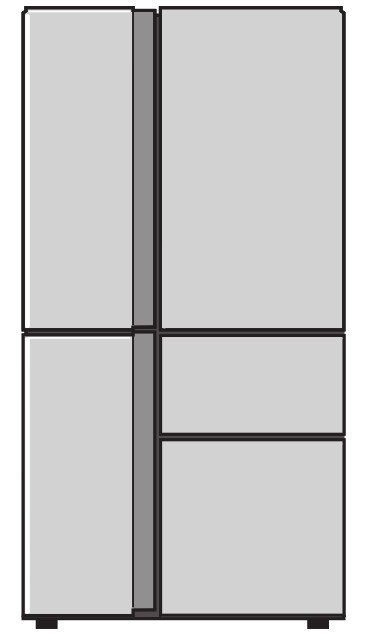
Description
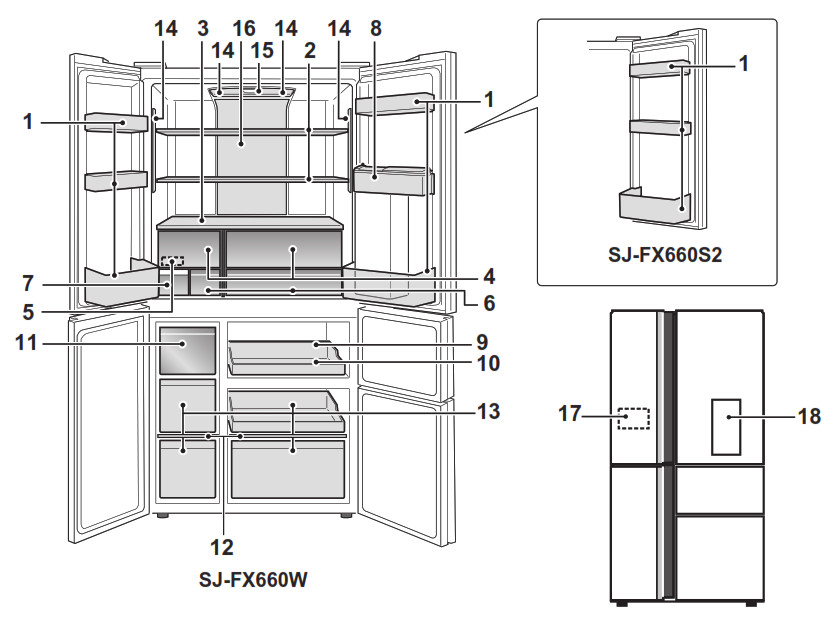
- Door pocket( SJ-FX660W: 5 pcs)(SJ-FX660S2 : 6 pcs)
- Refrigerator shelf (2 pcs)
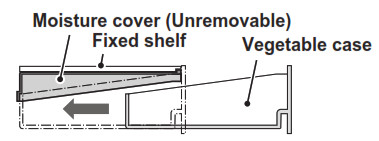
- Fixed shelf
- Vegetable caseMoisture cover is installed on the right side only.This cover works for storing food with high-moisture freshly.
- Egg holder
- Fresh case
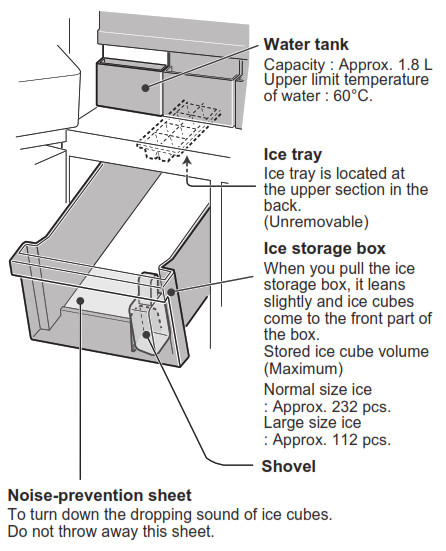
- Water tank (Ice maker)
- Dispenser tank < Only for SJ-FX660W >
- Case
- Stainless steel tray
- Ice storage boxTo prevent damage to the ice storage box, do not make ice in the ice storage box or pour oil into it.
- Freezer shelf
- Freezer case
- Light
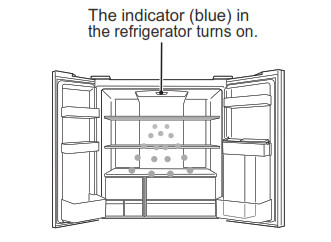
- Plasmacluster indicator
- Hybrid cooling panelThe panel cools the refrigerator compartment indirectly from the rear. In this way, food is cooled gently without being exposed to cold air flow.
- Control panel
- Water dispenser< Only for SJ-FX660W >
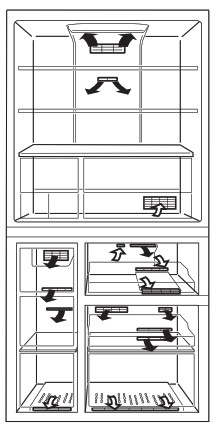
If you wish to store large items within your refrigerator
- You may remove any shelves or any pockets numbered 1,2,4,5,6,7,9,10,11,12,13 in the picture above.
- Cooling performance is not influenced even if you use the refrigerator in the above situation.
Door Alarm
- The door alarm sounds when the door* is left open.
- The door alarm sounds in 1 minute after opening the door and again after 1 minute (once in each case).
- If the door* is left open for approx. 3 minutes, the alarm sounds continuously.
- The alarm stops after closing all the door. (* Only refrigerator door and left freezer door.)
Deodorizing unit
- Deodorizing catalyst is installed on the routes of cold air. No operation and cleaning are required.
Storing food
- Ensure that the food is of the freshest possible quality to maximize the storage life of perishable food. The following is a general guide to help promote longer food storage.
- Food has a limited storage life. Make sure not to exceed use-by date indicated by manufacturer.
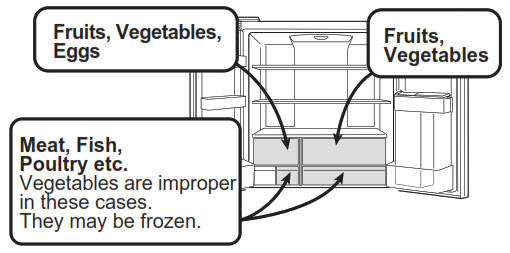
Refrigerator
Fruit / Vegetables
- Fruit and vegetables should be loosely enclosed in a plastic material e.g. wrap, bags (do not seal) and placed in the vegetable case to minimize moisture loss.
- Fruits and vegetables which are easily effected by low temperature should be stored in a cool place except for the refrigerator.

Dairy Products & Eggs
- Most dairy products have their best-before date on the outer packaging which informs the recommended temperature and storage life of the food.
- Eggs should be stored in the egg holder.
Meats / Fish / Poultry
- Place on a plate or a dish and cover with paper or plastic wrap.
- For larger cuts of meat, fish, or poultry, place to the rear of the shelves.
- Ensure all cooked food is wrapped securely or placed in an airtight container.* Notes for fresh food:
- Fresh food (securely wrapped) should be stored in limited time to prevent spoilage and badly affecting other stored foods.
- Fresh food (securely wrapped) should be stored in limited time to prevent spoilage and badly affecting other stored foods.
Freezer
- Freeze small quantities of food at a time in order to freeze them quickly.
- Food should be properly sealed or covered tightly. · Place food in the freezer evenly.
- Label bags or containers to keep an inventory of freezing food.
Multi temperature roomYou can choose from four kinds of temperature zones. See “Multi temperature room” about how to select the temperature zone.
| Temperature zone | Mode | Storing food |
| Refrigerating | Drinks, Daily dish Dessert etc. | |
| Fresh | Meat, Fish Daily product etc. | |
| Soft freezing | Meat, Fish etc. | |
| Freezing | Frozen food |
Soft freezingThis mode is suitable for storing food without freezing solid. You may cut easily even if the food is big. If the food is hard to cut, leave it for five to fifteen minutes on a cooking board then try again. Please note that this mode is not designed for long-term storage of frozen food. Stored food should be used within 1 week.
Advice for preventing dew or frost inside the refrigerator
- Keep the door securely closed. If the food falls down, it may cause a gap between the cabinet and the door. Move it back to the shelf or the pocket.
- Stored items should be packed or sealed with such as food containers or plastic wraps.
Advice for storing food
- Evenly place the food on the shelves to allow the cooling air to circulate efficiently.
- Hot food should be cooled before storing. Storing hot food increases the temperature in the unit and the risk of food spoilage.
- Opening the door for long periods can cause a significant increase of the temperature in the compartments of the appliance.
- Do not block the outlet and inlet of the cool air circulating circuit with food or containers; otherwise the food is not be evenly cooled throughout the refrigerator.
- Do not place food directly in front of cold air outlet. This may lead to the food freezing.
Control panel
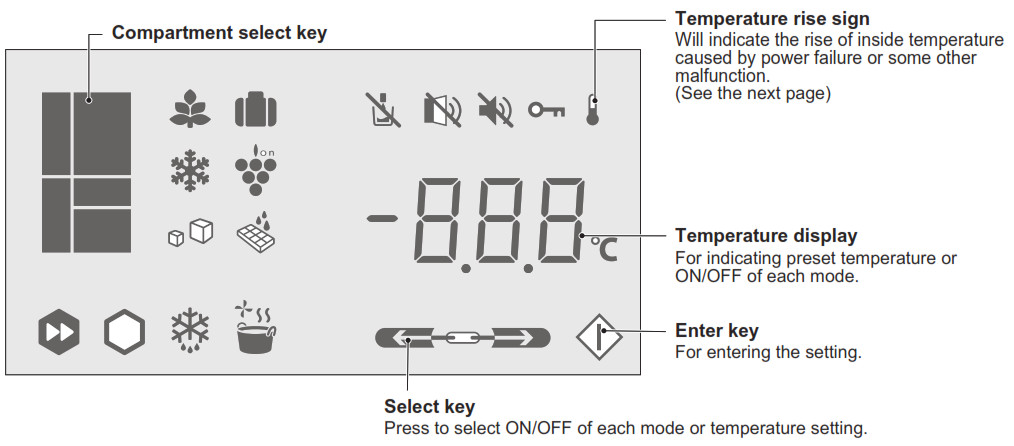
Icons
All modes are “OFF” by a default setting.Main modes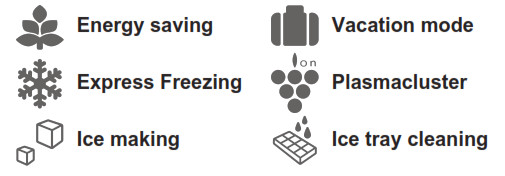
Multi temperature room assisting modes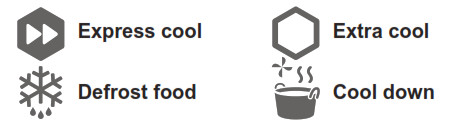
Additional settings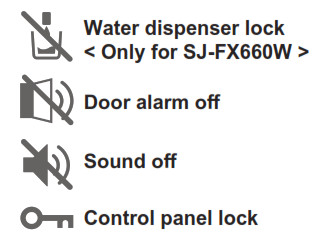
At the time of re-power distribution
- When there is a power failure during the operation of express freezing or ice tray cleaning, the operation is stopped.
- See “Multi temperature room” about the assisting mode. · The other settings are the same as before the power failure.
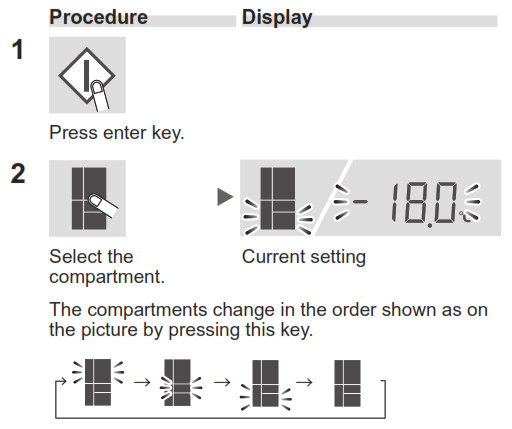
To light up the control panelPress the enter key.The control panel shows the preset temperature of each compartment and the operating icons. (All icons do not turn on because all modes are “OFF” by a default setting.)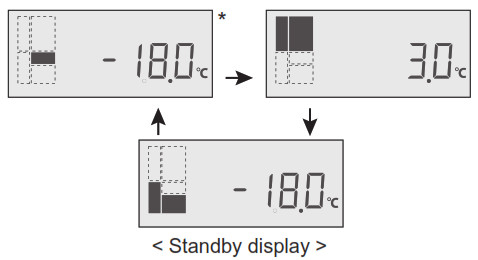 * The temperature is not indicated on the display while one of assisting modes in operation. Temperature display changes variously.Note
- Press the keys with your bare hand to operate. Operation with wet hand is invalid.
- Operation is not accepted while the door* is opened. (* Only refrigerator door.)
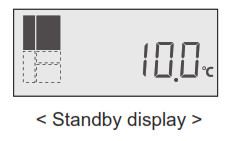
- When there is no operation for 1 minute, the display automatically returns to the standby display. Thus if there is no operation for another 1 minute the display turns off.
- Every time you open the door*, the control panel lights up to show the current setting. (* Only refrigerator door and left freezer door.)
Main modes
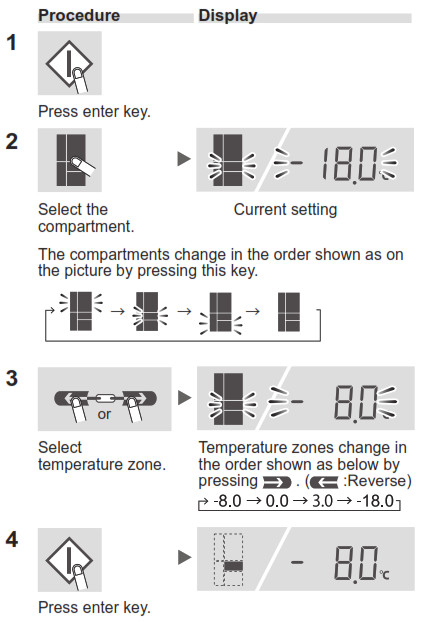
Controlling temperature
- The refrigerator controls its temperature automatically. You can set the preset temperature as below.
- See “Multi temperature room” about the preset temperature of multi temperature room.
Refrigerator
- Default setting is 3°C.
- You can adjust between 0°C and 6°C in step of 1°C.
Freezer
- Default setting is -18°C.
- You can adjust between -13°C and -21°C in step of 1°C.
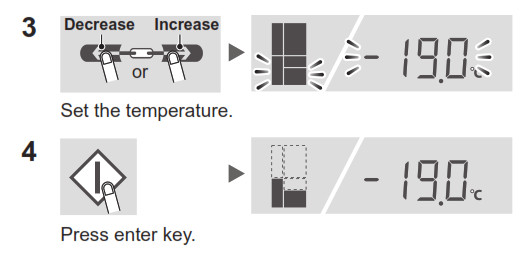
Advanced setting
- You can adjust the temperature in steps of 0.5°C in the following way at procedure 3.
E .g . Refrigerator Procedure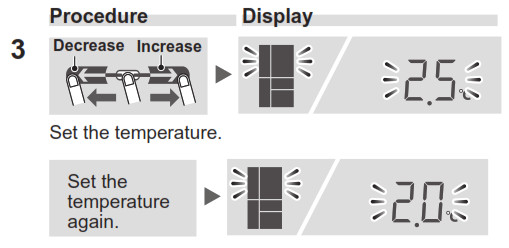
Note
- The temperature that indicated on the control panel is not the exact temperature inside.
- The internal temperatures could be affected by such factors as the location of the refrigerator, ambient temperature and the requency of door opening.
Temperature rise signIf the inside temperature becomes as follows, this sign lights up.Refrigerator: more than 10°CFreezer: more than -10°C
- Check the quality of food before you eat.
- This sign may light up at start of power supply.This sign turns off by opening or closing the door of lighted compartment of compartment select key when this sign is ON.
 Energy saving
- Use this mode to switch the appliance to energy-saving operation.
How to operate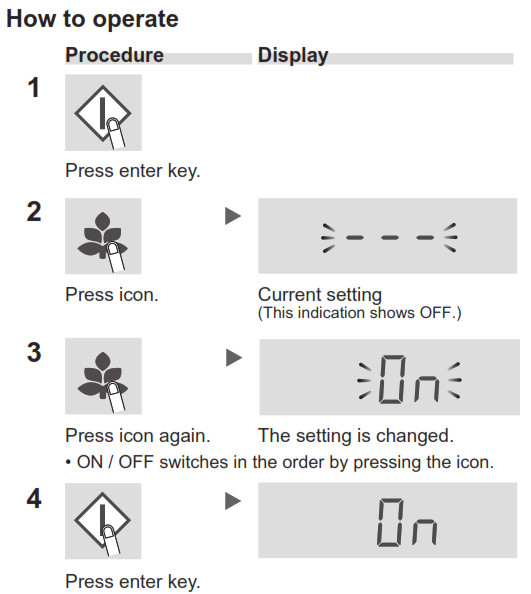
- While this mode is operating, the temperature inside of the refrigerator and freezer compartment becomes higher than the normal operation as follows. The displayed temperature is not be changed.
Under “Energysaving” mode Freezer Refrigerator Approx. 2°C plus Approx. 1°C plus
(When the temperature is set at F: -18°C, R: 3°C.)
- Cancel this mode if you feel the beverages are not cooled enough or ice making takes longer time.
Note
- The efficiency of power saving depends on the usage environment (controlling temperature, ambient temperature, frequency of opening the doors, amount of food).
 Vacation mode
- Use this mode when going on a trip or leaving the house for a long time.
- The temperature inside the refrigerator compartment is adjusted to approx. 10°C.
How to operate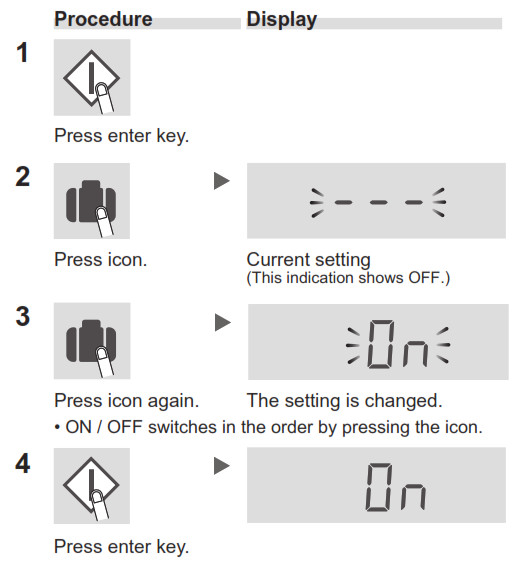 Note
Note
- Food storage period in the refrigerator compartment becomes approx. 1/2-1/3 of normal operation. Use this mode only when there is no perishable food.
- Temperature of refrigerator compartment cannot be modified. (“10°C” is indicated on the display.)
Tips for saving energy
- Install the refrigerator in a well-ventilated area and keep the space to ventilate.
- Keep your refrigerator out of direct sunlight and do not place it next to heat generating appliance.
- Avoid opening the door as much as possible.
- Hot food should be cooled before storing.
- Place the food evenly on the shelves to allow the cool air to circulate efficiently.
![]() Express freezing
Express freezing
This mode is to freeze food quickly not to lose its flavor. Most moisture inside the food freeze between -1°C – -5°C. It is important to accelerate the freezing speed to reach -5°C for making high-quality frozen food.
How to operate
Press enter key.
Express Freezing ends automatically in approx. 2~4 hours . (The icon turns off.)Note
- Large food cannot be frozen in a single operation.
- Express Freezing may require more than 4 hours when the operation overlaps with defrosting of the cooling unit. The operation starts after defrosting is completed.
- Avoid opening the door as much as possible during operation of this mode.
- The operating sound may become louder than usual while this mode is ON but it is normal.
Tips for the best freezing
- Pack foods into freezer bags or put them in sealed containers to avoid freezer burn which is a dry spot on foods.To help foods freeze faster, pack them in thin layers.
- Lay them flat into the freezer case under the ice storage box.
- If you wish to freeze large items, you may remove the freezer case.
 PlasmaclusterThe ionizer inside your refrigerator releases clusters of ions which are collective masses of positive and negative ions, into the refrigerator compartment. These ion clusters inactivate airborne mold fungus.
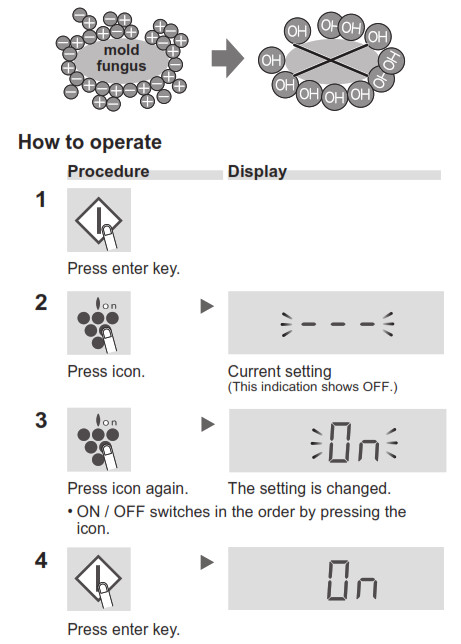
Note
- There may be a slight odor in the refrigerator. This is the smell of ozone generated by the ionizer. The amount of ozone is minimum and quickly decomposes in the refrigerator.
Multi temperature room
You can choose from four kinds of temperature zones. (3°C, 0°C, -8°C, -18°C). This room has four different assisting modes.
Temperature zone
- Default setting is -18°C.
- See “Storing food” about suitable food for each temperature zone.
Note
- The temperature that indicated on the control panel is not the exact temperature inside.
- All temperature zones are unadjustable. · When multi temperature room set at -18°C, its temperature varies depending on the setting of freezer.
- The internal temperatures could be affected by such factors as the location of the refrigerator, ambient temperature and the frequency of door opening.
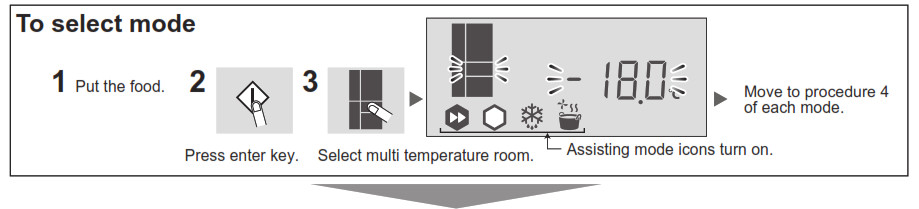
Assisting modes
- See the next page about operation procedure.
- All assisting modes end automatically.The temperature is set at 0°C or 3°C automatically. (See the next page.)
- The mode of express cool, extra cool, defrost food and cool down can not be in operation at the same time.
Mode
Feature Effect / Note Express coolThis mode is to cool beverages or food quickly. Extra coolThis mode is to cool beverages or food to ice-cold. Food with high-moisture may freeze. Defrost foodThis mode is to defrost frozen food. This mode is very convenient to defrost food slowly.Make sure not to defrost perishable food completely to keep its flavor or nutrient. Cool downThis mode is to cool down hot food • When you want to cool down hightemperature fluid food, make sure to keep it tightly covered or use an airtight container.Otherwise it may cause burn injury.• Do not store the container which the temperature of its outer surface is 60°C Or higher. Multi temperature room case may become deformed by that heat.
 Express cool
 Extra cool
 Defrost food
 Cool down
Note
- Avoid opening the door as much as possible during the operation.
- All assisting modes stop in the event of a power failure. The temperature is set to the ending temperature of each mode after recovery from the power failure.
Notes for multi temperature room
- Move all food to other compartment when you want to use the assisting modes.
- Wait 30 minutes at least after changing temperature zone (-8°C or -18°C). The temperature of multi-temperature room is not changed immediately.
- Do not put salt-containing food on the stainless tray directly. Stainless tray may rust.
- Food with strong smell should be wrapped or stored in airtight container tightly. Otherwise, the strong smell may be spreading to another compartment.
Multi temperature room Assisting modes
![]() Express cool
Express cool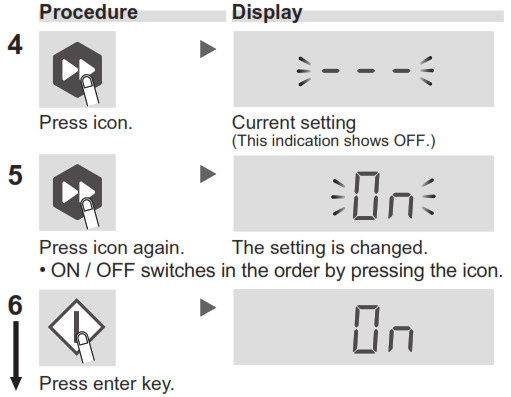
| Operating time *1 | Approx. 60 minutes |
| Temperature setting inside after completion of this mode *2 | 3°C |
![]() Extra cool
Extra cool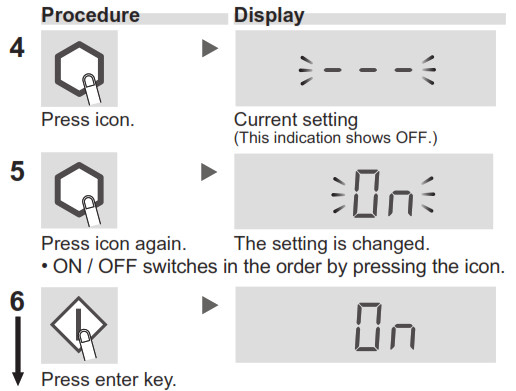
| Operating time *1 | Approx. 60 minutes |
| Temperature setting inside after completion of this mode *2 | 0°C |
 Defrost food
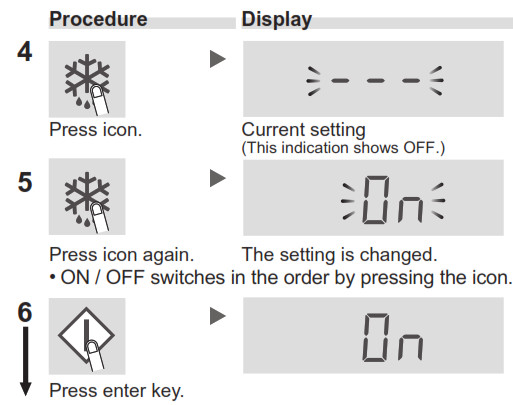
| Operating time *1 | Approx. 6 hours |
| Temperature setting inside after completion of this mode *2 | 3°C |
 Cool down
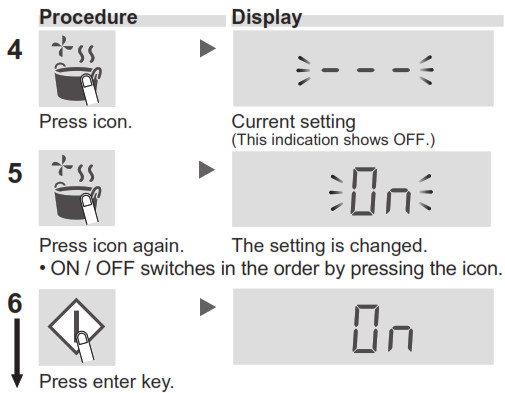
| Operating time *1 | Approx. 30-90 minutes |
| Temperature setting inside after completion of this mode *2 | 3°C |
*1 It takes longer time to complete when the operation overlaps with defrosting of the cooling unit because this mode starts after defrosting is completed.*2 The temperature setting after cancellation is the same.
Additional settings
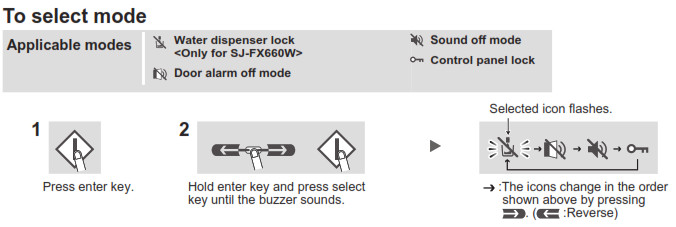
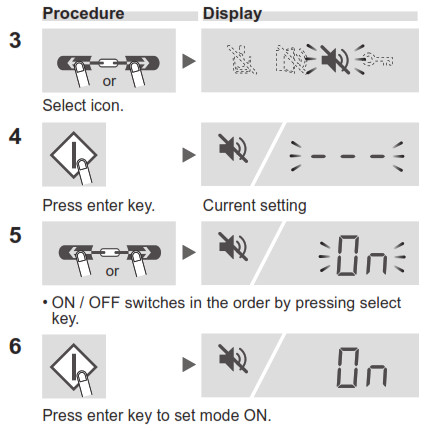
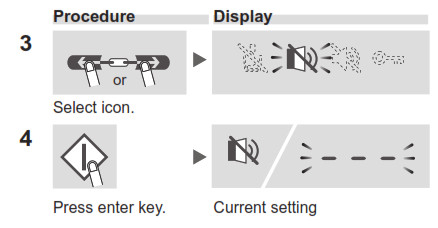
 Door alarm off mode
- Use this mode to switch the door alarm to OFF.
- Use this mode to switch the dispenser door alarm to OFF. <Only for SJ-FX660W>
 Sound off
- Use this mode to switch the sound of control panel and the ending sound of ice tray cleaning to “OFF”.
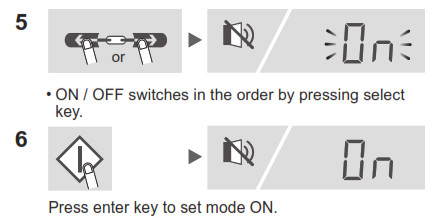
![]() Control panel lock
Control panel lock
- Use this mode to prevent the control panel from being used unintentionally by children or others.
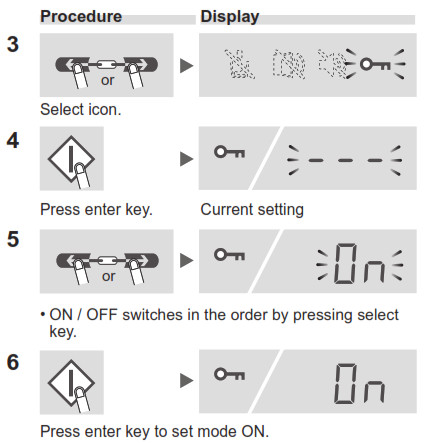
How to cancel control panel lock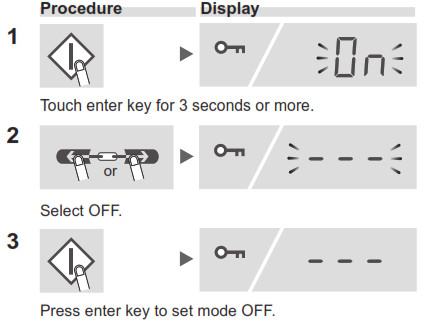
Automatic ice maker
Description
How ice cubes are made
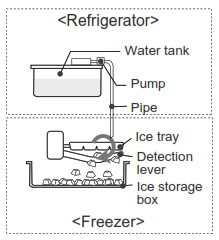
Water supply
- Water is sent from the water tank to the ice tray.
Ice making
- Ice cubes are made. (8 pieces at one time)
- The number of ice cubes per cycle may sometimes change.
Releasing
- Ice tray rotates to release the ice cubes and returns to “Water supply”.
- The ice tray doesn’t rotates when the ice storage box is full.
![]() Ice making
Ice making
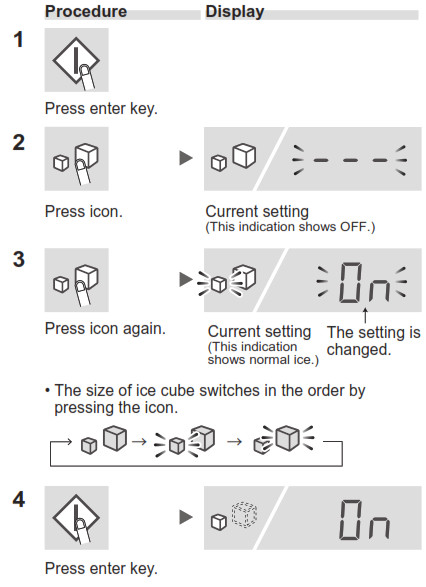
You can choose 2 sizes as shown below.
| Mode | Icon | Required time for each ice making |
| Normal ice | Approx. 2 hours | |
| Large ice | Approx. 3.5 hours |
Note
- The ice making time as shown above is only a rough indication at the ambient temperature of 30°C, temperature adjustment set to the initial setting (refrigerator : 3°C, freezer: -18°C), Energy saving turned off and with no opening or closing of the doors.
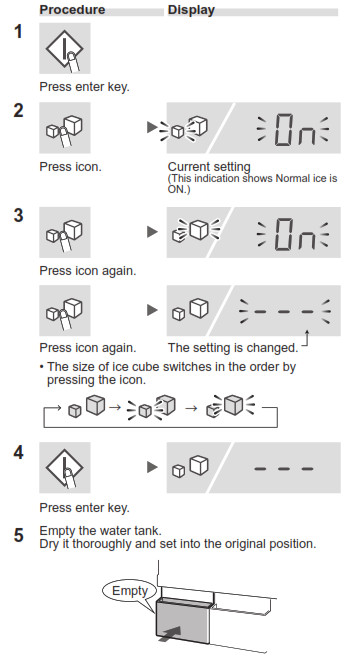
How to operate
- All the ice making modes are OFF(- – -) by a default setting.
How to useBefore using
- Wash the water tank and the ice storage box.
- Use ice tray cleaning mode to clean the ice tray and the pipe. (There may be odor or dirt within the automatic ice maker.)
Procedure
- Pour water into the water tank, and set the water tank.Note• Step 3 : Do not use other than potable water. (juice, tea, soda and sports drink etc.) They may dirty the inside of the ice maker and lead to break down.• Step 5 : Do not tilt the water tank. Otherwise, water may spill when you carry it.• Step 5 : Insert the water tank securely. Ice cubes are not be made unless the tank is inserted fully.Ice cubes are made automatically.
- Take out ice cubes.• 2 types of ice cube are made at the same time.• Ice cubes piled up at the back of the ice storage box. Spread them out to the front part to make more ice cubes.How to assemble or disassemble water tank• The picture above shows how to assemble the tank. Disassembly is in an opposite way.
 Note• Step 3 : Do not use other than potable water. (juice, tea, soda and sports drink etc.) They may dirty the inside of the ice maker and lead to break down.• Step 5 : Do not tilt the water tank. Otherwise, water may spill when you carry it.• Step 5 : Insert the water tank securely. Ice cubes are not be made unless the tank is inserted fully.Ice cubes are made automatically.
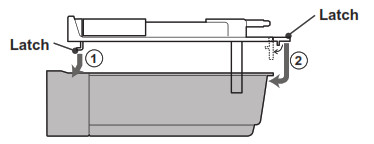 • The picture above shows how to assemble the tank. Disassembly is in an opposite way.
Note
- It takes approximately 24 hours to make the first set of ice cubes.
- For hygienic reasons, refill the water once a week even if water remains in the tank.
- Remove the water tank approximately once a week and wash it with water.
- When you leave the tank empty, it may sometimes make a groaning noise but this is normal.
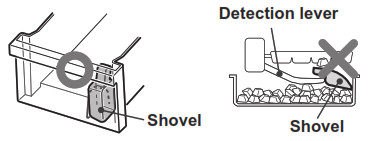
- Do not place the shovel or food on top of the ice cubes.This may cause the automatic ice maker to malfunction (damage of the detection lever, etc.) or the case not being able to be pulled out. Set the shovel at the designated location.
- Large size ice may not be made when the water level of the water tank is low even if large ice mode is selected.White in ice cubes and floating substance
- The minerals contained in water may solidify and whiten as water freezes. Minerals turn into a state which is insoluble once it freezes, so melting the ice cubes will leave only white floating substance, but this is normal.
- This is more likely to happen when you use hard water (e.g. The hardness of the water is 100 mg/L or more).
Ice making takes longer when:
- The room temperature is high.
- Less cooling operation, e.g. in winter.
- Many food products are stored.
- Refrigerator is defrosting of the cooling unit.
- The door is frequently opened.
- When you restart the ice making operation.
- Energy saving mode is in operation.
Ice making right after changing the mode
- The batch of ice cubes made right after changing the operating mode does not reflect the change in size. This is because there are still half-made ice cubes left in the ice tray when switching to the changed mode. Ice cubes of the 2nd batch or later reflects the mode change.
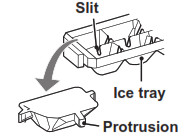
Protrusions of ice cubes:There are some slits in the ice tray.
- Therefore, the ice cubes have protrusions that caused by these slits.
- The protrusions may be pointed. Be careful when putting the ice cube directly in your mouth.
![]() Canceling Ice making
Canceling Ice making
- Use this mode during night time or winter time.
- You can use the ice storage box as a freezer case.
After canceling the ice making
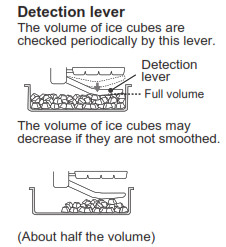
- Even after canceling the ice making mode, the ice tray and the detection lever operates because the ice maker conducts the ice releasing once.
- Wait 5 hours after canceling the ice making to put food in the ice storage box.
To start operation again
- Refer to “Ice making”.
 Ice tray cleaning
- This mode is for cleaning the ice tray and the pipe.
- When use this mode : Before making ice for the first time or when the refrigerator has not been used for a long time.
- The water is supplied from the water tank to the ice tray forcibly.
- The water discharge amount at one cleaning will be 100mL.However, when large ice mode is set as on, the water discharge will be 230mL.
Preparation
- Pour water into the water tank and set it.
- Empty the ice storage box.
How to operate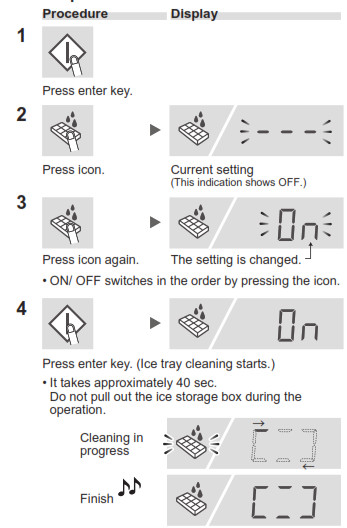
5. Follow steps 3 to 4 again.6. Press enter key to complete. Empty the water in the ice storage box.Dry it thoroughly and set it into the original position.
Note
- The setting of ice making returns to previous state after the cleaning is completed once.
Water dispenser < Only for SJ-FX660W >
Description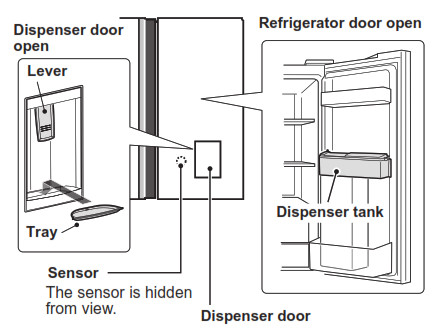 Dispenser door open
- Touch the sensor to open the dispenser door. (The dispenser door closes antomatically in a few minutes.) When you want to close the dispenser door, touch the sensor until the sound starts.
- The dispenser door alarm sounds before closing. (You can cancel the alarm by “Door alarm OFF” mode.)
- Touch the sensor or open the refrigerator door or freezer door (left) to prolong the opening time of the dispenser door.
If objects or your hand is caught in the dispenser door while the dispenser door is rotating .
- The dispenser door stops halfway.(The dispenser door closes automatically after a while. Touch the sensor to open the dispenser door again.)If the motion of the dispenser door stops because of a power failure.
- The dispenser door closes automatically after recovery from power failure.
![]() Warning
Warning
- Do not open the dispenser door forcibly.
- Do not touch the dispenser door when it is rotating.
Locking the dispenser doorUse this mode to prevent the water dispenser from being used unintentionally by children or others. (See “Additional settings”.)
How to useBefore usingRemove the dispenser tank and wash it. (See “Cleaning the dispenser tank” about how to remove it.)Procedure
- Pour the water into the dispenser tank.WarningFill with potable water only.• Make sure to install the dispenser tank before pouring water.• Make sure to close the cap. Otherwise, water may spill when the door is opened or closed.• Do not use other than potable water. If other liquid such as juice is used, it may cause a failure.• Upper limit temperature of the water is 50°C.
- Pour water into a glass.1 Touch the sensor to open the Sensor2 Push the lever with the glass.3 Pull the glass. (Water is stopped.) Lever4 Touch the sensor to close the dispenser door until the sound starts. (The dispenser door closes automatically even if you do not touch the sensor.)
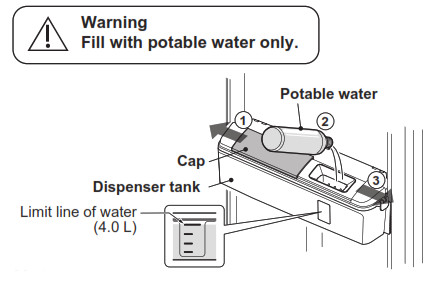 • Make sure to install the dispenser tank before pouring water.• Make sure to close the cap. Otherwise, water may spill when the door is opened or closed.• Do not use other than potable water. If other liquid such as juice is used, it may cause a failure.• Upper limit temperature of the water is 50°C.
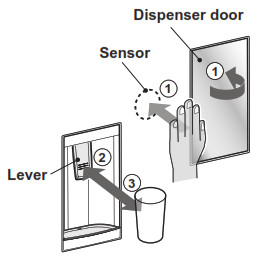
Note
- Hold your glass beneath the dispenser for a few seconds after use, to catch all the dripping. Some dripping may come down after using the dispenser.(Dripping may increase especially after refilling water to the empty dispenser tank.)
- For hygienic reasons, refill the water in the dispenser tank approximately once a week. Push the lever and let out all water in the dispenser tank.
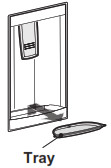
- Throw away the water in the tray frequently. Otherwise water may overflow.
- If the water dispenser is not used for an extended period of time, clean and dry the dispenser tank thoroughly and attach it to the original position.
- Do not put a glass or objects on the tray.
Water dispenser
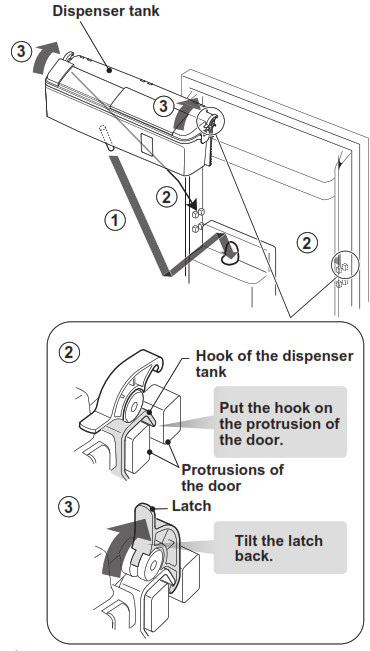
Cleaning the dispenser tank
Remove the dispenser tank approximately once a month and wash it with water.
- Empty the dispenser tank.Push the lever and let out all water in the dispenser tank.
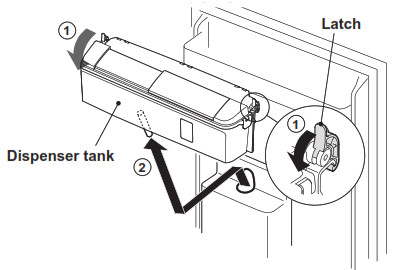
- Remove the dispenser tank from the door.1 Take the both latches off.2 Lift the dispenser tank up to remove.
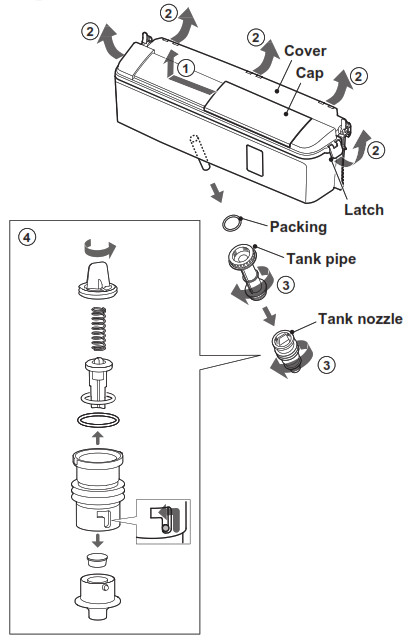
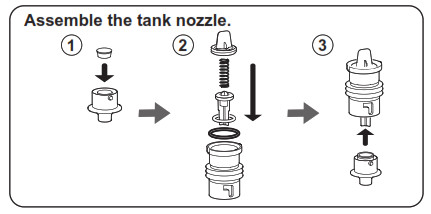
- Disassemble the dispenser tank.1 Remove the cap.2 Remove the cover. (Latches : 5 pieces)3 Remove the tank pipe and the tank nozzle.4 Disassemble the tank nozzle.
After cleaning
- Assemble the dispenser tank.(Reverse procedure to disassemble.)Ensure that each parts are attached firmly. Otherwise it may cause water leakage.
- Install the dispenser tank.Insert the dispenser tank fully and make sure to fasten the latches to install.The dispenser tank must be installed to use. Otherwise, dew condensation may form on the inside of the refrigerator.
Note
- When humidity is high, dew condensation may occur on tank pipe and tank nozzle.
- Make sure not to lose the packing when you disassemble the tank.
Care and cleaning
ImportantFollow the tips below to prevent cracks on the inner surfaces and plastic components .
- Wipe out food oil adhered to plastic parts.
- Some household chemicals may cause damage, so use only diluted washing-up liquid (soapy water).
- If undiluted detergent is used or soapy water is not wiped off thoroughly, it may result in cracks of plastic parts.
CleaningFor hygienic reasons, make sure to do following things regularly .
- Remove the accessories (e.g. shelves) from the cabinet and the door. Wash them by warm soapy dishwashing water. After that, rinse them in clean water and dry.
- Clean the inside with a cloth soaked in warm soapy dishwashing water. Then, use cold water to wipe off soapy water thoroughly.
- Wipe the exterior with a soft cloth each time it gets dirty.
- Clean the magnetic door seal with a toothbrush and warm soapy dishwashing water.
Note
- Do not use heavy-duty cleansers or solvents (lacquer, paint, polishing powder, benzine, boiled water, etc.) which may cause damages.
- If you pull out the power plug once, wait 5 minutes at least before connecting the power plug again.
- The glass shelves weigh approximately 3 kg each. Hold them firmly when remove from the cabinet and carry.
- Do not drop objects inside the refrigerator or strike the inner wall. This may cause cracks to inner surface.
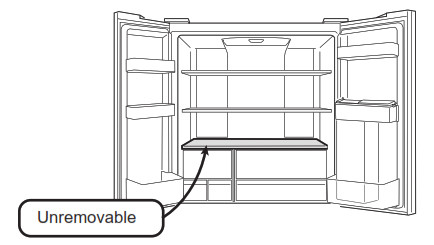
- The shaded parts in the picture below are unremovable.
Switching off your refrigeratorIf the refrigerator needs to be switched off for an extended period, the following steps should be taken to reduce the growth of mold:
- Remove all food.
- Remove the power plug from the socket.
- Clean and dry the interior thoroughly.
- Keep all the doors open slightly for a few days to dry.
Defrosting of the cooling unitDefrosting is automatically operated by a unique energy saving system.
When the compartment light is blownContact the service agent approved by SHARP to replace the light. The light is not to be replaced other than by qualified service personnel.
Before you call for service
Before calling for service, check the following points.General problems
| Problem | Solution / Situation |
The refrigerator does not cool at all. (The control panel shows the following display.) |
The refrigerator is set at “Demonstration mode” (Icons light up in order). Follow the steps 1 to 2 to cancel this mode.Cancel operation1. Open the refrigerator door.2. Press Enter key 5 seconds or more with the refrigerator door open. |
| The outside of the cabinet is hot when touched. | It is normal. This is because of the hot pipe is in the cabinet in order to prevent dew generation. |
| The area around the door handle and dispenser door <Only for SJ-FX660W> are hot when touched. | It is normal.The heater to prevent dew generation is inside the door.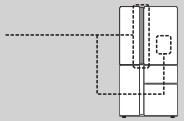 |
| Refrigerator makes loud noise. | Following sounds are normal.• The compressor makes loud noise when its operation starts.— Sound becomes quieter after a while.• The compressor makes loud noise once a day.— Operating sound is made immediately after automatic defrost operation of the cooling unit.• Sound of flowing fluid (gurgling sound, fizzing sound).— It is caused by refrigerant flowing in pipes (sound may become louder from time to time).• Cracking or crunching sound, squeaking sound— It is caused by expansion and contraction of inner walls and internal parts during cooling. |
| Frost or dew appears inside or outside the refrigerator. | This may occur in one of the following cases. Use a wet cloth for wiping frost and a dry cloth for wiping dew.• When the ambient humidity is high.• When the door is frequently opened and closed.• When food containing plenty of moisture are stored. (Wrapping is required.) |
| The food in the refrigerator compartment are frozen. | • Is the refrigerator temperature control set at 0°C for a long time?— Change the temperature control to 3°C or warmer.• Is the freezer temperature control set at -21°C for a long time?— Change the temperature control to -18°C or warmer.• If ambient temperature is low, food may freeze even if the refrigerator compartment is set at 6°C. |
| Odors in the compartment. | • Wrapping is required for the food with strong odors.• Deodorizing unit cannot remove all odors. |
| Door alarm does not stop. | • The alarm stops after close the door. |
| The control panel does not work. | This may occur in one of the following cases.• The panel or your finger is soiled with dripping, oil and etc.• When you touch the panel with gloved hand, adhesive bandage on your finger, nail or objects.• Sticker or tape is affixed on the keys.• Touch position is slightly off from the keys.• Operate time is not enough for the keys to work. |
| Ice making | |
| Ice maker does not work. | • Is water in the water tank?• Is the water tank securely set?• Is the shovel or food in the ice storage box?• Are all ice making modes “OFF”?• Are the ice cubes piled up at the back of the ice storage box? (Spread out the ice cubes evenly.)• Try the ice tray cleaning. If the ice tray cleaning works properly, wait for one day. Ice making starts again.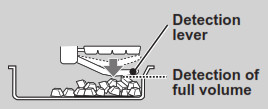 |
| It takes time to make ice cubes. | • Is it right after restarting ice making?• Is it right after refilling the tank with potable water? |
| Ice cubes are small, rounded or connected.Ice cubes have protrusions. There are some holes in ice cubes. | • If the water level of the water tank is low, the size of ice cube may become smaller than usual.• If you store ice cubes for a long time, they may become smaller, rounded, lumped together.• The protrusions of the ice cubes are caused by the slits in the ice tray.• The hole comes from air bubbles in ice cubes which may be lumped together and form bigger holes. |
| Ice cubes have some odor | • Is the water in the water tank old or with some odor?• Is there remaining detergent or bleach in the water tank used for cleaning the water tank?• If the ice cubes leave for a long time, odors may spreading to the ice cubes. |
| No water or ice cubes drop even when using “Ice tray cleaning”. | • Is the ice storage box full with ice cubes? Is there the shovel or other thing in the ice storage box? (Empty the ice storage box.)• Is water in the water tank? |
| Water dispenser < Only for SJ-FX660W > | |
| No water comes out. | • Is dispenser tank securely attached?• Is water in dispenser tank? |
| Dispenser door does not open. | • Is water dispenser door lock “ON”? |
| Water remains in the tray. | • Some water may come out of the water dispenser or inner pipe. It is normal. Throw away the water. |
| If you still require service | |
| • Refer to your nearest service agent approved by SHARP. |
![]() SHARP CORPORATIONTINS-C071CBRZ 21FK TH 1
SHARP CORPORATIONTINS-C071CBRZ 21FK TH 1
[xyz-ips snippet=”download-snippet”]