
Chordbuddy User Manual
Chordbuddy Troubleshooting
Congratulations! You are on your way to learning to play the most popular instrument ever. The following troubleshooting tips can help you with problems you may be experiencing getting started with the Chordbuddy. First, your guitar’s neck must be compatible to work with Chordbuddy.
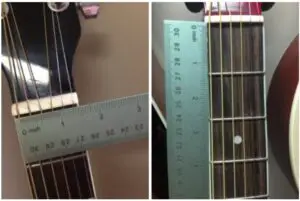
Using a common ruler you can measure your neck. The width must be from 1 ½ “ to 1 7/8” at the nut (pic 1) and from the nut to 3rd Fret wire must be 4”, give or take an eighth of an inch (pic 2). Most adult and ¾ size guitars meet these requirements but Chordbuddy does not work with nylon stringed classical or ½ size child guitars.
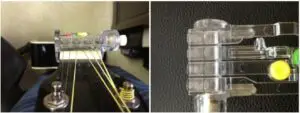
Your guitar must be tuned as shown on the DVD using one of our popular clip-on tuners (pic 3). In order to produce clear notes the Chordbuddy must be mounted at an angle so the grey feet or “booties” are not touching the strings when no colored button is pressed (pic 4).
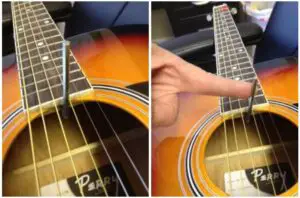
The grey booties on the G (blue) tab must be just above the 3rd fret wire that runs across the neck (pic 5). Once it is at the proper angle and position you must tighten the thumbscrew as tight as is needed to hold the device in position. An upgraded brass nut has been added to prevent stripping. The Chordbuddy needs to be mounted flush when observed from the top (pic 6).
Also, a pic of how the individual fingers with the colored buttons should stick out the top of the mounting bracket when properly installed (pic 7). Once the Chordbuddy is properly attached, a guitar neck adjustment may be in order if you’re experiencing “buzzing or dull notes”. This can be the product of the strings being too high off the neck. A guitar`s action and playability can be altered for the best by adjusting the truss rod.
This can be easily be accomplished using an Allen wrench. First, locate the Allen bolt (pic 8). Second, spread apart the middle (D and G) strings and insert the Allen wrench (pic 9). Third, make a ¼ (one quarter) clockwise turn and allow the wood to set 10 minutes before more adjusting. Patience is the key here. Take your time and make small adjustments, wood is a natural substance and requires time to adapt to the adjustment.
It is possible to damage your guitar if you over tighten the truss rod. If the truss rod is very loose, go ahead and tighten it until it is snug (pic 10). This will bring the strings closer to the neck and make it easier to produce clean notes. If the strings are “buzzing” or “fretting out” when not being chorded, this means they are too low and the truss rod needs to be turned counterclockwise.
Please note that some guitars do not have this option. If you do not feel comfortable adjusting the truss rod yourself, you can always take it to a local music shop and ask them to do it for you. If you feel you are in need of further assistance, please call ChordBuddy’s customer service, at 1-877-699-6188, Monday thru Friday, 8:00 am to 4:30 pm, central time.


Read More About This User Manuals…
 report this ad
Questions about your Manual? Post in the comments!
[xyz-ips snippet=”download-snippet”]