USER MANUAL
Thank you for purchasing the Sharper Image Electric Plumber. Please take a few minutes to read this guide and store it for future reference.
INTRODUCTION
The Electric Plumber is a new and innovative tool to help you remove stubborn clogs from your pipes and drains, without the use of harmful corrosive chemicals. It emits a burst of compressed air to remove clogs and odors in seconds.
FEATURES
- Clears clogs and odors instantly with compressed air
- For use on sinks, floor drains and toilets
- Adjustable air pressure
- Includes 3 interchangeable heads
- Includes carrying case
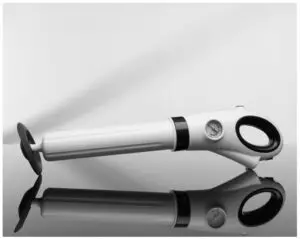
IDENTIFICATION OF PARTS
A – Pressure GaugeB – Pressure Release TriggerC – HandleD – Compressor On/Off SwitchE – Power ConnectionF – Air nozzleG – Drain HeadH – Wash Drain/Floor Drain HeadI – Inflatable Toilet HeadJ – AC AdapterK – Toilet Head Inflator Pump(shown here attached to Inflatable Toilet Head)
HOW TO OPERATE
- Attach the Head that best suits the drain:Drain Head for sinksWash Drain / Floor Drain Head for wash basins, shower stalls, tubs and floor drainsNote: Either end of this head can be used, depending on the size of the drain. Inflatable Toilet Head for toilets
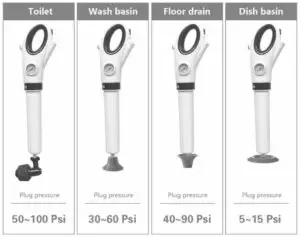
- Consult the Pressure Guide (below) to determine the correct air pressure for your application.
- Connect the AC Adapter to the Power Connection on the device.
- Plug the AC Adapter into an AC outlet.
- Turn on the Compressor On/Off Switch. Monitor the air pressure on the Pressure Gauge. DO NOT run the compressor for more than 30 seconds.
- When you reach the correct pressure, turn the compressor OFF and disconnect the power cable from the device.TIP: For the protection of your pipes, always start with the MINIMUM recommended air pressure. If the clog remains, try again with increased air pressure.
- Hold the Electric Plumber over the drain at a 90° angle. Press firmly to seal the head against the drain to prevent splashing. If there are two sinks connected, block the drain of the second sink in order to prevent splashing. For a clogged toilet, attach the Inflatable Toilet Head. Squeeze the hand pump until the head has a tight seal inside the toilet. See the illustrated Technique Guide below.Note: Press the button on the hand pump to release the air from the Inflatable Toilet Head.
- Push the Pressure Release Trigger to deploy a burst of compressed air that will remove the clog and/or odor.
- Repeat steps 5-8 if necessary. Do not exceed maximum recommended pressure. To prevent overheating, do not use this device more than 6 times in a row.
PRESSURE GUIDE
TECHNIQUE GUIDE
SAFETY WARNINGS
- Use this device only for its intended purpose.
- DO NOT run the air compressor for more than 30 seconds.
- DO NOT use this device more than 6 times in a row. Allow it to cool down before you resume operation.
- To prevent electric shock, do not plug this device in if your hands are wet.
- DO NOT operate this device if the cord appears worn or frayed. Contact Sharper Image Customer Service immediately.
- Disconnect this device from the AC outlet when not in use.
- NEVER point or shoot this device at yourself or other people, as serious injury can occur.
SPECIFICATIONS
WARRANTY / CUSTOMER SERVICE
Sharper Image branded items purchased from SharperImage.com include a 1-year limited replacement warranty. If you have any questions not covered in this guide, please call our Customer Service department at 1 (877) 210-3449. Customer Service agents are available Monday through Friday, 9:00 a.m. to 6:00 p.m. ET.

Read More About This User Manuals…
Questions about your Manual? Post in the comments!
[xyz-ips snippet=”download-snippet”]