TURNTABLE AUDIO RECORDERItem No. 207717
Thank you for purchasing the Sharper Image Turntable Audio Recorder. Please take a moment to read this guide and store it for future reference.
INTRODUCTION
The Sharper Image Turntable Audio Recorder gives new life to your vinyl records as digital MP3 files. It easily converts 33 and 45 RPM records to MP3s without a computer, so you can enjoy them on your computer or mobile device. You can even use it as a standalone player for your favorite 33 and 45 RPM records.
FEATURES
- Easy to use
- Plays and converts 33 and 45 RPM records to MP3
- Makes high-quality 128 Kbps MP3 files
- No computer needed
- Pre-balanced tone arm and cartridge
- Runs on USB power or 4 AA batteries
- Records onto USB flash drive or Micro SD card (not included)
- Maximum USB flash drive size: 128GB with FAT32 format
- Maximum Micro SD card size: 32GB with FAT32 format
- Built-in speaker for playback
- 3.5mm output jack for external speakers or headphones
- Includes 45 RPM record adapter and USB cable
- Compact and lightweight
- Dimensions 11.5” L x 4.8” W x 3.0” H
- Weight: 1.4 lbs.
IDENTIFICATION OF PARTS
- PLATTER – Place your record here.
- TONE ARM – Ready-to-use, pre-balanced tone arm and cartridge.
- 45 RPM ADAPTER – For use with 7-inch 45 RPM singles.
- ON/OFF and volume control.
- 33/45 RPM selector.
- AA/DC SWITCH – Switch power supply between AA batteries and DC.
- LINE OUT – Connect headphones or speakers (not included) via 3.5mm output jack.
- USB (USB On-The-Go) and Micro SD ports – To save the converted MP3 files.
- MINI USB – USB power supply plugs into a computer or AC outlet (wall adapter not included).
- Battery compartment – Insert 4 AA batteries for portable use.
- 45 RPM ADJUSTER
- 33 RPM ADJUSTERIMPORTANT: Do not use the adjusters unless you think the speed is too fast or too slow.
- SPEAKER
CONTROL PANEL
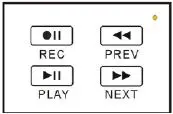
REC/STOP BUTTON – Press to start convert (record). Press again to stop.PLAY/STOP BUTTON – Press to playback the converted MP3 file in USB flash or Micro SD card.PREV BUTTON – During playback, press to play previous file.NEXT BUTTON – During playback, press to play next file.
OPERATING THE TURNTABLE AUDIO RECORDER
- Unhook and lower the arm clip.
- Raise the tone arm and move it to the side.
- Place your record on the platter.
- Lower the tone arm onto the record. The record will begin playing.
- When finished, raise the tone arm and return it to rest on the arm clip.
CONVERTING RECORDS TO MP3 – MANUAL MODE
- When the turntable is playing and a USB flash drive or Micro SD card is connected, the device is in standby mode (GREEN indicator light is on continuously).
- Press the recording button and the device will begin recording. The GREEN indicator light will be flashing while it is converting. Press the recording button again to STOP recording and save the file onto your USB flash drive or Micro SD card. NOTE: If the indicator light does not flash green, remove your USB flash drive or Micro SD card. Then reinsert the USB flash drive or Micro SD card and try again.
- At the interval between two songs, where you want to STOP RECORDING one file and START RECORDING a new file, short press the button. The flashing green indicator will be OFF for about 2 seconds while it saves your first song. Then, it will resume flashing to indicate it is recording the NEXT song.
CONVERTING RECORDS TO MP3 – AUTO MODE
The Turntable Audio Recorder has an automatic mode that automatically starts a new recording when it detects a pause in the music. When the device is in standby mode, press and hold the button for 3 to 5 seconds, until you see the indicator light change from GREEN to BLUE. Press the recording button to begin recording in auto mode.
PLAYING BACK YOUR FILES
The Turntable Audio Recorder has a convenient playback function so you can easily check your recorded files. In standby mode, press the playback button. The device will start to play the recording music. The indicator will be slowly flashing. Press the playback button again to stop playback and re-enter standby mode. During playback, use the up/down buttons to play the previous or next files.
Note: If you would like to play other MP3 files from your USB flash drive or Micro SD card, please note that they must be in the “TAPEMP3” folder for the device to access and play them.
TRANSFERRING FILES TO COMPUTER
To copy your MP3s to a computer, you must insert the USB flash drive or Micro SD card into your computer, then drag the files onto your hard drive. You cannot transfer files directly from the turntable to computer.
FREE EDITING SOFTWARE (OPTIONAL)
You may wish to trim or edit your new MP3 files. This is optional. To do this, you may use any audio editing software you choose. One popular program is Audacity, which has many user-friendly features and is available as a free download for Mac and PC users. For more information, visithttp://audacity.sourceforge.net/download/.
WARRANTY / CUSTOMER SERVICE
Sharper Image branded items purchased from SharperImage.com include a 1-year limited replacement warranty. If you have any questions not covered in this guide, please call our Customer Service department at 1 (877) 210-3449. Customer Service agents are available Monday through Friday, 9:00 a.m. to 6:00 p.m. ET.
report this ad[xyz-ips snippet=”download-snippet”]