![]()
INSTALLATIONRESILIENT INSTALLATION GUIDELINES FOR SPC PRODUCTS
I. GENERAL INFORMATIONAll instructions and recommendations should be followed for a satisfactory installation.
- Acclimation of material prior to installation is not required, however, the door covering should be installed in a climate-controlled environment with an ambient temperature range between 55° – 85°F (13°-29°C) or average temperature of 70°F (21.1°C).
- For installations involving 3 season scenarios, meaning, the dwelling or installed space is without climate control for extended periods during certain seasons of the year, the post-installation temperature range allowed is an ambient room temperature between -25°F and 155°F (31.6°- 68.3°C). This allowance is for coating doors only and does not apply to glue-down installations.
- Avoid exposure to direct sunlight for prolonged periods, doing so may result in discoloration. During peak sunlight hours, the use of drapes or blinds is recommended. Excess temperature due to direct sunlight can result in thermal expansion and UV fading.
- Install product after all other trades have completed work that could damage the flooring.
- If cabinets are to be installed on top of the mooring (including islands), that area of material must fully adhere to the sub or (including an additional 2’ft beyond the cabinets and islands).
- To minimize shade variation, mix and install planks from several cartons.
- Inspect all planks for damage before installing. If you have any concerns about the product ft or finish, call Shaw Information Services at 1-800-441-7429. Claims will not be accepted for ooring that has been cut to size and/or installed.
- Use cementitious patching and leveling compounds that meet or exceed maximum moisture level and pH requirements. Use of gypsum-based patching and/or leveling compounds that contain Portland or high alumina cement and meet or exceed the compressive strength of 3,000 psi is acceptable.
- Installation Methods: Floating (on, above or below grade) / Glue Down (on, above or below grade)
- Required perimeter expansion spacing for Floating or Glue Down installation is as follows:For areas less than 2500 sq ft, use a 1/4″ gapFor areas larger than 2500 sq ft. use a 1/2″ gap.
- This flooring is waterproof and reliably secures the flooring panels on all four sides. However, excessive moisture in the sub or could promote mold, mildew, and other moisture-related issues like the trapping of moisture emissions under the mooring, which may contribute to an unhealthy indoor environment.
- It is up to the mooring contractor to determine if a sub or is not cured. Should the sub or not be cured, a moisture barrier/mitigator like 6 mil poly should be considered for a successful installation and to prevent the material from being damaged by (moisture) vapor from the sub or.
- An additional layer of a minimum 4 mil poly m or equal vapor retarder with a perm rating of .1 or less may be used as an additional layer of protection.
- A second underlayment is allowed under any currently sold resilient product with attached underlayment in a residential application. If installed over a second underlayment, this underlayment cannot be greater than 3 mm thick. IIC (ASTM E492-09) and STC (ASTM E90-09) lab testing on certain resilient products tested with and without a second layer of underlayment, to date, does not indicate that a second underlayment will provide additional acoustic benefit.
- Crumb rubber underlayments are not an acceptable option for use with resilient our coverings due to performance issues resulting from chemical incompatibilities.
SUBFLOOR INFORMATION
All sub doors must be clean, at, dry, and structurally sound. The correct preparation of the sub or is a major part of a successful installation. Sub or must be at 3/16″ in 10′ or 1/8″ in 6′.Wood Sub doorsDo not install material over wood sub doors that lay directly on concrete or over-dimensional lumber or plywood used over concrete. Refer to ASTM F1482 for panel underlayment recommendations.
- Do not apply sheet plastic over wood sub doors.
- Basements and crawl spaces must be dry. The use of 6 mils black polyethylene is required to cover 100% of the crawl space of the earth. Crawl space clearance from the ground to the underside of the joist is to be no less than 18″ and perimeter vent spacing should be equal to 1.5% of the total square footage of the crawl space area to provide cross ventilation. Where necessary, local regulations prevail.
- DO NOT install over sleeper construction sub doors or wood sub or applied directly over concrete.
- All other sub colors – Plywood, OSB, particleboard, chipboard, wafer board, etc. must be structurally sound and must be installed following their manufacturer’s recommendations. Local building codes may only establish minimum requirements of the mooring system and may not provide adequate rigidity and support for proper installation and performance. If needed add an additional layer of APA-rated underlayment, fasten and secure according to the underlayment manufacturer’s recommendations.
- Resilient flooring is not recommended directly over f re-retardant treated plywood or preservative-treated plywood. An additional layer of APA rated 1/4″ thick underlayment should be installed.
Concrete Sub doors
NEW AND EXISTING CONCRETE SUBFLOORS SHOULD MEET THE GUIDELINES OF THE LATEST EDITION OF ACI 302 AND ASTM F 710, “STANDARD PRACTICE FOR PREPARING CONCRETE FLOORS TO RECEIVE RESILIENT FLOORING” AVAILABLE FROM THE AMERICAN SOCIETY FOR TESTING AND MATERIALS, 100 BARR HARBOR DRIVE, WEST CONSHOHOCKEN, PA 19428; 610-832-9585; HTTP://WWW.ASTM.ORG.
- Floors shall be smooth, permanently dry, clean, and free all foreign material such as dust, wax, solvents, paint, grease, oils, and old adhesive residue. The surface must be hard and dense, and free from powder or aking.
- If the adhesive residue is asphalt-based (cut-back), or any other type of adhesive is present, it must be removed by industry-accepted methods such as mechanical removal or wet scraping.
- If a chemical abatement has been performed, use Shaw Surface Prep EXT to remove any residual chemicals present. Once Shaw Surface Prep EXT has been properly cleaned and removed, apply one coat of Shaw MRP for additional protection.
- Adhesive removal through the use of solvents or citrus adhesive removers is not recommended. The solvent residue left in or on the sub oor may affect the new adhesive and oor covering.WARNING! DO NOT SAND, DRY SWEEP, DRY SCRAPE, DRILL, SAW, BEAD BLAST, OR MECHANICALLY CHIP OR PULVERISE EXISTING RESILIENT FLOORING, BACKING, LINING FELT, ASPHALTIC ” CUT BACK” ADHESIVES, OR OTHER ADHESIVES.These products may contain either asbestos bers and/or crystalline silica. Avoid creating dust. Inhalation of such dust is cancer and respiratory tract hazard. Smoking by individuals exposed to asbestos bers greatly increases the risk of serious bodily harm. Unless positively certain that the product is a non-asbestos-containing material, you must presume it contains asbestos. Regulations may require that the material be tested to determine asbestos content and may govern the removal and disposal of material. See current edition of the Resilient Floor Covering Institute (RFCI) publication Recommended Work Practices for Removal of Resilient Floor Coverings for detailed information and instructions on removing all resilient covering structures. For current information go to www.rfci.com.
- Concrete slabs must be dry with no visible moisture.
- Required Moisture Testing – maximum moisture level per ASTM 1869 CaCl is 8 lbs. and ASTM 2170 In-situ Relative Humidity 90% per 1000 sq.ft. in 24 hours.
- Do not install over concrete with a history of high moisture or hydrostatic conditions. Excessive moisture in the sub or could promote mold, mildew, and other moisture-related issues like the trapping of moisture emissions under the mooring, which may contribute to an unhealthy indoor environment. Shaw Industries does not warrant nor is responsible for damage to or covering due to moisture-related issues.
- pH level of concrete should be between 7-10.
- The inal responsibility for determining if the concrete is dry enough for installation of the flooring lies with the door covering installer.NOTE: IT MAY NOT BE THE FLOOR COVERING INSTALLER’S RESPONSIBILITY TO CONDUCT THESE TESTS. IT IS, HOWEVER, THE FLOOR COVERING INSTALLER’S RESPONSIBILITY TO MAKE SURE THESE TESTS HAVE BEEN CONDUCTED, AND THAT THE RESULTS ARE ACCEPTABLE PRIOR TO INSTALL THE FLOOR COVERING. WHEN MOISTURE TESTS ARE CONDUCTED, IT INDICATES THE CONDITIONS ONLY AT THE TIME OF THE TEST.
Lightweight Concrete
All recommendations and guarantees as to the suitability and performance of lightweight concrete under resilient ooring are the responsibility of the lightweight concrete manufacturer. The installer of the lightweight product may be required to be authorized or certified by the manufacturer. Correct on-site mixing ratios and properly functioning pumping equipment are critical. To ensure proper mixture, slump testing is recommended.
- Lightweight aggregate concretes having dry densities greater than 90 lbs. per cubic foot may be acceptable under resilient flooring.
- Concrete slabs with heavy static and/or dynamic loads should be designed with higher strengths and densities to support such loads.
- The surface must be permanently dry, clean, smooth, free of all dust, and structurally sound.
- Perform Bond testing to determine the compatibility of adhesive to the substrate. Shaw 9050 primer can be utilized to promote adhesion.
- Three internal relative humidity tests should be conducted for areas up to 1000 SF. One additional test, for each additional 1000 SF.
Radiant Heating: Radiant-heated sub our systems can be concrete, wood or a combination of both.The heating systems components must have a minimum of 1/2″ separation from the mooring product. The system must be on and operational for at least 2 weeks prior to installation to reduce residual moisture. Three days prior to installation lower the temperature to 65 degrees, after installation gradually increase the temperature in increments of 5° F to avoid overheating.Maximum operating temperature should never exceed 85°F. Use of an in- oor temperature sensor is recommended to avoid overheating. Contact the manufacturer of your radiant heating system for further recommendations.
- Electric Radiant Floors: consist of electric cables (or) mats of electrically conductive materials mounted on the sub or below the door covering. Mesh systems are typically embedded in thin-set. When embedding the system components, use cementitious patching and leveling compounds that meet or exceed Shaw’s maximum moisture level and pH requirements. Use of gypsum-based patching and/or leveling compounds that contain Portland or high alumina cement and meet or exceed the compressive strength of 3,000 psi are acceptable.
- Hydronic Radiant Floors: pump heated water from a boiler through tubing laid in a pattern under the mooring. Typically installed in channels under a wooden sub for (or) embedded in concrete slabs.
Existing Floor CoveringsFlooring can be installed over most existing hard-surface or coverings, provided that the existing or surface is fully adhered, clean, at dry structurally sound, and free of de action.
- Existing sheet vinyl doors should not be heavily cushioned and not exceed more than one layer in thickness. Soft underlayment and soft substrates will compromise the product’s locking ability as well as diminish its indentation resistance.
- Installation is NOT allowed over any type of carpet.
- Do NOT install over wood oors adhered to concrete.
- This product can be installed over existing ceramic/porcelain tile products with up to a 1/4 inch wide grout joint. If the grout joint width exceeds 1/4 inch, a cementitious patching compound should be used to ill the grout joint to make it smooth with the surface of the tile.
RAISED ACCESS PANEL SUBFLOORS
- Raised access panels must be stable, level, at, free, and clean of existing adhesives
- 24″ x 24″ panels are recommended
- Lippage (variation of height) between of panels must not exceed 0.295″ (0.75 mm)
- Gaps between panels must not exceed 0.039″ (1mm)
- There should be no de section of the individual panels Concave less than 0.0295″ (0.75 mm) Flatness 1/8″ in 10′
- Stagger the flooring tiles/planks to overlap the access panels
- Telegraphing of access panel seams may be visible and is not considered a product defect nor warranted by the flooring manufacturer.
If needed overlay the panels with a / ” (6 mm) plywood and properly fasten to the access panels prior to the installation of the or covering. Prior to underlayment installation, repair any loose or unstable panels. Use the appropriate installation methods for the product.
INSTALLATION
Tools: Tape Measure, Utility Knife, Jigsaw, Tapping Block or Rubber Mallet, Pull Bar, 1/4″ Spacers, T-Square, Safety Glasses, Broom or Vacuum and, if necessary, tools for sub or repair.Installation of 6 Mil Poly Film Underlayment is recommended for coating method only in high moisture applications.For use over concrete substrates – seams MUST be taped.Optional over wood substrates do NOT tape seams.
- Begin at the starting wall. Roll underlayment out parallel to the starting wall and allow the poly lm to run 2 inches up the wall.
- After the ooring has been installed trim back the poly lm from the wall.
- Roll the next course of poly lm parallel to the first run and overlap a minimum of 4 inches. Smooth out any wrinkles or creases in the poly lm.
- Use clear tape to tape the seams together when installed over concrete substrates.
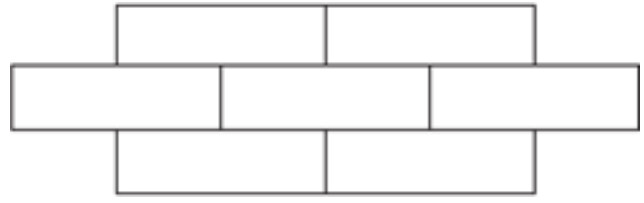
Continue to install the flooring over top of the poly lm taking care not to damage the poly lm.Note: Do not cover the entire area of the substrate to prevent damage or present a slip hazard. Roll the poly lm out one row at a time. Floating InstallationSPC plank flooring is designed to be installed utilizing the coating method. Proper expansion space 1/4″ (6.35 mm) is required. Undercut all doorjambs. Do not fasten wall moldings and or transition strips to the planks.Glue Down Installation: Shaw T-180 or comparable adhesive.FloorteTM is approved for glue-down installation over approved wood and concrete substrates. Follow adhesive label instructions for the proper trowel and required temperature for the adhesive. Maintain 5/16″ (8mm) perimeter expansion space. Refer to adhesive label for moisture limits of the adhesive.Tile patterns must be installed in a staggered (offset) brick pattern. Minimum 1/3 offset 1/2 offset is preferred.
- Before you start with the installation, it is important to determine the layout of the mooring. Proper planning and layout will prevent having narrow plank widths at wall junctures or very short-length pieces at the end of rows.
- As with all plank products, install the planks parallel to the longest exterior wall.
- Determine if the starter row will need to be cut. If the rst row of planks does not need to be trimmed in width, it will be necessary to cut off the unsupported tongue so that a clean, solid edge shows towards the wall.
- Installation of the product must start f rom the left side of the room, working to the right when working in f ront of the planks or facing the starting wall.
- Install the second plank in the row by angling the end tongue into the end groove of the rst plank. Maintain an expansion gap of approximately 1/4″ 6.35 mm f rom the wall. Start the second row by cutting a plank to the desired length. Keep in mind that the plank must not be shorter than 6″ (15cm) to achieve the best appearance.
- Install the rst plank in the second row by inserting the long side tongue into the groove of the plank in the rst row. This is best done with a low angle of the plank. Maintain pressure into the side seam as you rotate the plank to the sub oor. Install the second plank in the second row by inserting the short end tongue into the previously installed plank groove. Align the plank so that the long side tongue tip is positioned just over the groove lip of the plank in the rst row. Working f rom the end seam, at a low angle, insert the long tongue into the groove of the adjoining plank. Very little force is required to seat the tongue into the groove. You should feel the tongue lock into the groove.
- Work across the length of the room installing planks along the wall in the rst row and then aligning the planks in the second row. It is critical to keep these two rows straight and square, as they are the “foundation” for the rest of the installation. Check squareness and straightness often.
- Cut the last plank in the rst row and leave an expansion gap of around 1/4″ 6.35mm. Planks may be cut with a utility knife using the “score and snap” technique. The leftover of this plank may be used to start the third row if it’s a minimum 6″ – 15cm long.
- Continue installing planks and make sure to achieve a random appearance with an end a joint spacing minimum of 6″ – 15cm. Note: For a more suitable visual on wider and longer planks, increase end joint spacing to 8-10″ or 20-25cm. Check that all planks are fully engaged; if a slight gapping is found, the gap can be tapped together by using a tapping block and a scrap of flooring to cover the tapping block in order to avoid damages to the planks.
- . When tting under door casings, etc., If necessary, a at pull bar may be used to assist in locking the planks.
- When sitting around obstacles or into irregular spaces, planks can be cut easily and cleanly using a utility knife with a sharp blade. It is often bene cial to make a cardboard template of the area and transfer this pattern to the plank.
- Protect all exposed edges of the mooring by installing wall molding and/or transition strips. Make sure that no plank will be secured in any way to the sub or.
- For wet areas such as bathrooms caulk the perimeter of the door with silicone caulk.
- Protect the finished ooring from exposure to direct sunlight to reduce fading and thermal expansion.
- Cutting resilient products into a new point may lead to delamination. Use an ethyl cyanoacrylate-based glue to help fuse the resilient point together. Besure to clean all glue from the top surface immediately. Alcohol-based glues may cause resilient products to swell.
- Adhering tape to the surface of your resilient flooring could damage the surface.Do not use tape to secure our protection directly to the door during construction or renovation. Instead, adhere the tape to the material used to protect the door and secure it to the base molding along the wall. A material such as a ram board can also be used to protect your flooring.
For reference purposes only if printed or downloaded.shawoors.comRevision: 05.12.2021
References
[xyz-ips snippet=”download-snippet”]