![]()
SMART LED WHITE BULB USER GUIDE

The Shelly® Smart WiFi LED Bulb by Allterco Robotics is intended to be installed into a standard light socket (E27) in order to change the temperature and to dim the light. Shelly may work as a standalone device or as an accessory to a home automation controller.
Specification
Power supply: 110-230V ±10% 50/60Hz ACSocket: E26/E27Power Rating: 9WBrightness: Up to 800 lmColor Temperature: 2700K-6500KBeam Angle: 190°Working temperature: From -10°C to 40°CComplies with EU standards:
- RE Directive 2014/53/EU
- LVD 2014/35/EU
- EMC 2004/108/WE
- RoHS2 2011/65/UE
Radio signal power: 1mWRadio protocol: WiFi 802.11 b/g/nFrequency: 2400 – 2500 MHz;Operational range (depending on local construction):
- up to 30 m outdoors
- up to 15 m indoors
Dimensions: 122 x 60 mmElectrical consumption: < 1 W
Technical Information
- Control through WiFi from a mobile phone, tablet, PC, automation system or any other device supporting HTTP and/or UDP protocol
- Microprocessor management
- Controlled elements: multiple LED diodes
- Shelly may be controlled by an external switch
CAUTION! Danger of electrocution. Plugging the device into the power grid has to be performed with caution.CAUTION! Do not allow children to play with the device. Keep the devices for remote control of Shelly (mobile phones, tablets, PCs) away from children.CAUTION! Please handle it with care! The Shelly® DUO is FRAGILE!
Introduction to Shelly
Shelly® is a family of innovative devices, which allow remote control of electric appliances through mobile phone, PC, or home automation systems. Shelly® uses WiFi to connect to the devices controlling it.They can be in the same WiFi network or they can use remote access (through the internet).Shelly® may work standalone, without being managed by a home automation controller, in the local WiFi network, as well as through a cloud service, from everywhere the User has Internet access. Shelly® has an integrated web server, through which the User may adjust,control and monitor the Device. Shelly® has two WiFi modes – Access Point (AP) and Client Mode (CM).To operate in Client Mode, a WiFi router must be located within the range of the device. Shelly® devices can communicate directly with other WiFi devices through HTTP protocol. An API can be provided by the Manufacturer. Shelly® devices may be available for monitor and control even if the User is outside the range of the local WiFi network, as long as the WiFi router is connected to the Internet. The Shelly Cloud function could be used, which is activated through the web server of the Device or through the settings in the Shelly Cloud mobile application. The Users can register and access the Shelly Cloud, using either Android or iOS mobile applications, or any internetbrowser and the website: https://my.shelly.cloud/.
Installation Instructions
CAUTION! Danger of electrocution. Before installing the Device into the light socket please check if it has been powered off.CAUTION! Before beginning the installation please read the accompanying documentation carefully and completely.Failure to follow recommended procedures could lead to malfunction, danger to your life, or violation of the law. Allterco Robotics is not re- responsible for any loss or damage in case of incorrect installation or operation of this device.RECOMMENDATION! The Device may be connected to and may control electric circuits and light sockets only if they comply with the respective standards and safety norms.
Initial InclusionInstall the Shelly to the light socket. Press the switch/button to which Shelly is connected. The Shelly should turn on. Press the switch/button again and Shelly will turn it off.You may choose if you want to use Shelly with the Shelly Cloud mobile application and Shelly Cloud service. You can also familiarize yourself with the instructions for Management and Control through the embedded Web interface.
Factory ResetYou can return your Shelly DUO to its Factory Settings by
- Pressing 5 consecutive times the button/switch connected to
- Switching on/off the power 5 consecutive times.
Upon successful factory reset Shelly will turn to start flashing.
The Shelly Cloud mobile application
http://shelly.cloud/app_download/?i=ioshttp://shelly.cloud/app_download/?i=android
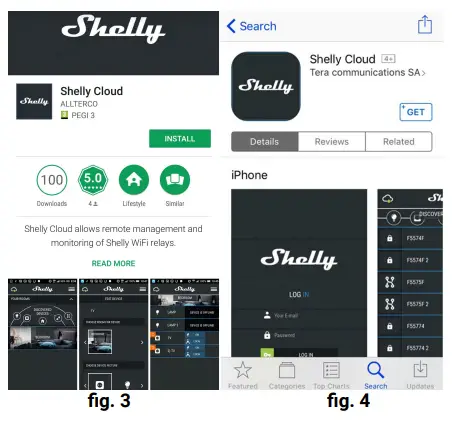
Shelly Cloud gives you the opportunity to control and adjust all Shelly® devices from anywhere in the world. All you need is an Internet connection and our mobile application, installed on your smartphone or tablet. To install the application please visit Google Play (Android- fig. 1) or App Store (iOS – fig. 2) and install theShelly Cloud app.
RegistrationThe first time you load the Shelly Cloud mobile app, you have to create an account that can manage all your Shelly® devices.Forgotten PasswordIn case you forget or lose your password, just enter the e-mail address you have used in your registration. You will then receive instructions to change your password.WARNING! Be careful when you type your e-mail address during the registration, as it will be used in case you forget your pass-word.After registering, create your first room (or rooms), where you are going to add and use your Shelly devices.
Shelly Cloud gives you the opportunity to create scenes for automatic turning on or off of the Devices at predefined hours or based on other parameters like temperature, humidity, light, etc. Shelly Cloud allows easy control and monitoring using a mobile phone, tablet, or PC.
Device InclusionTo add a new Shelly device, connect it to the power grid.
- Step 1 – Install your Shelly into the light socket and turn the light on.WARNING! In case the Device has not created its own WiFi network with SSID like ShellyBulbDuo-35FA58 check if you have power connected to Shelly. If you do not see an active WiFi network with SSID like ShellyBulbDuo-35FA58, reset the Device. If the device has been powered on, you have to power it off and on again 5 consecutive times*.Or if you have a switch/button connected to the Device, press it 5 consecutive times*.When the light starts to flash Shelly should return to AP Mode.If not, please repeat or contact our customer support at [email protected]*Upon each OFF state, please wait 2-3 seconds.
- Step 2 – Choose “Add Device”. In order to add more devices later, use the app Menu at the top right corner of the main screen and click “Add Device”. Type the name (SSID) and password for the WiFi network, to which you want to add the Device.

- Step 3 – WiFi inclusionIf using iOS: you will see the following screen:
Press the Home button of your iPhone/ iPad/iPod. Open Settings > WiFi and connect to the WiFi network created by Shelly, e.g.ShellyBulbDuo-35FA58.If using Android: your phone/tablet will automatically scan and include all new Shelly devices in the WiFi network that you are connected to.
Upon successful Device Inclusion to the WiFi network, you will see the following pop-up: -
Step 4 – Approximately 30 seconds after the discovery of any new devices оn the local WiFi network, а list will be displayed by default in the “Discovered Devices” room.
- Step 5 – Enter the Discovered Devices and choose the Device you want to include in your account.
-
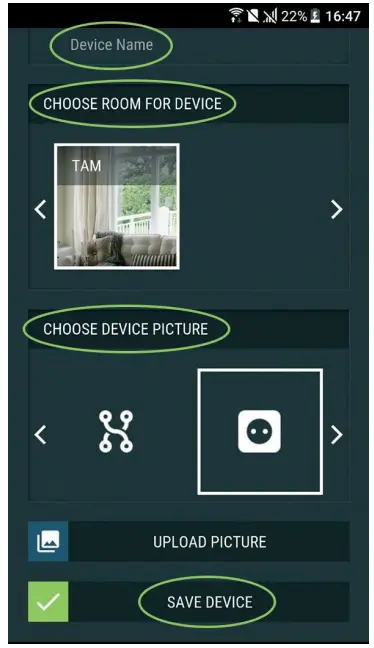
Step 6 – Enter a name for the Device (in the Device Name field).Choose a Room, in which the device has to be positioned. You can choose an icon or add a picture to make it easier to recognize.Press “Save Device”.
-
Step 7 – To enable connection to the Shelly Cloud service for remote control and monitoring of the Device, press “yes” on the following pop-up.
 Upon successful Device Inclusion to the WiFi network, you will see the following pop-up:
Shelly Device Settings
After your Shelly device is included in the app, you can control it, change its settings and automate the way it works. To switch the Device on and off, use the Power button. To enter at the details menu of the device, click on its name. From the details menu, you may control the Device, as well as edit its appearance and settings.
Timer
To manage the power supply automatically, you may use:
- Auto OFF: After turning on, the power supply will automatically shut down after a predefined time (in seconds). A value of 0 will cancel the automatic shutdown.
- Auto ON: After turning off, the power supply will be automatically turned on after a predefined time (in seconds). A value of 0 will cancel the automatic power-on.
Weekly ScheduleThis function requires an Internet connection. To use the Internet, your Shelly has to be connected to a local WiFi network with an active internet connection.Shelly may turn on/off automatically at a predefined time, at sunrise/sunset, or at a specified time before or after sunrise/sunset. Multiple schedules are possible.
Night Mode
With this model you can set a period of time and level of brightness, in which any turning on will set the brightness to the predefined level. You must select a start & end time, with the brightness level.
Internet/Security
- WiFi Mode – Client: This allows the device to connect to an available WiFi network. After typing the details in the respective fields, press Connect.
- WiFi Client Backup: Add a backup WiFi network, in case your primary one becomes unavailable.
- WiFi Mode – Acess Point: Configure Shelly to create a Wi-Fi Access point. After typing the details in the respective fields, press Create Access Point.
- Cloud: Enable or Disable connection to the Cloud service.
- Restrict Login: Restrict the web interface of Shely with a User-name and Password. After typing the details in the fields, press Restrict Shelly.

Settings
- Power-on default mode: this sets the default output state when shelly is powered.– On: configure shelly to turn on, when it has power.– Off: configure shelly to turn off, when it has power.
- Restore the last mode: configure shelly to return to the last state it was in when it has power.
- Transition time: set the time (in milliseconds), for which the shelly duo goes from 0% to 100%. The value can be from 0 to 5000 ms.
- Firmware update: update the firmware of shelly, when a new version is released.
- Time zone and geo-location: enable or disable the automatic detection of time zone and geo-location.
- Factory reset: return shelly to its factory default settings.
- Device information: here you can see the:– Device id – unique id of shelly– Device IP – the IP of shelly in your wi-fi network
The embedded web interfaceEven without the mobile app the Shelly device can be set and controlled through a browser and WiFi connection of a mobile phone, tablet, or PC.
Abbreviations used
- Shelly-ID – the unique name of the device. It consists of 6 or more characters. It may include numbers and letters, for example, 35FA58.
- SSID – The name of the WiFi network, created by the device, for example, shell color-35FA58.
- Access Point (AP) – the mode in which the device creates its own WiFi connection point with the respective name (SSID).
- Client Mode (CM) – the mode in which the device is connected to another WiFi network.
Installation/Initial inclusion
- Step 1 Install Shelly DUO into the light socket and turn the light on.
WARNING! In case the Device has not created its own WiFi network with SSID like ShellyBulbDuo-35FA58 check if you have power connected to Shelly. If you do not see an active WiFi network with SSID like ShellyBulbDuo-35FA58, reset the Device. If the Device has been powered on, you have to power it off and on again 5 consecutive times*. Or if you have a switch/button connected to the Device, press it 5 consecutive times*. When the light starts to flash Shelly should return to AP Mode. If not, please repeat or contact our customer support at *Upon each OFF state, please wait 2-3 seconds.
- Step 2 – When the light turns on, Shelly has created their own WiFi network (own AP), with name (SSID) such as ShellyBulbDuo-35FA58. Connect to it with your phone, tablet, or PC.
- Step 3 Type 192.168.33.1 into the address field of your browser to load the web interface of the Shelly device.
Home Page
This is the home page of the embedded web interface. If it has been set up is correct, you will see information about:
- Current power consumption, in Watts
- Current state (on/off)
- Current brightness level
- The current temperature of the light
- Power button
- Connection to Cloud
- Present time
- Settings
Internet/Security
- WiFi Mode – Client: This allows the device to connect to an available WiFi network. After typing the details in the fields, press Connect.
- WiFi Client Backup: Add a backup WiFi network, in case your primary one becomes unavailable.
- WiFi Mode – Acess Point: Configure Shelly to create a Wi-Fi Access point. After typing the details in the fields, press Create Access Point.
- Cloud: Enable or Disable connection to the Cloud service.
- Restrict Login: Restrict the web interface of Shely with a User-name and Password. After typing the details in the fields, press Restrict Shelly.
- SNTP Server: You can set a custom SNTP Server. Type the URL address and press Save.
ATTENTION! If you have entered incorrect information (wrong settings, usernames, passwords etc.), you will not be able to connect to Shelly and you have to reset the Device.
Timer
To manage the power supply automatically, you may use:
- Auto OFF: After turning on, the power supply will automatically shut down after a predefined time (in seconds). A value of 0 will cancel the automatic shutdown.
- Auto ON: After turning oft the power supply will be automatically turned on after a predefined time (in seconds). A value of 0 will cancel the automatic power-on.
WARNING! In case the Device has not created its own WiFi network with SSID like ShellyBulbDuo-35FA58 check if you have a power connected to Shelly. If you do not see an active WiFi network with SSID like ShellyBulbDuo-35FA58, reset the Device. If the Device has been powered on, you have to power it off and on again 5 consecutive times*. Or if you have a switch/button connected to the Device, press it 5 consecutive times*. When the light starts to flash Shelly should return to AP Mode. If not please repeat or contact our customer support at: [email protected] *Upon each OFF state, please wait 2-3 seconds.
Weekly Schedule
This function requires an Internet connection. To use the Internet, your Shelly has to be connected to a local WiFi network with an active internet connection.Shelly may turn on/off automatically at a predefined time, at sunrise/ sunset, or at a specified time before or after sunrise/sunset. Multiple schedules are possible.
Night Mode
With this model, you can set a period of time and level of brightness, in which any turning on will set the brightness to the predefined level. You must select a start & end time, with the brightness level.
Settings
- Power-On Default Mode – This sets the default output state when Shelly is powered.– ON: Configure Shelly to turn ON, when it has power.– OFF: Configure Shelly to turn OFF, when it has power.
- Restore Last Mode: Configure Shelly to return to the last state it was in when it has power.
- Transition Time – Set the time (in milliseconds), for which Shelly Duo goes from 0% to 100%. The value can be from 0 to 5000 ms.
- Time Zone and Geo-location – Enable or Disable the automatic detection of Time Zone and Geo-location.
- Firmware Update – Update the firmware of Shelly, when a new version is released.
- Factory Reset – Return Shelly to its factory default settings.
- Device Reboot – Reboots the device.
- Device Information – Here you can see the:– Device ID – Unique ID of Shelly– Device IP – The IP of Shelly in your Wi-Fi network
Additional Features
Shelly allows control via HTTP from any other device, home automation controller, mobile app or server. For more information about the REST control protocol, please visit www.shelly.cloud or send a request to [email protected].
Warranty Terms
- The Device’s warranty term is 24 (twenty-four) months, beginning from the date of purchase by the End User. The Manufacturer does is not responsible for extra warranty terms by the End Seller.
- The Warranty is valid for the territory of the EU. The warranty is applicable in compliance with all relevant laws and users’ rights pro The purchaser of the Device is entitled to exercise his/ her rights in accordance with all applicable laws and regulations.
- Warranty terms are provided by Allterco Robotics EOOD (referred hereinafter as the Manufacturer), incorporated under the Bulgarian law, with the address of registration 109 Bulgaria Blvd, floor 8, Triaditsa Region, Sofia 1404, Bulgaria, registered with the Commercial Register kept by the Bulgarian Ministry of Justice’s Registry Agency under Unified Identity Code (UIC) 202320104.
- Claims regarding the Conformity of the Device with the terms of the contract of sale shall be addressed to the Seller, in accordance with its terms of sale.
- Damages such as death or bodily injury, deterioration, or damages to objects different from the defective product, caused by a defective product are to be claimed against the Manufacturer using the contact data of the Manufacturer’s company.
- The User may contact the Manufacturer at [email protected] for operational problems that may be resolved remotely. It is recommended that the User contact the Manufacturer before sending it for servicing.
- The terms of removing defects depend on the commercial terms of the Seller. The Manufacturer is not responsible for untimely servicing of the Device or for faulty repairs carried out by unauthorized service.
- When exercising their rights under this warranty, the User must provide the Device with the following documents: receipt and valid warranty card with date of purchase.
- After a warranty repair has been carried out the warranty period is extended only for that period.
- The warranty does NOT cover any damages to the Device which occur in the following circumstances:
- When the Device has been used or wired inappropriately, including inappropriate fuses, overpassing maximal values of load and current electric shock, short circuit or other problems in the power supply, the power grid or the radio network.
- When there is a non-compliance between warranty card and/or without a purchase receipt, or attempted forgery of these documents, including (but not limited to) the warranty card or the documents proving the purchase.
- When there has been a self-repair attempt (de)installation, modification, or adaptation of the Device by unauthorized persons.
- Intentional or negligent improper handling, storing, or transportation of the Device, or in the event of non-observance of the instructions included in this warranty.
- When a non-standard power supply, network, or faulty Devices has been used.
- When damages occur which were caused regardless of the Manufacturer, including but not limited to: floods, storms, fire, lightning, natural disasters, earthquakes, war, civil wars, other force majeure, unforeseen accidents, robbery, water damage, any damages made by ingress of liquids, weather conditions, solar heating, any damages made by the intrusion of sand, humidity, high or low temperature, or air pollution.
- When there are other reasons beyond manufacturing defect, including but not limited to water damage, ingress of liquid into the Device, weather conditions, solar overheating, intrusion of sand, humidity, low or high temperature, air pollutionlu1)
- When there have been mechanical damages (forced opening, breaking, cracks, scratches, or deformations) caused by a hit, fall, or from another object, wrong use, or caused by not following the instructions for use.
- When damage has been caused by exposing the Device to severe outdoor conditions such as high humidity, dust too low or too high temperature. Terms of proper storage are specified in the User Manual.
- When damage has been caused by lack of maintenance by the User, as specified in the User manual.
- When damage has been caused by faulty accessories, or those not recommended by the Manufacturer.
- When damage has been caused by the use of non-original spare parts or accessories not suitable for the specified Device model, or after repairs and changes carried out by an unauthorized service or person.
- When damage has been caused by lack of maintenance by the User, as specified in the User manual.
- When damage has been caused by faulty accessories, or those not recommended by the Manufacturer.
- When damage has been caused by the use of non-original spare parts or accessories not suitable for the specified Device model, or after repairs and changes carried out by unauthorized service or person.
Environmental Protection
This marking on the device, accessories, or documentation indicates that the device and its electronic accessories (charger, USB cable) must be disposed of only in specially designated locations. This marking on the battery, the instruction manual, the safety instructions, the warranty card, or the packaging in- indicates that the battery in the device must be disposed of only in specially designated locations.Please follow the instructions for environmental protection and proper disposal of the Device, its accessories, and its packaging for the recycling of the materials for their further usage and to keep the environment clean!
You can find the latest version of the Shelly Dimmer user guide on this address: https://shelly.cloud/support/user-manuals/Or by scanning this QR code:
 report this ad
[PDF]
Manufacturer: Allterco Robotics EOODAddress: Sofia, 1407, 103 Cherni vrah blvd.Tel.: +359 2 988 7435E-mail: [email protected]http://www.Shelly.cloudThe Declaration of Conformity is available at:https://shelly.cloud/declaration-of-conformity/Changes in the contact data are published by the Manufacturer at the official website of the Device:http://www.shelly.cloudThe User is obliged to stay informed of any amendments of these warranty terms before exercising his/her rights against the Manufacturer. All rights to trademarks Shelly® and other intellectual rights associated with this Device belong to Allterco Robotics EOOD.
References
[xyz-ips snippet=”download-snippet”]