
H&T Temperature and Humidity Sensor
CONTROL YOUR HOME WITH YOUR VOICE All Shelly devices are compatible with Amazons’ Alexa and Google’ assistant. Please see our step-by-step guides on: https://shelly.cloud/compatibility
SHELLY APPLICATION

Shelly Cloud gives you opportunity to control and adjust all Shelly® Devices from anywhere in the world. You only need an internet connection and our mobile application, installed on your smartphone or tablet.
Registration
The first time you open the Shelly Cloud mobile app, you have to create an account which can manage all your Shelly® devices.
Forgotten Password
In case you forget or lose your password, just enter the e-mail address you have used in your registration. You will then receive instructions on how to change your password.⚠WARNING! Be careful when you type your e-mail ad dress during the registration, as it will be used in case you forget your password.
First steps
After registering, create your first room (or rooms), where you are going to add and use your Shelly devices. Shelly Cloud gives you opportunity to create scenes for automatic turning on or off of the Devices at predefined hours or based on other parameters like temperature, hu midity, light etc. (with available sensor in Shelly Cloud). Shelly Cloud allows easy control and monitoring using a mobile phone, tablet or PC.

Device Inclusion
Step 1 Place your Shelly H&T in the room where you want to use it. Press the Button – the LED should turn on and flash slowly.
⚠WARNING! If the LED does not flash slowly, press and hold the Button for at least 10 seconds. The LED should then flash quickly. If not, please repeat or contact our cus tomer support at:
Step 2 In order to add more devices later, use the Menu at the top right corner of the main screen and click “Add Device”. Type the name and password for the WiFi network, to which you want to add Shelly.
Step 3 If using iOS: you will see the following screen – On your iOS device open Settings > WiFi and connect to the WiFi network created by Shelly, e.g. ShellyHT-35FA58. – If using Android your phone will automatically scan and include all new Shelly devices in the WiFi network, that you defined.

 Upon successful Device Inclusion to the WiFi network you will see the following pop-up:

Step 4: Approximately 30 seconds after discovery of any new de vices оn the local WiFi network, а list will be displayed by default in the “Discovered Devices” room.
![]()
Step 5: Select Discovered Devices and choose the Shelly device you want to include in your account.
![]()
Step 6: Enter a name for the Device. Choose a Room, in which the device has to be positioned. You can choose an icon or upload a picture to make it easier to recognize. Press “Save Device”.
![]()
![]()
Step 7: To enable connection to the Shelly Cloud service for re mote control and monitoring of the Device, press “yes” on the following pop-up.

Shelly Devices Settings
After your Shelly device is included in the app, you can control it, change its settings and automate the way it works.
To switch the device on and off, use the Power button. To enter the details menu of the device, click on it’s name. From there you may control the device, as well as edit its appearance and settings.

Sensor settings
Temperature Units: Setting for change of the temperature units.• Celsius• Fahrenheit
Temperature Threshold: Define the temperature Threshold in which Shelly H&T will “wake up” and send status. The value can be from 0.5° up to 5° or you can disable it.
Humidity Threshold: Define the humidity Threshold in which Shelly H&T will “wake up” and send status. The val ue can be from 5 up to 50% or you can disable it.
Internet/Security
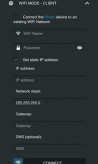
WiFi Mode – Client: Allows the device to connect to an available WiFi network. After typing the details in the re spective fields, press Connect.
WiFi Mode – Access Point: Configure Shelly to create a Wi-Fi Access point. After typing the details in the respec tive fields, press Create Access Point.
Restrict Login: Restrict the web interface (IP in the Wi-Fi network) of Shely with a Username and Password. After typing the details in the respective fields, press Restrict Login.
SettingsFirmware UpdateUpdate the firmware of Shelly, when a new version is re leased.Time Zone and Geo-locationEnable or Disable the automatic detection of Time Zone and Geo-location.Factory ResetReturn Shelly to its factory default settings. Device Information
Here you can see the:
• Device ID – Unique ID of Shelly• Device IP – The IP of Shelly in your Wi-Fi network Edit Device
From here you can edit:
• Device Name• Device Room• Device Picture
When you are done, press Save Device.
THE EMBEDDED WEB INTERFACE
Even without the mobile app Shelly can be set and con trolled through a browser and connection of a mobile phone or tablet.
Abbreviations used:
Shelly-ID – consists of 6 or more characters. It may in clude numbers and letters, for example 35FA58. SSID – the name of the WiFi network, created by the de vice, for example ShellyHT-35FA58.Access Point (AP) – in this mode in Shelly creates its own WiFi network.Client Mode (CM) – in this mode in Shelly connects to another WiFi network.
INSTALLATION/INITIAL INCLUSION
Step 1 Place Shelly in the room where you want to use it. Open it and press the Button. The LED should flash slowly. ⚠CAUTION! To open the device, twist the top and bottom part of the case counter clockwise.
⚠CAUTION! If the LED does not flash slowly, press and hold the Button for 10 seconds. Upon successful factory reset, the LED will flash slowly.
Step 2 When the LED is flashing slowly, Shelly has created a WiFi network, with name such as ShellyHT-35FA58. Connect to it.
Step 3 Type 192.168.33.1 into the address field of your browser to load the web interface of Shelly.
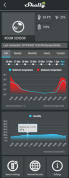
General – Home Page
This is the home page of the embedded web interface. Here you will see information about:
- Current Temperature
- Current Humidity
- Current battery percentage
- Connection to Cloud
- Present time
- Settings

Sensor Settings
Temperature Units: Setting for change of the temperature units.
- Celsius
- Fahrenheit
Send Status Period: Define the period (in hours), in which Shelly H&T will report its’ status. The value must be be tween 1 and 24.
Temperature Threshold: Define the temperature Thresh old in which Shelly H&T will “wake up” and send status. The value can be from 1° up to 5° or you can disable it. Humidity Threshold: Define the humidity Threshold in which Shelly H&T will “wake up” and send status. The val ue can be from 0.5 up to 50% or you can disable it. Internet/Security
WiFi Mode-Client: Allows the device to connect to an available WiFi network. After typing the details in the fields, press Connect.
WiFi Mode-Acess Point: Configure Shelly to create a Wi-Fi Access point. After typing the details in the fields, press Create Access Point.
Restrict Login: Restrict the web interface of Shely with a Username and Password. After typing the details in the respective fields, press Restrict Shelly.
Advanced Developer Settings: Here you can change the action execution:
- Via CoAP (CoIOT)
- Via MQTT
⚠ATTENTION: To reset the device, press and hold the Button for at least 10 seconds. Upon successful factory reset, the LED will flash slowly.
Settings
Time Zone and Geo-location: Enable or Disable the automatic detection of Time Zone and Geo-location. If Dis abled you can define it manually.
Firmware Upgrade: Shows present firmware version. If a newer version is available, you can update your Shelly by clicking Upload to install it.
Factory reset: Return Shelly to its factory settings. Device Reboot: Reboots the device.
Battery Life Recommendations
For the best battery life we recommend you the following settings for Shelly H&T:
- Sensor settings
- Send Status Period: 6 h
- Temperature Threshold: 1°
- Humidity Threshold: 10%
Set a static IP address in the Wi-Fi network for Shelly from the embedded web interface. Go to Internet/Security -> Sensor settings and press on Set static IP address. After typing the details in the respective fields, press Connect.
Keep Shelly at the best distance possible to the Wi-Fi router.
References
[xyz-ips snippet=”download-snippet”]