
INITIAL INCLUSION
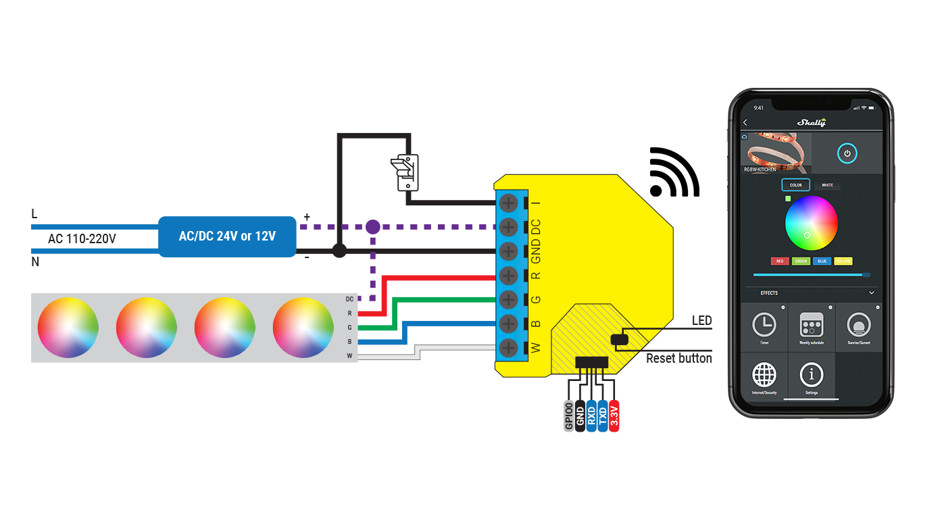
Before installing/mounting the Device ensure that the grid is powered off (turned down breakers).Connect the Shelly to the power grid following the wiring scheme above. You may choose if you want to use Shelly with the Shelly Cloud mobile application and Shelly Cloud service. You can also familiarize yourself with the instructions for Management and Control through the embedded Web interface.
CONTROL YOUR HOME WITH YOUR VOICE
All Shelly devices are compatible with Amazon Echo and Google Home. Please see our step-by-step guide on: https://shelly.cloud/compatibility/
SHELLY APPLICATION
 https://shelly.cloud/app_download/?i=shelly_generic
Shelly Cloud gives you the opportunity to control and adjust all Shelly® Devices from anywhere in the world. You only need an internet connection and our mobile application, installed on your smartphone or tablet.
RegistrationThe first time you load the Shelly Cloud mobile app, you have to create an account that can manage all your Shelly® devices.
Forgotten PasswordIn case you forget or lose your password, just enter the e-mail address you have used in your registration. You will then receive instructions to change your password. ⚠WARNING! Be careful when you type your e-mail address during the registration, as it will be used in case you forget your password.
First steps
After tablet or PC registering, create your first room (or rooms), where you are going to add and use your Shelly devices. Shelly Cloud gives you an opportunity to create scenes for automatic turning on or off of the Devices at predefined hours or based on other parameters like temperature, humidity, light etc. (with the available sensor in Shelly Cloud). Shelly Cloud allows easy control and monitoring using a mobile phone,.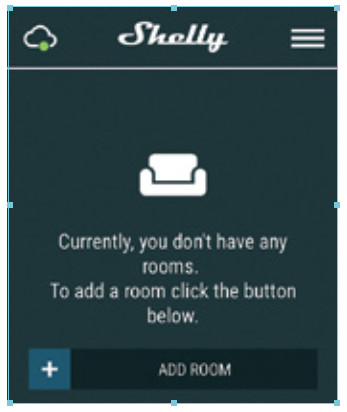
Device Inclusion
To add a new Shelly device, install it to the power grid following the Installation Instructions included with the Device.Step 1After the installation of Shelly following the Installation Instructions and the power is turned on, Shelly will create its own WiFi Access Point (AP).⚠WARNING! In case the Device has not created its own WiFi network with SSID like shellyrgbw2-35FA58 check if you have connected Shelly correctly by the scheme in Fig. 1. If you do not see an active WiFi network with SSID like shellyrgbw2-35FA58, reset the Device. If the device has been powered on, you have to power it off and on again. After turning the power on, you have 20 seconds to press 5 consecutive times the switch connected DC (SW). Or if you have physically access to the Device, press the reset button once. The LED strip light will begin to flash. After the device as began to flash, turn the power off and back on again. Shelly should return to AP Mode. If not, please repeat or contact our customer support at: [email protected]Step 2Choose “Add Device”. In order to add more Devices later, use the app menu at the top right corner of the main screen and click “Add Device”. Type the name (SSID) and password for the WiFi network, to which you want to add the Device.
Step 3
If using iOS: you will see the following screen: Press the home button of your iPhone/iPad/iPod. Open Settings > WiFi and connect to the WiFi network created by Shelly, e.g. shellyrgbw2-35FA58.. If using Android your phone/tablet will automatically scan and include all new Shelly Devices in the WiFi network that you are connected to.
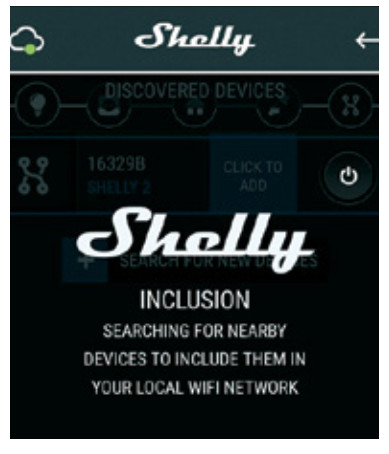
Upon successful Device Inclusion to the WiFi network you will see the following pop-up: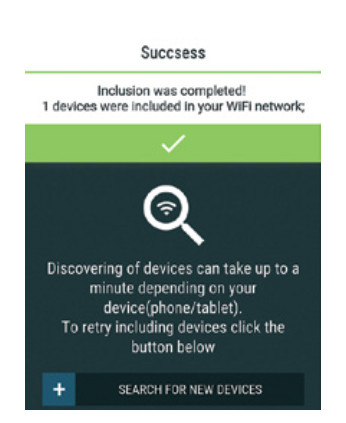 Step 4Approximately 30 seconds after the discovery of any new Devices оn the local WiFi network, а list will be displayed by default in the “Discovered Devices” room.
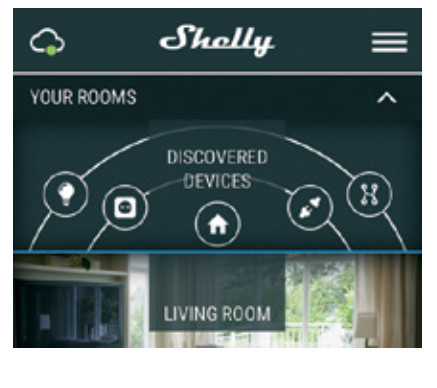 Step 5Enter Discovered Devices and choose the Device you want to include in your account.
 Step 6Enter a name for the Device (in the Device Name field). Choose a Room, in which the Device has to be positioned. You can choose an icon or add a picture to make it easier to recognize. Press “Save Device”.
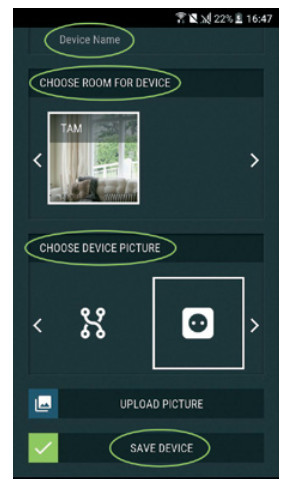 Step 7To enable connection to the Shelly Cloud service for remote control and monitoring of the Device, press “YES” on the following pop-up.
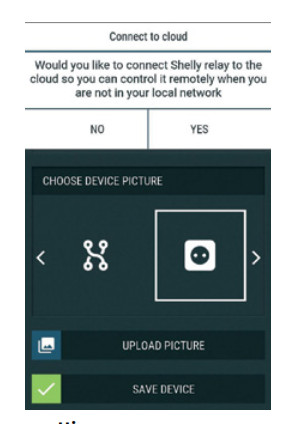 Shelly devises settings
After your Shelly device is included in the app, you can control it, change its settings and automate the way it works. To switch the device on and off, use the respective ON/OFF button. To enter at the details menu of the respective Device, simply click on it’s name. From the details menu, you may control the Device, as well as edit its appearance and settings. Work Modes – Shelly RGBW2 has two work modes color and white:
- Color – In Color mode you have a full-color gamma to choose the desired color from. Under the color gamma, you have 4 pure predefined colors – Red, Green, Blue & Yellow. Below the predefined colors you have the dimmer slider from which you can vary the Shelly RGBW2`s brightness.
- White – In White mode you have four separate channels, each with On/Off button and a dimmer slider – from which you can set the desired brightness for the corresponding channel of Shelly RGBW2.
Edit Device – From here you can edit
- Device Name
- Device Room
- Device Picture
When you are done, press Save Device.Timer – Тo manage the power supply automatically, you may use:
- Auto OFF – After turning on, the power supply will automatically shut down after a predefined time (in seconds). A value of 0 will cancel the automatic shutdown.
- Auto ON – After turning off, the power supply will be automatically turned on after a predefined time (in seconds). A value of 0 will cancel the automatic power-on.
Weekly Schedule – This function requires an Internet connection. To use the Internet, a Shelly Device has to be connected to a local WiFi network with a working internet connection. Shelly may turn on/off automatically at a predefined time. Multiple schedules are possible.Sunrise/Sunset – This function requires an Internet connection. Shelly receives actual information through the Internet about the time of sunrise/sunset in your area. Shelly may turn on or off automatically at sunrise/sunset, or at a specified time before or after sunrise/sunset. Multiple schedules are possible.Internet/Security
- WiFi Mode Client – Allows the device to connect to an available WiFi network. After typing the details in the respective fields, press Connect.
- WiFi Mode Acess Point – Configure Shelly to create a Wi-Fi Access point. After typing the details in the respective fields, press Create Access Point.
- Cloud – Enable or Disable connection to the Cloud service.
- Restrict Login – Restrict the web interface of Shely with a Username and Password. After typing the details in the respective fields, press Restrict Shelly.
Settings
Power-On Default Mode – This sets the default output state when Shelly is powered.
- ON – Configure Shelly to turn ON, when it has power.
- OFF – Configure Shelly to turn OFF, when it has power.
- Restore Last Mode – Configure Shelly to return to last state it was in, when it has power. Firmware Update – update the firmware of Shelly, when a new version is released. Time Zone and Geo-location – Enable or Disable the automatic detection of Time Zone and Geo-location. Factory Reset – Return Shelly to its factory default settings. Device Information – Here you can see the
- Device ID – Unique ID of Shelly
- Device IP – The IP of Shelly in your Wi-Fi network
THE EMBEDDED WEB INTERFACE
Shelly can be set and controlled through a browser.Abbreviations usedShelly ID – the unique name of the Device. It consists of 6 or more characters. It may include numbers and letters, for example 35FA58.SSID – the name of the WiFi network, created by the Device, for example, shellyrgbw2-35FA58..Access Point (AP) – the mode in which the Device creates its own WiFi connection point with the respective name (SSID).Client Mode (CM) – the mode in which the Device is connected to another WiFi network.
Initial inclusionStep 1
Install Shelly to the power grid following the schemes described above and place it into the console. After turning the power on Shelly will create its own WiFi network (AP). ⚠WARNING! If you don’t see the WiFi please follow the step 1 from the device inclusion section of the guide.
Step 2When Shelly has created an own WiFi network (own AP), with name (SSID) such as shellyrgbw2-35FA58. Connect to it with your phone, tablet or PC.Step 3Type 192.168.33.1 into the address field of your browser to load the web interface of Shelly.General – Home Page
- This is the home page of the embedded web interface. If it has been set up is correctly, you will see information about
- Current work mode – color or white
- Current state (on/off)
- Current brightness level
- Power button
- Connection to Cloud
- Present time
- Settings
Timer – Тo manage the power supply automatically, you may use:
- Auto OFF – After turning on, the power supply will automatically shut down after a predefined time (in seconds). A value of 0 will cancel the automatic shutdown.
- Auto ON – After turning off, the power supply will be automatically turned on after a predefined time (in seconds). A value of 0 will cancel the automatic power-on. Weekly Schedule – This function requires an Internet connection. To use the Internet, a Shelly Device has to be connected to a local WiFi network with working internet connection. Shelly may turn on/off automatically at a predefined time. Multiple schedules are possible.
Sunrise/Sunset – This function requires an Internet connection. Shelly receives actual information through the Internet about the time of sunrise/sunset in your area. Shelly may turn on or off automatically at sunrise/sunset, or at a specified time before or after sunrise/sunset. Multiple schedules are possible.
Internet/Security
- WiFi Mode Client – Allows the device to connect to an available WiFi network. After typing the details in the respective fields, press Connect.
- WiFi Mode Acess Point – Configure Shelly to create a Wi-Fi Access point. After typing the details in the respective fields, press Create Access Point.
- Cloud – Enable or Disable connection to the Cloud service.
- Restrict Login: Restrict the web interface of Shely with a Username and Password. After typing the details in the respective fields, press Restrict Shelly.
⚠ATTENTION! If you have entered incorrect information (wrong settings, usernames, passwords etc.), you will not be able to connect to Shelly and you have to reset the Device.⚠WARNING! If you don’t see the WiFi please follow step 1 from the device inclusion section of the guide.
Advanced Developer Settings – Here you can change the action execution via CoAP (CoIOT) or via MQTTFirmware Upgrade – Shows present firmware version. If a newer version is available, officially announced, and published by the Manufacturer, you can update your Shelly Device. Click Upload to install it to your Shelly Device.
Settings
Power-On Default Mode – This sets the default output state when Shelly is powered.
- ON – Configure Shelly to turn ON, when it has power.
- OFF – Configure Shelly to turn OFF, when it has power.
- Restore Last Mode – Configure Shelly to return to last state it was in, when it has power.
Time Zone and Geo-location – Enable or Disable the automatic detection of Time Zone and Geo-locationFirmware Update – Update the firmware of Shelly, when a new version is released.Factory Reset – Return Shelly to its factory default settings.Device Reboot – Reboots the device.Device Information – Here you can see the unique ID of Shelly.Additional Features – Shelly allows control via HTTP from any other device, home automation controller, mobile app or server. For more information about the REST control protocol, please visit https://shelly.cloud/developers/ or send a request to: [email protected]
![]()
References
[xyz-ips snippet=”download-snippet”]