PJ-32C Home Theater Projector
Home Theater Projector with BT INSTRUCTION MANUALMODEL NO. : PJ-32CPLEASE READ BEFORE OPERATING THIS EQUIPMENT
Important Safety Instructions1. Read these Instructions. 2. Keep these Instructions. 3. Heed all Warnings. 4. Follow all instructions. 5. Do not use this apparatus near water. 6. Clean only with a dry cloth. 7. Do not block any ventilation openings. Install in accordance with the manufacturer’sinstructions. 8. Do not install near any heat sources such as radiators, heat registers, stoves, or otherapparatus (including amplifier) that product heat. 9. Protect the power cord from being walked on or pinched particularly at plugs, conveniencereceptacles, and the point where they exit from the apparatus. 10. Only use attachments/accessories specified by the manufacturer. 11. Unplug this apparatus during lightning storms or when unused for long periods of time. 12. Refer all servicing to qualified service personnel. Servicing is required when the apparatushas been damaged in any way, such as power-supply cord or plug is damaged, liquid has been spilled or objects have fallen into the apparatus, the apparatus has been exposed to rain or moisture, does not operate normally, or has been dropped. 13. Use only with a cart, stand, tripod, bracket, or table specified by the manufacturer or sold with the apparatus. When a cart is used, use caution when moving the cart/ apparatus combination to avoid injury from tip-over.1
Additional Warnings and Precautions1. Do not look directly into the projector light. 2. Don’t touch the project lens 3. Mains adapter is used as disconnect device and it should remain readily operableduring intended use. In order to disconnect the apparatus from the mains completely, the mains plug should be disconnected from the mains socket outlet completely. 4. CAUTION: Use of controls or adjustments or performance of procedures other than those specified may result in hazardous radiation exposure. 5. WARNING: Changes or modified to this unit not expressly approved by the party responsible for compliance could void the user’s authority to operate the equipment. 6. WARNING: Use of this unit near fluorescent lighting may cause interference regarding use of the remote. If the unit is displaying erratic behavior move away from any fluorescent lighting, as it may be the cause. 7. WARNING: Shock hazard – Do Not Open. 8. Caution and marking information is located at the rear or bottom of the apparatus. 9. WARNING: To reduce the risk of fire or electric shock, do not expose this apparatus to rain, moisture, dripping, or splashing. 10. Objects filled with liquids, such as vases, shall not be placed on the apparatus.2
FCC WarningThis device complies with Part 15 of the FCC rules. Operation is subject to the following two conditions: (1) this device may not cause harmful interference, and (2) this device must accept any interference received, including interference that may cause undesired operation. NOTE: This equipment has been tested and found to comply with the limits for a Class B digital device, pursuant to Part 15 of the FCC Rules. These limits are designed to provide reasonable protection against harmful interference in a residential installation. This equipment generates, uses, and can radiate radio frequency energy and, if not installed and used in accordance with the instructions, may cause harmful interference to radio communications. However, there is no guarantee that interference will not occur in a particular installation. If this equipment does cause harmful interference to radio or television reception, which can be determined by turning the equipment off and on, the user is encouraged to try to correct the interference by one or more of the following measures:· Reorient or relocate the receiving antenna. · Increase the separation between the equipment and receiver. · Connect the equipment into an outlet on a circuit different from that to which thereceiver is connected. · Consult the dealer or an experienced radio/TV technician for help. Warning: Changes or modifications not expressly approved by the party responsible for compliance could void the user’s authority to operate the equipment.The equipment complies with FCC radiation exposure limits set forth for an uncontrolled environment. The equipment should be installed and operated with minimum distance 20cm between the radiator & your body.In The BoxMain Unit Lens Cover Remote AC Power cord User Manual3
Table of ContentsImportant Safety Instructions – – – – – – – – – – – – – – – – – – – – – – – – – – – P1 Additional Warnings and Precautions – – – – – – – – – – – – – – – – – – – – – P2 FCC Warning – – – – – – – – – – – – – – – – – – – – – – – – – – – – – – – – – – – – – – – – P3 In The Box – – – – – – – – – – – – – – – – – – – – – – – – – – – – – – – – – – – – – – – – – P3 Table of Contents – – – – – – – – – – – – – – – – – – – – – – – – – – – – – – – – – – – – P4 Remove & Close the Lens Cover – – – – – – – – – – – – – – – – – – – – – – – – P5 Placing of Your Projector – – – – – – – – – – – – – – – – – – – – – – – – – – – – – – P5 To Reduce Image Distortion – – – – – – – – – – – – – – – – – – – – – – – – – – – – P6 Distance Between The Projector And Screen – – – – – – – – – – – – – – – – P6 Installing your Projector in the Ceiling – – – – – – – – – – – – – – – – – – – – P6 Adjust The Vertical Location – – – – – – – – – – – – – – – – – – – – – – – – – – – – P7 Adjust The Focus And Keystone – – – – – – – – – – – – – – – – – – – – – – – P7 Controls of Remote – – – – – – – – – – – – – – – – – – – – – – – – – – – – – – – – – – P8 Install / Remove Batteries of Remote – – – – – – – – – – – – – – – – – – – – – P8 Controls of Projector – – – – – – – – – – – – – – – – – – – – – – – – – – – – – – – – – P9 Install Power Adapter – – – – – – – – – – – – – – – – – – – – – – – – – – – – – – – – – P10 Main Button Operation – – – – – – – – – – – – – – — – – – – – – – – – – – – – – – – P10 Connect HDMI show the Image On Projector Screen – – – – – – – – – P11 Connect AV Show The Image On Projector Screen – – – – – – – – – – – P11 Connect VGA Show The Image On Projector Screen – – – – – – – – – – P12 Connect Audio Output (Aux Out / Line Out / Earphones) – – – – – – – P13 Install USB Device And Micro SD Card “TF” – – – – – – – – – – – – – – – – P13 Using TF Card and USB Playback DMP (Media Player) — – – – – – – – P14 Using Bluetooth Playback – – – – – – – – – – – – – – – – – – – – – – – – P15 Multi-screen interactive connection for phone and projector – – – – P16 Using Projector Menu 1 – – – – – – – – – – – – – – – – – – – – – – – – – – – – – – P17 Using Projector Menu 2 – – – – – – – – – – – – – – – – – – – – – – – – – – – – – – P18 Using Projector Menu 3 – – – – – – – – – – – – – – – – – – – – – – – – – – – – – – P18 Specifications – – – – – – – – – – – – – – – – – – – – – – – – – – – – – – – – – – – – – – – P194
Remove & Close The Lens Cover
Remove the lens cover before using
Close the lens cover when unit is not using
Placing of Your ProjectorYour projector can be installed in four different configurations (see picture below):Front Table: Select this location with the projector placed near the floor in front of the screen. This is the most common way to position the projector for quick setup and portability.Rear Table: Select this location with the projector placed near the floor behind the screen. NOTE: That a special rear projection screen is required.Front Ceiling: Select this location with the projector suspended upside-down from the ceiling in front of the screen. NOTE: A projector mount is required to install the projector in a ceiling.Rear Ceiling: Select this location with the projector suspended upside-down from the ceiling behind the screen. NOTE:5
A projector mount is required to install the projector in a ceiling. A special rear projection screen is required.
To reduce Image DistortionMove the projector as close to the center of the screen as possible.The light beam from the projector should be perpendicular to the screen for a rectangular or square image.
Distance Between The Projector And Screen
Measure the distance between the projector and where you want to position the screen. This is the projection distance.
Distance1.16m 1.35m 1.51m 1.79m 2.15m 2.81m 3.43m 4.44m
Screen Size37inch 45 inch 50 inch 60 inch 72 inch 100 inch 120 inch 150 inch
Installing your Projector in the CeilingWhen installing the projector in the ceiling, please purchase a projector mount recommended by an installation professional and follow the instructions that come with the mount. Before installing the projector in the ceiling, please check to make sure the ceiling structure can support the weight of the projector and the mount. If in doubt, please ask the advice from an installation professorial.NOTE: Projector mount and screw(s) not included
6
Adjust The Vertical LocationFollow below picture to adjust the vertical location.Adjust The Focus And KeystoneFollow below picture to adjust the focus and trapezoidal screen. Adjust the focus by turning the knob while observing the image pixels near the center of the screen. Optimal focus is obtained when the pixels are clearly visible. Depending on the projected screen size, the focus near the screen edges may be less sharp than the screen center. Keystone image is created when the projector lens is projected from above or below the center of the screen. Keystone correction restores the distorted image to a rectangular or square shape.7
Controls of RemoteInstall / Remove Batteries of RemoteRemove the battery compartment cover on the back of your remote by carefully sliding to open. The battery cover can then be lifted away. Fit the correct batteries (not included), referring to the polarity markings. Finally, replace the cover.NOTES: Batteries shall not be exposed to excessiveheat such as placing under the sunlight or near a fire. Please make sure the batteries are installed with their correct polarities. Do not mix old and new batteries. Use only the same type of batteries. Do not dispose of the batteries in fire, battery may explode or leak. Do not recharge a non-rechargeable battery.8
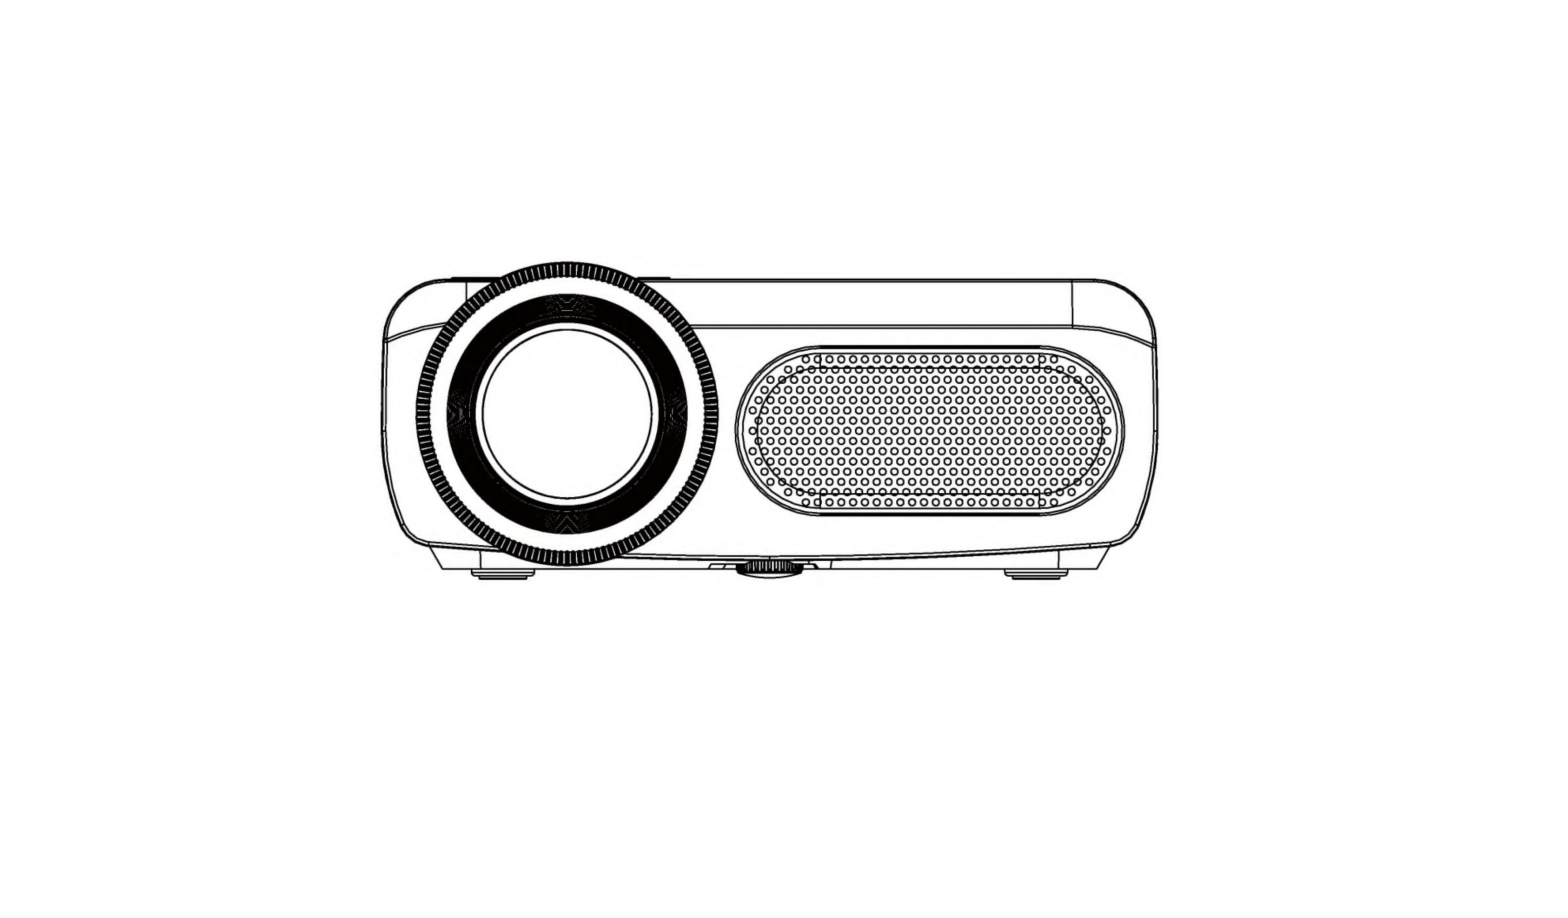
Controls of Projector
1 LENS 2 ANGEL ADJ. Knob 3 AC IN Socket 4 FOCUS ADJ. Knob 5 TRAPEZOIDAL ADJ. Knob 6 POWER Indicator 7 POWER Button 8 RETURN Button 9 SOURCE Button 10 MENU Button
11
Buttons
12
Buttons
13
Button
14 Audio out Jack
15 AV IN Jack
16 TF Card Slot
17 HDMI 1 & 2 Ports
18 USB Port
19 VGA IN Port
20 IR Sensor
9
Install Power AdapterFollow below picture to connect power cable Connect small end of cable FIRST. Plug the AC plug to power outlet.WARNING:Before connecting to the power supply, ensure that the supply corresponds to the information on the rating label at the back of the apparatus.Main Button Operation– Press the button to switch on unit, press again to turn off. / SOURCE – Press the button to select input source. / MENU – Press the button to enter projector menu.– Press the buttons to navigate and select screen item of menu. / EXIT – Press the button to return to previous status or exit the menu.– Press the buttons to fast search forward and rewind on USB / TF. – Press the buttons to search next or previous file on USB / TF. VOL+ / VOL – Press the buttons to select the sound level. – Press the button to play/pause the playback of file on USB / TF card. FLIP Press the button to rotate / mirror projector screen ZOOM – Press the button to select image scale.10
– Press to mute the audio. Press again to resume.Connect HDMI Show The Image On Projector ScreenRefer to the following picture to connect a set top box, a BD/DVD player or a streaming player to the HDMI input. 1. Turn off the unit before connect HDMI cable. 2. After connection, press the button to turn on unit and power indicator will lightGREEN 3. Press the / SOURCE button to select HDMI 1 or HDMI 2 and the video from theconnected device will be shown on projector screen. 4. Press the button to turn off unit power.
Important Note: If there is no sound from the internal speakers when playing media contents from a set top box, BD/DVD or streaming players connecting to the HDMI input, please check the set top box or the player’s digital audio settings and make sure it is set to “PCM Stereo” mode.
Connect AV Show The Image On Projector Screen
Follow below picture to connect AV cable and device. 1. Turn off the unit before connect AV cable.
2. Use AV cable to connect follow below figure
3. After connect, press the button to turn on unit and power indicator will light GREEN
4. Press the / SOURCE button to select AV mode and the video of AV device will
show on projector screen
5. Press
the
button
to
turn off
unit
power
11
Connect VGA Show The Image On Projector ScreenFollow below picture to connect VGA cable and device. 1. Turn off the unit before connect VGA cable.2. Press the button to turn off power of your projector before connection. 3. After connect, press the button to turn on unit and power indicator will lightGREEN 4. Press the / SOURCE button to select VGA mode and the video of VGA devicewill show on projector screen 5. Press the button to turn off unit power.
Please refer to the following table to adjust the output signal from computer
Type Resolution
Frequency
Field Frequency
31.5
60
VGA
640×480
34.7 37.9
70 72
37.5
75
PC
31.4
50
35.1
56
SVGA
800×600
37.9
60
46.6
70
48.1
72
12
46.9
75
40.3
50
XGA
1024×768
48.4
60
56.5
70
NOTE: In order to get the sound from the unit, please connect AV IN cable when you connect VGA input.
Connect Audio Output ( Aux Out / Line Out / Earphones)Follow below picture to connect audio cable and device.1. Press the button to turn off power of your projector before connection. 2. Use audio cable to connect follow below figure. 3. After connect and turn on both units. Your projector sound from external device now. 4. After using , turn off both unit
Important Note: If there is no sound from the stereo audio output when playing media contents from a set top box, BD/DVD or streaming players connecting to the HDMI input, please check the set top box or the player’s digital audio settings and make sure it is set to “PCM Stereo” mode.
Install USB Device And Micro SD Card “TF”
Follow below picture to
install USB and TF card
Turn off the unit before
install USB / TF card.
13
Using TF Card And USB Playback DMP (Media Player)
Install USB / TF device: 1. Turn off the unit before install USB / TF card. 2. Install the USB device into USB port.3. After connect, press the button to turn on unit and the power indicator light GREEN.
4. Press the mode.
/ SOURCE button to enter and use
buttons to search the DMP
5. After selection, use
buttons to search the PHOTO / MUSIC / MOVIE icon and
press the button to enter. If necessary, use the
button to select TF card or
USB and press the button to enter.
6. Use
buttons to search the correct file and press the button to preview
playback file and press the / EXIT button or button of remote to start playback.
7. Press
button to fast search forward and rewind.
8. Press
button to search next or previous file.
9. During playback, press the button to pause and press again to resume.
NOTE: Remove USB / TF device, press the button to turn off power FIRST.
Sub-Menu on Photo screen
1. When photo playback, press
Figure 1.
the button and more
function screen show on lower
(figure 1).
2. Use the
button to select
icon and press the button to play special function.
Sub-Menu on Music screen
1. When music playback, press
Figure 2.
the button and more
function screen show on lower
(figure 2).
2. Use the
button to select
icon and press the button to play special function.
Sub-Menu on Movie screen
1. When movie playback, press
Figure 3.
the button and more
14
function screen show on lower
(figure 3).
2. Use the
button to select
icon and press the button to play special function.
Using Bluetooth PlaybackPairing is the term used when two Bluetooth devices are connected wirelessly for the first time. This allows the devices to see each other and sets up a one to one communication channel between both devices.
Bluetooth Connection
1. Press the button to turn on unit and the power indicator light GREEN.
2. Press / MENU button to enter projector menu, press
buttons to select
SOUND menu
3. Use the
button to select Bluetooth column.
4. Press the button to turn “ON” 5. Turn on your External Bluetooth Speaker
Sound Mode Standard Balance 0 Bluetooth Off
and select to Bluetooth pairing mode.
6. A few seconds, you hearing “melody” sound that your unit and external Bluetooth
speaker connected.
7. After connection completed, the unit sound to External Bluetooth speaker.
Disconnect the Bluetooth
1. Press the / MENU button to enter the projector menu, press
select SOUND menu
2. Use the
button to select Bluetooth column
3. Press the button to turn “Off” that the Bluetooth disconnect.
buttons to
15
Multi-screen interactive connection for phone and projectorFirst, ensure the projector and the mobile is connected to the same wireless network Follow below steps to set up.
Support Screen Mirroring Settings (IOS mobile)
1. Press the / SOURCE button to enter and use
buttons to select the Screen
Mirroring mode.
2. Click the Wi-Fi menu to search and select “RKcast-XXXXXX” (XXXXXX is numbers
and letters. It show on the “Screen Mirroring” page) on the mobile device and enter
Pin “12345678” to connect
3. After connect, click the browser and input IP “192.168.49.1” address on the mobile.
4. Click to select Wi-Fi AP, choose the available local Wi-Fi router and input password to
connect.
5. After connect, the router’s name will be on the projector screen.
6. Click Screen Mirroring function on the mobile to achieve Screen Mirroring.
Support Airplay Settings (IOS mobile)
1. Press the / SOURCE button to enter and use
buttons to select the Screen
Mirroring mode.
2. Click the Wi-Fi menu to search and select “RKcast-XXXXXX” (XXXXXX is numbers
and letters. It show on the “Screen Mirroring” page) on the mobile device and enter
Pin “12345678” to connect
3. After connect, click the browser and input IP “192.168.49.1” address on the mobile.
4. Click to select Wi-Fi AP, choose the available local Wi-Fi router and input password to
connect.
5. After connect, the router’s name will be on the projector screen.
6. Click Mirror Icon of mobile player, select Airplay Bluetooth devices, will pop out select
device icon window, click “RKcast XXXXXX” to achieve Screen Mirroring.
7. The mobile device will mirror and browse online contents to projector. You can enjoy
online video/music/pictures, etc. (This feature is only supported by iOS 7 or above
devices).Note: When the router is successfully connected, the projector will automatically connect to the router next time. The mobile device can connect the projector or the router to mirror the network content.
Android Mirroring Settings (Miracast mode)
1. Press the / SOURCE button to enter and use
buttons to select the Screen
Mirroring mode.
2. Click the Wi-Fi menu to search and select available local Wi-Fi router and input
password to connect on the mobile.
3. Click Miracast function (different mobile models with different names) on the mobile
16
settings 4. Click to select “RKcast-XXXXXX” (XXXXXX is numbers and letters. It show on the“Screen Mirroring” page) on the mobile settings. The mobile device contents will mirror on the projector screen
Android Mirroring Settings (DLNA mode)
1. Press the / SOURCE button to enter and use
buttons to select the Air Play
mode.
2. Click the Wi-Fi menu to search and select “RKcast-19A1EF” on the mobile device and
enter Pin “12345678” to connect
3. After connect, click the browser and input “192.168.49.1” IP address on the mobile.
4. Click to select Wi-Fi AP, choose the available local Wi-Fi router and input password to
connect.
5. After connect, the router’s name will be on the projector screen.
6. Click Screen Sharing or Wireless Display (different mobile models with different
names) on the mobile
7. The mobile device will mirror and browse online contents to projector. You can enjoy
online video/music/pictures, etc. (This feature is only supported by Android system 4.2
or above devices).
Note: When the router is successfully connected, the projector will automatically connect
to the router next time. The mobile device can connect the projector or the router to
mirror the network content.
17
Using Projector Menu 1Press / MENU button to enter projector menu, press PICTURE menu.
buttons to select
This Picture menu showed on right upper of view screen.
Picture Mode Customer define Contrast Brightness Color Sharpness
Use
to select different picture effect to Medium / Soft
/ User / Vidid. Use
or
to select Contrast /
Brightness / Color / Sharpness digit If chose User item.
Follow below figure.
Use
to select different color temperature to Cool /
Medium / Warm / User. Use
or
to select Red /
Green / Blue digit If chose User item. Follow below figure.
Use
buttons to select screen ratio AUTO / 4:3 / 16:9.
Follow below figure.
Use
buttons to select Off / Low / Middle / High /
Default.
Use
buttons to select Auto Adjust / Horizon Pos. /
Vertical Pos. / Size / Phase. Use
or
to select
Horizon Pos. / Vertical Pos. / Size / Phase digit. Follow
below figure.
Use
buttons to select different zoom scale digit 75%
– 100%
Parameter 0-100 0-100 0-100 0-100
Color temper… (temperature)
Customer define Parameter
red
0-100
blue
0-100
green
0-100
18
Aspect Ratio AV modeHDMI modeVGA mode DMP (USB/TF Card) mode Air Play mode
Auto, 4:3, 16:9, Zoom1 ,Zoom2, Panorama Auto, 4:3, 16:9, Zoom1, Zoom2, Just Scan, Panorama, Point To Point Auto, 4:3, 16:9, Point To Point Auto, 4:3, 16:9Auto, 4:3, 16:9, Zoom1, Zoom2, Just Scan, Panorama, Point To Point
PC Setting (Active in VGA mode)
Customer define
Parameter
(Press
Horizon Pos.
0-100
Vertical Pos.
0-100
Size
0-100
Phase
0-100
to set)
Noted: PC setting menu is activated in VGA mode only.
Using Projector Menu 2Press / MENU button to enter projector menu, press menu.
buttons to select SOUND
This sound menu showed on right upper of view screen.
Use
to select different sound effect Standard / Music /
Movie / Sports / User. Use
or
to select Treble
and Bass digit if chose User item. Follow below figure to set
digit.
Use
to select Balance level to -50 to +50
Sound Mode – User Treble Bass
Press
buttons to select Off / On.Parameter 0-100 0-100
Using Projector Menu 3Press / MENU button to enter projector menu, press buttons to select OPTION menu.This OPTION menu showed on right upper of view screen.
Use
button to select different language.
Use
buttons to select Y or N. If choose “Y” that your
unit will go to factory default setting.
Press
buttons repeatedly to select different OSD19
Duration time Off / 5S / 10S / 15S / 20S / 25S / 30S.Press buttons repeatedly to select Front / Rear Ceiling / Front Ceiling / Rear For service center use only.
Specifications
Bluetooth Version
4.2
Light Source Type
LED
HDMI Input Supported Video Resolution.
1080p , 1080i , 720p, 576i , 480p, and 480i
Power Consumption
67W
Included Adapter
Input AC100-240V, 50/60Hz
Projection Size Input Port
37-150 inch AV/ VGA / HDMI
USB Port
Support USB device up to 32GB
Support format Mpeg1, Mpeg2, Mpeg4, mp3, Jpeg
TF Card
Support SD card up to 32GB
Net Weight Product Dimensions
Support format Mpeg1, Mpeg2, Mpeg4, mp3 , Jpeg 1.4 KG 230 x 200 x 94 mm
Specifications are typical, individual units might vary. They are subject to continuous improvement without notice and without incurring any obligation.
FCC Statement This equipment has been tested and found to comply with the limits for a Class B digital device, pursuant to Part 15 of the FCC Rules. These limits are designed to provide reasonable protection against harmful interference in a residential installation. This equipment generates uses and can radiate radio frequency energy and, if not installed and used in accordance with the instructions, may cause harmful interference to radio communications. However, there is no guarantee that interference will not occur in a particular installation. If this equipment does cause harmful interference to radio or television reception, which can be determined by turning the equipment off and on, the20
user is encouraged to try to correct the interference by one or more of the following measures: — Reorient or relocate the receiving antenna. — Increase the separation between the equipment and receiver. — Connect the equipment into an outlet on a circuit different from that to which the receiver is connected. — Consult the dealer or an experienced radio/TV technician for help.21
[xyz-ips snippet=”download-snippet”]