
![]()
SPARKULAR miniUSER MANUALV1.0
 Showven Technologies Co.,Ltd.SPARKULARminiUSER MANUAL
- Please read this manual carefully before operating this product.
- This manual contains the warranty card, please keep it well.
Safety Information
- Unauthorized repairs are prohibited, it may cause a serious incident.
- Keep SPARKULAR mini dry and do NOT use in rain or snow.
- Make sure the lid of the feeding hopper is well covered when using Sparkular mini. Accidentally Burning of Composite Ti can only use sands to extinguish. Composite Ti should keep away from moisture and stored in a dry sealed environment.
- Keep audience and flammable material at a minimum distance of 3m from SPARKULAR mini. Make sure sparks shoot out from Sparkular mini can NOT touch any objects.
- Clear material for Sparkular mini is necessary both before the show and after the show, to clear the Composite Ti remains in the pipe. Check whether there is Composite Ti aggregate in the nozzle after each show, if any, please clean it up, or it will affect the shooting effect or even damage Sparkular mini.
- The Sparkular mini power supply cable (sparkler mini power supply EX-cable) maximum allowed cascade for Sparkular mini is 6pcs(BT06)/3pcs(BT07), exceed connecting may result in damage or even cause fire.
- For better heat dissipation, block the air intake and the air outlet is prohibited.
- Cover of the nozzle of Sparkular mini is prohibited.
| Model | BT06/BT07 |
| Dimension | 168×180×228mm |
| Weight | 4.5kg |
| Input | AC 220V 50/60Hz (BT06)AC 110V 50/60Hz |
| Work Power | 380W |
| Work Temp. | -10 ℃ ~ 50 ℃ |
| Casing | Anti-flaming ABS |
| Fountain Height | 2.0m~3.5m, Depend on different types of composite Ti |
| Interface | Double DMX input interfaces, double AC power interfaces |
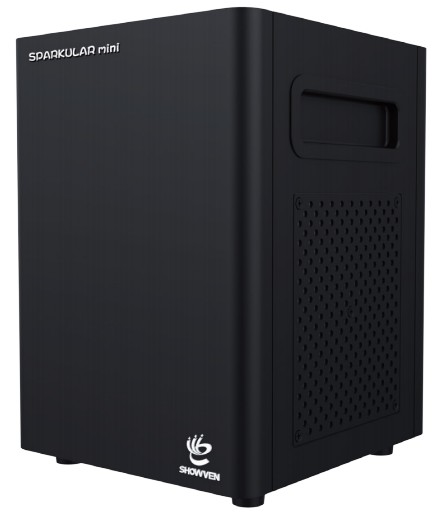
Advantages :
- Integrating wireless technology, Not exposed,anti-collision.
- One button start.
- Tilt protection function. More secure.
- Sophisticated design, light-weighted, and portable.
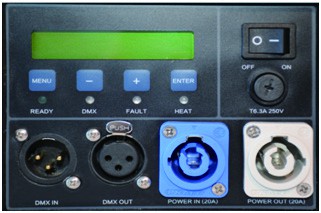 Operation Panel:LCD information display area, showing operate menu and working status of the machine.

LED display area :READY: After turn on the machine, it will automatically preheat for around 5 minutes, when the “READY” green light turns from flashing into long-on, indicates that the machine is ready to work.DMX: Flashing shows that the DMX signal is connected, otherwise is without signal.FAULT: When any malfunction, the light turns on.HEAT: When the machine is heating, the signal light turns on.

Control button area :MENU: Short press to switch interface, press for 3 seconds can switch to the advanced setup interface.– : Parameters down.+: Parameters up.ENTER: Confirm and save parameters.
Radiofrequency identification area :
- Composite Ti with RFID card, swiping cards used to identify parameters and types of granules.
- Please note that granules of RFID cards can increase the single machine-specific working time. The card is disposable, one card can only use one time.


Interface
Main Interface: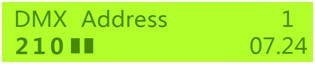
First line: Display DMX address is “1”.Second line: Display the present inner core temperature and the temperature progress bar; display remaining time is 7 minutes and 24 seconds.
Error informational display table:
| Error Information | Introductions |
| E0 System IC | System error. |
| E2 Temp. Sensor | Temperature sensor was damaged. |
| E3 P Temp. Over | Chassis temperature too high lead to shut down. |
| E4 Time Remain | Insufficient granules or remaining time, please swiping time card. |
| E5 K Temp. Over | Inner core temperature too high lead to shut down |
| E6 Heat Fail | Heating failed. |
| E7 Tip Over | Dumping alarm when the machine is tilted at less than 45 degrees. machine stops working when tilt alarm starts. |
Setting interface:Press “MENU” to enter the Setting interface, press the “MENU” button to enter different options until you return to the main interface.
| Options | Range | Instructions |
| Set DMX Address | 1-512 | Set the DMX address. machine becomes a wireless host and can send out DMX signal when it’s address is “1++”. |
| Wireless Control | ON/OFF | Wireless function switch. you can match code when shows “ON” |
| Manual Fountain | ON/OFF | Manual fountain switch, for testing purposes only. |
| Auto Clear Delay | 0.1-0.9s | Automatic clear material settings. |
Advanced menu:Press “MENU” 3 seconds to enter the advanced setup interface, press the MENU key to enter different options, press MENUtill 3 seconds to return to the main interface.
| Options | Range | Instructions |
| Set Temperature | 500-610 | Setup inner Core temperature. |
| Auto Heat | ON/OFF | Auto preheat function switch after turn on machine |
| Density | 70-100 | Adjust the sparks density. |
| Mode Selection | Factory Mode / User Mode | Factory Mode is factory debugging mode, User Mode is using a mode |
| Tip-Over Error | ON/OFF | Tilt function switch. |
| Default Parameter | Press “ENTER” to restore all parameters to the factory settings. |
Use:Power cable connection :
- For convenient use, there are power supply cables and a power supply ex-cable. power Supply ex-cable can achieve multiple devices connected, the maximum cascade is 6pcs(BT06)/3pcs(BT07). All power plugs are industrial plugs with locks, it need to toggle snap, and rotate when using.
- If you use a mobile power plate, be sure to use good quality and match-rated power products. 6 pcs machines require around 2000 watts, cores should be over 1.5 square.
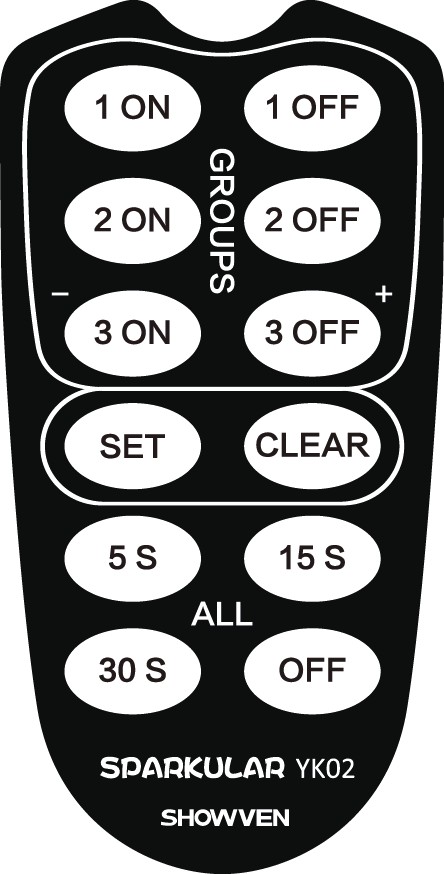
Wireless remote control mode:
- If the remote control cannot work, please check whether the wireless function was turned on. Press MENU to switch to wireless control setting, the menu is set to “ON”, press “ENTER”. This interface can also be matching code with the remote controller.
- Sparkular mini can be controlled by both DMX and remote controller, when there is DMX signal input, wireless remote the controller will not work.
- When using the remote control you need to pull out the antenna.

| 1 ON | Address “1” ON | 1 OFF | Address “1” OFF |
| 2 ON | Address “3” ON | 2 OFF | Address “3” OFF |
| 3 ON | Address “5” ON | 3 OFF | Address “5” OFF |
| SET | When using the different remote control | CLEAR | Automatically clean material for 3 seconds |
| 5 S | All Starts 5 seconds | 15 S | All starts 15 seconds |
| 30 S | All Starts 30 seconds | OFF | All stop |
Attention:
- The first group machines correspond to DMX address “1”, the second group DMX address is “3”, the third DMX address is “5”, the remote controller controls 3 group machines. It also can set all Sparkular mini addresses as “1”.
- When the lamp is not lit or becomes weak on the remote controller, replace the battery. It is better to take the battery out when transporting to prevent consumption of battery power by the unmeant press of a button. Battery model: 12V 23A
- When the machine is occasionally not working, may be caused by interference, please press the start button again.
- Wireless control is easily influenced by interference, it is suggested to stay as close to the machine as possible when use a remote controller, and machines cannot use metal shielding.
Wireless host Sparkular mini mode (requires communication cables):In occasion of strong interference, using the wireless host can avoid interference, ensure stable control. Set the first unit of Sparkular mini DMX address into “1++”, this machine address is “1”, but it can also output DMX signal and turns into wireless host Sparkular mini. Use communication cables to connect all the Sparkular mini, the host Sparkular mini will receive the signal from the remote controller and transfer to all other Sparkular minis via a communication cable to realize stable signal transmission.
Cable DMX mode :When using the DMX controller, the system takes 2 channels
| The First channel | Functions |
| 0-15 | Fountain OFF |
| 16-255s | Fountain ON |
| The second channel | Functions |
| 60-80 | Clear Material |
| 20-40 | Emergency Stop |
| 0-10 | Pre-heat OFF |
| 240-255 | Pre-heat ON |
Warranty Instructions
- Sincere thanks for your choosing SPARKULAR mini, you will receive quality service from us.
- The product warranty period is one year. If there are any quality problems within 7 days after shipping out from our factory, we can exchange a brand new same model machine for you.
- We will offer free of charge maintenance service for machines with hardware malfunction (except for the instrument damage caused by human factors)in the warranty period. Please don’t repair the machine without factory permission.
★Below situations NOT included in warranty service:
- Damage caused by improper transportation, usage, management, and maintenance, or damagecaused by human factors;
- Disassemble, modify or repair products without Showven’s permission;
- Damage caused by external reasons (lightning strike, power supply etc);
- Damage caused by improper installation or use;For product damage not included in the warranty range, we can provide paid service.
★Invoice and warranty card is necessary when applying for maintenance service from SHOWVEN.
Warranty Card
| Product Name: | Serial No. |
| Purchase Date: | |
| Tel: | |
| Address: | |
| Problem Feedback | |
| Actual Problem: | |
| Maintenance Detail: | |
| Service Engineer: | Service Date: |

 Showven Technologies Co., LtdAdd: Building B1, Changsha E Center No.18, Xiangtai Road, Liuyang Economic DevelopmentZone, Changsha City, 410300, Hunan Province, P.R.China.Tel : +86-731-83833068Web: www.showven.cnE-mail: [email protected]
https://www.facebook.com/Showven-228026294663699/?modal=admin_todo_tour
References
[xyz-ips snippet=”download-snippet”]