SHURE ADX1M Bodypack Transmitter
![]()
WARNING
- Battery packs may explode or release toxic materials. Risk of fire or burns. Do not open, crush, modify, disassemble, heat above 140°F (60°C), or incinerate.
- Follow instructions from manufacturer
- Only use Shure charger to recharge Shure rechargeable batteries
- WARNING: Danger of explosion if battery incorrectly replaced. Replace only with same or equivalent type.
- Never put batteries in mouth. If swallowed, contact your physician or local poison control center
- Do not short circuit; may cause burns or catch fire
- Do not charge or use battery packs other than Shure rechargeable batteries
- Dispose of battery packs properly. Check with local vendor for proper disposal of used battery packs.
- Batteries (battery pack or batteries installed) shall not be exposed to excessive heat such as sunshine, fire or the like Do not immerse the battery in liquid such as water, beverages, or other fluids.
- Do not attach or insert battery with polarity reversed.
- Keep away from small children.
- Do not use abnormal batteries.
- Pack the battery securely for transport.
Note: Use only with the included power supply or a Shure-approved equivalent.Please follow your regional recycling scheme for batteries, packaging, and electronic waste.
ADX1M Axient Digital Micro Bodypack Transmitter
ADX series transmitters deliver impeccable audio quality and RF performance, and are equipped with ShowLink remote control for real-time parameter adjustments and interference avoidance. This transmitter features wideband tuning, High Density (HD) mode, encryption, and advanced rechargeability. The contoured form factor and lightweight PEI plastic construction offer both comfort and heat resistance. The membrane switches and LEMO connector protect against moisture, while the OLED display provides excellent visibility in low-light environments.
Features
Performance
- 20 Hz to 20 kHz range with flat frequency response
- Automatic input staging optimizes gain setting
- Internal adaptive antenna optimizes signal when ADX1M is worn against the body
- Diversity ShowLink-enabled for remote transmitter control and automatic interference avoidance
- AES 256-bit encryption-enabled for secure transmission
- 120 dB, A-weighted, System Gain @ +10
- Digital output: >125dB, A-weighted (Dante, AES3, AES67)
- 100 meter (300 feet) line-of-sight operating range
- Selectable modulation modes optimize performance for spectral efficiency
- Standard – optimal coverage, low latency
- High density – dramatic increase in max system channel count
- Built-in tone generator and RF markers to facilitate walk-testing
- Switchable power levels = 2/10/20 mW (region dependent)
- Frequency Diversity selection using two bodypacks
- Shure SB910M rechargeable batteries for up to 7 hours of runtime, precision metering, and zero memory effect
Design
- Small and streamlined design for better concealment and wear®
- Ultem PEI plastic construction for heat resistance and durability
- Sealed buttons and LEMO connection for protection against sweat, spray, and moisture ingress Recessed LEMO connector
- High-contrast OLED display
- Detachable belt clip
Included Components
| SB910M Shure Rechargeable Battery | 95A24863 |
| Belt clip | 44A28563 |
Optional Accessories
| SB910M Shure Rechargeable Battery | 95A24863 |
| AD651FOB Talk Switch fob for bodypack transmitters | 90A37348 |
| Belt clip | 44A28563 |
ADX1M Transmitter Overview
- Input JackConnects to a 3-Pin LEMO connector microphone or instrument cable.
- Power and Exit ButtonPress and hold to turn transmitter on or off. Acts as a ‘back’ button to return to previous menus or parameters without confirming a value change.
- Infrared (IR) PortAlign with the receiver IR port during an IR Sync for automated transmitter tuning and setup.
- Up ButtonUse to navigate through parameter menus and to change settings.
- Down ButtonUse to navigate through parameter menus and to change settings.
- Enter ButtonSelects menu screens for editing and confirms parameter changes.
- DisplayView menu screens and settings. Press any button to activate the backlight.
- Power LEDGreen = unit is powered onRed = low battery, Mute Mode enabled, input overload, or battery error (see Troubleshooting)
- Battery LatchLatch to secure the battery.
- BatteryShure rechargeable battery.


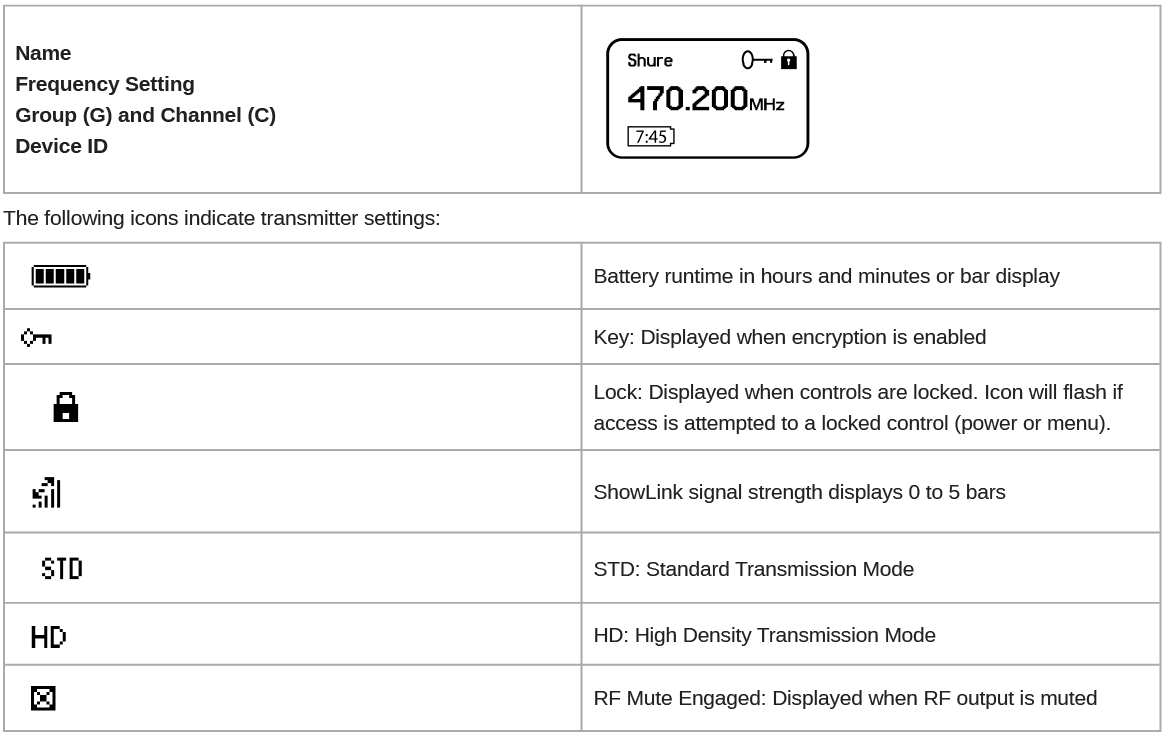
Home Screen Display
The home screen shows transmitter information and status.There are four pieces of information that you can choose to see on the home screen. Use the arrow buttons to select one of the following choices:
Transmitter Controls
Use the controls to navigate through parameter menus and change values.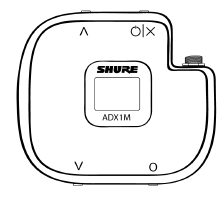
| ∨∧ | Use to scroll through menu screens and to change parameter values. |
| Acts as a back button to return to previous menus or parameters without confirming a value change. | |
| O | Enters menu screens and applies parameter changes. |
Locking the InterfaceLock transmitter interface controls to prevent accidental or unauthorized changes to parameters. The lock icon appears on the home screen when the interface lock is enabled.
- From the Utilities menu, navigate to Locks and select one of the following lock options:
- None: The controls are unlocked
- Power: The power switch is locked
- Menu: The menu parameters are locked
- All: The power switch and menu parameters are locked
- Press O to save.
To quickly unlock a transmitter: Press O twice, select None, and press O.
Shure Rechargeable Batteries
Shure lithium-ion batteries offer a rechargeable option for powering the transmitters. Batteries quickly charge to 50% capacity in one hour and reach full charge within three hours.The SB910M Shure rechargeable battery uses the SBC840M and the SBRC Shure chargers.Caution: Only charge Shure rechargeable batteries with a Shure battery charger.
Checking Battery Info
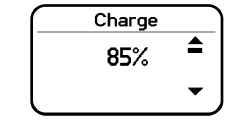
When using a Shure rechargeable battery, the receiver and transmitter home screens display the number of hours and minutes remaining.Detailed information for the battery is displayed Battery menu of the transmitter: Utilities > Battery
- Battery Life: Runtime reported in bar display and time (hours: minutes)
- Charge: Percentage of charge capacity
- Health: Percentage of current battery health
- Cycle Count: Total of the number of charging cycles for the installed battery
- Temperature: Battery temperature reported in Celsius and Fahrenheit
Important Tips for Care and Storage of Shure Rechargeable BatteriesProper care and storage of Shure batteries results in reliable performance and ensures a long lifetime.
- Always store batteries and transmitters at room temperature
- Ideally, batteries should be charged to approximately 40% of capacity for long-term storage
- Periodically clean the battery contacts with alcohol to maintain ideal contact
- During storage, check batteries every 6 months and recharge to 40% of capacity as needed
For additional rechargeable battery information, visit www.shure.com
Battery Installation

Removing the Battery
- Pull back to disengage the battery latch.
- Slide the battery out of the transmitter.
Installing the Battery
- Slide the battery into the transmitter.
- Fully engage the latch to secure the battery
ADX1M SB910M Battery Runtime
Note: Higher RF power levels decrease battery runtime. Battery runtime varies with battery age and environmental conditions.
| 2 mW | 10 mW | 20 mW |
| 6.5 to 8.5 hours | 6.0 to 8.0 hours | 5.0 to 6.0 hours |
Note: A Battery Hot warning indicates that transmitter battery needs to cool off. Otherwise, the transmitter will shut down. Let the device cool down and then consider swapping the transmitter battery to continue operation.Identify any possible external heat sources to the transmitter and operate the transmitter away from those external heat sources.All batteries should be stored and operated away from external heat sources in reasonable temperature conditions for best performance.
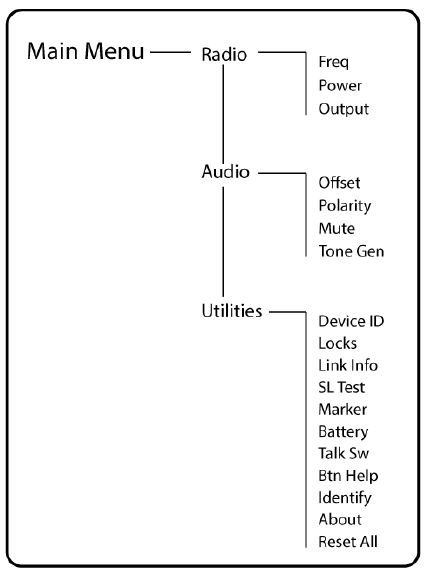
The Main menu organizes the available transmitter parameters into three sub-menus:
- Radio
- Audio
- Utilities
Tip: Use the arrow buttons to scroll between the sub-menus.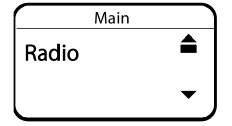
- To access the menu options from the home screen, press O . Use the arrow buttons to access additional menus and parameters.
- A menu parameter will blink when editing is enabled
- To increase, decrease or change a parameter, use the arrow buttons
- To save a menu change, press O
- To exit a menu without saving a change, press
Radio MenuPress the O button to enable editing of a group (G:) channel (C:) or frequency (MHz). Use the arrow buttons to adjust the values. To edit the frequency, press the O button once to edit the first 3 digits, or twice to edit the second 3 digits.
PowerHigher RF power settings can extend the range of the transmitter.
OutputSets the RF output to On or Mute.On: RF signal is activeMute: RF signal is inactive
OffsetAdjust Offset level to balance mic levels when using two transmitters or when assigning multiple transmitters to receiver slots. Adjustment range: -12 dB to +21 dB.
PolaritySelectable polarity assignment for audio input connector:Pos: Positive pressure on microphone diaphragm produces positive voltage on pin 2 (with respect to pin 3 of XLR output) and the tip of the TRS output.Neg: Positive pressure on microphone diaphragm produces negative voltage on pin 2 (with respect to pin 3 of XLR output) and the tip of the TRS output.
MuteWhen enabled, the power button is configured as a mute switch for the audio output. Press the power button to mute or un-mute the audio. Exit mute mode to return the power button to its normal functionality.
Tone GenTransmitter will generate a continuous test tone:Freq: The tone can be set to 400 Hz or 1000 Hz. Level: Adjusts of the output level of the test tone.
Device IDAssign a device ID of up to 9 letters or numbers.
LocksLocks the transmitter controls and power button.None: The controls are unlockedPower: The power switch is lockedMenu: The menu parameters are lockedAll: The power button and menu parameters are locked
SL TestShowLink test tool to measure the boundaries of ShowLink coverage.MarkerWhen enabled, press the enter button to drop a marker in Wireless Workbench.Battery
- Displays battery information:
- Battery Life: Runtime reported in bar display and time (hours:minutes) Charge: Percentage of charge capacity
- Health: Percentage of current battery health
- Cycle Count: Total of the number of charging cycles for the installed battery Temperature: Battery temperature reported in Celsius and Fahrenheit
Talk SwPress ENTER to add control from a talk switch. Press the button on the talk switch twice to complete the link.IdentifyWhen enabled, Identify flashes the transmitter icon in Wireless Workbench Inventory or Monitor tabs.Btn HelpA graphic identifying each button appears when the device is turned on. Use the Btn Help menu to turn the graphic On or Off.About
Displays the following transmitter information:Model: Displays the model numberBand: Displays the tuning band of the transmitter FW Version: Installed firmwareHW Version: Hardware versionSerial Num: Serial number
IR Sync
Use IR Sync to form an audio channel between the transmitter and receiver.Note: The receiver band must match the band of the transmitter.
- Select a receiver channel.
- Tune the channel to an available frequency using group scan or manually turn to an open frequency.
- Power on the transmitter.
- Press the SYNC button on the receiver.
- Align the IR windows between the transmitter and the receiver so that the IR LED illuminates red. When complete, Sync Success! appears. The transmitter and receiver are now tuned to the same frequency.
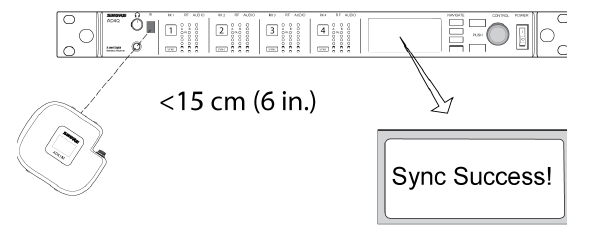
Note: Any change to the encryption status on the receiver (enabling/disabling encryption) requires a sync to send the settings to the transmitter. New encryption keys for the transmitter and receiver channel are generated on every IR sync, so to request a new key for a transmitter, perform an IR sync with the desired receiver channel.
Setting the Frequency Manually
The transmitter can be manually tuned to a specific group, channel, or frequency.
- Navigate to the Radio menu and select Freq.
- Scroll to select G: and C: to edit the group and channel, or select the frequency parameter (MHz). When editing the frequency, press O once to edit the first 3 digits, or twice to edit the last 3 digits.
- Use the ∧∨ buttons to adjust the group, channel, or frequency.
- Press O to save, and then press X when finished.

RF Mute
RF Mute prevents transmission of the audio by suppressing the RF signal, while allowing the transmitter to remain powered-on. The home screen displays RF MUTED in this mode.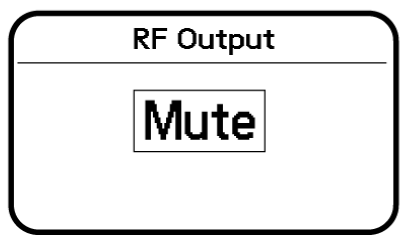
- From the Radio menu, navigate to Output.
- Choose one of the following options:On: RF signal is activeMute: RF signal is disabled
- Press O to save.
Turning the transmitter off and on, or replacing the battery will restore Output to On.
Safe Start
Power on in Safe Start mode to prevent interference with other devices. Hold the ^ button while powering on your device until the Safe Start menu appears.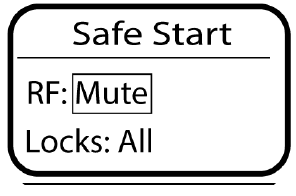
Safe Start menu options:
- RF: Mute or On
- Locks: None, Pwr, Menu, All
Use the navigation buttons to make changes.Tip: To exit the Safe Start menu, cycle the power or momentarily remove the battery.Note: Previous settings for locks and RF will be retained when the transmitter is powered on in Safe Start.
Wearing the Bodypack Transmitter
Clip the transmitter to a belt or slide a guitar strap through the transmitter clip as shown. For best results, the belt should be pressed against the base of the clip.The clip can removed and rotated 180 degrees to increase mounting options.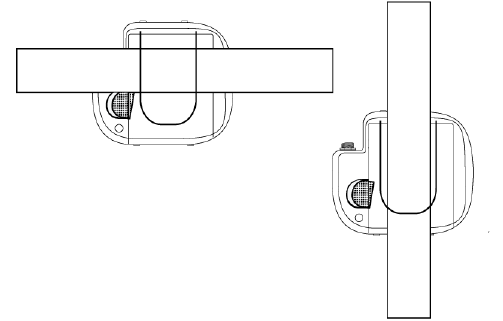
Remove and Install the Bodypack Clip
Input Overload
The OVERLOAD message is displayed when the audio input experiences a high-level input signal. Reduce the input signal or move mic away from the source to remove the overload.
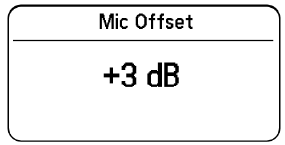
Matching Audio Levels with Mic Offset
When linking two or more transmitters to a receiver, there may be a difference in volume levels between microphones or instruments. If this occurs, use the Offset function to match the audio levels and eliminate audible volume differences between transmitters. If using a single transmitter, set Offset to 0 dB.
- Turn on the first transmitter and perform a sound check to test the audio level. Turn off the transmitter when finished.
- Turn on the second transmitter and perform a sound check to test the audio level. Repeat for any additional transmitters.
- If there is an audible difference in the sound level between the transmitters, navigate to the Offset menu (Audio > Offset) in the transmitter to increase or decrease the Offset in realtime to match the audio levels.
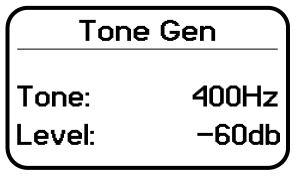
Tone Generator
The transmitter contains an internal tone generator that produces a continuous audio signal. The tone is helpful when conducting a sound check or for troubleshooting the audio signal chain. The level of the tone is adjustable from -60 dB to 0 dB and the frequency can be set to 400 Hz or 1000 Hz.Always start with the level set to -60 dB to avoid overloading speakers or headphones.
- From the Audio menu select Tone Gen.
- Set the frequency to 400 Hz or 1000 Hz.
- Select Level and use the arrow buttons adjust the value between -60 dB and 0 dB.
Turn off the tone by selecting Off from the menu or by cycling the transmitter power.
ShowLink Test
The ShowLink Test is a tool to find the boundaries of the ShowLink coverage area. When the ShowLink test is activated, a five-bar display indicating the link quality is shown on the screen. As the transmitter moves away from the access point, the number of bars will decrease. ShowLink control is maintained as long as 1 bar is displayed.If the transmitter is beyond the coverage range, ShowLink control will not be possible. However, the audio signal will not be affected or interrupted as long as the transmitter is within range of the RF signal.To improve coverage, adjust the location of your access points or place additional access points to extend coverage.To activate the ShowLink Test:
- From the Utilities menu, navigate to SL Test.
- Press the O button to start the test and walk the transmitter around the coverage area. Monitor the number of bars displayed and the state of the ShowLink icon. Coverage boundaries are indicated by 0 bars displayed or the ShowLink icon is empty.
- Press the X button to exit the ShowLink test.
Tip: During a ShowLink test, press O (enter) to drop a marker in Wireless Workbench.
Updating Firmware
Firmware is embedded software in each component that controls functionality. Periodically, new versions of firmware are developed to incorporate additional features and enhancements. To take advantage of design improvements, you can upload and install new versions of the firmware by using the Shure Update Utility. The Shure Update Utility is available for download from http://www.shure.com/.
Firmware Versioning
When performing an update, first download firmware to the receiver, and then update transmitters to the same firmware version to ensure consistent operation.The firmware numbering for Shure devices uses the following format: MAJOR.MINOR.PATCH (e.g., 1.2.14). At a minimum, all devices on the network (including transmitters), must have the same MAJOR and MINOR firmware version numbers (e.g., 1.2.x).
Updating the Transmitter
- Download the firmware to the receiver.
- Access the following menu from the receiver: Device Configuration > Tx Firmware Update.
- Align the IR ports between the transmitter and the receiver. IR ports must be aligned for the entire download, which can take 50 seconds or longer.The red alignment LED will turn on when the alignment is correct.
- Press ENTER on the receiver to begin the download to the transmitter. The receiver will display the progress of the up date as a percentage.
Input Connector Diagram
LEMO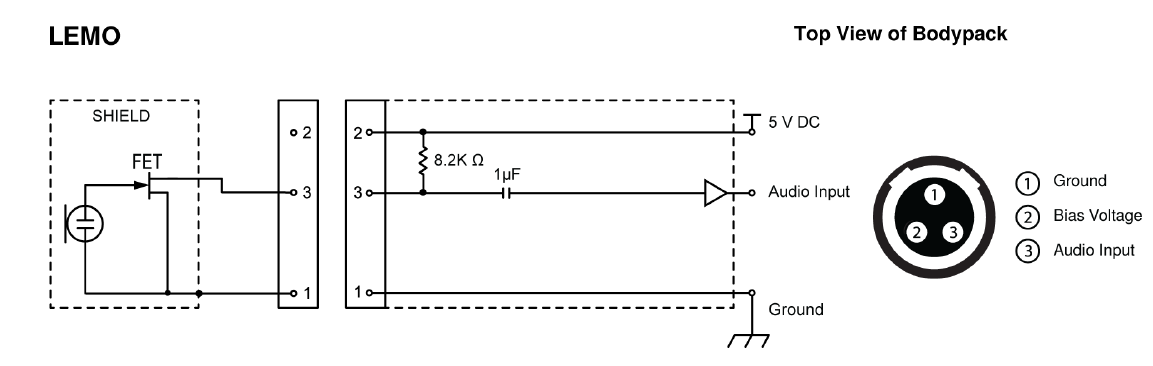
Frequency Bands and Transmitter RF Power
| Band | Frequency Range (MHz) | RF Power (mW)*** |
| G53 | 470 to 510 | 2/10/20 |
| G54 | 479 to 565 | 2/10/20 |
| G55† | 470 to 636 | 2/10/20 |
| G56 | 470 to 636 | 2/10/20 |
| G57△ | 470 to 616* | 2/10/20 |
| G62 | 510 to 530 | 2/10/20 |
| H54 | 520 to 636 | 2/10/20 |
| K53† | 606 to 698 | 2/10/20 |
| K54△ | 606 to 663** | 2/10/20 |
| K55 | 606 to 694 | 2/10/20 |
| K56 | 606 to 714 | 2/10/20 |
| K57 | 606 to 790 | 2/10/20 |
| K58 | 622 to 698 | 2/10/20 |
| L54 | 630 to 787 | 2/10/20 |
| P55 | 694 to 703, 748 to 758, 803 to 806 | 2/10/20 |
| R52 | 794 to 806 | 10 |
| JB | 806 to 810 | 2/10 |
| X55 | 941 to 960 | 2/10/20 |
- with a gap between 608 to 614 MHz.
- with a gap between 608 to 614 MHz and a gap between 616 to 653 MHz.
- power delivered to the antenna port.
- Output power limited to 10 mW above 608 MHz.
operation mode varies according to region. In Brazil, High Density mode is used.
Australia Warning for Wireless
This device operates under an ACMA class licence and must comply with all the conditions of that licence including operating frequencies. Before 31 December 2014, this device will comply if it is operated in the 520-820 MHz frequency band. WARNING: After 31 December 2014, in order to comply, this device must not be operated in the 694-820 MHz band.
LICENSING INFORMATIONLicensing: A ministerial license to operate this equipment may be required in certain areas. Consult your national authority for possible requirements. Changes or modifications not expressly approved by Shure Incorporated could void your authority to operate the equipment. Licensing of Shure wireless microphone equipment is the user’s responsibility, and licensability depends on the user’s classification and application, and on the selected frequency. Shure strongly urges the user to contact the appropriate telecommunications authority concerning proper licensing, and before choosing and ordering frequencies.
Certifications
Certified under FCC Part 15 and FCC Part 74.
Certified by ISED in Canada under RSS-210.FCC ID: DD4ADX1MG57, DD4ADX1MK54, DD4ADX1MX55. IC: 616A-ADX1MG57, 616A-ADX1MK54. Meets essential requirements of the following European Directives:
- WEEE Directive 2012/19/EU, as amended by 2008/34/EC
- RoHS Directive EU 2015/863Note: Please follow your regional recycling scheme for batteries and electronic waste
This product meets the Essential Requirements of all relevant European directives and is eligible for CE marking.Hereby, Shure Incorporated declares that the radio equipment is in compliance with Directive 2014/53/EU. The full text of the EU declaration of conformity is available at the following internet address: http://www.shure.com/europe/complianceAuthorized European representative:Shure Europe GmbHHeadquarters Europe, Middle East & AfricaDepartment: EMEA ApprovalJakob-Dieffenbacher-Str. 1275031 Eppingen, GermanyPhone: +49-7262-92 49 0Fax: +49-7262-92 49 11 4Email: [email protected]
Information to the user
This device complies with part 15 of the FCC Rules. Operation is subject to the following two conditions:
- This device may not cause harmful interference.
- This device must accept any interference received, including interference that may cause undesired operation.
Note: This equipment has been tested and found to comply with the limits for a Class B digital device, pursuant to part 15 of the FCC Rules. These limits are designed to provide reasonable protection against harmful interference in a residential installation. This equipment generates uses and can radiate radio frequency energy and, if not installed and used in accordance with the instructions, may cause harmful interference to radio communications. However, there is no guarantee that interference will not occur in a particular installation. If this equipment does cause harmful interference to radio or television reception, which can be determined by turning the equipment off and on, the user is encouraged to try to correct the interference by one or more of the following measures:
- Reorient or relocate the receiving antenna.
- Increase the separation between the equipment and the receiver.
- Connect the equipment to an outlet on a circuit different from that to which the receiver is connected.
- Consult the dealer or an experienced radio/TV technician for help.
This device operates on frequencies shared with other devices. Consult the Federal Communications Commission White Space Database Administration website to determine available channels in your area prior to operation.
Canada Warning for WirelessThis device operates on a no protection, no interference basis. Should the user seek to obtain protection from other radio services operating in the same TV bands, a radio licence is required. For further details, consult Innovation, Science and Economic Development Canada’s document Client Procedures Circular CPC2128, Voluntary Licensing of Licence Exempt LowPower Radio Apparatus in the TV Bands.
This device contains licence exempt transmitter(s)/receiver(s) that comply with Innovation, Science and Economic Development Canada’s licence exempt RSS(s). Operation is subject to the following two conditions:
- This device may not cause interference.
- This device must accept any interference, including interference that may cause undesired operation of the device.
Contact Customer SupportDidn’t find what you need? Contact our customer support to get help.![]()
References
[xyz-ips snippet=”download-snippet”]