
SHURE IntelliMix Room

IntelliMix Room Getting Started
What is IntelliMix® Room?
IntelliMix Room is digital signal processing (DSP) software designed to optimize the performance of Shure networked microphones with videoconferencing software, resulting in better conference room audio all around. It’s designed to run on the same computer as any videoconferencing software, which reduces the amount of equipment in the room.
What Do I Need to Use IntelliMix Room?
IntelliMix Room requires other software and hardware to work in your room. You’ll need the following:
Software:
 Shure Designer software installed on a separate computer and connected to the same network as IntelliMix Room.
- Designer lets you control all installations of IntelliMix Room in one place.
- For best results, do not run IntelliMix Room and Designer on the same computer.
- Videoconferencing software (such as Zoom, Microsoft Teams, or BlueJeans) installed on the same computer/device as IntelliMix Room
Hardware:
- Dante-enabled microphone, such as a Shure MXA910 or MXA310
- PC or other physical device optimized for running IntelliMix Room (no virtual machines)
- See the System Requirements for recommended specifications.
- Other room components, such as displays, cameras, loudspeakers, switches, Cat5e cables, and meeting control interfaces
How to Purchase IntelliMix Room
To purchase, contact your local Shure sales representative (find yours at shure.com). For each installation, you can choose from 8 or 16 channels of IntelliMix DSP. Licenses are available for 3- and 5-year durations.
After purchasing, you’ll receive an email with instructions for creating a software.shure.com account, where you can find your license ID. The license ID activates all purchased installations.
Next steps:
- Install IntelliMix Room on all devices.
- Discover and activate all IntelliMix Room installations using Shure Designer software.
- Apply DSP and route audio for each installation using Designer.
Installing IntelliMix Room
Before installing, make sure you have admin rights for all devices.
- Purchase IntelliMix Room from your Shure sales representative (find yours at shure.com).
- Download the .exe from shure.com.
- Launch the installation file and follow the steps.
- Choose network interface cards (NICs) to use for Shure control, Dante audio, and licensing.
- The Shure control NIC must match the one used by Designer software.
- Important: For licensing, only use a permanent NIC on the computer. This setting can’t be changed after installation.
- Choose which PC optimizations to make. For the best audio performance, choose all options.
- Click the IntelliMix Room icon in the system tray to access basic settings and a troubleshooting event log.
Next steps:
- Activate IntelliMix Room installations using Designer software (free at shure.com). IntelliMix Room installations will not pass audio until you activate your license.
- Control DSP, routing, and all other settings with Designer.
System Requirements
For best results:
- Install on devices that meet the recommended specifications.
- Do not run IntelliMix Room and Designer on the same PC.
Devices that don’t meet the minimum specifications are not supported. Virtual machines are not supported.
- Processor:
- Intel (64 bit)
- 8th generation Core i5 or better
- 2.2 GHz or better
- 4 physical cores or better
- 6 threads (logical processors) or better
- Memory:
- 8 GB RAM
- Storage:
- Solid State Drive (SSD) required
- Operating System (64 bit):
- Windows 10 Pro
- Windows 10 Pro Education
- Windows 10 Education
- Windows 10 IoT
- Windows 10 Enterprise IoT
- Internet Connection:
- Required for initial license activation
If your device meets the minimum specifications but not the recommended specifications, see the Use Case Limitations.
- Processor:
- Intel (64 bit)
- 7th generation Core i5
- 2.2 GHz
- 4 physical cores
- 4 threads (logical processors)
- Memory:
- 8 GB RAM
- Storage:
- Solid State Drive (SSD) required
- Operating System (64 bit):
- Windows 10 Pro
- Windows 10 Pro Education
- Windows 10 Education
- Windows 10 IoT
- Windows 10 Enterprise IoT
- Internet Connection:
- Required for initial license activation
- Use Case Limitations:
- Avoid using displays with resolutions above 1080p.
- Avoid screen sharing displays with resolutions above 1080p.
- Avoid using large-format, interactive touch screen displays. Touch panel controllers work.
Optimizing Windows for Conference Room Audio Processing
These are the recommended Windows settings for conference room audio processing:
- Disable Cortana.
- Disable notifications from Windows and installed programs.
- Use the high performance power plan in Power Options.
- Make sure this plan uses active cooling in the advanced power options.
- Disable all Sleep and Hibernate settings.
- Disable network throttling.
Additionally, follow these system best practices:
- Reboot the computer regularly.
- Disconnect unused USB devices.
- Remove software with high CPU loads, such as games or streaming apps.
- Make sure the computer’s BIOS is updated.
- Check that Ethernet, Wi-Fi, and display drivers are updated.
Choosing Networks for Shure Control and Dante Audio
This software sends 2 types of data over the network: Shure control data and Dante audio data. You can use the same NIC (network interface card) for both, or use 2 different NICs to separate the traffic.
During installation, you will be asked to choose a network for each one.
Shure control NIC:
- Choose the network that Designer uses.
- Used for device discovery and control
Dante audio NIC:
- Choose the same network as other Dante devices to send audio between devices.
- Cannot use Wi-Fi
- Used to carry Dante digital audio
To change the NICs after installation, click the IntelliMix Room icon in the system tray of the computer running IntelliMix Room.
To change Designer’s NIC, go to Settings.
Discovering IntelliMix Room in Designer
Each installation of IntelliMix Room appears as a separate device in Designer. Each installation’s name matches the computer’s network name.
To find any online installations:
- Go to Online devices.
- Use the checkboxes to select IntelliMix Room installations and add them to locations.
If you can’t find some installations:
- Go to the computer that won’t appear in Designer.
- Click the IntelliMix Room icon in the system tray.
- Make sure IntelliMix Room is using the same Shure control NIC (network interface card) as Designer.
Note: IntelliMix Room doesn’t show up in Shure Update Utility or Shure Web Device Discovery.
Activating IntelliMix Room
To activate the software, you need:
- A license for each installation
- Licenses are based on the channel count (8 or 16 channels) for each installation of the software.
- Your license ID
- A license ID activates all licenses in your account.
- Find in your purchase confirmation email, or in your account at software.shure.com.
- Internet connection for all devices running IntelliMix Room
IntelliMix Room must be installed on a device before you can activate that license.
- In Designer, go to Online devices. Check that you can discover all installations.
- Each installation appears as a separate device. The device name matches the PC’s name.
- If you don’t see all installations, check the Shure control NIC settings on the computer running IntelliMix Room. Use the same network as Designer.
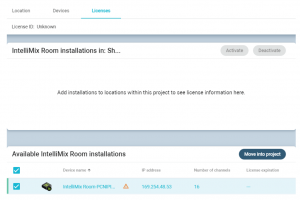
- Create a new project in Designer.
- If you have many license IDs to manage, create a separate project for each license ID.
- Go to the project’s Licenses page. From the list of available installations, select one to move into the project. Click Move into project.
- If you add multiple installations to a project at the same time, choose installations that all use the same license type. For example, move all 8-channel licenses into the project first, and then repeat the process for your 16-channel licenses.
- If you add multiple installations to a project at the same time, choose installations that all use the same license type. For example, move all 8-channel licenses into the project first, and then repeat the process for your 16-channel licenses.
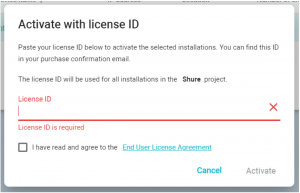
- Click Activate. Choose the license type for the installation and click Next.
- Add your license ID and click Activate. This license ID is used for all installations in the project. If the device running IntelliMix Room has an internet connection, the installation activates and is ready to use.
Next steps:
- Create locations and add IntelliMix Room installations to them.
- Route audio to IntelliMix Room to apply DSP.
Routing Microphone Signals to the DSP
To route your microphone’s signal to IntelliMix Room for processing, use Designer.
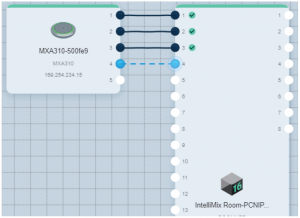
This example reflects a small conference room with:
- MXA310 using 4 channels
- Computer with 8-channel IntelliMix Room and videoconferencing software installed
- Display and camera

To route signals to the DSP:
- Create a location in Designer. Add the MXA310 and IntelliMix Room installation to the location from the Online devices list.
- Both devices must be in the same location to route audio between them.
- Open the location and go to Routing. This page lets you create Dante audio routes and link Shure networked mute buttons to devices.
- Click Optimize. The Optimize workflow automatically routes audio signals, applies DSP settings, turns on mute synchronization, and enables LED logic control for connected devices.
You can also manually route audio and apply DSP settings outside of the Optimize workflow if you prefer.
- Check the audio routes and settings to make sure they fit your needs. You might need to:
- Delete unnecessary routes.
- Check levels and adjust gain.
- Verify that AEC reference signals are correctly routed.
- Fine-tune DSP blocks as needed.
- Open IntelliMix Room’s device configuration window. From here, you can adjust DSP settings and route the signal to other sources. Check that your mic inputs are using the AEC reference you want to use.
- To send your signal to other sources, go to Matrix mixer.
- To send the automix signal to videoconferencing software, route to the virtual audio output.
- To send the automix signal to other Dante sources, route to the appropriate Dante output. Use Dante Controller to route IntelliMix Room Dante outputs to non-Shure devices.
Note: If you’re using a non-Shure Dante microphone, use Dante Controller to route the near-end signal to IntelliMix Room.
Applying DSP Blocks
To apply DSP blocks:
- Open a location that contains an IntelliMix Room installation.
- Select the installation and click Configure.
- In Schematic view, click a DSP block to open the settings window. You can also access DSP blocks from the Inputs and Outputs tabs.
DSP blocks also get applied during Designer’s Optimize workflow.
Routing Far-End Audio to IntelliMix Room
To use acoustic echo cancellation (AEC), you need to route a far-end signal to the software. The AEC uses that far-end signal as a reference and blocks it from being sent back to the far end as echo.
Each input channel can use a different AEC reference source. If all channels use the same source, select the AEC reference source on each input channel.
- In your conferencing software’s settings, select IntelliMix Room Echo Cancelling Speakerphone as the playback device. This sends the far-end signal to IntelliMix Room‘s virtual audio input.
- Open IntelliMix Room‘s configuration window in Designer.
- On each microphone input channel, select AEC. Choose the far-end reference source from the menu.
- For best results, use the signal that feeds your local reinforcement system as the reference source.
- For best results, use the signal that feeds your local reinforcement system as the reference source.

Sending Far-End Audio to Loudspeakers and Other Sources
- Go to Matrix mixer.
- Find the far-end signal, which comes to the software through the Virtual Audio Input.
- Check the box where the Virtual Audio Input and the destination intersect. You can also adjust crosspoint gain here. Common destinations include:
- PC audio output (3.5 mm or HDMI connector): Go to Schematic view and click PC Output. Choose an output from the menu. Display speakers connected by HDMI cable or the 3.5 mm connector are common options.
- Dante output destinations (loudspeakers or Shure ANI, for example)
Using Videoconferencing Software with IntelliMix Room
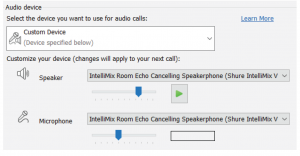
To connect IntelliMix Room to videoconferencing software, select IntelliMix Room Echo Cancelling Speakerphone as the speaker and the microphone in your videoconferencing software. Do the same thing in the computer’s sound settings.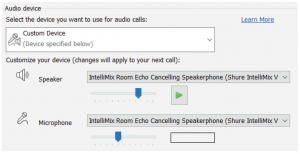
The microphone setting sends signals to the videoconferencing software from any microphone connected to IntelliMix Room.
The speaker setting sends a far-end signal from the videoconferencing software to IntelliMix Room. This is how IntelliMix Room gets an AEC reference and a signal for local sound reinforcement.
If you choose a different source as the speaker, you won’t be able to get far-end audio from the videoconferencing software into IntelliMix Room to use as an AEC reference.
Adjusting Input levels
The Inputs tab controls a channel’s gain before it reaches the matrix mixer. However, you should also adjust the source’s gain before it reaches IntelliMix Room.
To monitor a source’s input level before IntelliMix Room processing: Set metering to Pre-gain in the Settings menu.
- Check the source level before it reaches IntelliMix Room. Verify that the networked microphones or other Dante sources are operating at nominal output levels.
- Adjust gain in the Inputs tab.
- This gain stage adjusts the signal level before it reaches the matrix mixer.
- Mix the levels as high as possible so that the loudest channel does not reach the peak level (0 dB) on the meter.
Network Setup Examples
IntelliMix Room works with many different types of networks. Here are some of the most common network setups:
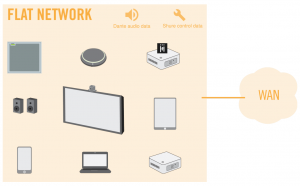
- Flat Network
- All A/V and corporate devices are on the same network.
- Use one network for Shure control and Dante audio data.
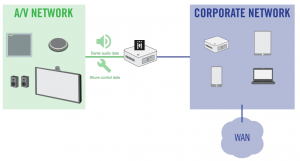
- Corporate and AV Network
- All A/V devices are on a separate network from the corporate network.
- The computer running IntelliMix Room uses the A/V network for Dante audio and Shure control data.
- The computer uses a wired connection to the corporate network for internet. USB 3.0 to gigabit Ethernet adapters are a common way to connect to 2 NICs.
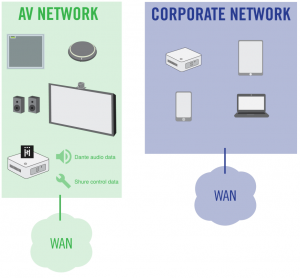
- Corporate and AV Network with Separate Internet Connections
- IntelliMix Room and all other A/V devices are on a separate network that has its own internet connection, which is completely separate from the corporate network.
- Use the A/V network for both Dante audio and Shure control data.
Contact Customer Support
Didn’t find what you need? Contact our customer support to get help.

References
Service
Shure – Sign In
IntelliMix® Room – Audio Processing Software – Shure USA
IntelliMix Room System Requirements
Shure: Microphones, Wireless microphones, in-ear monitoring, earphones, headphones
Shure: Microphones, Wireless microphones, in-ear monitoring, earphones, headphones
Service
Shure: Microphones, Wireless microphones, in-ear monitoring, earphones, headphones
Shure – Sign In
IntelliMix Room Command Strings
IntelliMix Room Command Strings
📧[email protected]
Network Block or IP whitelist for FlexNet Operations Cloud – Community
IntelliMix Room User Guides
IntelliMix Room User Guides
Shure: Microphones, Wireless microphones, in-ear monitoring, earphones, headphones
Entitlement Management Software Solutions | Revenera
[xyz-ips snippet=”download-snippet”]