![]() MXA-MUTENetwork Mute Button
MXA-MUTENetwork Mute Button
Shure MXA Network Mute Button user guide. Learn how to connect 1 or many PoE-powered mute buttons to Shure mics and processors to control muting and unmuting.Version: 2.2 (2021-E)
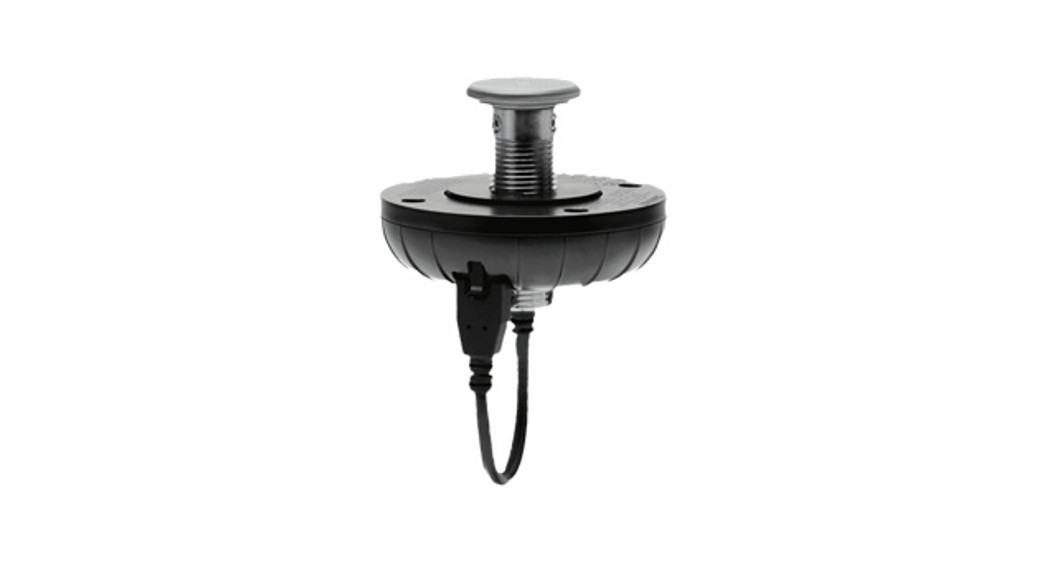
The MXA Network Mute Button is a configurable PoE-powered mute button accessory designed for muting and unmuting Shure networked products, including Microflex ®Advance™ array microphones, IntelliMix P300, IntelliMix Room, and ANIUSBMATRIX. One or many of the low-profile, touch-sensitive mute buttons can be configured to mute one or multiple MXA microphones, depending on user needs or room configurations.
- Designer System Configuration software for easy setup and configuration
- SystemOn Audio Asset Management software for remote management and troubleshooting
- PoE powered
- Compatible with third-party control systems via programmable command strings
- LED status with configurable colors and brightness
- Easy table installation in 1 inch (25 mm) or 7/8 inch (22 mm) holes
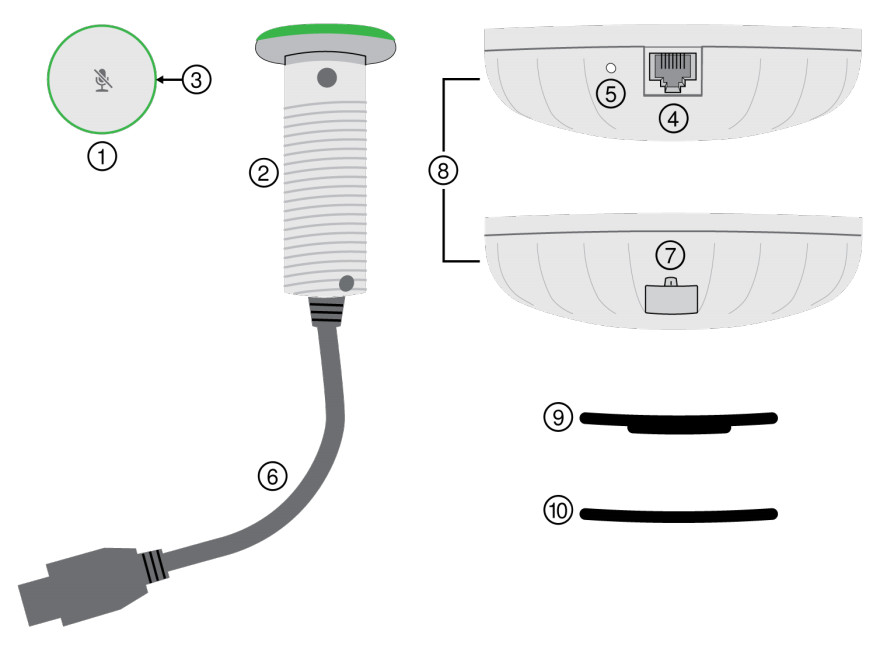
- Mute buttonPress to mute connected devices. Toggle, push-to-talk, and push-to-mute modes are also available.
- Mute button tubeInsert into the hole on the table.
- Light ringOpen the mute button in Designer to control color and brightness.
- Network portConnect a Cat5e (or better) cable supplying Power over Ethernet (PoE) here.
- Reset buttonNetwork reset (press for 4-8 seconds): Resets all Shure control IP settings to factory defaults.Full factory reset (press for more than 8 seconds): Resets all network and configuration settings to the factory defaults.
- Power cableConnect to the 8-pin power connector on the base.
- Power cable connectorConnect the 8-pin power cable here.
- BaseSits underneath the table surface and provides power and control signals to the mute button.
- GrommetUse to adjust the fit of the tube in 7/8 or 1 inch (22 or 25 mm) holes.
- SpacerUse the spacers to adjust the position of the network port on the base under the table.
What’s in the Box
- Mute button
- Base
- Grommet
- Spacers (2)
Model Variations
| SKU | Description |
| MXA-NMB | Network Mute Button |
| MXA-NMB/BLANK | Network Mute Button without mute icon |
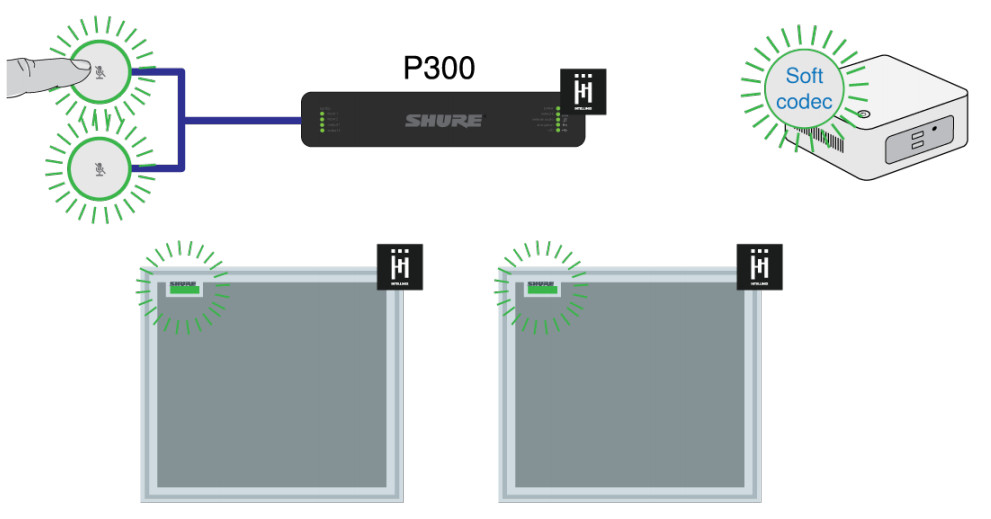
The network mute button is a simple muting solution for rooms with no microphone on the table, for when the microphone has no mute button, or for when you need another way to control muting. Use Shure Designer software to link mute buttons to a compatible device.You can link mute buttons to Shure microphones, DSPs, or audio network interfaces. When you link mute buttons to a DSP or audio network interface, any supported devices connected to the DSP or audio network interface match the button’s mute status.For example, in this room, 2 mute buttons are linked to a P300. Two MXA910 microphones are connected to the P300, and the P300 sends the near-end signal to a soft codec running on a computer. When you press one of the mute buttons, all connected devices show the correct mute status. The signal gets muted at the best point in the signal chain for DSP performance.
 Installing the Mute Button
 Installing the Mute Button
The mute button fits in tables that are between 0.31 and 2.05 inches (8 to 52 mm) thick.To get started, you will need:• Drill with 7/8 or 1 inch (22 or 25 mm) drill bit1
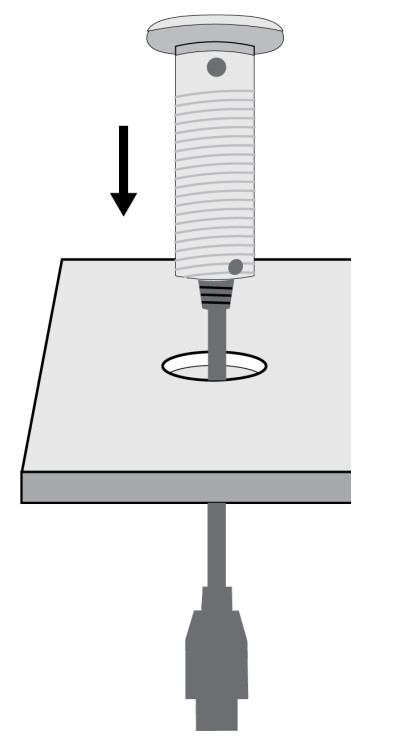
- Drill a hole in the table. You can use a 7/8 or 1 inch (22 or 25 mm) drill bit, because the grommet accommodates both sizes. The mute button tube is 7/8 inches (22 mm) wide.
- Insert the mute button tube into the hole.
- Slide the grommet onto the tube so it’s flush against the bottom of the table.7/8 inch (22 mm) hole: Grommet pointing down1 inch (25 mm) hole: Grommet pointing upOptional: Add 1 or more of the included spacers between the grommet and the base to help position the network port under the table. The spacers give you multiple network port positions.
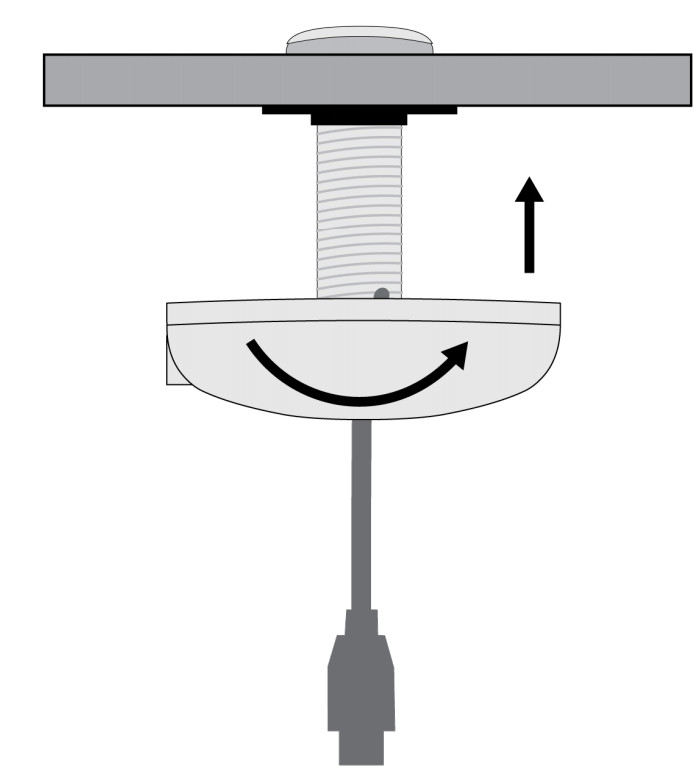
- Slide the base onto the tube and tighten it by hand until it is snug against the table. You may want to hold the top of the mute button as you tighten the base to keep the mute icon correctly positioned on the table.
- Connect the 8-pin power cable to the power connector on the base.
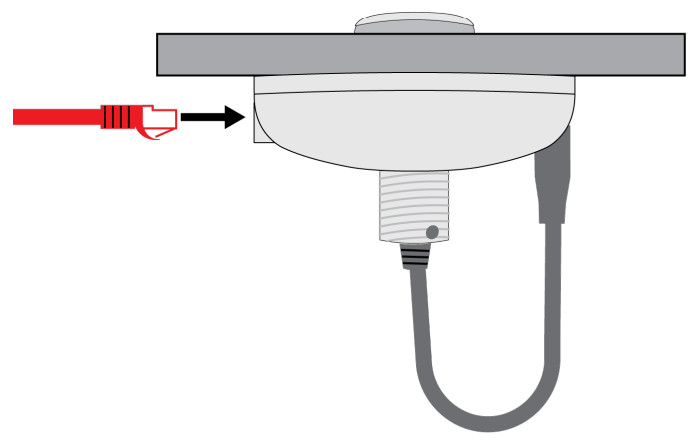
- Connect a Cat5e (or better) Ethernet cable to the network port. Make sure the cable supplies Power over Ethernet from a network switch or PoE injector.
- Check that the mute button’s light ring turns on after you plug in the Ethernet cable.
- To link the mute button to other devices and control other settings, open it in Shure Designer software.


Power Over Ethernet (PoE)
This device requires PoE to operate. It is compatible with all PoE sources.Power over Ethernet is delivered in one of the following ways:
- A network switch that provides PoE
- A PoE injector device
Controlling Devices with Shure Designer SoftwareTo control this device’s settings, use Shure Designer software. Designer enables integrators and system planners to design audio coverage for installations using MXA microphones and other Shure networked devices.To access your device in Designer:
- Download and install Designer on a computer connected to the same network as your device.
- Open Designer, and check that you’re connected to the correct network in Settings.
- Click Online devices. A list of online devices appears.
- To identify devices, click the product icon to flash the lights on a device. Select your device in the list and click Configure to control device settings.
Learn more at shure.com/designer.You can also access basic device settings using Shure Web Device Discovery. Full control is available in Designer.
Using Designer’s Optimize Workflow
Designer’s Optimize workflow speeds up the process of connecting systems with at least 1 microphone and 1 audio processor.Optimize also creates mute control routes in locations with MXA network mute buttons. When you select Optimize in a location,The designer does the following:
- Creates audio routes and mute control routes
- Adjusts audio settings
- Turns on mute synchronization
- Enables LED logic control for applicable devices
The settings are optimized for your particular combination of devices. You can customize settings further, but the Optimize workflow gives you a good starting point.After optimizing a location, you should check and adjust settings to fit your needs. These steps may include:
- Deleting unnecessary routes.
- Checking levels and adjusting gain.
- Verifying that AEC reference signals are correctly routed.
- Fine-tuning DSP blocks as needed.
Compatible devices:
- MXA910
- MXA710
- MXA310
- P300
- IntelliMix Room
- ANIUSB-MATRIX
- MXN5-C
- MXA Network Mute Button
To use the Optimize workflow:
- Place all relevant devices in a location.
- Select Optimize. Designer optimizer microphone and DSP settings for your equipment combination.If you remove or add devices, select Optimize again.
How to Update Firmware Using Designer
Applies to version 4.2 and newer.Before setting up devices, check for firmware updates using Designer to take advantage of new features and improvements.You can also install the firmware using Shure Update Utility for most products.To update:
- Open Designer. If there’s new firmware that you haven’t downloaded yet, Designer shows a banner with the number of updates available. Click to download firmware.
- Go to Online devices and find your devices.
- Choose a firmware version for each device from the Available firmware column. Make sure that no one is editing device settings during an update.
- Select the checkbox next to each device you plan to update and click Update firmware. Devices may disappear from
- Online devices during an update. Don’t close Designer while updating firmware.
Firmware Versioning
When updating firmware, update all hardware to the same firmware version to ensure consistent operation.The firmware of all devices has the form of MAJOR.MINOR.PATCH (e.g., 1.2.14). At a minimum, all devices on the network must have the same MAJOR and MINOR firmware version numbers (e.g., 1.2.x).
Light Ring
You can control the light ring’s color, brightness, and status using Designer. Open the mute button’s configuration window, and go to Settings > Lights to adjust the settings.
Mute SettingsTo control mute settings, open the device’s configuration window in Designer and go to Settings > Logic control.
- Toggle: Press the button to toggle between muted and unmuted.
- Push-to-talk: Press and hold the button to unmute the microphone.
- Push-to-mute: Press and hold the button to mute the microphone.
Use Designer to link one or more mute buttons to a device. When you link the mute button to Shure devices with IntelliMixDSP, the AEC stays converged to deliver the best performance.In most rooms, all mute buttons control muting for the same device. To set this up:
- Create a location in Designer.
- Add the mute buttons and other Shure devices in the room to the location.
- Open the location and go to Routing.From here, you can link mute buttons to compatible devices.
- Drag and drop from each of the mute buttons to the device you want to mute.In rooms with at least 1 microphone and 1 audio processor, you can use the Optimize workflow to let Designer automatically create mute control routes for you.Use these guidelines to choose what device to link the mute button to:
Microphone with IntelliMix DSP (MXA910 or MXA710), no separate DSP: Link the mute buttons to the microphone.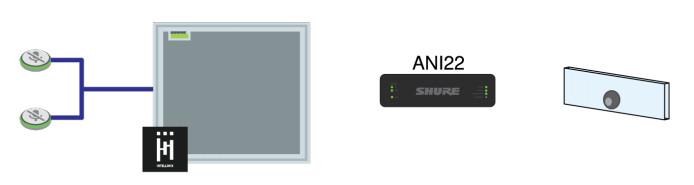 One or more microphones connected to separate DSP (P300, IntelliMix Room, or ANIUSB-MATRIX): Link the mute buttons to the DSP.
 The microphone connected to third-party DSP: If using the microphone’s IntelliMix output, link the mute button to the microphone. If using the microphone’s direct outputs, use third-party command strings to set up muting.
Compatible Devices
You can link the mute button to the following devices to control muting:
- MXA310
- MXA710
- MXA910
- ANY USB-MATRIX (Also mutes supported soft codecs connected by USB)
- IntelliMix P300 (Also mutes supported soft codecs connected by USB)
- IntelliMix Room
IP Ports and Protocols
Shure Control
| Lat TCP/UDP | Protocol | Description | ||
| 21 | tcp | FTP | Required for firmware updates (otherwise closed) | Closed |
| 22 | tcp | SSH | Secure Shell Interface | Closed |
| 23 | tcp | Telnet | Not supported | Closed |
| 68 | udp | DHCP | Dynamic Host Configuration Protocol | Open |
| 80• | tcp | HTTP | Required to launch an embedded web server | Open |
| 443 | tcp | HTTPS | Not supported | Closed |
| 161 | tcp | SNMP | Not supported | Closed |
| 162 | tcp | SNMP | Not supported | Closed |
| 2202 | tcp | ASCII | Required for 3rd party control strings | Open |
| 5353 | udp | mDNSt | Required for device discovery | Open |
| 5568 | udp | SDTI | Required for inter-device communication | Open |
| 8023 | tcp | Telnet | Debug console interface | Closed |
| Port | TCP/UDP | Protocol | Description | Factory Default |
| 8180 | tcp | HTML | Required for web application | Open |
| 8427 | udp | Multicast SLPt | Required for inter-device communication | Open |
| 64000 | tcp | Telnet | Required for Shure firmware update | Open |
† These protocols require multicast. Ensure multicast has been correctly configured for your network.
Using a Third-Party Control SystemThis device sends and receives logic commands over the network. Many parameters controlled through Designer can be controlled using a third-party control system, using the appropriate commandstring.Common applications:
- Mute
- LED color and behavior
- Loading presets
- Adjusting levels
A complete list of command strings is available at: pubs.shure.com/command-strings/MXA-MUTE.
Specifications
Connector TypeRJ45, 8-pin power cableCable RequirementsCat 5e or higher (shielded cable recommended)Power RequirementsPower over Ethernet (PoE), Class 1Power Consumption2 W, maximumWeight0.43 kg (0.95 lbs)Control SoftwareShure Designer
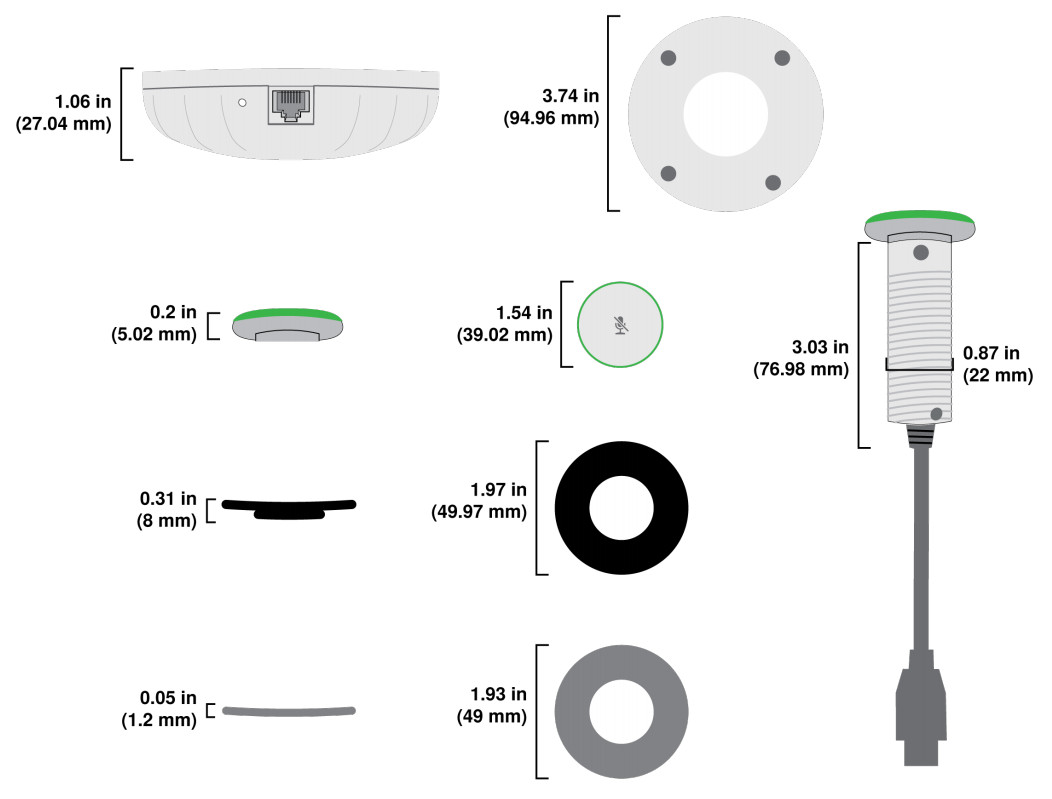
Ingress Protection RatingIEC 60529 IPX1Operating Temperature Range−6.7°C (20°F) to 40°C (104°F)Storage Temperature Range−29°C (-20°F) to 74°C (165°F)Dimensions
| Base | 3.74 x 3.74 x 1.06 in. (94.96 x 94.96 x 27.04 mm) H x W x D |
| Mute Button | 1.54 x 1.54 x 0.2 in. (39.02 x 39.02 x 5.02 mm) H x W x D |
| Mute Button Tube | 0.87 x 0.87 x 3.03 in. (22 x 22 x 76.98 mm) H x W x D |
| Grommet | 1.97 x 1.97 x 0.31 in. (49.97 x 49.97 x 8 mm) H x W x D |
| Spacer | 1.93 x 1.93 x 0.05 in. (49 x 49 x 1.2 mm) H x W x D |
Contact Customer Support
 Contact Customer Support
Didn’t find what you need? Contact our customer support to get help.
IMPORTANT SAFETY INSTRUCTIONS
- READ these instructions.
- KEEP these instructions.
- Heed all warnings.
- FOLLOW all instructions.
- DO NOT use this apparatus near water.
- CLEAN ONLY with dry cloth.
- DO NOT block any ventilation openings. Allow sufficient distances for adequate ventilation and install in accordance with the manufacturer’s instructions.
- DO NOT install near any heat sources such as open flames, radiators, heat registers, stoves, or other apparatus (including amplifiers) that produce heat. Do not place any open flame sources on the product.
- DO NOT defeat the safety purpose of the polarized or grounding-type plug. A polarized plug has two blades with one wider than the other. A grounding-type plug has two blades and a third grounding prong. The wider blade or the third prong are provided for your safety. If the provided plug does not fit into your outlet, consult an electrician for the replacement of the obsolete outlet.
- PROTECT the power cord from being walked on or pinched, particularly at plugs, convenience receptacles, and the point where they exit from the apparatus.
- ONLY USE attachments/accessories specified by the manufacturer.
- USE only with a cart, stand, tripod, bracket, or table specified by the manufacturer, or sold with the apparatus. When a cart is used, use caution when moving the cart/apparatus combination to avoid injury from tip-over.
- UNPLUG this apparatus during lightning storms or when unused for long periods of time.
- REFER all servicing to qualified service personnel. Servicing is required when the apparatus has been damaged in anyway, such as power supply cord or plug is damaged, liquid has been spilled or objects have fallen into the apparatus,the apparatus has been exposed to rain or moisture, does not operate normally, or has been dropped.
- DO NOT expose the apparatus to dripping and splashing. DO NOT put objects filled with liquids, such as vases, on the apparatus.
- The MAINS plug or an appliance coupler shall remain readily operable.
- The airborne noise of the Apparatus does not exceed 70dB (A).
- Apparatus with CLASS I construction shall be connected to a MAINS socket outlet with a protective earthing connection.
- To reduce the risk of fire or electric shock, do not expose this apparatus to rain or moisture.
- Do not attempt to modify this product. Doing so could result in personal injury and/or product failure.
- Operate this product within its specified operating temperature range.

![]() This symbol indicates that dangerous voltage constituting a risk of electric shock is present within this unit.
This symbol indicates that dangerous voltage constituting a risk of electric shock is present within this unit.
![]() This symbol indicates that there are important operating and maintenance instructions in the literature accompanying this unit.
This symbol indicates that there are important operating and maintenance instructions in the literature accompanying this unit.
Important Product Information
The equipment is intended to be used in professional audio applications.This device is to be connected only to PoE networks without routing to the outside plant.Note: This device is not intended to be connected directly to a public internet network.Changes or modifications not expressly approved by Shure Incorporated could void your authority to operate this equipment.Note: Testing is based on the use of supplied and recommended cable types. The use of other than shielded (screened) cable types may degrade EMC performance.Please follow your regional recycling scheme for batteries, packaging, and electronic waste.
Information to the user
This device complies with part 15 of the FCC Rules. Operation is subject to the following two conditions:
- This device may not cause harmful interference.
- This device must accept any interference received, including interference that may cause undesired operation.
Note: This equipment has been tested and found to comply with the limits for a Class B digital device, pursuant to part 15 of the FCC Rules. These limits are designed to provide reasonable protection against harmful interference in a residential installation. This equipment generates uses and can radiate radio frequency energy and, if not installed and used in accordance with the instructions, may cause harmful interference to radio communications. However, there is no guarantee that interference will not occur in a particular installation. If this equipment does cause harmful interference to radio or television reception, which can be determined by turning the equipment off and on, the user is encouraged to try to correct the interference by one or more of the following measures:
- Reorient or relocate the receiving antenna.
- Increase the separation between the equipment and the receiver.
- Connect the equipment to an outlet on a circuit different from that to which the receiver is connected.
- Consult the dealer or an experienced radio/TV technician for help.
This Class B digital apparatus complies with Canadian ICES-003.CAN ICES-3 (B)/NMB-3 (B)The CE Declaration of Conformity can be obtained from: www.shure.com/europe/compliance
Authorized European representative:Shure Europe GmbHHeadquarters Europe, Middle East & AfricaDepartment: EMEA ApprovalJakob-Dieffenbacher-Str. 1275031 Eppingen, GermanyPhone: +49-7262-92 49 0Fax: +49-7262-92 49 11 4Email: [email protected]This product meets the Essential Requirements of all relevant European directives and is eligible for CE marking.
The CE Declaration of Conformity can be obtained from Shure Incorporated or any of its European representatives. For contact information please visit www.shure.com
References
ANIUSB-MATRIX – ANIUSB-MATRIX USB Audio Network Interface with Matrix Mixing – Shure USA
Designer – System Configuration Software – Shure USA
Documentation Finder – Shure Europe
MXA-MUTE Command Strings
Shure: Microphones, Wireless microphones, in-ear monitoring, earphones, headphones
Shure: Microphones, Wireless microphones, in-ear monitoring, earphones, headphones
MXA-MUTE Command Strings
IntelliMix P300 – Audio Conferencing Processor – Shure USA
Service
Designer – System Configuration Software – Shure USA
MXA310 User Guides
MXA-MUTE Command Strings
Designer – System Configuration Software – Shure USA
IntelliMix P300 – Audio Conferencing Processor – Shure USA
Device Discovery – Shure Web Device Discovery Application – Shure USA
IntelliMix Room User Guides
Documentation Finder – Shure Europe
MXA710 User Guides
Firmware – Shure USA
Service
P300 User Guides
ANIUSB-MATRIX – ANIUSB-MATRIX USB Audio Network Interface with Matrix Mixing – Shure USA
MXA910, MXA910-60CM, MXA910W-A, MXA910W-US User Guides
Designer – System Configuration Software – Shure USA
Shure: Microphones, Wireless microphones, in-ear monitoring, earphones, headphones
ANIUSB-Matrix User Guides
MXA-MUTE Command Strings
[xyz-ips snippet=”download-snippet”]